Quickstart: Use Visual Studio to create your first Vue.js app
In this 5-10 minute introduction to the Visual Studio integrated development environment (IDE), you'll create and run a simple Vue.js web application.
Prerequisites
You must have Visual Studio installed and the Node.js development workload.
If you haven't already installed Visual Studio 2019, go to the Visual Studio downloads page to install it for free.
If you need to install the workload but already have Visual Studio, go to Tools > Get Tools and Features..., which opens the Visual Studio Installer. Choose the Node.js development workload, then choose Modify.

You must have the Node.js runtime installed.
If you don't have it installed, we recommend you install the LTS version from the Node.js website for best compatibility with outside frameworks and libraries. Node.js is built for 32-bit and 64-bit architectures. The Node.js tools in Visual Studio, included in the Node.js workload, support both versions. Only one is required and the Node.js installer only supports one being installed at a time.
In general, Visual Studio automatically detects the installed Node.js runtime. If it does not detect an installed runtime, you can configure your project to reference the installed runtime in the properties page (after you create a project, right-click the project node, choose Properties, and set the Node.exe path). You can use a global installation of Node.js or you can specify the path to a local interpreter in each of your Node.js projects.
Create a project
First, you'll create a Vue.js web application project.
If you don't have the Node.js runtime already installed, install the LTS version from the Node.js website.
For more information, see the prerequisites.
Open Visual Studio.
Create a new project.
Press Esc to close the start window. Type Ctrl + Q to open the search box, type Basic Vue.js, then choose Basic Vue.js Web application (either JavaScript or TypeScript). In the dialog box that appears, type the name basic-vuejs, and then choose Create.

If you don't see the Basic Vue.js Web application project template, you must add the Node.js development workload. For detailed instructions, see the Prerequisites.
Visual Studio creates the new project. The new project opens in Solution Explorer (right pane).
Check the Output window (lower pane) for progress on installing the npm packages required for the application.
In Solution Explorer, open the npm node and make sure that all the listed npm packages are installed.
If any packages are missing (exclamation point icon), you can right-click the npm node and choose Install Missing npm Packages.
Explore the IDE
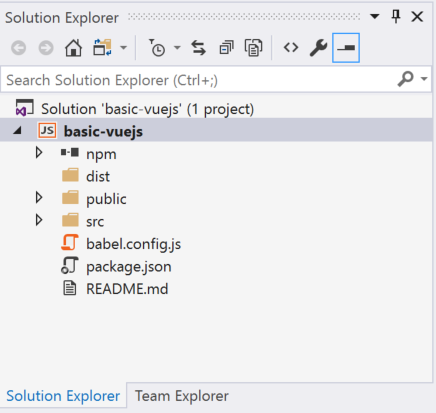
Take a look at Solution Explorer in the right pane.

Highlighted in bold is your project, using the name you gave in the New Project dialog box. On disk, this project is represented by a .njsproj file in your project folder.
At the top level is a solution, which by default has the same name as your project. A solution, represented by a .sln file on disk, is a container for one or more related projects.
The npm node shows any installed npm packages. You can right-click the npm node to search for and install npm packages using a dialog box.
If you want to install npm packages or run Node.js commands from a command prompt, right-click the project node and choose Open Command Prompt Here.
Add a .vue file to the project
In Solution Explorer, right-click any folder such as the src/components folder, and then choose Add > New Item.
If you don't see all the item templates, choose Show All Templates, and then choose the item template.
Select either JavaScript Vue Single File Component or TypeScript Vue Single File Component, and then click Add.
Visual Studio adds the new file to the project.
Build the project
Next, choose Build > Build Solution to build the project.
Check the Output window to see build results, and choose Build from the Show output from list.
The JavaScript Vue.js project template (and older versions of the TypeScript template) use the build npm script by configuring a post build event. If you want to modify this setting, open the project file (<projectname>.njsproj) from Windows Explorer and locate this line of code:
<PostBuildEvent>npm run build</PostBuildEvent>
Run the application
Press Ctrl+F5 (or Debug > Start Without Debugging) to run the application.
In the console, you see a message Starting Development Server.
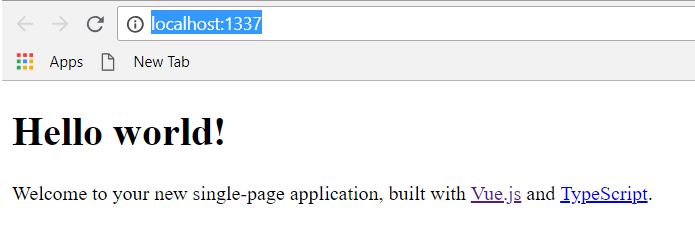
Then, the app opens in a browser.
If you don't see the running app, refresh the page.

Close the web browser.
Congratulations on completing this Quickstart! We hope you learned a little bit about using the Visual Studio IDE with Vue.js. If you'd like to delve deeper into its capabilities, continue with a tutorial in the Tutorials section of the table of contents.