Migrate to Always On VPN and decommission DirectAccess
Applies to: Windows Server 2022, Windows Server 2019, Windows Server 2016, Windows 10
« Previous: Plan the DirectAccess to Always On VPN migration
Migrating from DirectAccess to Always On VPN requires a specific process to migrate clients, which helps minimize race conditions that arise from performing migration steps out of order. At a high level, the migration process consists of these four primary steps:
Deploy a side-by-side VPN infrastructure. After you have determined your migration phases and the features you want to include in your deployment, you will deploy the VPN infrastructure side by side with the existing DirectAccess infrastructure.
Deploy certificates and configuration to the clients. Once the VPN infrastructure is ready, you create and publish the required certificates to the client. When the clients have received the certificates, you deploy the VPN_Profile.ps1 configuration script. Alternatively, you can use Intune to configure the VPN client. Use Microsoft Endpoint Configuration Manager or Microsoft Intune to monitor for successful VPN configuration deployments.
Remove devices from the DirectAccess security group. As users migrate successfully, you remove their devices from the DirectAccess security group. Before removing DirectAccess from your environment, check to see if the DirectAccess security group is empty. Do not remove the security group if it still contains members. If you do remove the security group with members in it, you risk leaving employees without remote access from their devices. Use Microsoft Endpoint Configuration Manager or Microsoft Intune to determine device-assignment information and discover which device belongs to each user.
Decommission the DirectAccess server. When you have successfully removed the configuration settings and DNS records, you are ready to tear down the DirectAccess server. To do so, either remove the role in Server Manager or decommission the server and remove it from AD DS.
Before starting the migration process from DirectAccess to Always On VPN, be sure you have planned for the migration. If you have not planned your migration, see Plan the DirectAccess to Always On VPN migration.
Tip
This section is NOT a step-by-step deployment guide for Always On VPN but rather is intended to complement Always On VPN Deployment for Windows Server and Windows 10 and provide migration-specific deployment guidance.
Deploy a side-by-side VPN infrastructure
You deploy the VPN infrastructure side by side with the existing DirectAccess infrastructure. For step-by-step details, see Always On VPN Deployment for Windows Server and Windows 10 to install and configure the Always On VPN infrastructure.
Side-by-side deployment consists of the following high-level tasks:
Create the VPN Users, VPN Servers, and NPS Servers groups.
Create and publish the necessary certificate templates.
Enroll the server certificates.
Install and configure Remote Access Service for Always On VPN.
Install and configure NPS.
Configure DNS and firewall rules for Always On VPN.
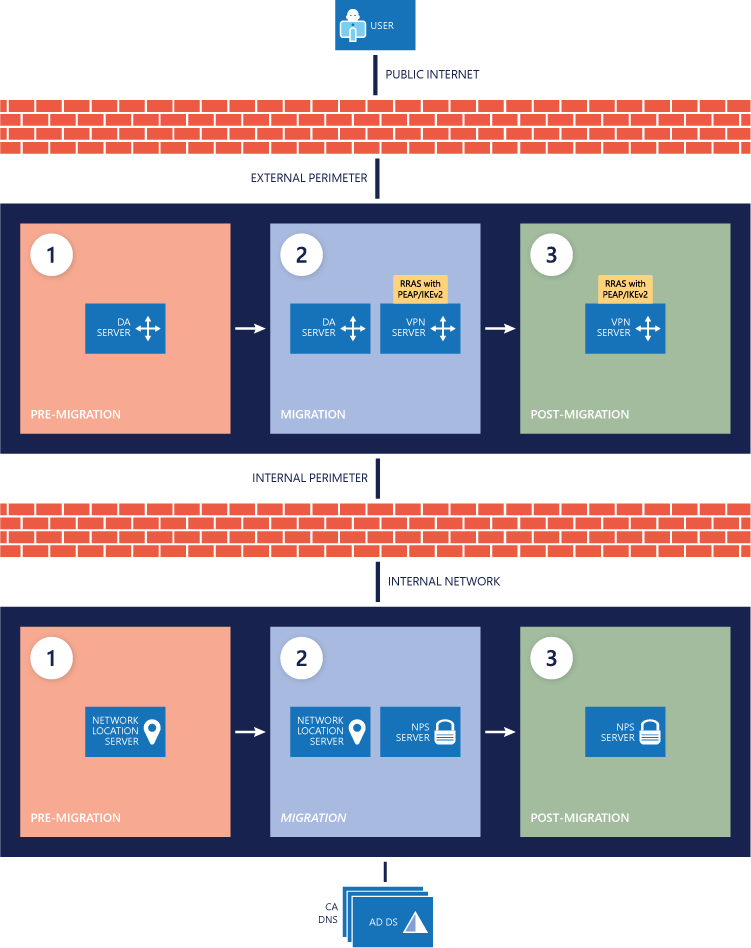
The following image provides a visual reference for the infrastructure changes throughout the DirectAccess-to–Always On VPN migration.
Deploy certificates and VPN configuration script to the clients
Although the bulk of the VPN client configuration in the Deploy Always On VPN section, two additional steps are needed to complete the migration from DirectAccess to Always On VPN successfully.
You must ensure that the VPN_Profile.ps1 comes after the certificate has been issued so that the VPN client does not attempt to connect without it. To do that, you execute a script that adds only those users who have enrolled in the certificate to your VPN Deployment Ready group, which you use to deploy the Always On VPN configuration.
Note
Microsoft recommends that you test this process before performing it on any of your user migration rings.
Create and publish the VPN certificate, and enable the auto-enrollment Group Policy object (GPO). For traditional, certificate-based Windows 10 VPN deployments, a certificate is issued to either the device or the user so that it can authenticate the connection. When the new authentication certificate is created and published for auto-enrollment, you must create and deploy a GPO with the auto-enrollment setting configured to the VPN Users group. For the steps to configure certificates and auto-enrollment, see Configure the server infrastructure.
Add users to the VPN Users group. Add whichever users you migrate to the VPN Users group. Those users stay in that security group after you have migrated them so that they can receive any certificate updates in the future. Continue to add users to this group until you have moved every user from DirectAccess to Always On VPN.
Identify users who have received a VPN authentication certificate. You are migrating from DirectAccess, so you will need to add a method for identifying when a client has received the required certificate and is ready to receive the VPN configuration information. Run the GetUsersWithCert.ps1 script to add users who are currently issued nonrevoked certificates originating from the specified template name to a specified AD DS security group. For example, after running the GetUsersWithCert.ps1 script, any user issued a valid certificate from the VPN Authentication Certificate template is added to the VPN Deployment Ready group.
Note
If you do not have a method to identify when a client has received the required certificate, you could deploy the VPN configuration before the certificate has been issued to the user, causing the VPN connection to fail. To avoid this situation, run the GetUsersWithCert.ps1 script on the certification authority or on a schedule to synchronize users who have received the certificate to the VPN Deployment Ready group. You will then use that security group to target your VPN configuration deployment in Microsoft Endpoint Configuration Manager or Intune, which ensures that the managed client does not receive the VPN configuration before it has received the certificate.
GetUsersWithCert.ps1
Import-module ActiveDirectory
Import-Module AdcsAdministration

$TemplateName = 'VPNUserAuthentication'##Certificate Template Name (not the friendly name)
$GroupName = 'VPN Deployment Ready' ##Group you will add the users to
$CSServerName = 'localhost\corp-dc-ca' ##CA Server Information

$users= @()
$TemplateID = (get-CATemplate | Where-Object {$_.Name -like $TemplateName} | Select-Object oid).oid
$View = New-Object -ComObject CertificateAuthority.View
$NULL = $View.OpenConnection($CSServerName)
$View.SetResultColumnCount(3)
$i1 = $View.GetColumnIndex($false, "User Principal Name")
$i2 = $View.GetColumnIndex($false, "Certificate Template")
$i3 = $View.GetColumnIndex($false, "Revocation Date")
$i1, $i2, $i3 | %{$View.SetResultColumn($_) }
$Row= $View.OpenView()

while ($Row.Next() -ne -1){
$Cert = New-Object PsObject
$Col = $Row.EnumCertViewColumn()
[void]$Col.Next()
do {
$Cert | Add-Member -MemberType NoteProperty $($Col.GetDisplayName()) -Value $($Col.GetValue(1)) -Force
      }
until ($Col.Next() -eq -1)
$col = ''

if($cert."Certificate Template" -eq $TemplateID -and $cert."Revocation Date" -eq $NULL){
   $users= $users+= $cert."User Principal Name"
$temp = $cert."User Principal Name"
$user = get-aduser -Filter {UserPrincipalName -eq $temp} –Property UserPrincipalName
Add-ADGroupMember $GroupName $user
   }
  }
Deploy the Always On VPN configuration. As the VPN authentication certificates are issued, and you run the GetUsersWithCert.ps1 script, the users are added to the VPN Deployment Ready security group.
| If you are using... | Then... |
|---|---|
| Configuration Manager | Create a user collection based on that security group's membership.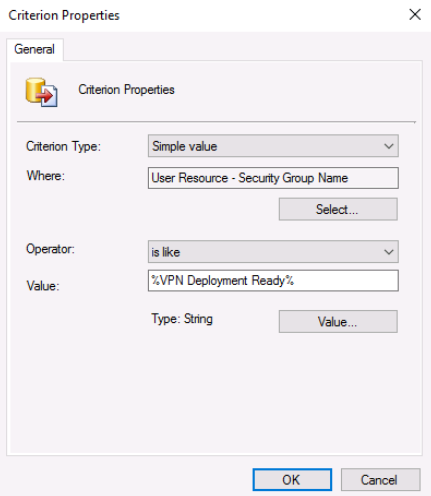 |
| Intune | Simply target the security group directly once it is synchronized. |
Each time you run the GetUsersWithCert.ps1 configuration script, you must also run an AD DS discovery rule to update the security group membership in Configuration Manager. Also, ensure that the membership update for the deployment collection frequently occurs enough (aligned with the script and discovery rule).
For additional information about using Configuration Manager or Intune to deploy Always On VPN to Windows clients, see Always On VPN Deployment for Windows Server and Windows 10. Be sure, however, to incorporate these migration-specific tasks.
Note
Incorporating these migration-specific tasks is a critical difference between a simple Always On VPN deployment and migration from DirectAccess to Always On VPN. Be sure to properly define the collection to target the security group rather than using the method in the deployment guide.
Remove devices from the DirectAccess security group
As users receive the authentication certificate and the VPN_Profile.ps1 configuration script, you see corresponding successful VPN configuration script deployments in either Configuration Manager or Intune. After each deployment, remove that user's device from the DirectAccess security group so that you can later remove DirectAccess. Both Intune and Configuration Manager contain user device assignment information to help you determine each user's device.
Note
If you are applying DirectAccess GPOs through organizational units (OUs) rather than computer groups, move the user's computer object out of the OU.
Decommission the DirectAccess infrastructure
When you have finished migrating all your DirectAccess clients to Always On VPN, you can decommission the DirectAccess infrastructure and remove the DirectAccess settings from Group Policy. Microsoft recommends performing the following steps to remove DirectAccess from your environment gracefully:
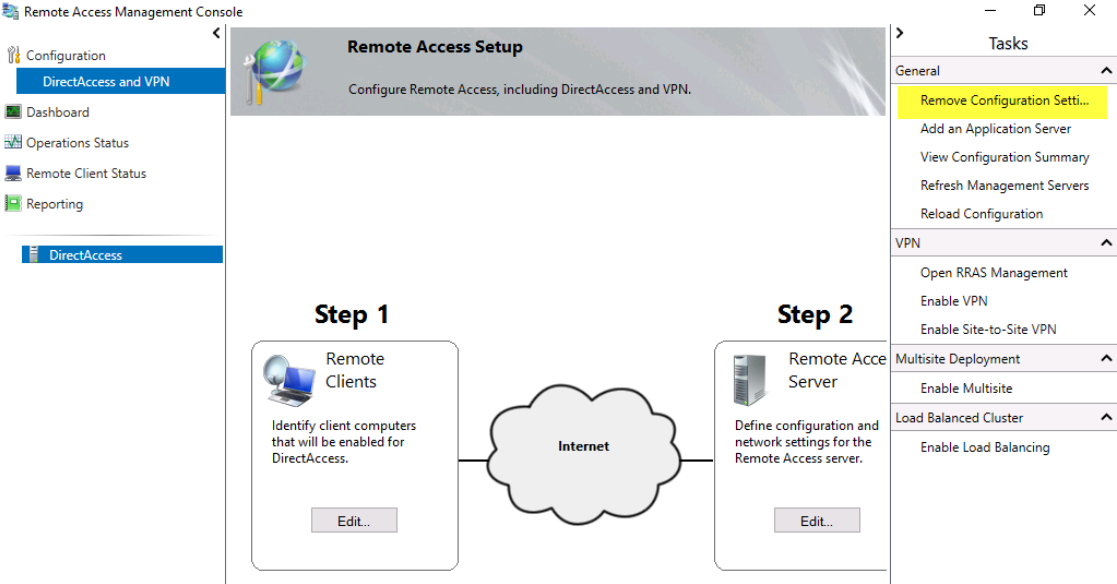
Remove the configuration settings. Remove the GPOs and the Remote Access Group policy settings Remote Access created by opening the Remote Access Management console and selecting Remove Configuration Settings, as shown in the image below. If you remove the group before you remove the configuration, you will likely get errors.
Remove devices from the DirectAccess security group. As users migrate successfully, you remove their devices from the DirectAccess security group. Before removing DirectAccess from your environment, check to see if the DirectAccess security group is empty. Do not remove the security group if it still contains members. If you do remove the security group with members in it, you risk leaving employees without remote access from their devices. Use Microsoft Endpoint Configuration Manager or Microsoft Intune to determine device-assignment information and discover which device belongs to each user.
Clean up DNS. Be sure to remove any records from your internal DNS server and public DNS server related to DirectAccess, for example, DA.contoso.com, DAGateway.contoso.com.
Decommission the DirectAccess server. When you have successfully removed the configuration settings and DNS records, you are ready to tear down the DirectAccess server. To do so, either remove the role in Server Manager or decommission the server and remove it from AD DS.
Remove any DirectAccess certificates from Active Directory Certificate Services. If you used computer certificates for your DirectAccess implementation, remove the published templates from the Certificate Templates folder in the Certification Authority console.
Next step
You are done migrating from DirectAccess to Always On VPN.