Microsoft Monetize - Key/value targeting
Publishers often have custom data about users (age, gender, income, interests, location, etc) or content (search keywords, contextual tags, ad positions, etc) that could be utilized to produce offerings that can be of value to advertisers. There are a variety of ways to target publisher customer data to accomplish this, including query strings and segment targeting. Another way is through custom key/value targeting.
With custom key/value targeting, you can define your own keys and their corresponding values to make full use of publisher data and help advertisers reach their intended audience. Microsoft Advertising allows you to create custom key value sets that can be used in advertising campaigns to target specific types of customers.
Pre-defining keys and values
Before you can target on key/value sets, you must have keys predefined. This can be done through the UI or through the API Keys and values are managed through the Key/Value Management window. Navigate to this window from the Network menu. See Pre-Defining Targeting Keys and Values for more information. Keys can also be predefined by using the API Targeting Key Service.
Values do not need to be predefined; they can be created or imported when you define your key/value targeting. (See Creating New Values for more information.) However, values can be predefined from the Key/Value Management window, or by using the API Targeting Value Service.
Targeting on line items and campaigns
Targeting can be set on the line item or campaign. You can set up targeting when you create the line item or campaign, and you can also add or change your targeting settings by editing the line item or campaign.
Important
- See Working with Line Items for information on setting up your line items and campaigns.
- See Buy-Side Targeting for information on various other types of targeting.
For standard line items and campaigns, use the Targeting section. This will open the Key/Value Targeting dialog.
Key/value targeting defined
Let's take a moment to explore what, exactly, key/value sets are. The key is the category, or the thing you're targeting. Examples of keys are cars, countries, and cities. The values are the particular elements within that category that you want to target. Examples of values within the countries key (or category) would be USA, Canada, and Mexico. So how do we target on these? By defining the values within each key that we want to target, and combining those key/value sets into one target audience.
Setting up key/value targeting - overview
At the top of the Key/Value Targeting dialog you'll have the option to Target any or all of the following key/value groups. This option allows you to define whether the user must meet all the key/value requirements you specify, or whether you're targeting users who meet any one of the requirements. (In mathematical terms, it's the difference between an OR relationship and an AND relationship.) We'll explain this option in more detail in the next sections.
When you first open the Key/Value Targeting dialog you'll see a group with a Select Key dropdown. When you click Select Key, you'll choose a key from the list. This will open a new section where you can select the values for that key. You can choose to Select Pre-Defined Values or Bulk Select Values.
- Select Pre-Defined Values: The values displayed under this tab were added through the API targeting-value service. Click the checkbox next to each value you want to target with this key.
- Bulk Select Values: This tab gives you the option of defining your own values for this target. If you're working with a large set of values for the given key, you can import those values from a CSV file. Click the Import values from file button to select the file. Only unique values will be added; any duplicate values will be ignored. You can also enter values into the text box on this tab, one value per line. See Creating New Values for more information.
After you've selected your values, you can continue to add keys to this group or create a new group. When you've finished adding all your keys, values and groups, click Add.
Creating key/value targets
Let's start by walking through a very simple example. In this example we're going to target users who enjoy eating certain fruits. In particular, we want to target users who eat either apples or oranges. The key is fruit, and the values are apple and orange. Here are the steps to create this target:
- In the Key/Value Targeting dialog, click Select Key.
- Select fruit from the dropdown. If you don't see the key you're looking for, scroll down the dropdown list or use the search box. (This is just an example. You may not have a fruit key defined as one of your targeting options.)
- In the Select Pre-Defined Values tab, click the checkboxes next to apple and orange. (As with keys, you can type the name or label in the search box to find values quickly.)
- Notice that apple and orange have been added to the Selected Values list at the bottom.
- Click Done.
- Click Add.
You've just created your key/value target.
Warning
You might need to scroll down to see the Done button. If you click Add after selecting your values, the target will be saved as-is and take you back to the Edit/Create Line Item/Campaign window. That wouldn't be a problem in this simple example, but as you'll see in our next example, having to reopen the Key/Value Targeting dialog after each value entry may get tedious.
Building targeting groups
Now let's say we want to get a little more complicated. What if you want to target based on fruit and the city in which it's eaten? We'll start by writing out a targeting statement. We want to target:
All users who live in either Seattle or LA and eat oranges, and all users who live in NY and eat apples.
You saw in the previous section that we build key/value targeting by grouping sets of keys and values. That means that in order to turn our targeting statement into an actual target we first need to break down our statement into key/value sets.
| Statement | Key [Values] |
|---|---|
| live in either Seattle or LA | city [Seattle, LA] |
| eat oranges | fruit [orange] |
| live in NY | city [NY] |
| eat apples | fruit [apples] |
Notice in the first statement that we lumped Seattle and LA together. When you create your key/value set, you'll select a key (city) and all the values you want to associate with that key (Seattle, LA). This is an or operation. In other words, the users can be in cityA or cityB or cityC, etc. This makes sense, because if this were an and operation it would never be true - users can't be in Seattle and LA at the same time.
With our statement in key/value sets, we now need to figure out how to group those sets together with and and or operators. One way to do this is by building an expressions tree:

We have two groups on this tree:
The group on the right side of the tree represents the first part of our statement: All users who live in either Seattle or LA (city [Seattle, LA]) AND eat oranges (fruit [orange]).
The group on the left side of the tree represents the last part of our statement: all users who live in NY (city [NY]) AND eat apples (fruit [apple]).
We tie the two groups together with an OR, because we want to target users who are in either group. (An AND would target users who are in both groups.)
To see how to enter our target statement into the Key/Value Targeting dialog, we're going to step through our expression diagram while we go through the dialog. (For this example we're assuming keys of fruit and city have been predefined, along with their associated values.)
We're going to start our key/value target from the bottom-right of our expression tree:
![The expression tree with the bottom-right entry of the right side group highlighted - city [Seattle, LA].](media/uioperator-diagram-step-a.png)
Click Select Key.
Select city from the dropdown.
In the Select Pre-Defined Values tab, click the boxes next to Seattle and LA.
Click Done. (Be careful to click Done and not Add. Clicking Add will save the key/value target and close the Key/Value Targeting dialog.)
Now we move to the left:
![The expression tree with the bottom-left entry of the right side group highlighted - fruit [orange].](media/uioperator-diagram-step-b.png)
Click Add key.
Click Select Key.
Select fruit from the dropdown.
Click the box next to orange.
Click Done.
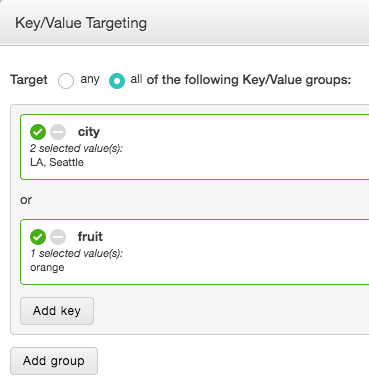
Our target now looks like this:

Notice the or between our city key/value set and our fruit key/value set. If we look at our diagram, we can see that we need this relationship to be an AND; we want city is Seattle or LA AND fruit is orange.

To change this relationship, at the top of the Key/Value Targeting dialog, select a Target of any of the following key/value groups. This will change the or to and.
We've now completed our group on the right side of our expression diagram.

Now it's time to start our group on the left. This means we need to create another group. Click Add group. Notice that the operator between groups has been set to or. Looking at our diagram, that's exactly what we want between our groups.

Enter the key/value target for the first part of our right-side group.
![The expression tree with the bottom-right entry of the left side group highlighted - city [NY].](media/uioperator-diagram-step-d.png)
Click Select Key.
Select city from the dropdown.
Click the box next to NY.
Click Done.
Now enter the final key/value set in the expression.
![The expression tree with the bottom-left entry of the left side group highlighted - fruit [apple].](media/uioperator-diagram-step-e.png)
Click Add key.
Click Select Key.
Select fruit.
Click the box next to apple.
Click Done.
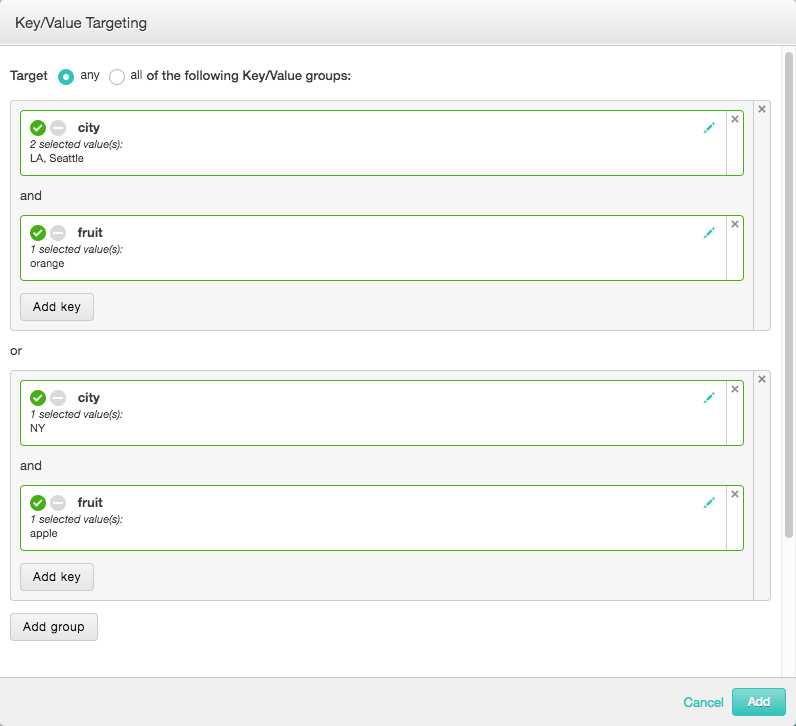
Your Key/Value Targeting should look like this:

Click Add to save your key/value target.
Numeric key/value targeting
The example in the previous section described adding keys with string values. Adding keys with numeric values is similar, but with the addition of more comparison operators.
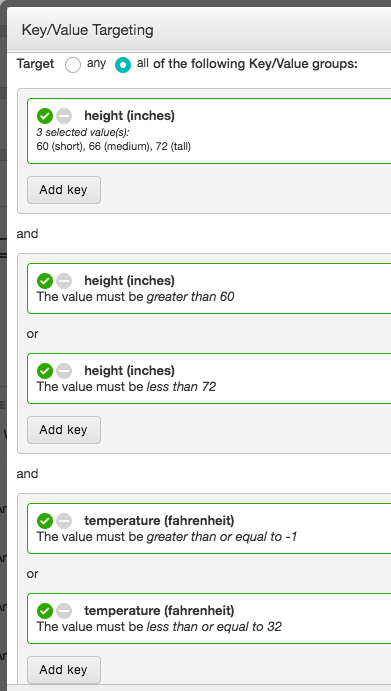
When you're working with strings, the only comparison operators that really make sense are equals and not equals. For example, the expression string1 > string5 is meaningless. (Unless you're looking at things like ASCII values, which we're not.) But with numbers, we have many more options. When you select a numeric key in Key/Value Targeting, you can choose from the following:
| Comparison | Description | Example |
|---|---|---|
| one of | With this option you can select from a set of predefined values. To be targeted, the key value must match one of the selected values. | age must be one of 21, 30, or 40 age in 21, 30, 40 |
| greater than | Any value that is greater than the selected value will be targeted. | height (inches) must be greater than 60 height (inches) > 60 |
| greater than or equal | Any value that is greater than or equal to the selected value will be targeted. | temperature must be greater than or equal to 0 temperature > 0 |
| less than | Any value that is less than the selected value will be targeted. | height (inches) must be less than 72 height (inches) < 72 |
| less than or equal | Any value that is less than or equal to the selected value will be targeted. | temperature must be less than or equal to 32 temperature <= 32 |
For all options other than one of, you must type in a value. As you type any matching predefined values will be displayed, but you don't have to use a predefined value, you can enter any numeric value.
Here's an example of using all the preceding numeric targeting:

Modifying a key/value target
You can create only one key/value target per line item or per campaign. To change the values associated with a given key, click the pencil icon on the right side of the key box in the Key/Value Targeting dialog. You can remove all or part of the target expression by clicking the X in the upper-right corner of each group or key box .
Warning
If you click the X to remove a key/value set or a group, you cannot undo that action. You must add the key/value set or group again.
Creating new values
In the preceding examples, we added values by selecting them in the Select Pre-Defined Values tab. The values that are displayed on this tab are populated using the targeting value API service. You can also enter new values to target, either by importing them from a file or by entering them individually. After you select a key, select the Bulk Select Values tab.
Pre-defined values will be available any time you select the associated key. Values you define here will be available only on the key/value set on which you define them.
Importing values
If you're targeting your key on a large number of values, you can bulk import them from a CSV (comma-separated values) file. Your CSV file can not contain comma-separated values. The application will look for files with a .csv extension, but the file you import must be a plain-text file containing one value per line. For example, if your key is city, you might want to import a file that looks like this:
London
Paris
New York
San Francisco
Los Angeles
Boise
Denver
Sydney
Tokyo
If you do put commas in your CSV file, you'll receive an error when you attempt to import that file.
Entering new values
You can enter individual values to target with the specified key. Simply type the values you want to target for that key in the text box, one value per line.
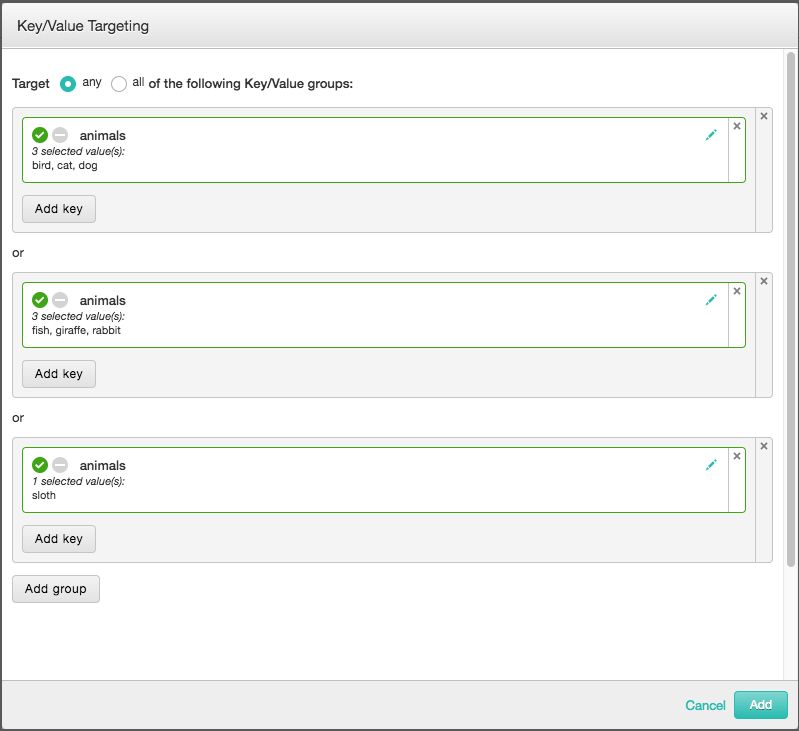
A key can have a maximum of 999 values. To add more values to a given key, you can combine keys with the same name with or expressions, as shown here:

Value name requirements
The following restrictions are enforced when entering or importing values:
- Value names are not case-sensitive. For example, if
FOOexists,Foo,foo,FOo, etc. are treated as duplicates. - Accented characters are considered unique. For example, if
båtvagnexists,batvagnis treated as a different value and must be defined separately. (If you want accented and non-accented characters to be considered duplicates, you might be able to insert a wildcard in place of the character. See Wildcards for more information.) - Value names have a maximum length of 100 characters.
- Value names can contain whitespace, so they can be more than one word.
- Value names cannot contain any of the following special characters:
"(double quotes)'(apostrophe)=(equal sign)!(exclamation point)+(plus sign)#(hashtag)~(tilde);(semicolon)^(caret)()(parentheses)<>(angle brackets)[](square brackets),(comma)&(ampersand)
Wildcards
You can use the * wildcard symbol to target multiple values. For example, let's say that rather than targeting apples, you wanted the option to target specific types of apples. You could have a key of fruit with values that include granny smith apple, red delicious apple, honeycrisp apple. To target a specific type of apple you would enter the value honeycrisp apple. If you decide you want to target all apples, you would use a wildcard in your value: *apple.
You can use up to two wildcards in a value. So if for some reason your values had been entered as delicious apple red and delicious apple golden, you could find all delicious apples with the value delicious apple, and all apples of any type with the value: * apple *.
Group restrictions
The Key/Value Targeting screen places restrictions on how detailed your targeting can be. Notice that within a group you can add a key, but you cannot add another group. This allows for two levels of nesting. That means you can target
(city = NY AND city = LA) OR (fruit = apple)
but you can't target
(city = New York AND (city = LA AND fruit = orange)) OR (fruit = apple)
There's no way to add a group within a group, which is what would be required for that additional level of nesting.
If you need to create more complicated targeting expressions, you'll have to use the API. Creating your expressions using API services allows you to nest up to five levels. (See Custom Key Value Targeting for more information on creating key/value targeting through the API.) Keep in mind that if you do create more complicated expressions in the API, you won't be able to view or edit those targets in the UI. If you receive a message like this:
"Unable to edit this Key-Value profile in the user-interface. Use the API to make changes to this profile."
you probably have a key/value targeting expression that was created using the API and has more than two levels.