SharePoint Calculator Service Part 9 – Claims Auth
One of the game-changing features of SharePoint 2010 is support for claims-based identities. It opens up a whole new set of exciting scenarios by blowing the doors off of the walled garden of the Active Directory. Well, maybe I exaggerate, but only slightly!
In this article, we’ll modify our Calculator service application to support claims-based authentication (AuthN) and authorization (AuthZ).
About Claims-based Authentication
SharePoint has made a big bet on claims-based authentication in the 2010 release. In fact, it is the only type of authentication explicitly supported by the Service Application Framework.
This decision unifies the authentication model used inside a SharePoint server farm and eliminates the complexities around supporting many different types of authentication.
NOTE: SharePoint 2010 still supports many sign-in authentication options such as Windows authentication, for example, when a user signs-in to a SharePoint site from a browser. What we’re talking about here is authentication between the Web Front End tier and the Application Server tier inside a SharePoint server farm.
I feel like I should draw a picture here:
In this article, we’re specifically talking about the “Claims (only)” arrow connecting the WFE tier to the Application Server tier where our Calculator service application is hosted.
NOTE: It is technically possible to implement your own authentication scheme, but you’ll find that there is no explicit support for this in the Service Application Framework. You’ll end up spending a bunch of time implementing your own authentication and authorization management infrastructure, and your service application will not support the many new scenarios enabled by claims authentication. In short, SharePoint administrators will likely be very unhappy to find this out when they deploy your service.
If you’re interested in more details about some of the scenarios made possible by claims-based authentication, you can read the MSDN documentation or check out the great resources on the SPIdentity blog including three excellent videos linked in this post.
On with the implementation!
First, we need to tell WCF that we want to use claims-based authentication with our service application.
We do that by changing the service binding in our web.config:
web.config
- <system.serviceModel>
- <services>
- <service
- name="Sample.Calculator.Service.CalculatorServiceContract">
- <endpoint
- address=""
- contract="Sample.Calculator.Service.ICalculatorServiceContract"
- binding="customBinding"
- bindingConfiguration="CalculatorServiceHttpBinding" />
- </service>
- </services>
- <bindings>
- <customBinding>
- <binding
- name="CalculatorServiceHttpBinding">
- <security
- authenticationMode="IssuedTokenOverTransport"
- allowInsecureTransport="true" />
- <binaryMessageEncoding>
- <readerQuotas
- maxStringContentLength="1048576"
- maxArrayLength="2097152" />
- </binaryMessageEncoding>
- <httpTransport
- maxReceivedMessageSize="2162688"
- authenticationScheme="Anonymous"
- useDefaultWebProxy="false" />
- </binding>
- </customBinding>
- </bindings>
- </system.serviceModel>
The interesting change here is that we specify a custom binding (lines 8, 13-29) with an authentication mode of IssuedTokenOverTransport (line 17).
This tells WCF to require a SAML token (containing claims about the authenticating party) in the security header of any messages sent to the service.
The allowInsecureTransport option is required because we’re using HTTP as our transport (line 24), which means that the SAML token will be sent in plain-text over the wire to the service.
This may be appropriate in scenarios where the physical network is considered secure (e.g., a private back-end LAN connecting WFE and App Server) and performance is the primary consideration.
It’s also appropriate for this article because we haven’t yet covered service application endpoints (something we’ll do in the near future).
We’ll also discuss WCF bindings that are supported and work well for service application scenarios in a future article.
But for now, you can just consider the custom binding to be some magic configuration settings that enable our service to work with claims-based authentication.
Next, we need to turn off IIS authentication, because IIS natively doesn’t know anything about SAML tokens. As far as IIS is concerned, connections to our service will be anonymous. Instead, WCF/WIF will take care of authentication.
We do this in web.config as well:
- <system.webServer>
- <security>
- <authentication>
- <anonymousAuthentication enabled="true" />
- <windowsAuthentication enabled="false" />
- </authentication>
- </security>
- </system.webServer>
Now, as far as IIS is concerned, we have enabled anonymous authentication.
NOTE: I regret that this last step is necessary, as it should have been the default configuration. It’s just one of those things that slipped through the cracks during the release cycle and unfortunately we’re probably stuck with it now, as a change to the default configuration would be a breaking change.
Configuring the Service Host Factory
Next, we need to implement a service host factory. This is necessary because it is the only WCF extensibility point where we can configure the service host for claims support due to the requirement that the service host be configured before it is opened.
NOTE: If you already have a service host factory, you can continue to use it. Just follow along and insert the serviceHost.Configure method call in your CreateServiceHost override as described below.
To do this, we’ll modify our calculator.svc file to reference a new service host factory class:
calculator.svc
- <%@ServiceHost
- Language="C#"
- Service="Sample.Calculator.Service.CalculatorServiceContract, Sample.Calculator.Service, Version=1.0.0.0, Culture=neutral, PublicKeyToken=d5d38459f57e2f46"
- Factory="Sample.Calculator.Service.CalculatorServiceHostFactory, Sample.Calculator.Service, Version=1.0.0.0, Culture=neutral, PublicKeyToken=d5d38459f57e2f46"
- %>
Line 4 is the only change from our original WCF service. It simply tells WCF to call our CalculatorServiceHostFactory when creating our service host.
So now we need to implement the service host factory:
CalculatorServiceHostFactory.cs
- internal sealed class CalculatorServiceHostFactory : WebServiceHostFactory
- {
- public override ServiceHostBase CreateServiceHost(
- string constructorString,
- Uri[] baseAddresses)
- {
- ServiceHostBase serviceHost = base.CreateServiceHost(constructorString, baseAddresses);
- // Configure the service host for claims authentication
- serviceHost.Configure(SPServiceAuthenticationMode.Claims);
- return serviceHost;
- }
- }
The interesting code here is the call to serviceHost.Configure (line 10). This is a C# extension method implemented in the Microsoft.SharePoint namespace (specifically, in the SPServiceHostOperations class). Don’t be confused by the extension method syntax. The Configure method is not a WCF method on the ServiceHostBase class. It is a SharePoint method.
This method internally does the following:
1. It configures the service host to support authentication via Windows Identity Foundation (WIF).
2. It configures the service host to use an authorization manager that enforces the service application security policy as configured by an administrator.
3. It attaches a WCF behavior (implemented internally by the Service Application Framework) to the service host that handles an optional ServiceContext SOAP message header. A WCF client can use this header to enable correlation of diagnostic information across machine boundaries, to coerce the server thread locale to match the client request locale, and to support multi-tenancy or partitioning of a service application based on a SharePoint site subscription identifier.
Each of these items deserves more explanation, but that’s for another time. For now, rest assured that the Configure method is doing lots of nice things for your service application.
That’s it!
To summarize, we modified our service binding to support issued token authentication, made a single method call to configure our service host, and our service application magically supports claims-based authentication (AuthN) and authorization (AuthZ).
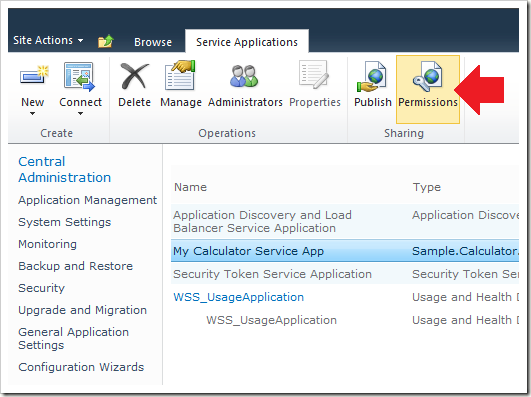
For example, a farm administrator can now use the Permissions button in the Service Applications Management page to grant or restrict access to our service application:
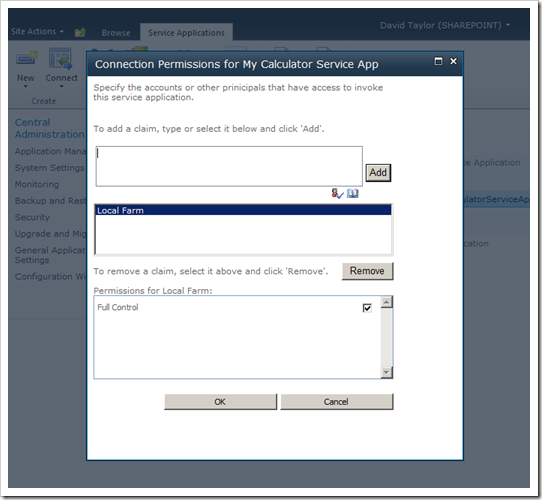
By default, any identity that has the “Local Farm” claim will have “Full Control” access to the service application:
In effect, this means that any process in the server farm can access the service application. So, services “just work” in a single farm topology by default.
Administrators can customize these permissions to create the advanced topologies I wrote about in a previous post, for example, restricting access to only a specific web application.
Administrators can even use the Publish ribbon button to make the Calculator service application available to clients outside the server farm (“service federation”), and thanks to claims-based authentication, the clients can even be in a different Active Directory domain. In fact, the clients don’t even have to be a member of a Windows domain or have an Active Directory available at all!
As with the Administrators ribbon button that we look at in my last post, service implementers can customize the permissions to provide more granularity than just “Full Control” and enforce these permissions on a per-method basis rather than the basic “all-or-nothing” access enforced by the Connection Permissions settings.
Identity Delegation
Another feature we now have available to our service application is the end-user identity. We can inspect the end-user’s identity (as signed-in on the Web Front End) all the way back in the App Server tier where our service application is executing.
This may seem like an obvious thing, but it wasn’t possible with Windows authentication without a PhD in Kerberos and domain administrator-level access to the Active Directory, because a feature called “delegation” of the user token is required to flow a Windows identity across multiple servers.
Not so with SharePoint claims-based identities. Delegation works out of the box, no PhD required.
We’re not taking advantage of this feature yet, but I’ve got a cool feature planned for the Calculator service that will make good use of it in a future article.
Enjoy!
Comments
Anonymous
May 24, 2010
Hi Many thanks for this enlightening series on SAF, It of great help for me and my team. In my scenario I am planning to use a service hosted as a Windows Service, we are using windows service as our service will be interacting with host of other systems to aggregate and process data before making it available to SharePoint. It will be so nice if you can provide some information on how to deal with Windows Service and create and manage its application and proxies. I have searched & struggled for weeks but there is nothing available for Windows ServicesAnonymous
May 25, 2010
Hi Amit, Windows services are supported by SAF via the SPWindowsService and SPWindowsServiceInstance base classes. These two classes allow you to integrate basic management operations for your Windows service into SharePoint, such as starting and stopping the service on remote machines and rolling passwords across a server farm. These classes existed in the previous release of SharePoint and are documented in MSDN. If you want to integrate more deeply with SharePoint, you can subclass SPServiceApplication and SPServiceProxy/SPServiceApplicationProxy to create a service application and proxy for your Windows service. I'll be covering the SPServiceProxy and SPServiceApplicationProxy integration over my next few posts, which will apply to Windows service-hosted web services as well as well as IIS-hosted web services. I've also added a Windows service application example to my list of topics to cover in a future article. Hope this helps!Anonymous
May 31, 2010
The comment has been removedAnonymous
June 01, 2010
Hi Doug, I do plan to post the completed sample. I'm writing it as I go, though, so it's not ready yet. No promises, but I hope to have something to post by the end of the week. RE: the error you're seeing, it appears that there may be an issue with the WCF binding you've specified, or perhaps you aren't using the SPChannelFactoryOperations extension method to create the channel. In any case, I'll be covering the proxy classes soon, so that will give you a working example to compare with your code.Anonymous
July 28, 2010
Hi Amit In case of using SPServiceApplication/SPServiceApplicationProxy please remember to override SPServiceApplication.IsConnected(SPServiceApplicationProxy proxy) method.Anonymous
February 22, 2011
The comment has been removedAnonymous
February 23, 2011
The comment has been removedAnonymous
June 22, 2011
Hi, I do exactly what you did in you example in my own custom service. Everything works wonderful with claims or classic authentication until I have installed SP1 for Windows Server 2008 R2. Now I have the problem that in my service the user (ServiceSecurityContext.Current.PrimaryIdentity) is no longer the caller, now it is NT AUTHORITYANONYMOUS. I have described my problem here social.msdn.microsoft.com/.../a41ee97f-c809-4c53-832b-892aec79119f. With classic authentication it still works. Maybe you have an explanation for it. Harry


