Suite B Public Key Infrastructure Part III
Hey everyone, I'm back to grinding it out again! Here's another one for your "suite-tooth." We've covered installing and configuring a Suite B Offline Root CA, and also issuing end-entity key agreement and digital signature certificates in accordance with RFC 5759 from an offline Root CA. Let's go over the scenario of a two tier suite B PKI. The benefits of a two tier PKI such as security, ease of administrative overhead for issuance, and scale (up and out) have been largely discussed in other blogs, on TechNet, and MSDN, etc. In most scenarios the agility and automation that comes from having an AD integrated enterprise online issuing CA is the cats' pajamas, and is in a number of cases the preferred way to go. That being said, if we're going to have an online issuing CA, the most secure way to do it is to subordinate it under an offline root CA (this has also been discussed in detail). So today we'll talk about subordinating a Suite B certificate authority underneath a Suite B offline Root CA, both running Windows Server 2012 R2; in accordance with the RFC.
Suite B Non Self-Signed Certificate Authority Certificates
So we've got our Suite B Offline Root CA already setup from Part I of the series. We're going to subordinate a new 2012 R2 CA underneath it. This is a typical two tier PKI installation, so a lot of the legwork for configuring AIAs, CDPs, CRL publication intervals, etc. I've already done and these topics are also covered on other posts and articles. We'll be using the following configuration settings for an online non self-signed CA. Note that the RFC states that either curve P-256 or curve P-384 may be used. Here we’ll use the P-384 curve. Be sure to check 3rd party compatibility with these algorithms as not all vendors support them. We'll use the same CSP, key length, and hash algorithm as the offline root CA. Remember that ECC algorithms are stronger than RSA algorithms and are less computationally expensive.
CSP: ECDSA_P384#Microsoft Software Key Storage Provider
Key Length: 384
Hash Algorithm: SHA-384
As with the Root CA, for Non self-signed CA certificates (Subordinte or intermediate CAs) the RFC states that the following extensions must be present: authorityKeyIdentifier, keyUsage, and basicConstraints. Furthermore it states that the keyUsage extension and the basicConstraints extension must be marked as critical, and that the keyCertSign and CRLSign bits must be set. All other bits (except for digital signature and non-repudiation, which may be set) must not be set.
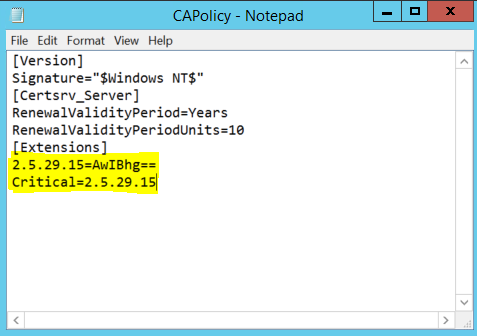
Deja-vu, first on the hit list is to mark the Key Usage extension as critical on the Subordinate CA certificate. In order to do that we need to configure some settings in the CAPolicy.inf file that is parsed and used during the CA installation. There are quite a few great articles out there on the CAPolicy.inf syntax. The CAPolicy.inf file needs to be placed in the %windir% directory in order for the installation routine to read it in and use the settings. Here is the CAPolicy.inf file we'll use to install the sub-ca:
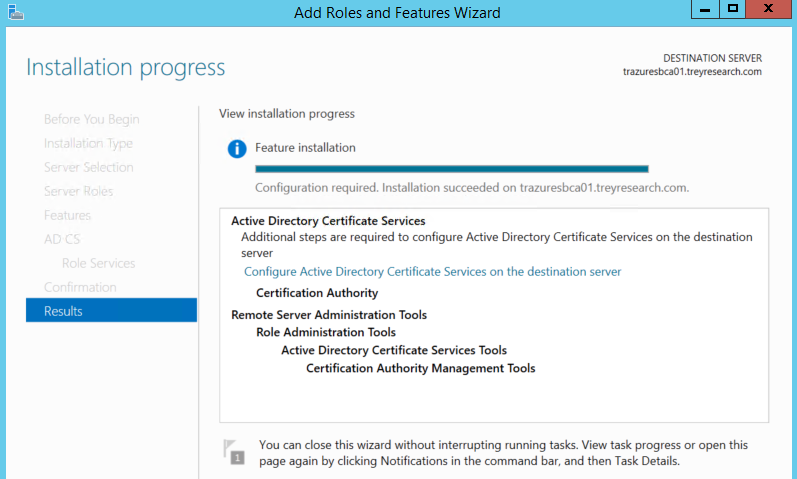
We've already talked about how we arrived with these values in the CAPolicy.inf file in order to mark the key usage extension as critical in Part I. Place this bad boy in %windir% and lets fire up server manager to get the sub-ca installed. The installation is essentially the same as Part I, so if need be check that out. I'll show the differences here below during the configuration of the CA. let's click configure:
Select the CA role service:
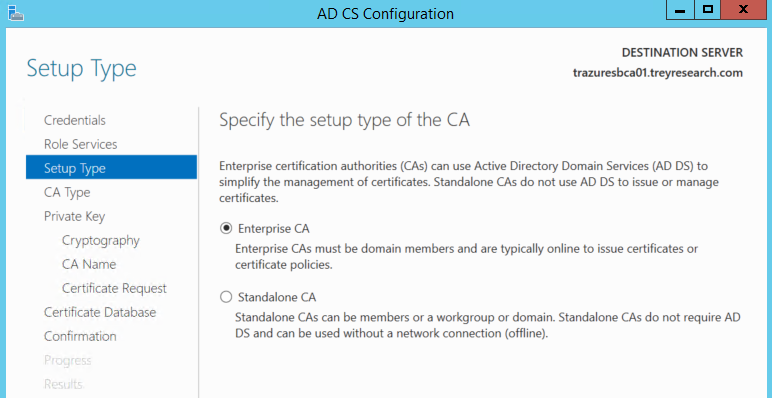
Here's where the configuration gets a little different. We want to choose Enterprise CA.
For the CA type select Subordinate CA.
Select create a new private key.
Here's the cryptography we're going with.
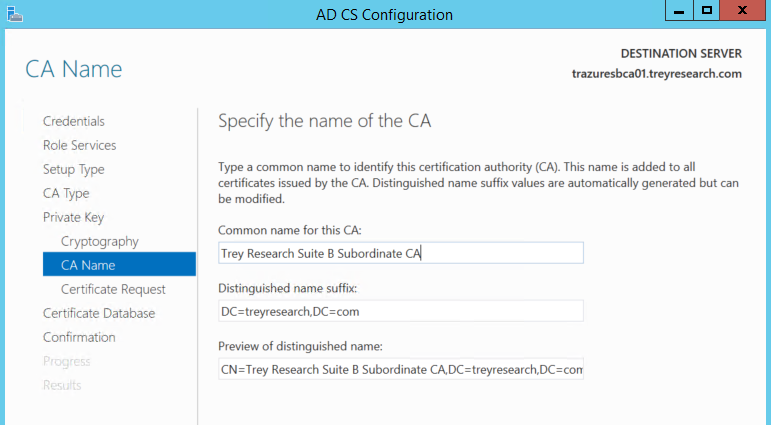
Here we specify the CA name.
Certificate signing request. As we'll be subordinating the CA underneath an offline root CA, we need to generate a CSR to be signed by the offline root CA.
After that specify the CA database location, and click configure to get things going. When you're done you'll see this note basically telling you that the installation isn't finished until you cut the cert from a root or other CA (in this case its a root CA):
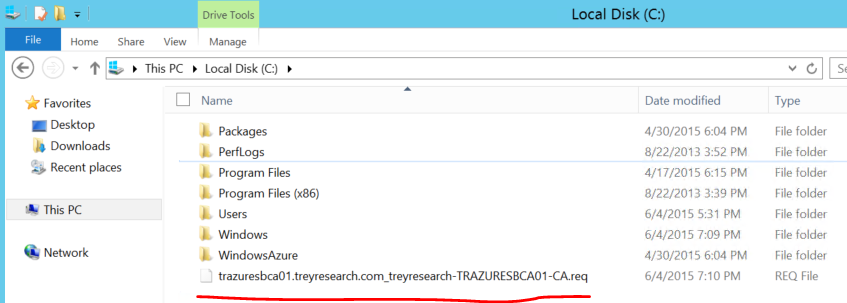
Now here's where we have a little fun going back and forth to the offline Root CA AKA "Sneaker-Netting." First we've got to get the CSR generated on the Sub copied to some media so that we can get it on the Root CA. Once on the root CA we need to submit the CSR so we can sign it with the Root CAs' ECDSA key and generate the public key portion of the sub-ca's certificate. Use your ways and means to get the CSR off of the Sub-CA and onto the Root CA, may the force be with you in your quest.
Meanwhile on the Root CA...We need to issue a certutil command to allow the CA to issue the Sub CA certificate with the Key Usage extension marked as critical. This flag allows the Root CA to honor the request flags in the CSR from the Sub.
certutil.exe –setreg policy\EditFlags –EDITF_ADDOLDKEYUSAGE
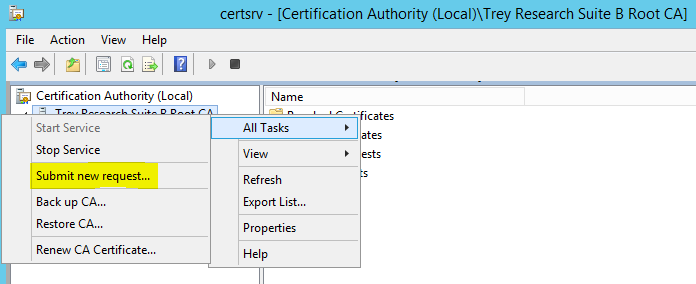
Any changes to the CA configuration which are stored in the registry are read in at the time the CA service starts, so since we made a change to the configuration we need to bounce the CA service to read in the new configuration. Once the service is restarted let's crack open the Certificate Authority MMC Snap-in, Right click on the CA name in the left pane | Click All Tasks | Click Submit new request.
Browse to the CSR and click Open.
In the left pane of the snap-in click on Pending Requests. In the right pane right click on the pending request click All Tasks | Issue.
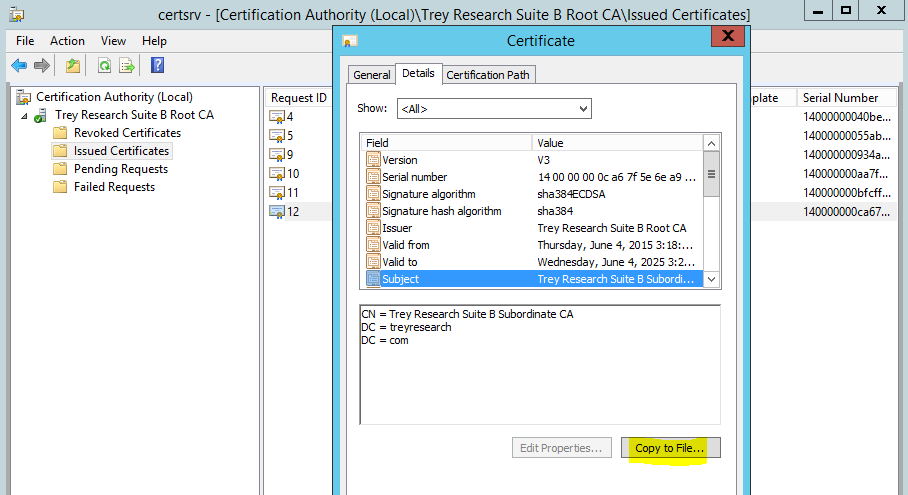
Back to the left pane folks...and click Issued Certificates, then in the right pane double click the SubCA certificate, click the details tab, then click copy to file. Follow the wizard to export it as a DER encoded binary file.
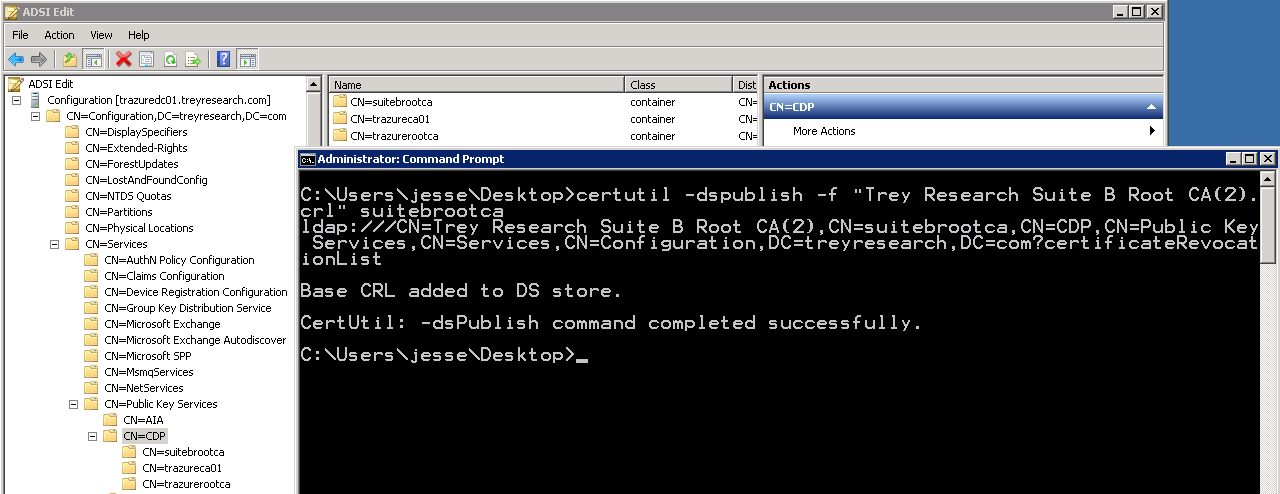
Get your sneakers on. Grab the Sub CA certificate file you just exported and also navigate to %windir%\System32\CertSrv\CertEnroll directory and grab the Root CA certificate and the Root CA CRL. I'll see you on the other side. Hopefully that doesn't take long. We need to publish the root CA cert and CRL into LDAP via certutil, this way when we install the CA certificate and start the service we don't get any revocation or trust errors. So, publish that root CA crl into LDAP like so:
And now on to the Root CA certificate:
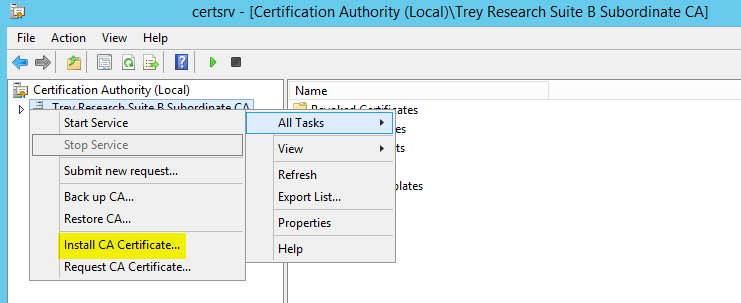
Ok, you can run a gpupdate /force on your sub-ca so that the Root CA certificate is installed into the trusted root certification authorities store on the machine. So now that we have the trust anchor for the new PKI installed, and we have revocation information available in at least one CDP (LDAP), let's install that Sub CA certificate. On the Sub CA open the Certification Authority snap-in, right click on the CA name | click All Tasks | click Install CA Certificate.
Browse to the Sub CA certificate, that is; the der encoded file that you exported on the Root CA and copied to the Sub CA and click Open, you should see something flash that says it's loading the certificate.
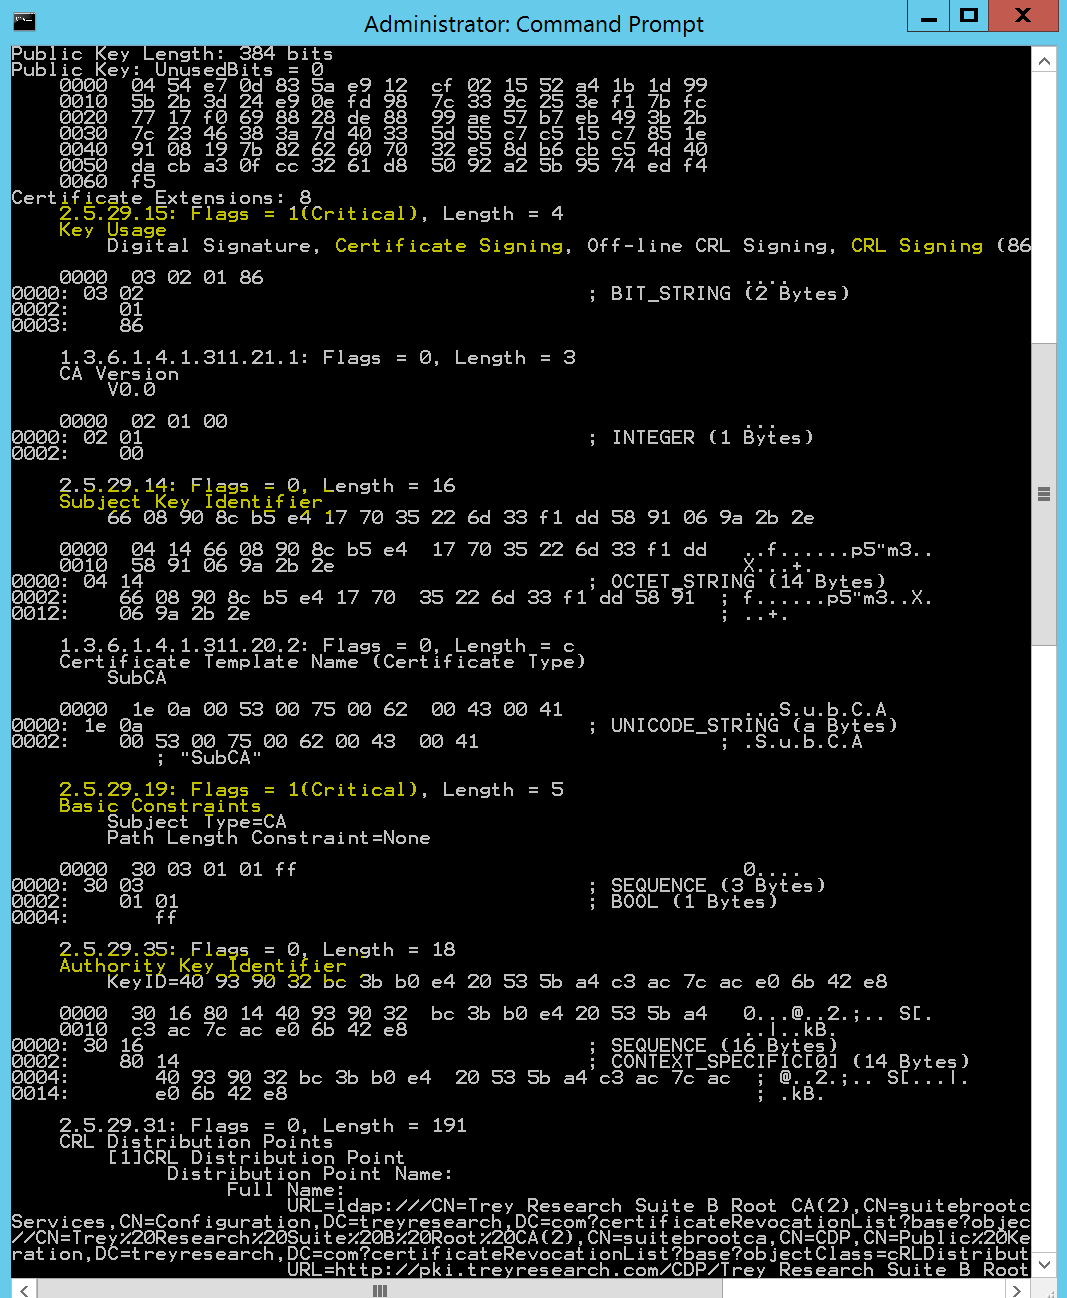
At this point you should be able to start the Certification Authority service without error. Now comes the part of configuring your CA, there are tons of considerations and options here; this is out of scope for this post. There are a number of TechNet articles and posts out there on the configuration of your CA. Switching gears back to the Sub CA certificate itself, lets examine it to ensure we are meeting all of the specifics. Certutil -v gives us the verbose output we need:
And here is the rest...
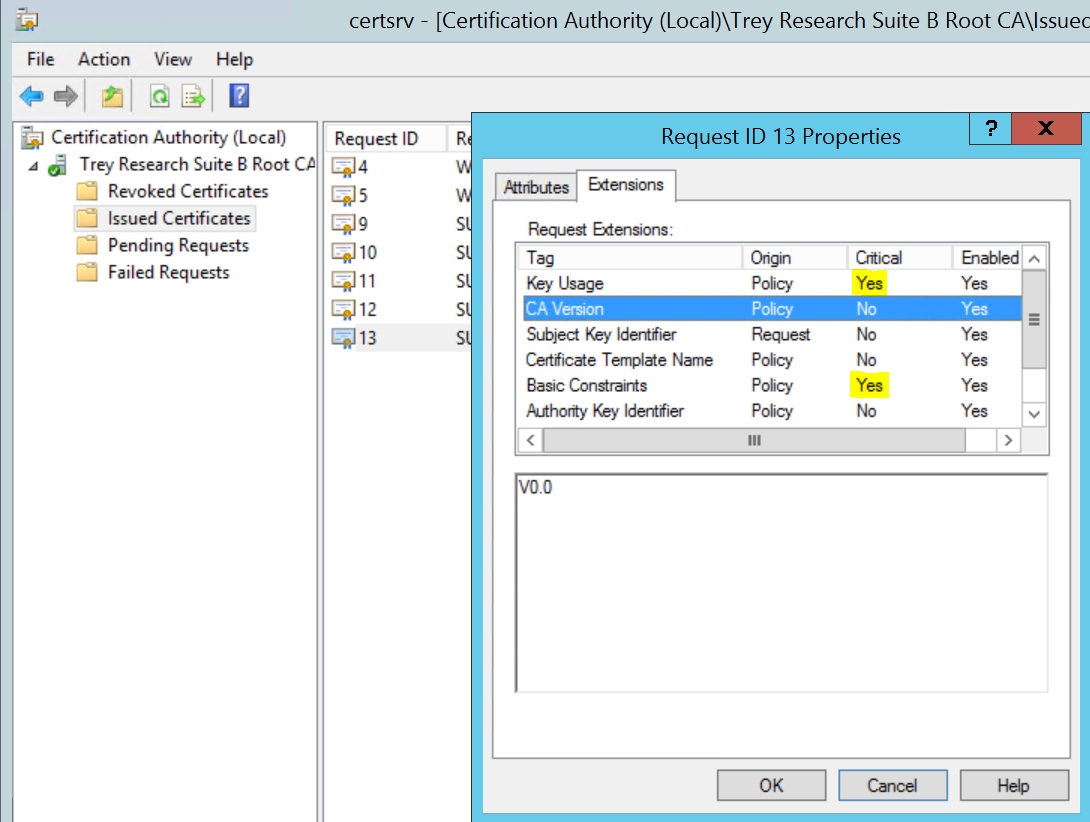
Also on the Root CA if you look at the Sub CA certificate under the issued certificates folder, right click on it | All Tasks | click View Attributes/Extensions and take a peek at the extensions tab you can see which extensions are marked as critical:
So we've subordinated this AD integrated online issuing CA under our offline Root CA in accordance with the RFC. There are a lot of moving parts with installing and configuring a PKI, so everything wasn't covered here. The nice thing about this infrastructure is that it's stood up and running side by side with my existing RSA based PKI, this way I can have the best of both worlds and not be stuck in one or the other. Here's a snapshot of these two separate PKIs in my lab in Windows Azure:
Below is a scrape of the Suite B Root CA, this PKI has multiple AIA, CDP, and OCSP URI extensions defined for both the Root and Sub CAs.
Meeting certificate requirements for a given solution is fairly straightforward and less troublesome now that I can issue RSA and/or ECC certificates. ECC cryptography hasn't been widely deployed and leveraged by a large number of folks and vendors, but in this case we're ready to start cutting those certificates today where applicable and required. So in summary; we're in a position to issue both types (cryptography) of certificates, we have the security and elasticity of an offline root for both PKI chains, and we have the forward looking flexibility to scale both of these infrastructures up and out. Oh and we can issue ECC certs in compliance with the Suite B RFC. Let's not neglect a solid revocation status checking infrastructure, without it PKI well...just doesn't cut the mustard. Perhaps I'll go into detail on this in my next post. I hope everyone out there is gearing up for a great weekend, it's been a great week in IT @Microsoft!
Oh and before you go...one piece of troubleshooting advice for this week...check FIPS! ; )
See you next time!
Jesse Esquivel
Comments
- Anonymous
December 21, 2015
The comment has been removed
