Using ASP.NET MVC and jQuery to create confirmation prompts
Having coded up samples several times showing how to add confirmation prompts to links on a web page I figured I’d post it here so that I can simply grab it next time round!
My colleague Simon Ince & I put together a Ramp Up session for ASP.NET MVC 2. As part of the Ajax module we cover Unobtrusive Javascript and I think it’s fair to say that this was more Simon’s influence than mine. However, the more I’ve embraced the idea the more I’ve come to like it: I end up with cleaner web pages that degrade gracefully and get script that is easier to re-use. What’s not to like?
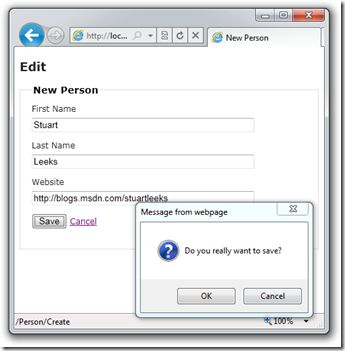
Imagine a page for editing personal details like the following:
Here we have a few input controls and a submit button. We also have a Cancel link that navigates away from the page without POSTing the form. A common requirement is to add a confirmation prompt when the user clicks the link to allow them to abort the cancel if they clicked on it inadvertently. One way that this is sometimes achieved is by adding an onclick handler to the anchor tag:
<a href="/Person" onclick="JavaScript:return confirm('are you sure?')">Cancel</a>
The remainder of this post will show you how to tweak this so that we can apply the Unobtrusive Javascript principle. We could add an id to the anchor tag and then simply move the script out of the page into a separate script file, but this would leave us with a script that only worked for this single case. Instead we will add an attribute on the anchor tag that stores the text to use for the confirmation prompt. Since browsers are supposed to ignore attributes with the “data-“ prefix we will use data-confirmprompt:
<a data-confirmprompt="are you sure?" href="/Person">Cancel</a>
In our script file we will use jQuery to select the anchor and add in the onclick behaviour. Our script file will look like:
 /// <reference path="jquery-1.4.4.js" />
$(document).ready(function () {
    $('*[data-confirmprompt]').click(function (event) {
        var promptText = $(this).attr('data-confirmprompt');
        if (!confirm(promptText)) {
            event.preventDefault();
        }
    });
});
The first couple of lines are house-keeping. Line 1 is a comment that indicates to Visual Studio that we’re using jQuery and gives us intellisense for the jQuery functions (You can drag the file from Solution Explorer to saved typing, and then use Ctrl+Shift+J to update intellisense). The “$(document).ready()” bit specifies a function to run when the document has loaded.
Inside the ready function, we use the selector syntax to specify that we want to find any element that has the data-confirmprompt attribute. We could have used ‘a[data-confirmprompt']’ but that would only find anchor tags and I want to be able to use this on submit buttons as well. Once we’ve selected the elements, we call the jQuery click function to bind a function to the click handler for each element. Within the event handler, jQuery rather helpfully sets ‘this’ to be the element that the event is firing for so we can use $(this).attr(‘name’) to retrieve an attribute from the element – in our case to retrieve the value of the data-confirmprompt attribute. Once we have the prompt text we can display the prompt using the confirm function and if the function returns false (i.e. if the user clicks cancel) then we call event.preventDefault to prevent the default click behaviour, i.e. prevent following the link or submitting the form.
Now we just need to make sure that jQuery and our script file are referenced and we’re in business! We can simply add the data-confirmprompt to anything that we want confirmation on before accepting the click event – for example, we can also add it to the Save button and specify different prompt text:
If you’re using ASP.NET MVC then you might be looking at the anchor tag above and thinking “what about Html.ActionLink?” – good question! The ActionLink I’ve been using is just to go back to the default/index action for the current controller:
Html.ActionLink("Cancel", "Index")
There are some overloads to this that allow you to specify additional attributes to render. For example,
Html.ActionLink("Cancel", "Index", null, new { foo="bar" })
will render
<a href="/Person" foo="bar>Cancel</a>
Notice the use of an anonymous type to specify the attributes: “new {foo = “bar”}”? We want to create an attribute called “data-confirmprompt” but unfortunately C# won’t let us define a property with a ‘-‘ in it! Well, the anonymous type syntax is just a shorthand for creating a RouteValueDictionary, so we can fall back to collection initialisers and write
Html.ActionLink("Cancel", "Index", null, new RouteValueDictionary { {"data-confirmprompt", "are you sure?" }})
Admittedy that’s not terribly pretty! Fortunately MVC 3 brings some help as it will automatically convert underscores in the property names to minuses so we can write
Html.ActionLink("Cancel", "Index", null, new { data_confirmprompt="are you sure?" })
and the “data_confirmprompt” property will be converted to an attribute called “data-confirmprompt” – spot on!
We’ve now got a nice clean HTML page that doesn’t contain any script and a nicely reusable script file that we can reference to add confirmation behaviour to any elements on a page that have the data-confirmprompt attribute set.
Comments
- Anonymous
October 12, 2016
Thanks for the article! :)

