How to add a custom Paste Special command to the VS Editor menu
When editing code with the Visual Studio Editor, you may have come across a very useful feature that allows for copying JSON or XML data to the clipboard, and then pasting new classes into your code based upon the structure of the data. For example, consider the following JSON data:
{"employees":[ {"firstName":"John", "lastName":"Deere", "age":"25"}, {"firstName":"Karen", "lastName":"Carpenter", "age":"33"}, {"firstName":"Ronald", "lastName":"McDonald", "age":"101"} ]}
If you select the above JSON text and copy it to the systems’ clipboard, and then select Visual Studio’s “Edit | Paste Special | Paste JSON as Classes” menu command, you’ll end up with a couple of nice new classes inserted into your code file, based upon the structure of the JSON data. For example:
public class Rootobject { public Employee[] employees { get; set; } } public class Employee { public string firstName { get; set; } public string lastName { get; set; } public string age { get; set; } }
Seeing as how DulcineaS posted a question about adding additional Paste Special commands to Visual Studio, I suspect a small walkthrough might be useful to others that may be contemplating adding similar customizations to the IDE. Additionally, given VS 2015 has been out for some time now, I wanted to play with the updated code spew the new VS 2015 VSIX template and Custom Command item template generated.
So without further ado, lets walk through the process of building a new custom command that pastes text as a comment, into a C# code file.
Prerequisites
Visual Studio 2015 Community Edition or better.
Don’t forget to use the custom install option and specify the Visual Studio Extensibility Tools. If you don’t, you will need to rerun the setup, to install the extensibility tools that include the project templates and reference assemblies used in this walkthrough.
Walk Through
Those of you familiar with earlier versions of the Visual Studio SDK, take note. The VSSDK Project Templates deployed with the earlier Visual Studio SDKs were revamped for VS 2015, with some of the features turned into Item Templates. So first things first, we need a new VSIX project, to which we’ll subsequently add a custom command to.
Create a new “VSIX Project”
Think of the VSIX project as the deployment or installation package for your extension. Building this project will result in a .VSIX file that you can use to easily deploy your extension.
- Select the File | New.Project… menu item, to invoke the “Add New Project” dialog
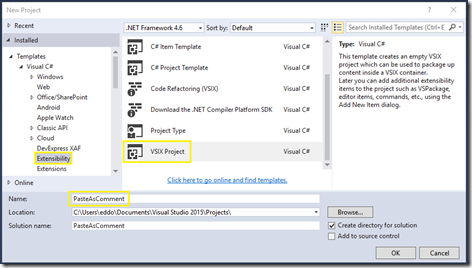
- Select the “VSIX Project” template and enter a project name as highlighted below

- Click the “OK” button to create the initial VSIX project
Add a new “Custom Command”
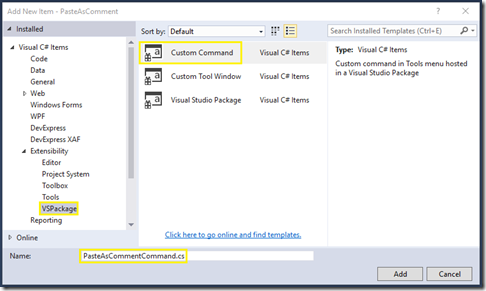
Now we need to add an extensibility point to our newly created VSIX Project. We want to add an additional command to the Edit | Paste Special menu item, so we should choose the “Custom Command” template as follows:
- Select the Project | Add New Item… menu item, to invoke the “Add New Item” dialog
- Select the “Custom Command” template and enter a filename as highlighted below

- Select the “Add” button to add the custom command to the project
Modify the Custom Command
By default, the Item template simply adds our new command to the Tools menu, so we’ll need to modify its properties, so that it shows up on the correct menu, and displayed or hidden, depending upon whether there is any text currently copied to the clipboard.
- Open the .VSCT file (PasteAsCommentCommandPackage.vsct)
- Locate the following command definition
<Button guid="guidPasteAsCommentCommandPackageCmdSet" id="PasteAsCommentCommandId" priority="0x0100" type="Button">
<Parent guid="guidPasteAsCommentCommandPackageCmdSet" id="MyMenuGroup" />
<Icon guid="guidImages" id="bmpPic1" />
<Strings>
<ButtonText>Invoke PasteAsCommentCommand</ButtonText>
</Strings>
</Button> - Then replace it with the following
<Button guid="guidPasteAsCommentCommandPackageCmdSet" id="PasteAsCommentCommandId" priority="0x0300" type="Button">
<Parent guid="guidSHLMainMenu" id="IDG_VS_EDIT_PASTE" />
<CommandFlag>DefaultInvisible</CommandFlag>
<CommandFlag>DynamicVisibility</CommandFlag>
<CommandFlag>DefaultDisabled</CommandFlag>
<Strings>
<ButtonText>Paste Text As Comment</ButtonText>
</Strings>
</Button> - Save and close the .vsct file
Note, the guidSHLMainMenu:IDG_VS_EDIT_PASTE group is where the existing “Paste JSON As Classes” and “Paste XML As Classes” commands are located. By changing our command’s parent to the same menu group, and setting it’s priority to 0x0300, we have placed our custom “Paste Text As Comment” command in the same menu group, such that it will appear beneath the other two commands.
Additionally, I’ve removed the icon, and also added the various CommandFlags to allow for showing and enabling the command programmatically.
Side Note:
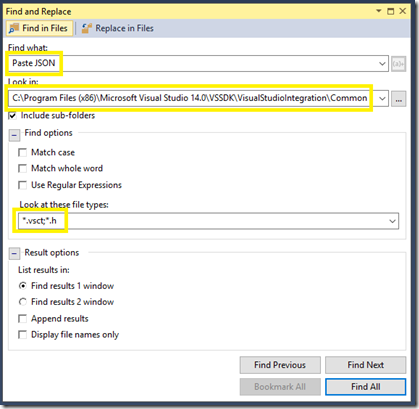
So how did I know to use that guidSHLMainMenu and IDG_VS_EDIT_PASTE value? Finding these values can be tricky. I usually start by searching the .VSCT files that ship with the Visual Studio SDK, to see if I can get a hit on a related menu item. For example:
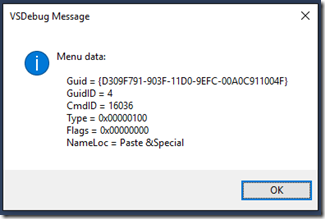
However, in this instance I didn’t turn up any references to the Paste commands I was interested in (not entirely unexpected). So the next step was use the old EnableVSIPLogging trick to find the menu I was interested in. Which resulted in the following:
So firing up the Find In Files, and casting a wider net. I tried searching all .VSCT files for the word “Special” as that doesn't pop up very often in the VS menus, and found the following in ShellCmdPlace.vsct:
<Menu guid="guidSHLMainMenu" id="IDM_VS_EDITOR_PASTE_MENU" priority="0x0580" type="Menu"> <Parent guid="guidSHLMainMenu" id="IDG_VS_EDIT_CUTCOPY"/> <Strings> <ButtonText>Paste &Special</ButtonText> <CommandName>Paste &Special</CommandName> </Strings>
But this is the menu definition, and while we could use this to add a new menu group with our command, what I really want to do is find the menu group the other commands are already added to. Unfortunately, this particular menu group is not published in any of the VSSDK files, and I had to resort to searching through the Visual Studio code base to see how the Paste JSON As Classes, was defined:
<Button guid="guidJsonPackageCmdSet" id="cmdidPasteJsonAsClasses" priority="0x0100" type="Button"> <Parent guid="guidSHLMainMenu" id="IDG_VS_EDIT_PASTE" /> <CommandFlag>DynamicVisibility</CommandFlag> <CommandFlag>DefaultInvisible</CommandFlag> <CommandFlag>DefaultDisabled</CommandFlag> <Strings> <ButtonText>Paste &JSON As Classes</ButtonText> </Strings> </Button>
And as it turns out, the actual ID we want (IDG_VS_EDIT_PASTE) is defined in the vsshlids.h file. So we can happily use that definition from our own VSCT file.
Specifying When to Load the Package
By default, this VSPackage will load only when you first selected the menu item. However, because we want to programmatically show and enable the command, we need to ensure the package is loaded at the most appropriate time. In general, you should avoid loading your package until needed. This particular example only supports C#, so we can force the package to load whenever a C# project is loaded by adding the following attribute to our Package class as follows:
[PackageRegistration(UseManagedResourcesOnly = true)] [InstalledProductRegistration("#110", "#112", "1.0", IconResourceID = 400)] [ProvideMenuResource("Menus.ctmenu", 1)] [ProvideAutoLoad(VSConstants.UICONTEXT.CSharpProject_string)] [Guid(PasteAsCommentCommandPackage.PackageGuidString)] public sealed class PasteAsCommentCommandPackage : Package { ….. }
Implementing the Command
First, add a reference to the Microsoft.VisualStudio.Editor.dll, Microsoft.VisualStudio.ComponentModelHost.dll and PresentationCore.dll assemblies. then add the following using statements to your PasteAsCommentCommand.cs file:
using System; using System.ComponentModel.Design; using System.Globalization; using System.Windows; using Microsoft.VisualStudio.Shell; using Microsoft.VisualStudio.Shell.Interop; using Microsoft.VisualStudio.Editor; using Microsoft.VisualStudio.ComponentModelHost; using EnvDTE; using EnvDTE80;
Then add the following helper functions to your PasteAsCommentCommand class:
private DTE2 _dte = null; DTE2 GetDTE() { if (_dte == null) { _dte = Package.GetGlobalService(typeof(SDTE)) as DTE2; } return _dte; } private IVsEditorAdaptersFactoryService _adapterFactoryService = null; IVsEditorAdaptersFactoryService GetAdapterFactoryService() { if (_adapterFactoryService==null) { IComponentModel componentModel = (IComponentModel)Package.GetGlobalService(typeof(SComponentModel)); _adapterFactoryService = componentModel.GetService<IVsEditorAdaptersFactoryService>(); } return _adapterFactoryService; }
Next, modify the existing PasteAsCommentCommand constructor, to create an OleMenuCommand, instead of a MenuCommand, and add a BeforeQueryStatus handler method, which we will use to show and enable the command programmatically:
private PasteAsCommentCommand(Package package) { if (package == null) { throw new ArgumentNullException("package"); } this.package = package; OleMenuCommandService commandService = this.ServiceProvider.GetService(typeof(IMenuCommandService)) as OleMenuCommandService; if (commandService != null) { var menuCommandID = new CommandID(CommandSet, CommandId); var menuItem = new MenuCommand(this.MenuItemCallback, menuCommandID); var menuItem = new OleMenuCommand(this.MenuItemCallback, menuCommandID); menuItem.BeforeQueryStatus += MenuItem_BeforeQueryStatus; commandService.AddCommand(menuItem); } }
Next, implement the MenuItem_BeforeQueryStatus method as follows:
private void MenuItem_BeforeQueryStatus(object sender, EventArgs e) { OleMenuCommand pasteCommand = (OleMenuCommand)sender; // hidden by default pasteCommand.Visible = false; pasteCommand.Enabled = false; Document activeDoc = GetDTE().ActiveDocument; if (activeDoc != null && activeDoc.ProjectItem != null && activeDoc.ProjectItem.ContainingProject != null) { string lang = activeDoc.Language; if (activeDoc.Language.Equals("CSharp")) { // show command if active document is a csharp file. pasteCommand.Visible = true; } // enable command, if command is visible and there is text on the clipboard pasteCommand.Enabled = (pasteCommand.Visible) ? Clipboard.ContainsText() : false; } }
And finally, implement the MenuItemCalback method as follows:
private void MenuItemCallback(object sender, EventArgs e) { string comment = string.Format("// {0}", Clipboard.GetText()); DTE2 dte = GetDTE(); try { dte.UndoContext.Open("Paste Text as Comment"); var selection = (TextSelection)dte.ActiveDocument.Selection; if (selection!= null) { selection.Insert(comment); dte.ActiveDocument.Activate(); dte.ExecuteCommand("Edit.FormatDocument"); } } finally { dte.UndoContext.Close(); } }
Build and Test the Solution
- Build the Solution
- Launch the Experimental Instance of VS (CTRL+F5), or (F5 if you want to run under the debugger)
- Create a new C# project, or load an existing one
- Open a C# (.cs) source file in the code editor.
- Copy some text to the clipboard
- Click in the code editor, where you want the comment to be added
- The select the Edit | Paste Special | Paste Text as Comment command to insert the commented text into the source file
Summary
And there you have it. A new custom command, added to the Paste Special menu, that will paste any text copied to the clipboard, formatted as a comment, into your C# source file.
In the event I’ve missed something in the above walkthrough, or the casual reader would rather peruse the source, I’ve published the working sample code to the VSXArcana Repo on GitHub. Enjoy.

