Step by Step Creating a Windows 8 app from Windows Phone App Studio
Windows Phone App Studio now supports the creation of Windows 8 apps in additional to Windows Phone! This post will show you how to generate a Windows 8 app and get it ready to publish.
If you haven’t used Windows Phone App Studio before, you should check out the other resources on our Windows Phone App Studio Resources page which include a post which explains how to build an app using Windows Phone App Studio. Don’t forget if you are in Canada your apps could earn you rewards!
This post will explain how to
- Preview the Windows 8 app
- Change the Windows 8 Splash Screen
- Update the information for publishing the application
- Associate your app with the Windows Store
- Generate the app files for testing and publishing
- Test your app and capture screenshots for publishing
Preview the Windows 8 app
When you have finished building your app. You can preview the appearance of your app as a Windows 8 app, select Windows Preview to change from the Windows Phone preview to the Windows 8 application preview.

A pop up windows will appear giving you a preview of your application as a Windows 8 app.

Changing the Windows 8 Splash screen
Once you are happy with the basic appearance of your app (changed the background color, content, etc, as explained in the previous posts of this series, you need to specify a Windows 8 splash screen background.
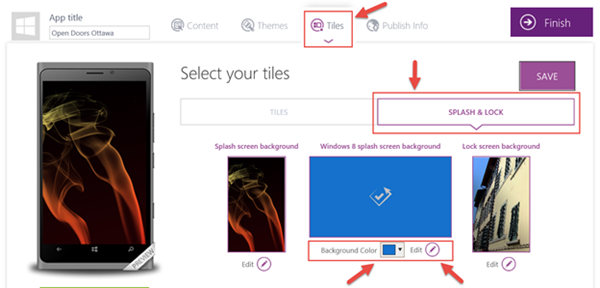
Select Tiles | Splash & Lock. Then you can choose between two splash screen designs.
- Solid color background with the icon you selected for your tiles.
- A photograph as a background.

For a solid color background, simply select the desired background color from the color drop down box.
If you wish to use a photograph as a background, Select Edit and then choose an image to use as a background. The image you use as a splash screen for a Windows 8 app should be 620x300 pixels.

Tip: If the image you want to use isn’t 620x300 pixels, you can resize it using a tool such as MSPaint. You may need to turn off the “Maintain aspect ratio” checkbox if your original image isn’t the same proportions as 620x300 pixels. This may cause the image to be skewed when you resize it, so you may have to play around a bit to find a suitable image that looks good in those proportions.

Updating the information for publishing the application
Now you are ready to specify the information that will affect how the app appears in the Windows store.
Select the Publish Info Tab
Enter the app name
Enter the app name you wish to use when you publish your app to the store. Do give this some thought, the app name is the first indication to a user of what your app can do. There is a nice MSDN article called “What to name your app” with some tips on selecting a good name.
Enter the app description
When a user brings up details of your app in the store, they will see the app description. This is your chance to convince a user that yes your app is the right app to download! The description should make it clear who should use this app and what the app can do. There is an MSDN article with tips on writing a good description “Your apps description”
Select your language
Specify the language of your application. Although it is possible to create multilingual applications for both Windows Phone and Windows 8. The Windows Phone App Studio does not currently give you the ability to create multilingual applications, so you should specify the primary language of the application. If you want to make the app multilingual, you will need to export the source code into Visual Studio and add the necessary language support. For more information see localizing your apps why and how
Specify whether you wish to include an About page for your application
An about page allows the user to see basic information about your app
Specify whether you wish to include advertisements in your application
Advertising is one of the ways you can make money from your application. The more time advertisements spend displayed to users, the more money you earn. However, adding advertisements to your app isn’t quite as simple as flipping the toggle switch to enable ad clients. There are additional steps you must complete to include advertising. The Windows Phone App Studio ‘how to’ describes the additional steps. If this is your first application, I would suggest you get your app working and published, and then you come back and add the advertising later.

Windows Store Association
The Windows Store requires you to reserve your App Name before you submit to the store. Once you have reserved the name the store will assign your application a Package Identity. You need to know this information and your name and ID as the publisher before Windows Phone App Studio can generate a package you can publish for your Windows 8 app.
Once Windows Phone App Studio has that information, it can update a file in the package called the application manifest. That’s why you have the “Associate the App with the Store” in the Publish Info tab within App Studio.
So how exactly do we do all that?
Reserve your app name in the Windows Store
First you will need a Windows Dev Center account. If you are a student, you can get one for free through DreamSpark. If not, you’ll have to pay a registration fee of $20. We won’t look at the exact steps in this tutorial, but you can create an account here. It’s a single store account for Windows Phone and Windows Store
Once you’ve registered and logged in to your account, go to the Dev Center home page. Select Dashboard | Submit an app.

Select App Name

Specify the app name you have selected and select Reserve Name.

If someone else is already using your app name you will have to pick another name. If you have selected a valid app name then you get a message informing you that you can Save to reserve the selected app name.

The app name you just reserved will be your App Display name! Make a note of it.
Get the information from the store needed to associate your Windows Phone App Studio app with this reserved app name.
Find out your app identity.
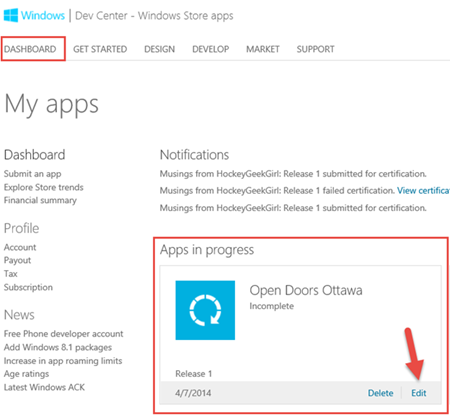
While still in the Windows Store, go to Dashboard, and select Edit for your application

Now select Services from the menu and in the text select Live services site.

Under Application Identity, make a note of the Identity Name it will be something like 1234user.YourAppName. This is your App Identity.

Now go back to the dashboard and select Profile to get your publisher information

In your profile take a note of your publisher id and your publisher name

Associate your Windows Phone Studio app with the Windows Store
Now you have all the information you need to associate your app with the store. Return to Windows Phone App Studio, go to the Publish Info tab and select Associate app with the store.

When you select Associate App with the store, a popup window is displayed. Use the information you just collected from the Windows Store to populate the fields.
- App Identity: This was the App identity you got from the Store Dashboard, when you selected the app you reserved, then selected Edit | Select Services, and selected the “Live Services site”.
- App Display Name: This is the name you defined when you reserve the App name in the store
- Publisher ID: This is the id you got from your Account profile. It should have the following format “CN=AAAAA-1111-2222-BBBBBBBBB”
- Publisher Name: This is the name you got from your Account profile.
Add your privacy policy
Whenever a Windows Store app collects personal information, you must declare a privacy policy. Apps that connect to the internet retrieve the IP address of the person using the app. This information is considered personal, so therefore any Windows Store application that connects to the internet must have a privacy policy. The privacy policy tells the user how the information collected is used by the application.
Here is a link to a post entitled “Windows 8 Certification tips: The privacy statement” . This post tells you more about the privacy statement and how to set up the privacy statement for your application.
Once you have set up a web page (you can set up a free website for your privacy policy using Azure Web Sites). Include the URL for your privacy policy on the Publish Info page in Windows Phone App Studio

Generating the App Publishing Files
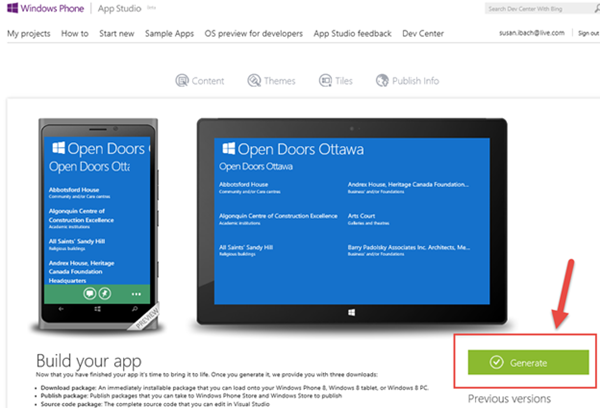
First, open up the app you want to publish in the Windows Phone App Studio browser. It doesn’t matter what page you’re on. Select the Finish button.

This will take you to a page where you can GENERATE your app packages. You’ll notice that there is a section labelled “Previous versions” – currently this is probably blank, because this is the first version you have created.
Select Generate.

A pop up will appear that gives you the choice of generating the code for a Windows Phone app or a package that contains code for a Windows Phone and Windows 8 application.

Once you’ve generated your app, you will see a version listed in the “Previous versions” section. Now, in the main body of the page, you will see three major options:
· Download package – choose this option if you want to download your app to your own phone only. This is useful if you want to use your app yourself without publishing to the store, or if you want to see how it works on your phone before publishing it.
· Download publish package – choose this option to go straight to publishing without changing your code or taking screenshots. If you do not have Visual Studio, this is the option you should take.
· Download source code – choose this option if you want to edit your code or take screenshots using an emulator.
Test your app and capture screenshots for publishing
Now we are going to install the app on our pc, so we can test it and capture screenshots. You will need a screenshot to publish your app to the store.
Install the certificate
First we need to install a certificate so that our PC or laptop will trust the app we are about to install. Expand Pre-requisites and choose Install Windows 8.1 Certificate. Save the downloaded file to somewhere you can find it afterwards. I created a subfolder called AppStudio.

Navigate to the folder and you will find a file called Add-RootCertificate.zip. Select that file and either right click and choose Extract All, or select the file and choose Extract All from the menu to extract the contents of the zip file.

Now right click the file Add-RootCertificate.ps1 and select Run as PowerShell script


You will probably get a prompt warning you that this is a script file that could harm your computer. You must allow the program to run to continue and install the certificate.
When the program runs you will see a window appear asking you to make sure you are logged in as the administrator on your machine. It will prompt you to hit Enter. When you hit Enter, you will receive one or two more warnings, after you select the option to run the script the certificate will be installed.
NOTE: The reason you are getting so many warnings is because PowerShell is a tool system administators often use to change settings on your computer. It’s very useful, but because it can change computer settings, that means if a hacker managed to trick you into running a malicious powerscript file on your computer it could get your computer pretty messed up. As is always the case! Only download and run files from sources you trust!
Install the application
Now we have our certificate installed, we can install our application
Under installable packages select the Windows 8.1 installable package

Navigate to the folder and you will find a file called StoreApp.zip. Select that file and either right click and choose Extract All, or select the file and choose Extract All from the menu to extract the contents of the zip file. Just like you did with the certificate zip file.
Now go into the extracted contents and find the file called App-AddDevPackage.ps1 . This is another PowerShell script, but this one will install your application. Right click on the file and choose Run with PowerShell just like you did with the script that installed your certificate. A window will open as the app runs and after it runs a message will display saying your app has been installed successfully
NOTE: This app is a Windows 8.1 app so you must be running Windows 8.1 to install and run your application.
Run the application and capture screenshots
Now you can run your application. The easiest way to launch your application is to press the Windows Key button on your keyboard and then type the name of your application.


Then select your application from the search results and you can see your app up and running!
When you publish your app you will want a screenshot, you can use the keyboard combination of <Ctrl>+<Shift>+<PrtSc> to get a screenshot to your clipboard. Then open Paint, and choose Paste and now you have your screenshot in Paint where you can save it to use when you publish your application. You many want to create several screenshots showing off different aspects of your application. Here is a screenshot of my application in Windows 8.1

I now have a working application for Windows 8.1 and screenshots so I have everything I need to publish my app to the store! Now it’s your turn!
Comments
Anonymous
April 27, 2014
That's great!!Anonymous
May 01, 2014
Thank you for your clear tutorial. I have crated an app from WP app studio and published in the Windows 8.1 market. Then I did an amendment and trying to update the package. But I got following errors. -- Validation error: You've already used v1.0.0.0 for neutral. Please change the version number and upload again. -- Validation error: Your neutral package must have a version number greater than 1.0.0.0 Could you please assist me how to edit app version number.?Anonymous
May 01, 2014
@SYD Harry - post your question to the Windows Phone support forum - that way you not only get an answer from the team that supports the tool (so if there is a bug they know about it, or if a new feature is needed they know about it) but you also help others who may hit the same error. If you don't get an answer in the next couple of days, then let me know and I will follow up. Here is the URL for the Windows Phone App Studio support forum: social.msdn.microsoft.com/.../homeAnonymous
May 01, 2014
@SYD Harry I found a related post from another developer social.msdn.microsoft.com/.../i-have-a-problem-when-i-try-to-update-my-appAnonymous
May 04, 2014
Hola nose como contactar con alguien de Microsoft para poder desarrollar una APP con ellos mismos si estuvieraís interesados para desarrollarla me gustaria poder contactar con vosotrosAnonymous
May 04, 2014
@Daniel, my Spanish is limited but I think you are asking for two things: how to get started building an app from scratch using code and how to contact me. My twitter handle is hockeygeekgirl. I recommend you check out the Microsoft Virtual Academy where there are some very good online courses for gettings started building apps such as this jump start for Windows 8 apps www.microsoftvirtualacademy.com/.../windows-store-app-development-essentials-with-c-refresh you can also find very good resources at dev.windows.com
