Step By Step Displaying Custom or Open data with Windows Phone App Studio for non coders
No coding required! Want to create an application to share information, but need more than a title, description, and image? In this post you will learn how you can create an app to display Open data or your own custom data with just a browser and without writing a single line of code!
If you haven’t seen Windows Phone App Studio before you may want to check out our Windows Phone App Studio Resources page for tips to help you get started.
In this post we will cover
- Deciding what data to display in your app
- Creating a new app to display your data
- Describing your data
- Entering the data
- Troubleshooting your data import
- Displaying the data in your application
- Adding actions to phone numbers, addresses, and email
In the post Building an apps for non coders, we explored how you could display Youtube videos, RSS feeds, Bing search results, and basic data in an application. But all our data examples assumed you were content using the basic collection data template which provides fields for a title, subtitle, image and description. You may have different data you want to display.
In this post we will explore how you can create your own collection pages and specify exactly what fields you want to include.
Don’t forget if you are in Canada and publish your app before June 1,2014 you can earn rewards through the Developer Movement!
Deciding what data to display in your app
Business data
My sister is co-founder of a running group that helps people train for anything from a 5 km race to an iron man triathlon. She shares running tips, suggested races, as well as details on upcoming clinics. An app would be a great way to share this information with her current runners, and new potential customers.
Any data you own
My husband is quite the chef, he makes a myriad of fabulous dishes. Due to popular demand from friends and family. He has created a Word Document of his best recipes. Every year we add a few new recipes and distribute it. When I describe his awe inspiring and tasty tiramisu recipe inevitably I am asked for the recipe. My husband’s recipes would make a great basis for an application, because anyone who wants his recipes could just download the app, and I can add new recipes as they come along.
Open Data
If you are not familiar with Open Data, it’s a pretty simple concept, cities and governments and various agencies provide access to data files on everything from parking lots, to election results, to water quality test results. A quick bing search for “Open Data Ottawa, Open Data Australia, Open Data Edmonton” will allow you to find hundreds of different data sets you could use for your application.
Windows Phone App Studio allows you to import data from CSV (Comma Separated Variable) files. This is significant, because when you look at Open Data websites you will notice that the different data is available in different format. Your life will be easier if the data set you select is available as an Excel spreadsheet or as a .csv file.

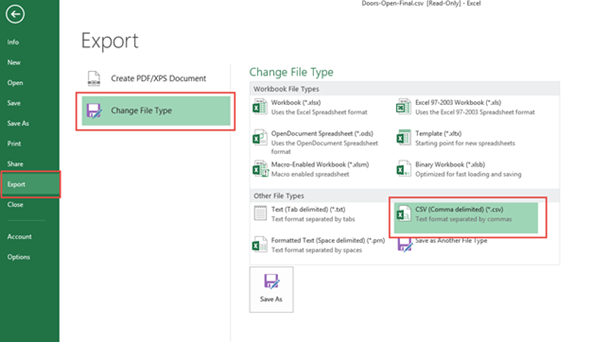
Windows Phone App Studio allows you to import data in a csv file into an application. Excel files can easily be converted to a csv file. In Excel 2013 you would choose File | Export | Change File Type | CSV to save the contents of an Excel file to a csv file. In earlier versions of Excel it might be an option under File | Save as.
Creating a new app to display the data
Log in to Windows Phone App Studio, and create a new app using the Empty App Template

You will see a pop up window with more information about the selected template. Select Create to start building your application

You now have an application with no pages at all. We saw how to add RSS, Flickr, Youtube, and Bing pages in the post Step By Step How to build an app using Windows Phone App Studio. Now we are going to learn how to add customized data using the collection pages. Add a new Collection page to your app.

When you add a new collection section:
Enter a name for your new collection
Select either static or dynamic resources. This is an important decision!
- Static resources – your app will work when the user has no internet connection or data connection because the data will be stored within the application itself. The drawback is if you want to put new data in the application, you will have to update the app and publish a new version of the application to the store
- Dynamic resources – your app will fetch the data from the cloud when the user runs the application. That means you can add new data any time you want and the user will see the new data the next time they run the application. The drawback is the user cannot see the data unless they have internet access.
Select Create new to start adding the data fields you want to your application.

Describing your data
When you click Create new, a blank line will be added to the table where you specify information about the data you plan to display.
Name – is the name of the field you want to display. The name cannot contain any spaces.
ColumnType – is the type of data you will display in the field. You can choose between text, song, phone, email, image, artist, album, and address. Most of your data will probably be text, however, selecting specific column types can give you the ability to provide additional functionality to your application. For example:
- Address –Gives the user the ability to tap a field and see the address on a map
- Email – Gives the user the ability to tap on that email address and send an email to that user
- Phone – Gives the user the ability to tap on that phone number and place a call to that number
Multiline – indicates if the data displayed in this field may wrap across multiple lines on the screen (descriptions, comments, or even long names should have Multiline set to true
Add a row for each field of data you want to display. I have decided to build an app for Open Doors Ottawa, an annual event where you can visit different interesting buildings across the city. There is an open data set available with the data in CSV format.
If you are planning to import the data from a CSV or Excel file
- List the fields in the same order that they appear in your file
- Make sure the column headings are the same in your import file as they are in your data fields
- Make sure the CSV file uses semi-colons to separate the data (further down in this guide, within the importing data troubleshooting tips the steps to change from “,” to “;” for a CSV file are listed)
- Do a search within your data for “;” characters which might be misinterpreted as field separators and replace them with a different character.

Entering the data
After you have listed all your fields it is time to add the data itself. To do that, save your changes and then select Edit Data.

Now you have two ways to specify the data to display in your app.
Type the data in manually.
Select Create New to create a new row of data, you will see all the fields you defined listed. Just type in values for each of the fields. Each time you want to add a new row, select Create new again. Select Save every few rows, just in case you make a data entry error. It’s easier to figure out which of 3 rows has the error than which of 30 rows has the error.

Import the data from a CSV file
Often it is easier to import the data from a CSV file. You could type the data into an Excel Spreadsheet and then save it as a CSV file to import, or you could use an existing CSV file from a system or open data set.
I have a CSV file showing all the locations for the Ottawa Open Doors event that I downloaded from the City of Ottawa open Data site. I have deleted a few columns of data I don’t wish to display in the app.
When I start, my spreadsheet looks like this. Over the course of developing the app I may delete columns I don’t want to display, or reformat some fields.

I save it as a CSV file using the Export feature in Excel 2013.

I select Import Data from a CSV file

Because the first row of my file contains column headers I move the slider to indicate the first row is header information and not data.
Then I select Confirm

I see the Windows Explorer open so I can navigate to and select the .csv file containing the data I want to import then select Open.

NOTE: If your file contains a lot of data, be patient! You may spend a little time staring at the screen with the Confirm button while the data is loaded. You may want to create a test file with only two or three rows of data and make sure you can import that before you try to import all your data.
If you are lucky your screen will come back showing the data nicely loaded correctly in each field, something like this:

Troubleshooting your data import
Do your column headers match the column names in the application?
If you have column headers in your CSV file the column names must match the names of the columns you created in the application. If not you will see empty rows imported with no data displayed.
Is your data separated by commas or semi-colons?
If you are like me, you may find that you just get a bunch of blank rows instead! If that happens, chances are your CSV file is using commas instead of semi-colons to separate the fields. That is what happened to me. I had to use Delete All rows to delete the blank rows and try again.
To check if your CSV file is using commas or semicolons you can browse to the file in Windows Explorer. Right click on the file and choose Open With | Notepad.

When I opened my file I discovered that commas were used to separate the fields. The Windows Phone App Studio tool expects semi-colons. That’s why I seem to end up with a table of empty rows.

After a little digging, I discovered Excel decides whether to use commas or semi-colons based on your Regional Settings in Control Panel. So I had to open Control Panel and select Clock, Language, and Region.

Then I select Change date, time, or number formats from the Region settings.

Then select Additional settings to reach the property that controls list separators

Now you can change the List separator to a semi colon

Now save your CSV file in Excel again and try once again to import the file.
Data is imported but not lined up in fields properly
Once I got my CSV file formatted correctly with semi-colons as separators I imported the data but I could see that the data was sort of messed up. The values in the start time field are obviously NOT start times.

When I open up my data I discovered that my original data contained some special characters, including semi-colons. So I have to use <CTRL><F> search and replace in Excel to replace those semi-colons with something else so that the semi colons that happen to appear in my data are not interpreted as field separators.
In my case double quotes were appearing as the string “"” within my data file so all I did was replace all occurrences of " with a double quotes symbol.

You import the data and it looks like nothing happened
Sometimes I select a file to import and I am brought back to the screen and it looks like nothing happened at all: no error messages, no data imported, just a blank screen with no data.

I suspect this is some sort of time-out issue, because what I discovered was if you return to the previous screen by selecting the arrow beside Edit Collection Data and come back again it works. You might be prompted to log in when you switch between screens (that’s why I think it may be some sort of time-out)
Displaying the data in your application
Now that you have the data loaded you can Save your changes and add pages to your application to display the data.
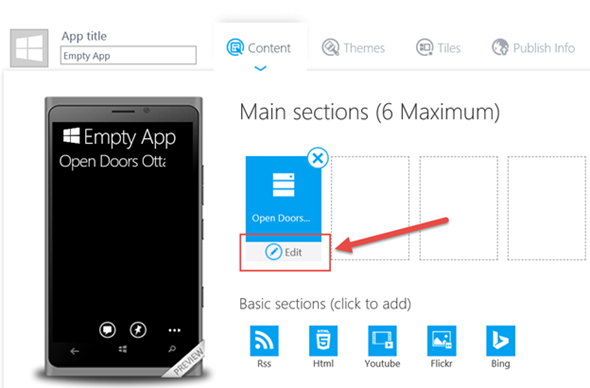
Return to the main sections editor page and select Edit for the collection that now contains data.

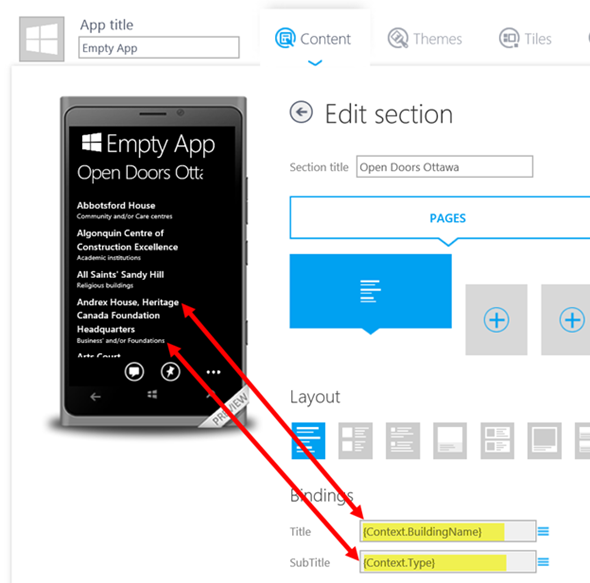
This will bring you to the section editor.
When a user views a section the first page they see is a list of all the records available. In my case it would be a list of all the different buildings you can visit during Open Doors Ottawa. Then you would navigate to another page or pages to see the details about that specific building.
The first page layout you must design will be the page that lists all the records. You have to decide which layout you like. After you pick a layout, then you have to decide which fields from the record will be displayed in the list using the Bindings.

After you select a layout and set your bindings, you can see how the page will appear in the preview

When a user selects a particular entry from the master page they will be brought to the detail pages. Now we have to add the detail pages to provide more information about the building selected. Select the “+” symbol in the Pages to add a new detail page.

After you add a detail page, choose a layout, and use the Bindings to specify what data will be displayed on the page. In the example below I have created a page to show a description of the building. Ignore the Action fields for now. We will examine that a little later.

You can add additional detail pages to display the remaining information, I have added pages for the location, hours, and contact information.
Remember when I was picking the column types for my fields? I mentioned certain fields provide additional functionality to the user! On my address page I display the address field which is stored in a field with the Address Column Type. On my contact page I display a phone number and an email address which are stored in fields with the Phone and Email Column types respectively.
Let’s see how this app would now appear to a user
 |
 |
 |
Adding actions to phone numbers, email and addresses
Now I want to add a little more functionality! Remember how I mentioned when we chose our column types, that certain column types would allow us to let the user tap on the fields to perform actions? Well I have a Phone number, and Address and an email address. So I am going to add Actions to those fields in the application in the detail page editor.

Now when I go to the Location and Contact pages, the user sees additional icons. If they select the field beside the icon the application will perform the action I defined in the detail pages (call the number, look up an address, or email a contact)
 |
 |
Don’t forget you can edit the colors, theme, add a background photo, add options like Share, pin, and read text to your application as well. This is documented in the Step By Step how to create an application in Windows Phone App Studio so I won’t repeat everything here!
You now have the ability to build and publish useful applications for Windows Phone 8 (and Windows 8 as well since Windows Phone App Studio now generates both but more on that in another post!)
Don’t forget if you are in Canada and publish your app before June 1,2014 you can earn rewards through the Developer Movement!
Comments
Anonymous
September 09, 2015
Hello, Is there a way to add one or more blank fields that can be filled by the user of the app ? I wan to give an app for contacts but each user can fill his own contractnumber and or other fieldsAnonymous
September 10, 2015
Hi Marc, Unfortunately this tool isn't really designed for that sort of user interaction, it's more of a tool for building apps that provide data to users. You have a few options, you could take the completed code from App studio and open it in visual Studio to add the extra pages and code for contact information. Or you could look into another tool for building the app such as Cordova or Touch develop.
