Project Silk jQuery UI Widget QuickStart
Project Silk provides guidance for building cross-browser Web applications with a focus on client-side interactivity. These applications take advantage of the latest Web standards like HTML5, CSS3 and ECMAScript 5 along with modern Web technologies such as jQuery, Internet Explorer 9 and ASP.NET MVC3.
This Widget QuickStart illustrates the way Project Silk uses the jQuery UI widget factory to create maintainable components that implement client-side behavior. The approach used in this QuickStart is often referred to as progressive enhancement.
Business Scenario
Our team has been asked to enable cross-browser, keyword lookup with hyperlinking to popular Internet websites. This feature will need to be added dynamically to all company web pages.
Another team has been tasked with tagging the web page keywords. The words will be dynamically tagged based on server-side business logic driven by agreements with 3rd parties.
The focus of this QuickStart will be enabling the client-side behavior for the tagged keywords. When a user hovers over a keyword, the browser will display a popup of popular links for that keyword from the delicious.com bookmarking service.
Walkthrough
To interact with the completed scenario, follow the below steps:
Open the default.htm file using Internet Explorer 9. After the file's content is displayed you'll need to click on the "Allow block content" button at the bottom of the browser window. This is a security feature of Internet Explorer 9.
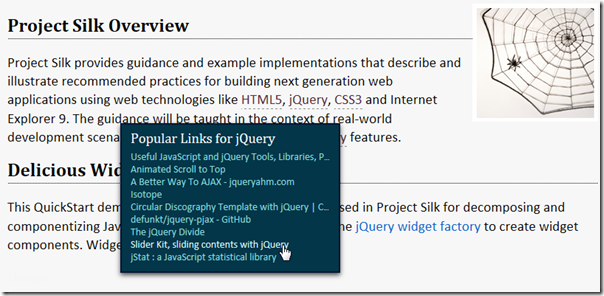
After allowing blocked content, you'll notice the keywords have a new color and have been underlined with a dash line as pictured below.
Using your mouse, hover over an underlined keyword. A popup with the top 10 most popular links for that keyword will be displayed. Notice the keyword has been repeated in the title of the popup.
- One second after moving your mouse away from the keyword, the popup will close unless your mouse is within the boundary of the popup.
- If the keyword is on the left side of the page the popup will open to the right of the mouse. If the keyword is on the right side of the page the popup will open to the left side of the mouse as in the below image.
Move your mouse over the popup. You can now click on a link. When clicked, a new browser window will open and navigate to the URL of the clicked link.
Moving your mouse out of the popup boundary will cause the popup to be closed.
Conceptual View
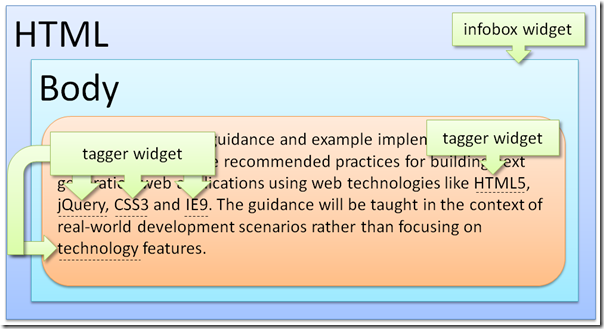
This section graphically illustrates the relationship of the jQuery UI widgets to the HTML page elements.
The image below shows a single infobox widget attached to the page's body element. Additionally, a tagger widget has been attached to each keyword.
The below HTML reveals a keyword tagging strategy that leverages HTML5 data attributes. Each of the keywords has been wrapped in a span tag with the data-tag data attribute applied. For our scenario imagine the keyword wrapping was accomplished on the server-side.
 <!DOCTYPE html>
<html>
<head>
  <title>Project Silk: Delicious Widget QuickStart</title>
  <link rel="stylesheet" href="style.css" />
  <meta http-equiv="X-UA-Compatible" content="IE=9">
</head>
<body>
  <div id="container">
    <img src="projectsilk.png" />
    <h1>
      Project Silk Overview</h1>
    <p>
      Project Silk provides guidance and example implementations
      that describe and illustrate recommended practices for
      building next generation web applications using web
      technologies like <span data-tag>HTML5</span>,
      <span data-tag>jQuery</span>, <span data-tag>CSS3</span>
      and Internet Explorer 9. The guidance will be taught in
      the context of real-world development scenarios rather
      than focusing on <span data-tag>technology</span>
      features.</p>
Attaching Widgets
Widgets are attached to HTML elements. When a widget is attached its options can also be set.
 (function ($) {
  $('body').infobox({
    dataUrl: 'https://feeds.delicious.com/v2/json/popular/'
  });
  $('span[data-tag]').tagger();
} (jQuery));
The above code demonstrates the infobox widget being attached to the body element. The dataUrl option value will be used when performing popular keyword link look-ups.
The jQuery selector 'span[data-tag]' returns a jQuery wrapped set that contains all span tags with a data-tag attribute. Think of a jQuery wrapped set as a collection or an array. A tagger widget will be attached to each of the span tags in the returned collection.
Widget Initialization
When created, the jQuery UI widget factory will call the private method _create. This method provides the developer an opportunity to perform widget setup actions. Examples include building and injecting markup, adding CSS classes, binding events, etc.
 _create: function () {
  var self = this;
  self._targetElement = $('<div class="qs-info-box" />');
  $('body').append(self._targetElement);
  self._targetElement.hover(
    function () {  // mouseenter
      self._isMouseOver = true;
    },
    function () {  // mouseleave
      self._isMouseOver = false;
      self.hideTagLinks();
    }
  );
}
The above code snippet first sets up a closure for this called self, so that the widget can be referenced in the hover event handlers.
Recall that the infobox widget is attached to the body element; however, it currently has no UI element in the DOM to work with. The element div.qs-info-box will contain the UI for this widget. It will be stored in the _targetElement variable and attached to the body element. Now the infobox widget has a DOM element it can reference, manipulate, and attach event handlers to.
The hover behavior is defined by two functions. The first function is the mouseenter event handler and the second function is the mouseleave event handler.
Widget Interactions
An interesting challenge with this scenario is giving the user time to click the links without showing the popup longer than needed. The implementation requires coordination between the two widgets.
Mouse Entering a Keyword
When the mouse enters the keyword span, the mousenter event handler in the tagger widget is invoked.
 function (event) {  // mouseenter
  clearTimeout(timer);
  screenWidth = window.innerWidth;
  if (event.pageX > screenWidth / 2) {
    offsetX = -270;
  }
  self._locatedInfoBox.infobox('displayTagLinks',
                              $(this).text(),
                              event.pageY + offsetY,
                              event.pageX + offsetX);
}
The following describes the steps to displays the keyword links within the popup ( _targetElement) in the above code.
clearTimeout - This clears the timer created when the mouse previously left the keyword.
Calculate the horizontal offset depending on the location of the mouse relative to the center of the screen.
Pass the keyword text and X,Y positions for the popup to the displayTagLinks functionon the infobox widget.
Inside the displayTagLinks function, the URL is augmented with the keyword text in preparation for the Ajax request. The maximum number of items to be returned is also included in the URL according to the requirements of the delicious.com service as seen in this line of code:
url = this.options.dataUrl + tag + '?count=' + self.options.maxItems;On successful completion of the Ajax call, the contents of the popup are constructed and applied to the _targetElement using its jQuery html function. Before showing the popup with the show function, the position is set using the jQuery css function. You can see this in the _displayResult function below, which is called by the success and error Ajax handlers.
 _displayResult: function (element, html, top, left) {
  element.html(html);
  element.css({ top: top, left: left });
  element.show();
}
The Ajax error condition behaves in a similar fashion except an error message will be display in lieu of the links if an Ajax error occurs.
Mouse Leaving a Keyword
When the mouse leaves the keyword span, a 1000 millisecond delay is set to call the hideTagLinks function on the infobox widget. The popup is only hidden if the mouse is not over it. Effectively, the 1000ms delay provides the user time to move the mouse from the keywords to the links.
 hideTagLinks: function () {
  if (!this._isMouseOver) {
    this._targetElement.hide();
  }
}
Mouse Entering the Popup
Internally the infobox widget maintains state about whether the mouse is over the popup or not using the _isMouseOver property.
When the mouse enters the popup, _isMouseOver is set to true.
 function () {  // mouseenter
  self._isMouseOver = true;
}
Mouse Leaving the Popup
When the mouse leaves the popup, _isMouseOver is set to false and hideTagLinks is invoked.
 function () {  // mouseleave
  self._isMouseOver = false;
  self.hideTagLinks();
}

hideTagLinks: function () {
  if (!this._isMouseOver) {
    this._targetElement.hide();
  }
}
Download
The source code and Microsoft Word document version of the blog post can be downloaded at: https://silk.codeplex.com/releases/view/64272
More Information
You may find the following links useful in your investigation of the jQuery UI widget factory:
- https://jqueryui.com/docs/Developer_Guide
- https://wiki.jqueryui.com/w/page/12138135/Widget-factory
- https://www.erichynds.com/jquery/tips-for-developing-jquery-ui-widgets/
- https://bililite.com/blog/understanding-jquery-ui-widgets-a-tutorial/
Comments
Microsoft values your opinion about our products, guidance, documentation and samples. You can leave feedback on this blog post or on the The Project Silk site at: https://silk.codeplex.com/releases/view/64272
Thank you for your feedback and have a great day,
Karl Shifflett


