Create your backlog in Azure Boards
TFS 2018
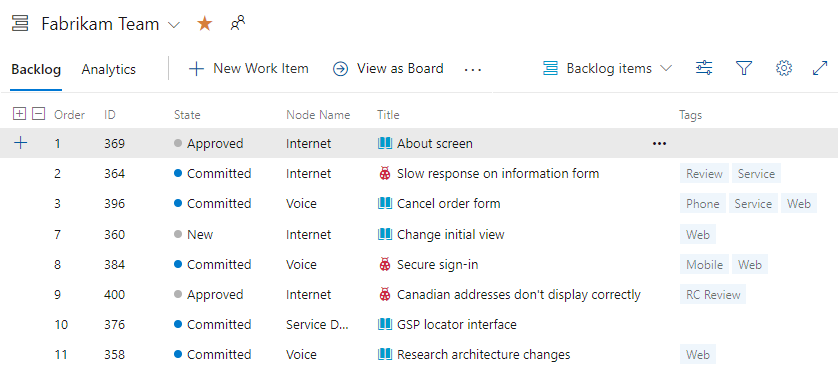
The product backlog is your project plan, which shows what your team intends to deliver. It contains user stories, backlog items, or requirements that you add to it. Your backlog is a flat list of work items, as the following image illustrates, which shows a Scrum process for Azure DevOps Services. For the Agile, Basic, and CMMI process models, the Backlog items selection appears as Stories, Issues, and Requirements.
Prerequisites
When you create a project or a team, backlogs get created automatically. Each team has access to their own product, portfolio, and sprint backlogs.
| Prerequisite | Description |
|---|---|
| Project Administrator or Contributor member | You must be added to a project as a member of the Contributors or Project Administrators security group. |
| Stakeholder access | To add or modify work items, you must be granted Stakeholder access or higher. |
| Contributor member or Allow perms on | To view or modify work items, you must have your View work items in this node and Edit work items in this node permissions set to Allow. By default, the Contributors group has this permission set to Allow. For more information, see Set permissions and access for work tracking. |
| Defined iterations | To use the Planning pane, your team administrator must define iteration (sprint) paths and configure team iterations. |
Add a backlog
If you have a project, you have a backlog. Your backlog contains a list of features and requirements that you want to build, ordered by priority. By default, each project has a team and a set of backlogs for that team. You can add more backlogs if you need to support more teams. When you create a new team, you also create various team assets that a team admin can customize to suit the team’s workflow. To add a set of backlogs to support a new team, see Add a team.
Each team's set of backlogs is associated with one or more work item types. The work item type associated with a backlog depends on the process selected at project creation, team configurations, and process customizations.
The backlogs defined for each default process are:
- Agile: Stories, Features, and Epics
- Scrum: Backlog items, Features, and Epics
- CMMI: Requirements, Features, and Epics
To customize your backlogs to add custom work item types, add portfolio backlogs, or other supported options, see On-premises XML process model.
Open your backlog
From your web browser, do the following steps to open your product backlog.
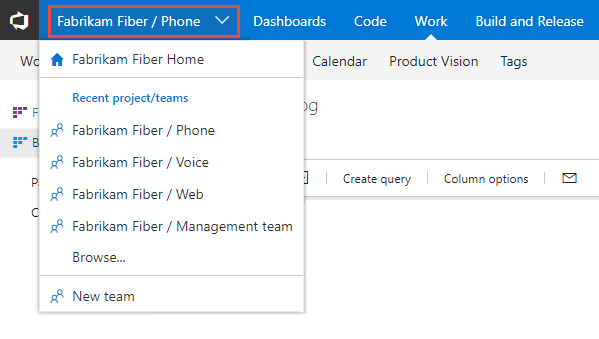
On your web browser, open your team's product backlog and select the team from the project and team selector. Then select Work > Backlogs. Select the product backlog, which is Backlog items for Scrum, Stories for Agile, or Requirements for CMMI.
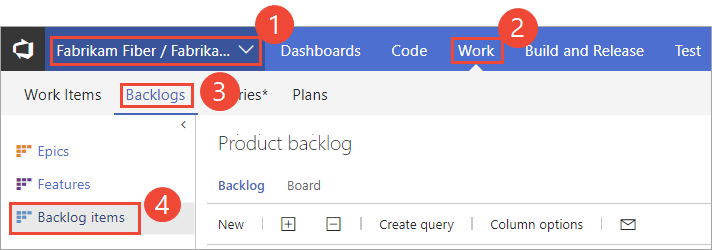
To select another team, open the project and team selector. Select a different team, or select the Browse option.
Track bugs on your backlog
Some teams like to track bugs along with requirements on the backlog. Other teams like to track bugs as tasks completed in support of a requirement, so that bugs appear on their Taskboard. Before you determine how to manage bugs, see Configure and customize, Treat bugs as requirements or tasks and Show bugs on backlogs and boards.
Convert ideas into backlog items
Your backlog shows work that you plan to do or that's in progress. As soon as the State of a work item is set to Done or Completed, the work item doesn't show on your backlog. You can use the backlog controls to filter or change your view.
If you already defined a long list of items, you don't have to reenter them one at a time. Instead, use Import or update work items in bulk by using CSV files or Microsoft Excel to quickly import them to your backlog.
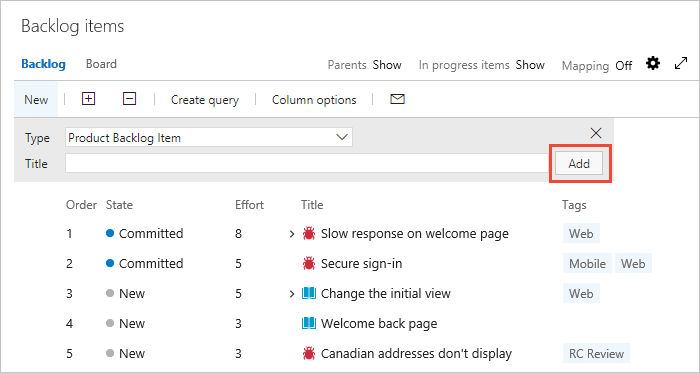
To build your backlog, enter a title and select Add. If you don't see the Add link, select New to open the quick add panel. Optionally, set In progress items to Show or Hide. Work items are automatically assigned the default Area Path and Iteration Path selected for the team. For more information, see Configure team settings.
Note
If you have Stakeholder access , you can only add work items to the bottom of the backlog. For more information, see Stakeholder access quick reference.
Repeat this step until you capture all your main ideas.
Depending on whether you create your project with Basic, Agile, Scrum, or CMMI, the items in your backlog might be called issues, user stories, PBIs, or requirements. All three are similar, as they describe the customer value to be delivered and the work to be performed.
By default, user stories appear on Agile backlogs, issues on Basic backlogs, PBIs and bugs appear on Scrum backlogs, and requirements appear on CMMI backlogs.
Reorder your backlog
Reorder your items to create a prioritized list of work. Review and prioritize your backlog frequently to help your team know what's most important to deliver next.
You can't sort your backlog on a column. To view a sorted listed, select Create query. Save and open the query, and then sort the query results. To learn more about queries, see Use the query editor to list and manage queries.
To reorder your backlog, drag the work items. Or, if you prefer to use the keyboard, hold down the Alt key and use the up and down arrows.

Note
To reorder a backlog, you must have Basic or higher level access. If you have Stakeholder access, you can't reorder backlog items. For more information, see Stakeholder access quick reference.
Backlogs that participate in portfolio management or that contain nested same-type child items might not allow you to reorder the items. For more information, see these articles:
- Backlogs, portfolios, and Agile project management, Work with multi-team ownership of backlog items
- Fix reordering and nesting issues
Add details and estimates to backlog items
Building and prioritizing your backlog provides a high-level roadmap. Before your team can start work on any item, however, they need more details. Capture the details within the work item form.
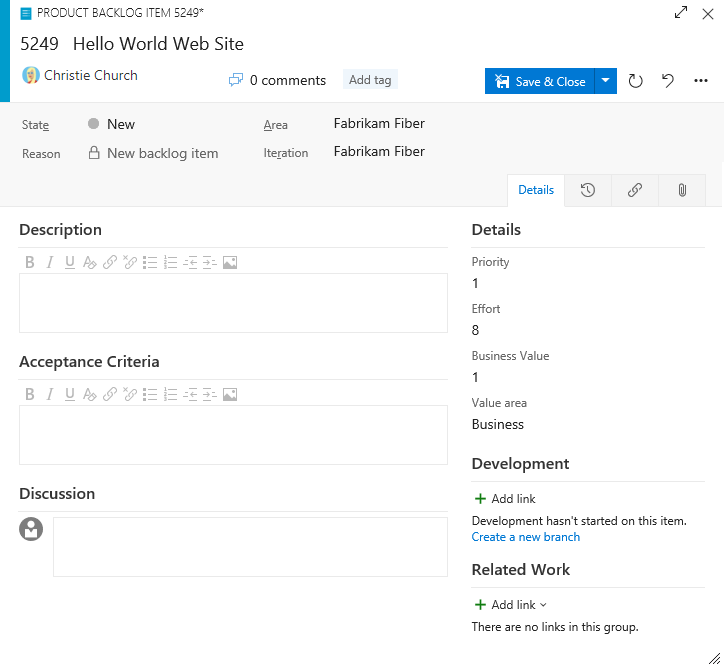
To open each item, double-click or press Enter. Then add all the information you want to track. Change one or more field values, add a description, or make a note in the Discussion section. You can also choose the ![]() Attachments tab and drag a file onto it to share the file with others.
Attachments tab and drag a file onto it to share the file with others.
Enter as much detail as the team needs to do the following tasks:
- Understand the scope
- Estimate the work required
- Develop tests
- Ensure that the end product meets acceptance criteria
Note
You can only assign work to a single user. If you need to assign work to more than one user, add a work item for each user and distinguish the work to be done by title and description. The Assigned To field only accepts user accounts that have been added to a project or team.
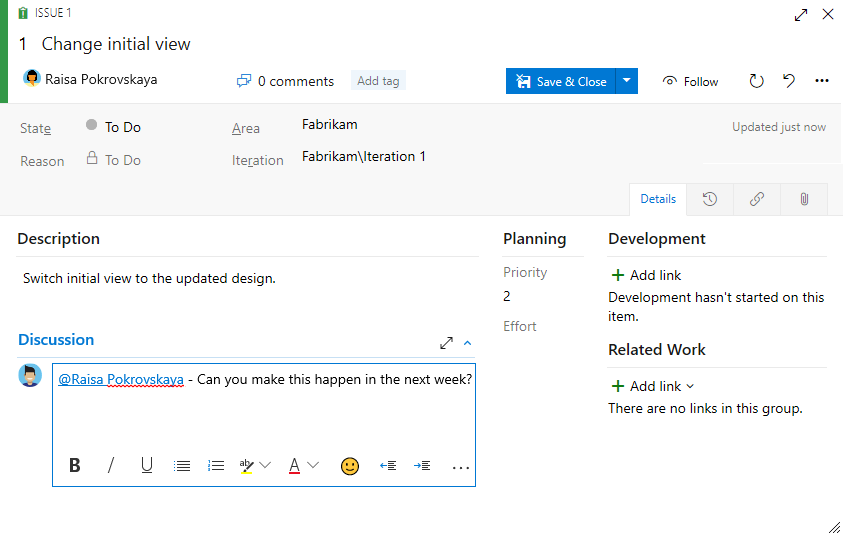
For example, here we assign the story to Raisa Pokrovskaya and we add a discussion note, at-mentioning Raisa.

Select Save & Close when you're done.
To plan a sprint, at a minimum, estimate the effort involved to implement each backlog item. To capture effort in the work item form, use Effort for Basic or Scrum, Story Points for Agile, or Size for CMMI.
Field
Usage
Provide a relative estimate of the amount of work required to complete a PBI. For user stories and requirements, you capture estimates in Story Points and Size.
Most Agile methods recommend that you set estimates for backlog items based on relative size of work. Such methods include powers of 2 (1, 2, 4, 8) and the Fibonacci sequence (1, 2, 3, 5, 8, and so on). Use any numeric unit of measurement your team prefers.
The estimates you set for Effort, Size, or Story Points are used to calculate velocity and forecast sprints.
Specify a priority that captures the relative value of a PBI compared to other PBIs. The higher the number, the greater the business value.
Use this field when you want to capture a priority separate from the changeable backlog stack ranking.
Provide enough detail to create shared understanding of scope and support estimation efforts. Focus on the user, what they want to accomplish, and why. Don't describe how to develop the product. Do provide sufficient details so that your team can write tasks and test cases to implement the item.
Define what "Done" means by describing the criteria for the team to use to verify whether the PBI or the bug fix is fully implemented.
Before work begins on a PBI or bug, describe the criteria for customer acceptance as clearly as possible. Have conversations between the team and customers to determine the acceptance criteria. These criteria help ensure a common understanding within the team to meet customers' expectations. Also, this information provides the basis for acceptance testing.Impact Assessment (CMMI only)
Describes the customer impact of not implementing the requirement. You might include details from the Kano model about whether this requirement is in the surprise, required, or obvious categories.
Show or hide In Progress Items
Choose In progress items show or hide In Progress backlog items. If you turn the In Progress items control off, then items that are in the Active, Committed, or Resolved states or states that map to the In Progress category state don't appear in the backlog.
You'd likely choose to hide In Progress items when you want to forecast work. For more information, see Forecast your product backlog.
Your product backlog is one of three classes of backlogs available to you, backlogs, boards, and plans. If you don't see the work items you expect on your backlog, see Set up your backlogs and boards.
Next steps
With your backlog in place, your team can begin work on the top-priority items. Now it's time to decide how you want to work as a team. Do you want to use Scrum or Kanban? You can use these methods independently or together.
Teams who want the least overhead for tracking and estimating might prefer Kanban. Teams who like to work at a steady cadence and plot the details of their sprint plan might prefer Scrum and sprint planning.
