Publish symbols with Azure Pipelines
TFS 2018
With Azure Pipelines, you can publish your symbols to Azure Artifacts symbol server using the Index sources and publish symbols task. You can use the debugger to connect and automatically retrieve the correct symbol files without knowing product names, build numbers, or package names. Using Azure Pipelines, you can also publish your symbols to files shares and portable PDBs.
Note
The Index sources and publish symbols task is not supported in release pipelines.
Publish symbols to Azure Artifacts symbol server
Sign in to your Azure DevOps organization, and then navigate to your project.
Select Pipelines, select your pipeline, and then select Edit to modify your pipeline.
From your pipeline definition, select
+to add a new task.Search for the Index sources and publish symbols task. Select Add to add it to your pipeline.
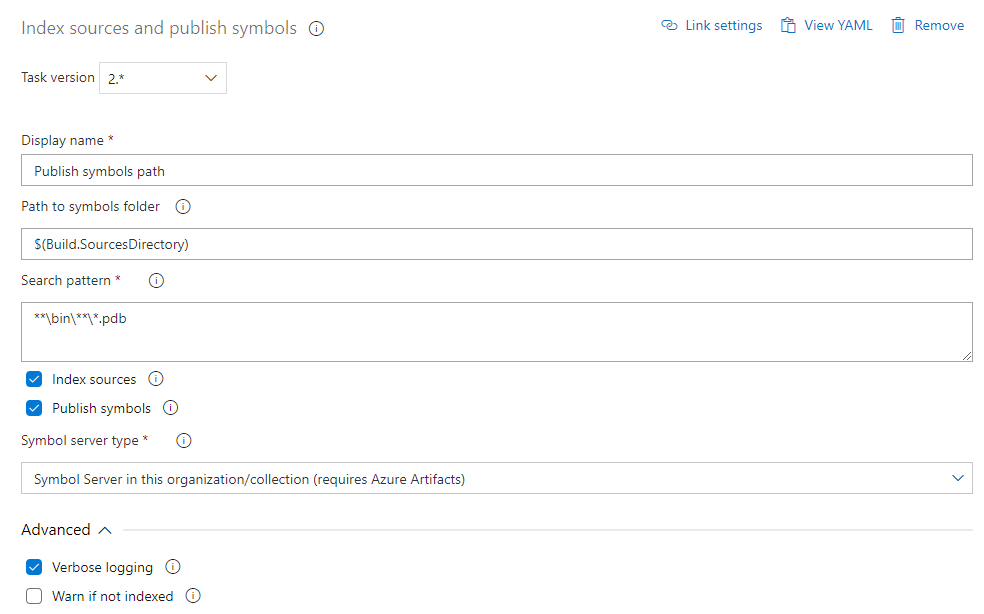
Fill out the required fields as follows:
Task version: 2.\*.
Display name: task display name.
Path to symbols folder: path to the folder hosting the symbol files.
Search pattern: the pattern used to locate the .pdb files in the folder you've designated under Path to symbols folder. Single-folder wildcard (
*) and recursive wildcards (**) are both supported. Example: *\bin**.pdb: will search for all .pdb files within all subdirectories named bin.Index sources: indicates whether to inject source server information into the PDB files.
Publish symbols: indicates whether to publish the symbol files.
- Symbol server type: select Symbol Server in this organization/collection (requires Azure Artifacts) to publish your symbols to Azure Artifacts symbol server.
Verbose logging: include more information in your logs.
Publish symbols to a file share
Aside from Azure Artifacts symbol server, you can also publish your symbols to a file share using the Index Sources and Publish Symbols task.
Sign in to your Azure DevOps organization, and then navigate to your project.
Select Pipelines, select your pipeline, and then select Edit to modify your pipeline.
From your pipeline definition, select
+to add a new task.Search for the Index sources and publish symbols task. Select Add to add it to your pipeline.
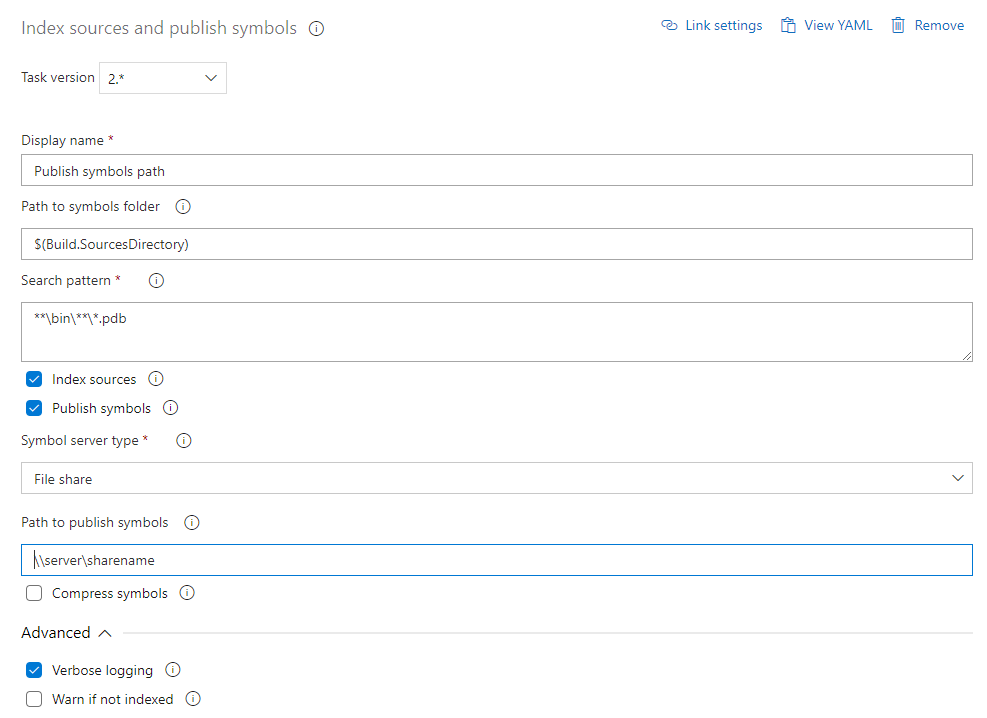
Fill out the required fields as follows:
Task version: 2.\*.
Display name: task display name.
Path to symbols folder: path to the folder hosting the symbol files.
Search pattern: the pattern used to locate the .pdb files in the folder you've designated under Path to symbols folder.
Index sources: indicates whether to inject source server information into the PDB files.
Publish symbols: indicates whether to publish the symbol files.
- Symbol server type: select File share to publish your symbols to a file share.
- Path to publish symbols: the file share that will host your symbols.
Verbose logging: check to include more information in your logs.
Publish portable PDBs to Azure Artifacts symbol server
Portable PDBs are symbol files that can be created and used on all platforms unlike the traditional PDBs which are used on Windows only. For portable PDBs, the build does the indexing, but you still need to use the Index Sources and Publish Symbols task to publish your symbols.
Use Source Link in .NET projects
Source Link is a set of tools that allow developers to debug their source code by mapping from the .NET assemblies back to the source code. Check out the dotnet/sourcelink GitHub repository to learn about the different packages included.
For projects hosted on GitHub, add the
Microsoft.SourceLink.GitHubpackage reference to your project file.<ItemGroup> <PackageReference Include="Microsoft.SourceLink.GitHub" Version="1.1.1" PrivateAssets="All"/> </ItemGroup>For projects hosted on Azure Repos (former Visual Studio Team Services), add the
Microsoft.SourceLink.AzureRepos.Gitpackage reference to your project file.<ItemGroup> <PackageReference Include="Microsoft.SourceLink.AzureRepos.Git" Version="1.1.1" PrivateAssets="All"/> </ItemGroup>For projects hosted on Azure DevOps Server (former Team Foundation Server), add the
Microsoft.SourceLink.AzureDevOpsServer.Gitpackage reference to your project file.<ItemGroup> <PackageReference Include="Microsoft.SourceLink.AzureDevOpsServer.Git" Version="1.1.1" PrivateAssets="All"/> </ItemGroup>
Set up the publish task
The Index Sources & Publish Symbols task is used to index your source code and publish your symbols to Azure Artifacts symbols server and file shares. Because we're using Source Link, we'll have to disable indexing in the publish task.
Sign in to your Azure DevOps organization, and then navigate to your project.
Select Pipelines, select your pipeline, and then select Edit to modify your pipeline.
From your pipeline definition, select
+to add a new task.Search for the Index sources and publish symbols task. Select Add to add it to your pipeline.
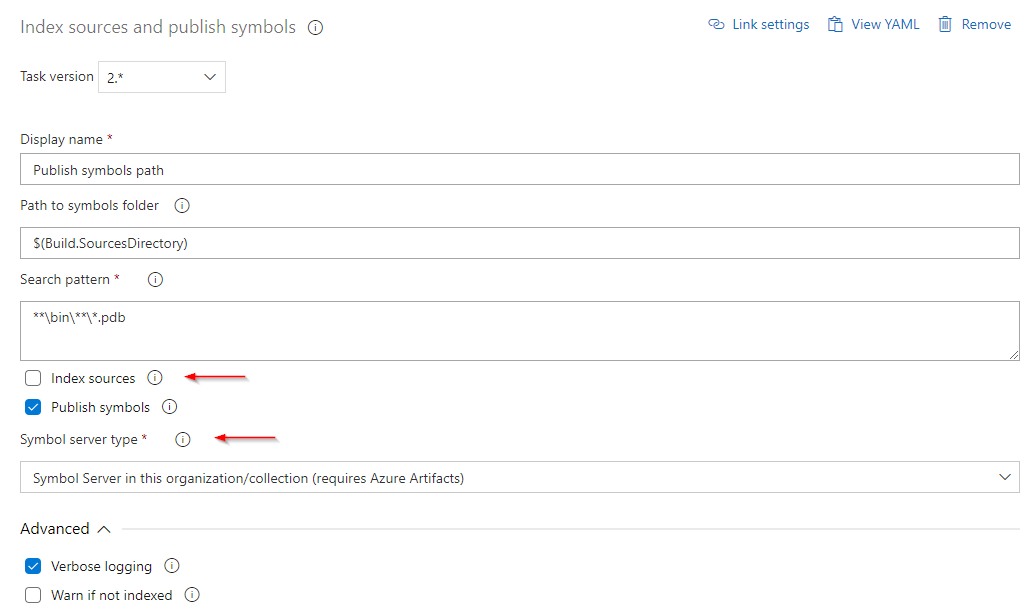
Fill out the required fields and select Symbol Server for the Symbol server type. Make sure you uncheck Index sources to disable indexing.
Important
To delete symbols published via the Index Sources & Publish Symbols task, you must first delete the build that generated those symbols. This can be accomplished by using retention policies or by manually deleting the run.
Set up Visual Studio
Note
Visual Studio for Mac does not support debugging using symbol servers.
Before starting to consume our symbols from Azure Artifacts symbol server, let's make sure that Visual Studio is set up properly:
In Visual Studio, select Tools then Options.
Select Symbols from the Debugging menu.
Select the
+sign to add a new symbol server location.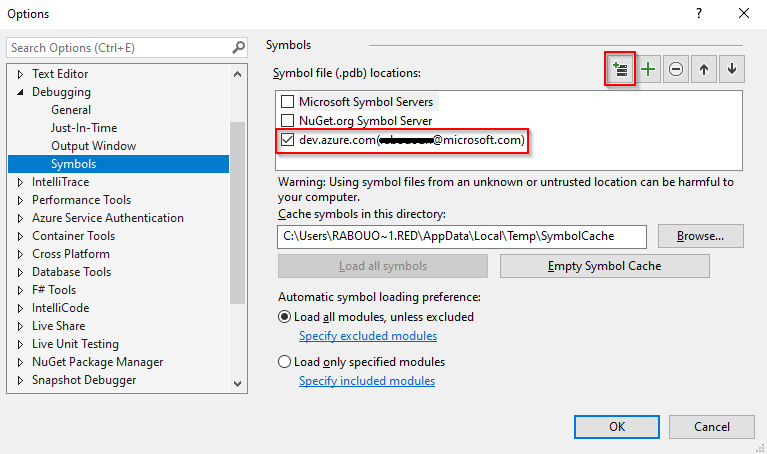
A new dialog box will appear, select your account from the dropdown menu, and then select the organization that you wish to connect to. Select Connect when you're done.
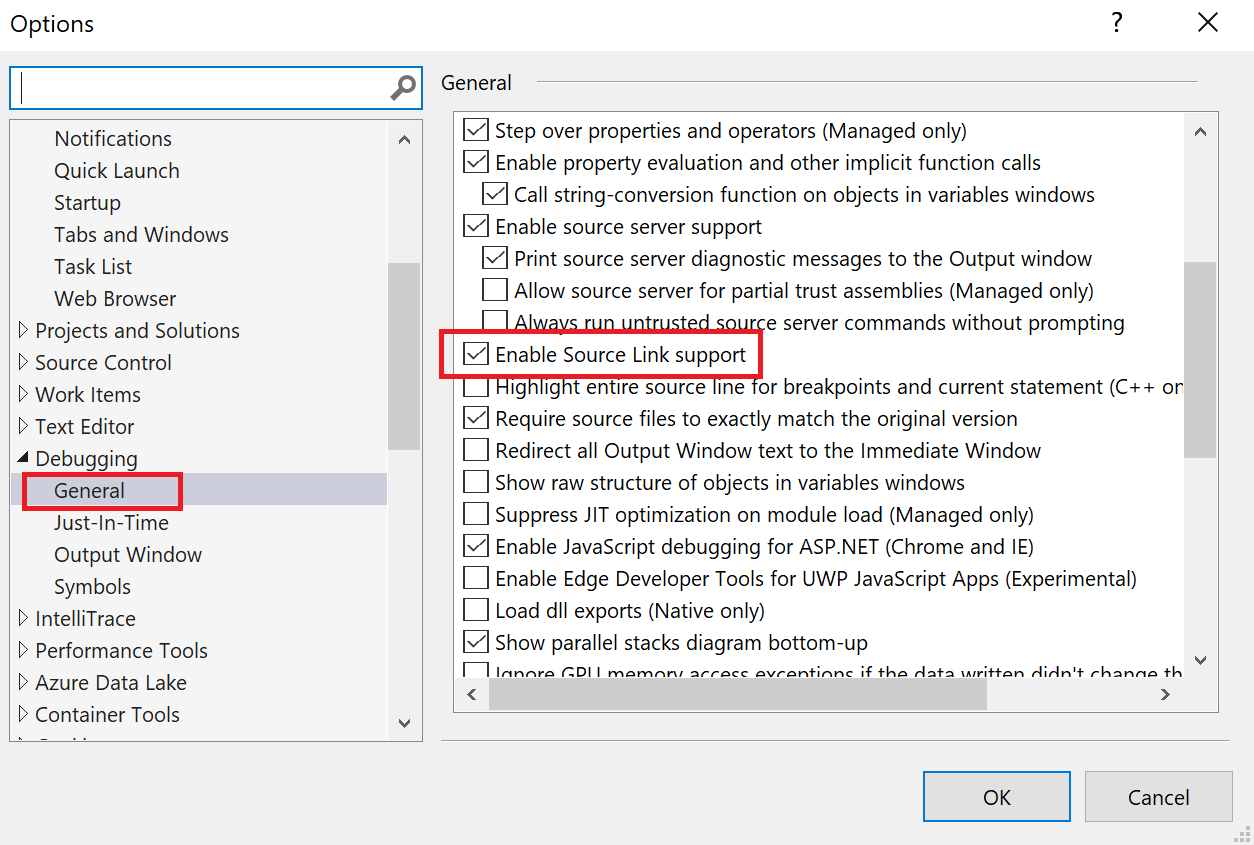
Select General from the same Debugging section. Scroll down and check Enable Source Link support to enable support for portable PDBs.
Note
Checking the Enable source server support option allows you to use Source Server in cases where the source code isn't available locally or the symbol file does not match the source code. If you want to enable debugging for third-party source code, deselect the Enable Just My Code checkbox.
FAQs
Q: What is the duration for which symbols are retained?
A: A symbol file has the same retention period as the build that generated it. When you delete a build either manually or using retention policies, the symbols that were generated by that build will be deleted as well.
Q: Can I use source indexing on a portable PDB generated from a .NET Core assembly?
A: This is not possible at the moment. Source indexing is not currently supported for portable PDBs. The recommended approach is to configure your build to do the indexing.