Get started with Git in Azure Repos
TFS 2018
Visual Studio 2019 | Visual Studio 2022
Get started with developing your code using Azure Repos and Git repositories. You can use Visual Studio or Git commands to clone a repository, define local branches, commit and push changes, and sync with others. If you need to create or import a repository, see Create a new Git repo in your project or Import a Git repository.
Note
This article describes how to use Visual Studio to manage Azure Repos Git repositories. Using similar procedures, you can use Visual Studio to manage GitHub repositories. To clone a GitHub repository, get the URL as described in Cloning a repository.
For an overview of the Git workflow, see Azure Repos Git tutorial.
Note
Visual Studio 2019 version 16.8 and later versions provide a new Git menu for managing the Git workflow with less context switching than Team Explorer. Procedures provided in this article under the Visual Studio tab provide information for using the Git experience as well as Team Explorer. To learn more, see Side-by-side comparison of Git and Team Explorer.
Prerequisites
To view code, you must be a member of an Azure DevOps project with Basic access or higher. If you aren't a project member, get added.
To clone or contribute to code, you must be a member of the Contributors security group or have the corresponding permissions.
To learn more about permissions and access, see Default Git repository and branch permissions and About access levels.
Get your code
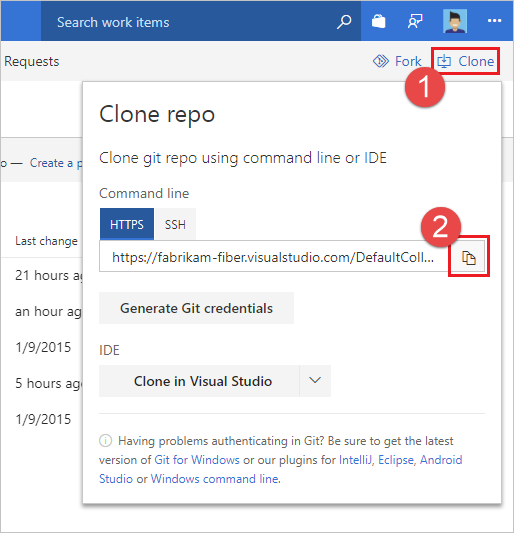
You can clone a remote Git repository to create a local copy of it. Cloning creates both a copy of the source code for you to work with and version control information so Git can manage the source code.
If you prefer to create a local repository without cloning, see Create a new Git repo. After creating your local repository you can proceed to commit, share, and sync your work.
- Visual Studio 2022
- Visual Studio 2019 - Git menu
- Visual Studio 2019 - Team Explorer
- Git Command Line
Visual Studio 2022 provides a Git version control experience by using the Git menu, Git Changes, and through context menus in Solution Explorer. Visual Studio 2019 version 16.8 also offers the Team Explorer Git user interface. For more information, see the Visual Studio 2019 - Team Explorer tab.
From the Git menu on the menu bar, choose Clone Repository...
In the Clone a repository window, enter the remote repo location and the folder path for the cloned repo. If you don't know the remote repo location, select Azure DevOps from Browse a repository options.
Select Clone. After you’ve cloned a Git repository, Visual Studio detects the repository and adds it to your list of Local Repositories in the Git menu.
Commit your work
Git branches isolate your changes from other work in the project. The recommended Git workflow is to use a new branch for every feature or fix you work on. You make commits in your local Git repository to save your changes on that branch.
- Visual Studio 2022
- Visual Studio 2019 - Git menu
- Visual Studio 2019 - Team Explorer
- Git Command Line
From the Git menu on the menu bar, choose New Branch... to open the Create a new branch window.
In the Create a new branch window, enter a descriptive branch name to let others know what work the branch contains. By default, Visual Studio creates your new branch from the current branch. The Checkout branch checkbox automatically switches you to the newly created branch. Select Create.
Add a README.md file to your cloned repo. In Solution Explorer, you can browse the repo contents using Folder View or open Visual Studio solutions in the repo. Git tracks changes made both inside and outside of Visual Studio.
When you're satisfied with your changes, save them in Git using a commit. In the Git Changes window, enter a message that describes the changes, and then select Commit All. Commit All commits unstaged changes and skips the staging area. You can choose to stage all files before committing by selecting the stage all + (plus) button at the top of the Changes section in the Git Changes window.
Select the commit information link to get further details about the commit.
Share your changes
After you've added one or more commits to a branch and you're ready to share those changes with others, push your commits so others can see them.
Once you've pushed your commits, you can create a pull request. A pull request lets others know you'd like to have your changes reviewed. After approval, a pull request typically adds your changes to the default branch of the remote repository.
- Visual Studio 2022
- Visual Studio 2019 - Git menu
- Visual Studio 2019 - Team Explorer
- Git Command Line
In the Git Changes window, select the up-arrow push button to push your commit.
Or, you can push your changes from the Git Repository window. To open the Git Repository window, select the outgoing / incoming link in the Git Changes window.
Or, you can push your changes from the Git menu on the menu bar.
Create a pull request so that others can review your changes. If you've just pushed your changes from the Git Changes window, you can select the Create a Pull Request link to open a web browser where you can create a new pull request in the Azure Repos web portal.
Or, if you've just pushed your changes from the Git Repository window, you can select the Create a Pull Request link at the top of that window.
Or, you can right-click any branch in the Git Repository window and select Create Pull Request.
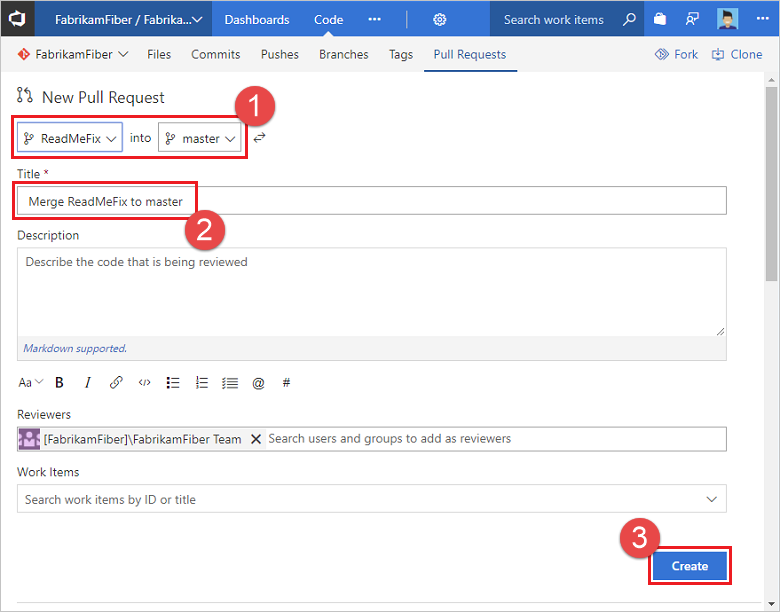
When the pull request opens in the Azure Repos web portal, verify your source and destination branches. In this example, we want to merge commits from the add-readme-file branch into the main branch. Enter a title and optional description, specify any reviewers, optionally associate any work items, and then select Create.

For more information on pull requests, see the Pull request tutorial.
Sync with others
You can keep your local branches in sync with their remote counterparts by pulling commits created by others. Although Git is good at merging incoming changes with your changes, sometimes you might have to resolve a merge conflict. While you're working on your feature branch, it's a good idea to periodically switch to your main branch and pull new commits to keep it current with the remote main branch.
- Visual Studio 2022
- Visual Studio 2019 - Git menu
- Visual Studio 2019 - Team Explorer
- Git Command Line
In the Git Changes window, you can keep your local branch current with its remote counterpart by using the Fetch, Pull, Push, and Sync buttons.
From left to right in the previous screenshot, the button controls are:
- Fetch downloads remote commits that aren't in your local branch, but doesn't merge them.
- Pull performs a fetch and then merges the downloaded commits into your local branch.
- Push uploads your unpushed commits to the remote repository, which adds them to the corresponding remote branch.
- Sync performs a Pull then a Push.
You can also select Fetch, Pull, Push, and Sync from the Git menu.


