Use the Microsoft Unit Testing Framework for C++ in Visual Studio
Applies to: ![]() Visual Studio
Visual Studio ![]() Visual Studio for Mac
Visual Studio for Mac
Note
This article applies to Visual Studio 2017. If you're looking for the latest Visual Studio documentation, see Visual Studio documentation. We recommend upgrading to the latest version of Visual Studio. Download it here
The Microsoft Unit Testing Framework for C++ is included by default in the Desktop Development with C++ workload.
To write unit tests in a separate project
Typically, you run your test code in its own project in the same solution as the code you want to test. To set up and configure a new test project, see Writing unit tests for C/C++.
To write unit tests in the same project
In some cases, for example when testing non-exported functions in a DLL, you might need to create the tests in the same project as the program you're testing. To write unit tests in the same project:
Modify the project properties to include the headers and library files that are required for unit testing.
In Solution Explorer, on the shortcut menu of the project you're testing, choose Properties. The project properties window opens.
In the Property Pages dialog, select Configuration Properties > VC++ Directories.
Select the down arrow in the following rows and choose <Edit>. Add these paths:
Directory Property Include Directories $(VCInstallDir)Auxiliary\VS\UnitTest\include Library Directories $(VCInstallDir)Auxiliary\VS\UnitTest\lib
Add a C++ Unit Test file:
Right-click on the project node in Solution Explorer and choose Add > New Item.
In the Add New Item dialog, select C++ File (.cpp), give it an appropriate name, and then choose Add.
To link the tests to the object or library files
If the code under test doesn't export the functions that you want to test, you can add the output .obj or .lib file to the dependencies of the test project. Modify the test project's properties to include the headers and library or object files that are required for unit testing.
In Solution Explorer, on the shortcut menu of the test project, choose Properties. The project properties window opens.
Select the Configuration Properties > Linker > Input page, then select Additional Dependencies.
Choose Edit, and add the names of the .obj or .lib files. Don't use the full path names.
Select the Configuration Properties > Linker > General page, then select Additional Library Directories.
Choose Edit, and add the directory path of the .obj or .lib files. The path is typically within the build folder of the project under test.
Select the Configuration Properties > VC++ Directories page, then select Include Directories.
Choose Edit, and then add the header directory of the project under test.
Write the tests
Any .cpp file with test classes must include "CppUnitTest.h" and have a using statement for using namespace Microsoft::VisualStudio::CppUnitTestFramework. The test project is already configured for you. It also includes a namespace definition, and a TEST_CLASS with a TEST_METHOD to get you started. You can modify the namespace name and the names in parentheses in the class and method macros.
The test framework defines special macros for initializing test modules, classes, and methods, and for cleanup of resources after tests complete. These macros generate code to execute before a class or method is first accessed, and after the last test has run. For more information, see Initialize and cleanup.
Use the static methods in the Assert class to define test conditions. Use the Logger class to write messages to the Output Window. Add attributes to test methods
Run the tests
On the Test menu, choose Windows > Test Explorer.
If not all your tests are visible in the window, build the test project by right-clicking its node in Solution Explorer and choosing Build or Rebuild.
In Test Explorer, choose Run All, or select the specific tests you want to run. Right-click on a test for other options, including running it in debug mode with breakpoints enabled.
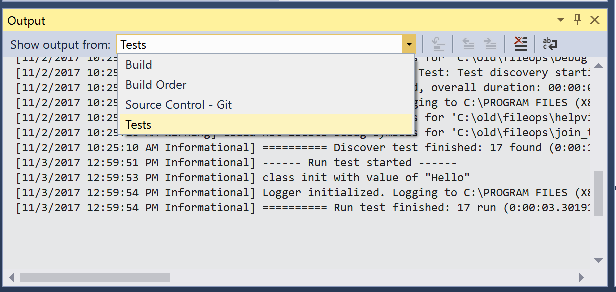
In the Output Window choose Tests in the drop-down to view messages written out by the
Loggerclass:
Define traits to enable grouping
You can define traits on test methods, which enable you to categorize and group tests in Test Explorer. To define a trait, use the TEST_METHOD_ATTRIBUTE macro. For example, to define a trait named TEST_MY_TRAIT:
#define TEST_MY_TRAIT(traitValue) TEST_METHOD_ATTRIBUTE(L"MyTrait", traitValue)
To use the defined trait in your unit tests:
BEGIN_TEST_METHOD_ATTRIBUTE(Method1)
    TEST_OWNER(L"OwnerName")
    TEST_PRIORITY(1)
    TEST_MY_TRAIT(L"thisTraitValue")
END_TEST_METHOD_ATTRIBUTE()

TEST_METHOD(Method1)
{
    Logger::WriteMessage("In Method1");
    Assert::AreEqual(0, 0);
}
C++ trait attribute macros
The following pre-defined traits are found in CppUnitTest.h. For more information, see The Microsoft Unit Testing Framework for C++ API reference.
| Macro | Description |
|---|---|
TEST_METHOD_ATTRIBUTE(attributeName, attributeValue) |
Use the TEST_METHOD_ATTRIBUTE macro to define a trait. |
TEST_OWNER(ownerAlias) |
Use the predefined Owner trait to specify an owner of the test method. |
TEST_PRIORITY(priority) |
Use the predefined Priority trait to assign relative priorities to your test methods. |