Intel® SCS Add-on 2.1 and SC2012 R2 ConfigMgr Integration (RCS Database mode) - Part 6
Intel AMT Deployment
This part will cover the procedure to provision Intel AMT computers. As a prerequisite, we strongly recommend executing the following 3 tasks on each client computer. To obtain these modules, please contact vendor of client computers.
- Update BIOS
- Intel Management Engine Interface (Intel MEI) installation
- Local Manageability Service (LMS.exe) installation
For more details about prerequisites, please refer to the section 2.2 Supported Intel AMT Versions of Intel(R)_SCS_User_Guide.pdf document included in the Intel SCS for Microsoft System Center Configuration Manager package.
Firewall configuration
1. On the client computer, run the “Windows Firewall wit Advanced Security] console. In the [Inbound Rules], create a [New Rule].
2. Select [Port] and click on [Next].
3. Select [TCP], select [Specific local ports] and type “16993” and “16995”. Click [Next]

4. Select [Allow the connection] and click [Next]
5. Put a check on [Domain], [Private] and [Public] and click [Next]
6. Type a name for the new rule and click [Finish]
Adding Enterprise Root CA certificate thumbprint into AMT computers
≪Warning≫
If using a public certificate, this section can be skipped.
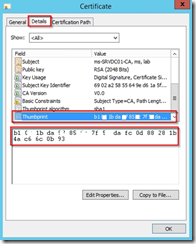
1. Select the Enterprise CA Root certificate and open properties.
2. From the [Details] tab, select [Thumbprint] and note the thumbprint.

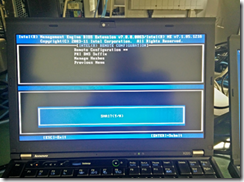
3. Turn on an Intel AMT computer and press <Ctrl+P> during boot to trigger the Intel ME interface. Default password is “Admin”.

※the way to access to Intel ME console might be different on some computer hardware.
4. Select [Intel AMT Configuration]

5. Select [Remote Setup And Configuration]

7. Select [Manage Hashes] then to add a new entry, type the <ins> key.

8. Enter hash name ”Contoso Root CA”

9. To the question [SHA1?], type “Y”.

10. Type the hash we got on step 2

11. Set the newly added hash in “Active” status and leave Intel MBEx saving changes.
Enable Intel SCS Platform Discover task sequence
1. From [Software Library]-[Overview]-[Operating Systems]-[Task Sequence], right-click on [Intel SCS: Platform Discovery] task sequence and [Enable] it.

2. Click [OK] on the dialog box.
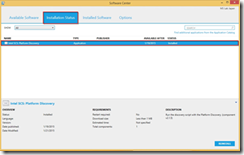
3. On the client computer, run [Start]-[All Programs]-[Microsoft System Center 2012 R2]-[Configuration Manager]-[Software Center]. Verify that [Intel SCS: Platform Discovery] task sequence has ended successfully.
4. From [Assets and Compliance]-[Overview]-[Device Collections], right-click on [Intel AMT: Exists] and click on [Update membership].

5. Click [OK] to the warning dialog box.
6. Verify that membership of [Intel AMT: Exists] collection has been updated.
Enable Intel AMT Discovery and Report task sequence
1. From [Software Library]-[Overview]-[Operating Systems]-[Task Sequence], right-click on [Intel AMT: Discovery and Report] task sequence and [Enable] it.

2. Click [OK] on the dialog box.
3. On the client computer, run [Start]-[All Programs]-[Microsoft System Center 2012 R2]-[Configuration Manager]-[Software Center]. Verify that [Intel AMT: Discovery and Report] task sequence has ended successfully.

4. From [Assets and Compliance]-[Overview]-[Device Collections], right-click on [Intel AMT: Not Configured] and click on [Update membership].

5. Click [OK] to the warning dialog box.
6. Verify that membership of [Intel AMT: Not Configured] collection has been updated.
Enable Intel AMT Remote Configuration task sequence
1. From [Software Library]-[Overview]-[Operating Systems]-[Task Sequence], right-click on [Intel AMT: Remote Configuration] task sequence and [Enable] it.

2. Click [OK] on the dialog box.
3. On the client computer, run [Start]-[All Programs]-[Microsoft System Center 2012 R2]-[Configuration Manager]-[Software Center]. Verify that [Intel AMT: Remote Configuration] task sequence has ended successfully.

4. From [Assets and Compliance]-[Overview]-[Device Collections], right-click on [Intel AMT: Configured] and click on [Update membership].

5. Click [OK] to the warning dialog box.
6. Verify that membership of [Intel AMT: Configured] collection has been updated.
Enable Intel AMT Remote Maintenance task sequence
1. From [Software Library]-[Overview]-[Operating Systems]-[Task Sequence], right-click on [Intel AMT: Remote Maintenance] task sequence and [Enable] it.

2. Click [OK] on the dialog box.
AMT Status discovery
1. From [Assets and Compliance]-[Overview]-[Device Collections], double-click on [Intel AMT: Configured] collection. From the computer list, right-click on a computer and click on [Manage Out of Band]-[Discover AMT Status].

2. Click [OK] to the dialog box
3. Select [Intel AMT: Configured] collection and add [AMT Status] and [AMT Version] columns by right-clicking on the column name bar.

4. Verify [AMT Status] and [AMT Version]
Intel AMT provisioning is, then, over.


