AppFabric WCF Service Template (C#)
Now available Download the AppFabric WCF Service Template C#
Windows Communication Foundation (WCF) is Microsoft’s unified programming model for building service-oriented applications. Windows Server AppFabric provides tools for managing and monitoring your web services and workflows.
The AppFabric WCF Service template brings these two products together providing the following features:
- Monitor the calls to your service across multiple servers with AppFabric Monitoring
- Create custom Event Tracing for Windows (ETW) events that will be logged by AppFabric Monitoring
Setup
To build and test an AppFabric WCF Service you will need the following:
Walkthrough
- Add a new project using the ASP.NET Empty Web Application Template.
- Add a new item to your project using the AppFabric WCF Service template named SampleService.svc
- Open the SampleService.svc.cs file and replace the SayHello method with the following code:
    1: public string SayHello(string name)
    2: {
    3:     // Output a warning if name is empty
    4:     if (string.IsNullOrWhiteSpace(name))
    5:         AppFabricEventProvider.WriteWarningEvent(
    6:             "SayHello",
    7:             "Warning - name is empty");
    8:     else
    9:         AppFabricEventProvider.WriteInformationEvent(
   10:             "SayHello",
   11:             "Saying Hello to user {0}",
   12:             name);
   13:
   14:     return "Hello " + name;
   15: }
Enable Monitoring
- Open web.config
- Enable the EndToEndMonitoring Tracking profile for your web application
    1: <microsoft.applicationServer>
    2:   <monitoring>
    3:     <default enabled="true" connectionStringName="ApplicationServerMonitoringConnectionString" monitoringLevel="EndToEndMonitoring" />
    4:   </monitoring>
    5: </microsoft.applicationServer>
    6:
    7: <system.serviceModel>
    8:   <diagnostics etwProviderId="830b12d1-bb5b-4887-aa3f-ab508fd4c8ba">
    9:     <endToEndTracing propagateActivity="true" messageFlowTracing="true" />
   10:   </diagnostics>
   11:   <behaviors>
   12:     <serviceBehaviors>
   13:       <behavior>
   14:         <etwTracking profileName="EndToEndMonitoring Tracking Profile" />
   15:         <serviceMetadata httpGetEnabled="true" />
   16:       </behavior>
   17:     </serviceBehaviors>
   18:   </behaviors>
   19: </system.serviceModel>
Verify with Development Server
- In the Solution Explorer window, right click on the SampleService.svc file and select View in Browser.
- The ASP.NET Development Server will start and the SampleService.svc file will load in the browser.
- After the browser opens, select the URL in the address box and copy it (CTRL+C).
- Open the WCF Test Client utility.
- Add the service using the endpoint you copied from the browser.
- Double click the SayHello operation, enter your name in the name parameter and click Invoke.
- Verify that your service works.
Verify with IIS
To see the events in Windows Server AppFabric you need to deploy the Web project to IIS or modify your project to host the solution in the local IIS Server. For this example you will modify the project to host with the local IIS server.
Run Visual Studio as Administrator If you are not running Visual Studio as Administrator, exit and restart Visual Studio as Administrator and reload your project. For more information see Using Visual Studio with IIS 7. |
- Right click on the Web Application project you’ve recently created and select properties
- Go to the Web tab
- Check Use Local IIS Web Server and click Create Virtual Directory
- Save your project settings (Debugging will not save them)
- In the Solution Explorer window, right click on the SampleService.svc file and select View in Browser. The address should now be that of the IIS (“https://localhost/applicationName/”) and not of the ASP.NET Development Server (“https://localhost:port/”).
- After the browser opens, select the URL in the address box and copy it (CTRL+C).
- Open the WCF Test Client utility.
- Add the service using the endpoint you copied from the browser.
- Double click the SayHello operation, enter your name in the name parameter and click Invoke.
- Verify that your service works.
- Leave the WCF Test Client open (you will need to use it in the next step).
Verify Monitoring
- Open IIS Manager (from command line: %systemroot%\system32\inetsrv\InetMgr.exe)
- Navigate to your web application (In the Connections pane open ComputerName à Sites à Default Web Site à ApplicationName)
- Double Click on the AppFabric Dashboard to open it
- Look at the WCF Call History you should see some successful calls to your service.
- Switch back to the WCF Test Client utility. If you’ve closed the utility, repeat steps 5-8 in the previous step, Verify with IIS.
- Double click the SayHello operation, enter your name in the name parameter and click Invoke.
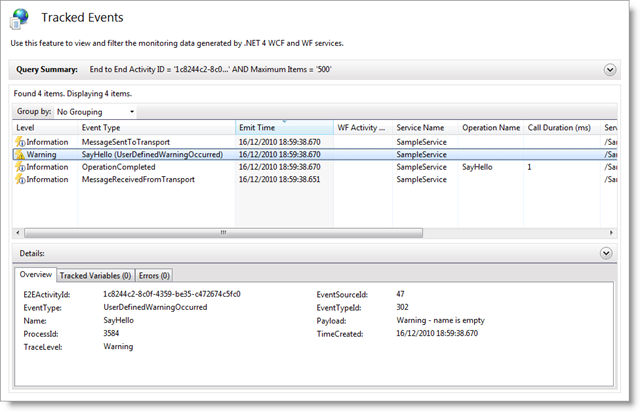
- Change the name to an empty string, or select null from the combo box and invoke the service again. This will generate a warning event.
- To see the monitoring for this activity switch back to the IIS Manager and refresh the AppFabric Dashboard.
- Click on the link in the WCF Call History for SampleService.svc and you will see events for the completed calls. In this level you can see calls made to get the service’s metadata (Get calls) and calls for the service operations (SayHello calls).
- To see specific events, right click on an entry for the SayHello operation and select View All Related Events.
- In the list of related events you will see the user defined event named SayHello. The payload of this event contains the message logged by the operation.
Happy Coding!
Ron Jacobs
https://blogs.msdn.com/rjacobs
Follow me on twitter: https://twitter.com/ronljacobs
Comments
- Anonymous
April 02, 2011
The comment has been removed


