How to Sort SharePoint Document Set Allowed Content Types
Recently I’ve been working on a SharePoint 2010 document management solution, and this has provided the opportunity get deep in the weeds on features such as Document Sets, the Document ID Service, Content Organizer and In-Place Records Management. I will share more details about my experiences in future posts, but in a nutshell, the organization has an engineering process that involves producing a set of a deliverables that get approved at each stage of a process. Deliverables are conditionally provisioned based on project details, and at each stage, approved deliverables are routed into a document repository controlled by a configuration management team to support auditing. After deploying the first version of this solution, I received a high-severity bug that the project document set content types were not in alphabetical order. Although it may seem like a cosmetic/annoyance issue on the surface, considering there are approximately 125 different content types involved, it was actually making it considerably difficult for users to find and select the appropriate project document content type . In this post, I’m going to go into a bit of a rabbit hole and discuss how to solve this issue—but first, let me provide some background on the problem.
A Document Set is a container for multiple documents and provides the ability to treat the set as a single unit and even share properties from the container across all documents. This feature is very useful for processes where there is a “packet” of documents that move through a lifecycle such as a loan application, or in this example, a project going through an engineering process. The packet has shared information such as “Project Name,” or “Project Type,” as well as details about what types of documents go into the packet. In SharePoint, this is is implemented as a Document Set template that has information about the document content types it is allowed to contain. Rather than talking about it, let me show you:
In this example, I created a “Project Document Set” content type that inherits from “Document Set.” It has columns for the Project Name, Description and the Project Type. I’ve also defined an initial set of content types for the types of documents that the organization produces. I started with a base content type called “Deliverable,” and created several content types that inherit from it:
Now let’s edit the Document Set settings for the Project Document Set content type. The first setting is “Allowed Content Types.” This enables you to specify what types of documents can go into the set. I’ll add an initial list of deliverables. Everything seems to be going fine so far, but notice that the list on the right is already not in alphabetic order, but rather is in the order in which content types are added:
Next I’ll create a new Project Document set and add some documents to it. Notice that when I upload a document and edit the document properties, the Content Type drop down is in the same order as the Document set allowed content types list:
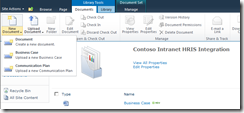
In addition, Content Types are in the same order on the New Document ribbon button:
You could manually modify the content type order for each document set by hand by selecting each document set in the library and selecting “Change New Button Order” on the list item menu.
Although you can change the content type order for a single document set, all new Document Sets content types will have the original content type order. Another way you could try to solve this problem is to go to the Document Set settings page and remove all the content types and re-add them in alphabetical order. You may, however, encounter an error that the content type is in use:
Even if you don’t have the content type in use issue, imagine if you had 125 allowed content types and you needed to manually re-order them. When the 126th content type is added, you’d have to remove and re-add them all again. What a pain! It would be nice if the UI had an up, down and a sort alphabetically button, but since we don’t have that in this version, I have another solution: PowerShell.
This script uses the object model to remove all content types from the Document Set template, sort them, and then re-add them. It will also update all document sets in one library to use the new content type ordering.
<#
This script will sort the allowed content types for a document set

Example: .\Sort-DocumentSetContentTypes.ps1 https://contoso.com/sites/docman "Project Document Set" "Project Documents"
#>
param
(
[string]$siteUrl = $(throw "Site URL is required"),
[string]$docSetContentTypeName = $(throw "Document set content type name is required"),
[string]$listToUpdate = $(throw "The name of the list to update existing document sets")
)
$web = Get-SPWeb $siteUrl
$dsct = $web.ContentTypes[$docSetContentTypeName]

$dst = [Microsoft.Office.DocumentManagement.DocumentSets.DocumentSetTemplate]::GetDocumentSetTemplate($dsct)
$ctById = @{}

foreach($ctId in $dst.AllowedContentTypes)
{
$ct = $web.ContentTypes[$ctId]
$ctById.Add($ctId, $ct)
}
$sorted = ($ctById.Values | Sort Name)
$dst.AllowedContentTypes.Clear()

foreach($ct in $sorted)
{
$dst.AllowedContentTypes.Add($ct.Id)
}
$dst.Update($true)
#update all document sets

$web.Dispose()

$web = Get-SPWeb $siteUrl
$list = $web.Lists[$listToUpdate]

foreach($folder in $list.RootFolder.Subfolders)
{
if($folder.Item.ContentType.Name -eq $dsct.Name)
{
Write-Host "Updating allowed content types for existing document set" $folder.Name
$docSet = [Microsoft.Office.DocumentManagement.DocumentSets.DocumentSet]::GetDocumentSet($folder)
# this gets rid of the "Content types have been added gold bar"
$docSet.Provision()
}
}
Comments
- Anonymous
February 14, 2013
nice blog post, however why didn't they just do this properly and allow you to edit the order via the GUI


