Arduino Due and Mobile Service(it-IT)
Introduction.
In the previous article Arduino Due: Development , it was made an introduction of this board, after setting up starting from the installation of the necessary libraries, to finish with the setting up the Ethernet shield, with which the Arduino Due can access to the Internet. In this second article, we will see how Arduino can interact with the services of Microsoft Azure, precisely with the Mobile Service. We will start by creating a Mobile Service, we will build a small circuit using the sensor temperature and humidity DHT11, ending with the piece of code that will be responsible for transferring the information detected by the sensor on Microsoft Azure. We will see in the order:
- Create a Mobile Service.
- Build electronic circuit.
- Write the code for to upload data form sensor dht11 to Microsoft Azure.
- Test application.
- Conclusion.
Create a Mobile Service.
Creating a mobile service is very simple; you first need to have an account and a subscription to Microsoft Azure. Entered the portal, the home screen press the New button that we find in the lower left as shown.
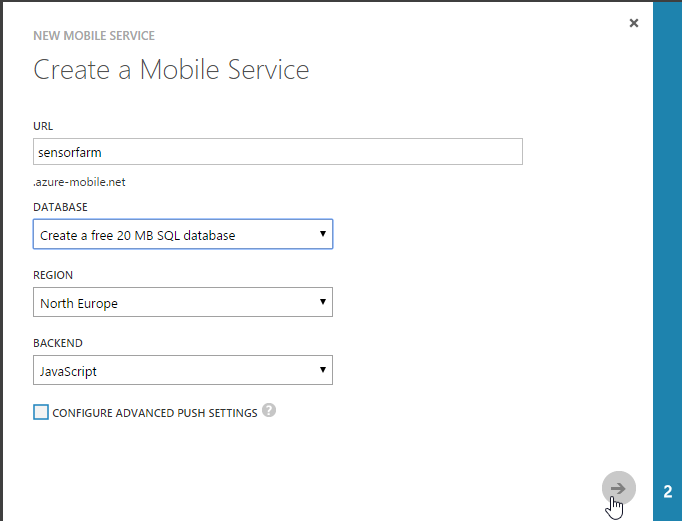
At the next screen, we have to do a name the Mobile Service, choose whether to use an existing or create a free 20 MB database, where to place it, in my case the Data Center nearest and North Europe, so this will not be the same for everyone, but it is advisable to choose the Data Center nearest you, last thing, the part of Backend, I will let JavaScript.
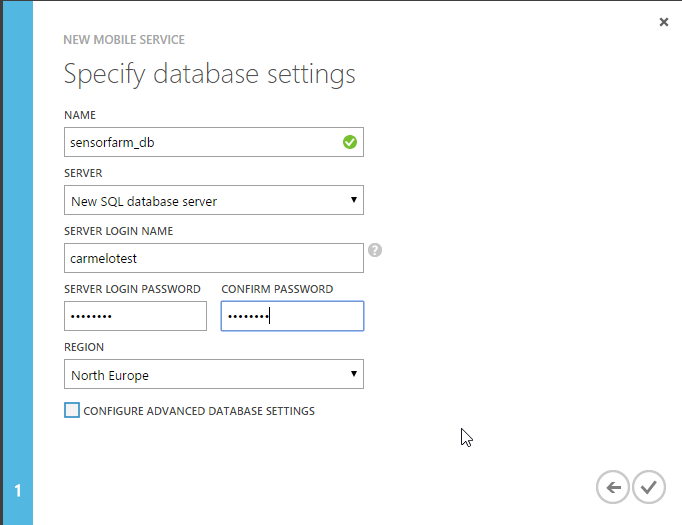
Next step, create a Database, then give it a name, choose whether to create a new database SqlServer, and last thing to enter your credentials, as shown in the figure.
After this activity, expect Azure creates the Mobile Service, we will notice that we will have a Mobile service and one Database.
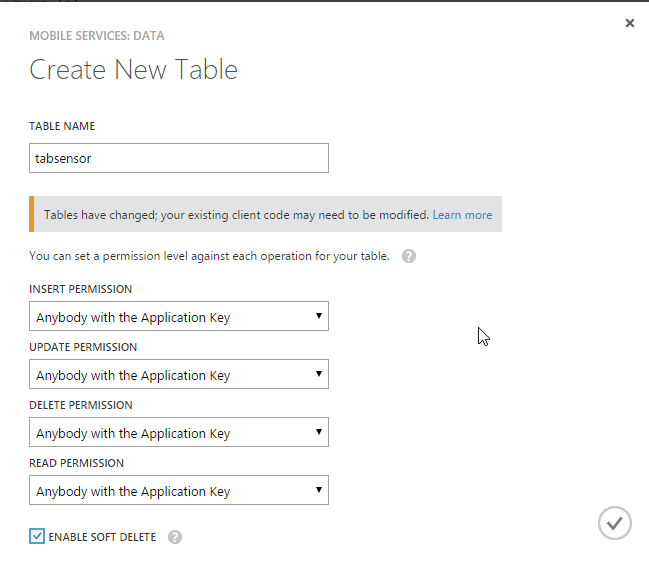
We are now ready to create a table within the Database sensorfarm_db. Click with the mouse on sensorfarm under Mobile Service, the next screen, click the button located next to the "ADD A TABLE". You will see another screen where we will have to enter the name of the table, insert tabsensor as shown in the following figure.
Leave all the other fields as they are and click on the button shown with checkmarks in the lower right corner and wait until it creates the table.
We have up to here end the procedure for the creation of a Mobile Service, we now turn to the implementation of the electronic circuit.
Build electronic circuit.
For the realization of the circuit, we need the following components:
- Board Arduino Due
- Board Ethernet shield
- Sensor DHT11
- BreadBoard (basis for the connection of the sensor)
- Colmeter (cables for the connection from board Arduino Due and sensor DHT11)
- Power Supply cable for the connection board Arduino due
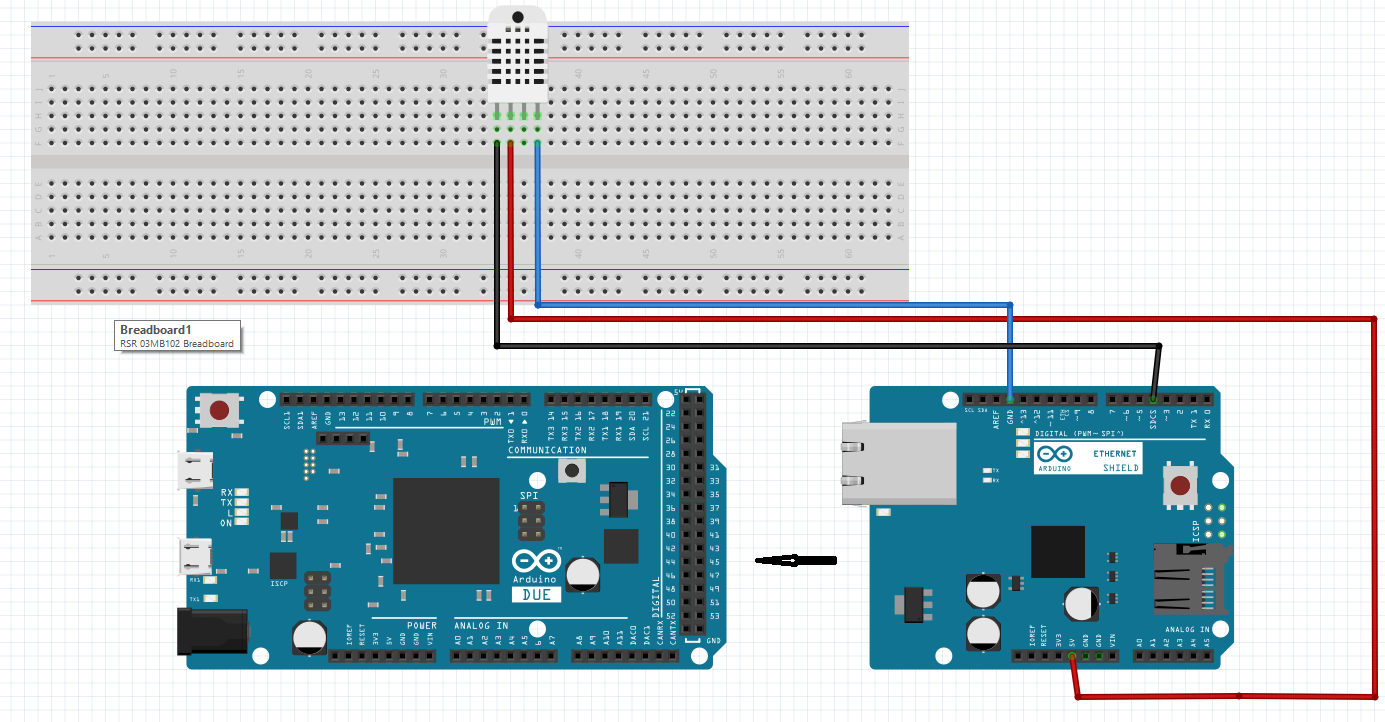
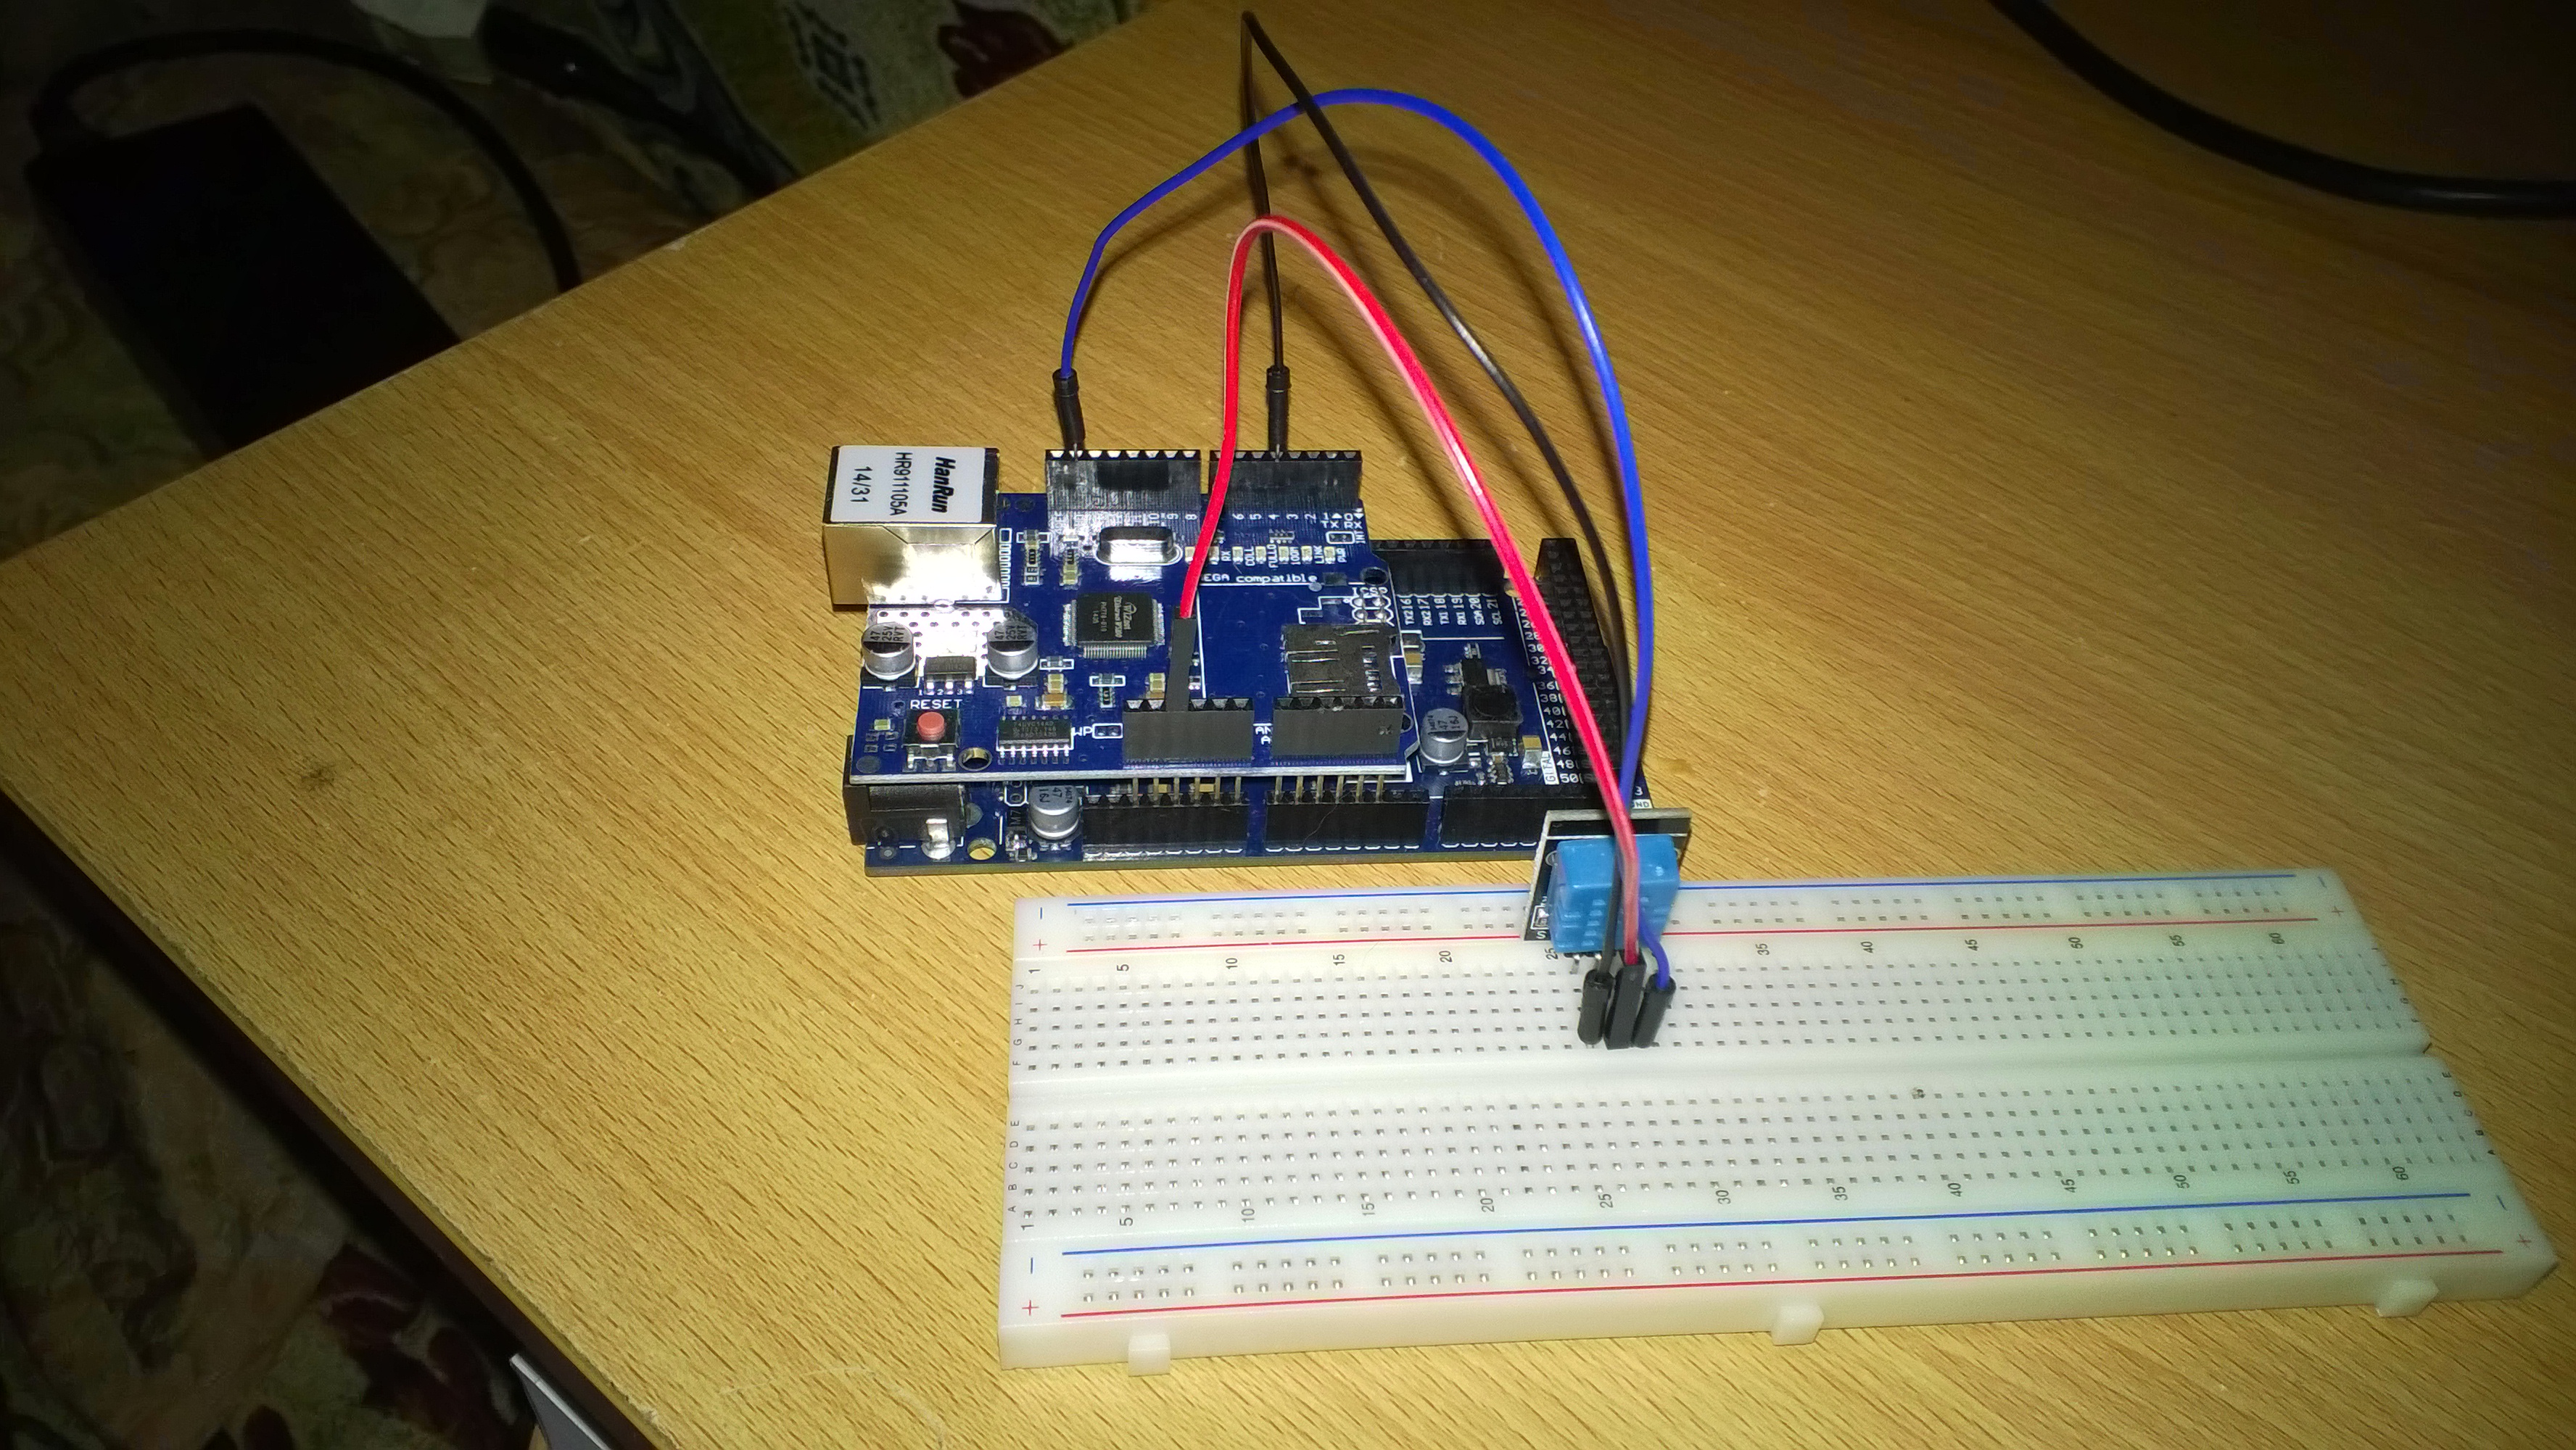
Here I leave the pictures of the final circuit. The sensor can operate from a voltage of 3.3 Volt dc up to a maximum of 5.5 Volt. For greater clarity on the connection and operation, refer to the official documentation.
The connection are:
- Pin Signal Sensor with cable Black on pin 4 Arduino Due
- **Pin +5v Sensor with cable Read on pin 5v Arduino Due **
- Pin – Sensor with cable blue on pin GND Arduino Due
In the image above, it is noted that the Ethernet Shield, is superimposed on the Arduino Due, in order to have the pins required for connection, see the black arrow from right to left. I left separate the two boards only to display all the necessary components. After the connection, here's how to be practical in our circuit.
As possible and note the Ethernet Shield is superimposed on the Arduino Due.
Write the code for to upload data form sensor dht11 to Microsoft Azure.
Also finished the construction of the circuit, we are ready to start the software, the first thing to do but run, and download the necessary libraries to use the sensor DHT11 found at this link. After downloading, you need to install it; we can run two modes:
- Extracting the files in the .zip file and manually copy the directory C: \ Program Files (x86) \ Arduino \ libraries.
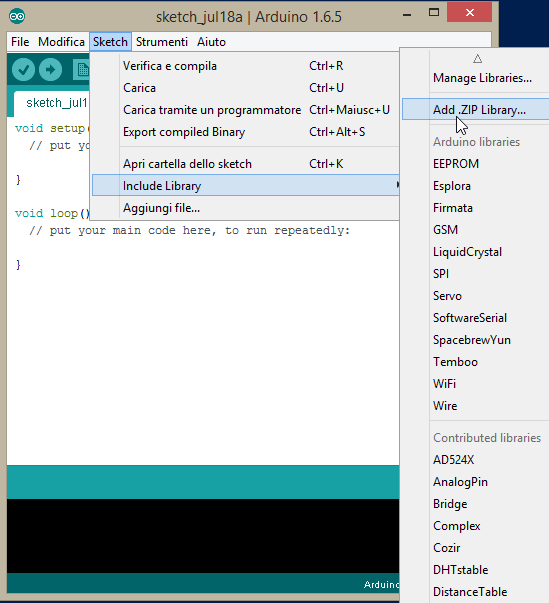
- Follow the procedure below, Start the Arduino IDE, let's select the menu Sketch command Include Library and then Add .ZIP Library ... as shown.
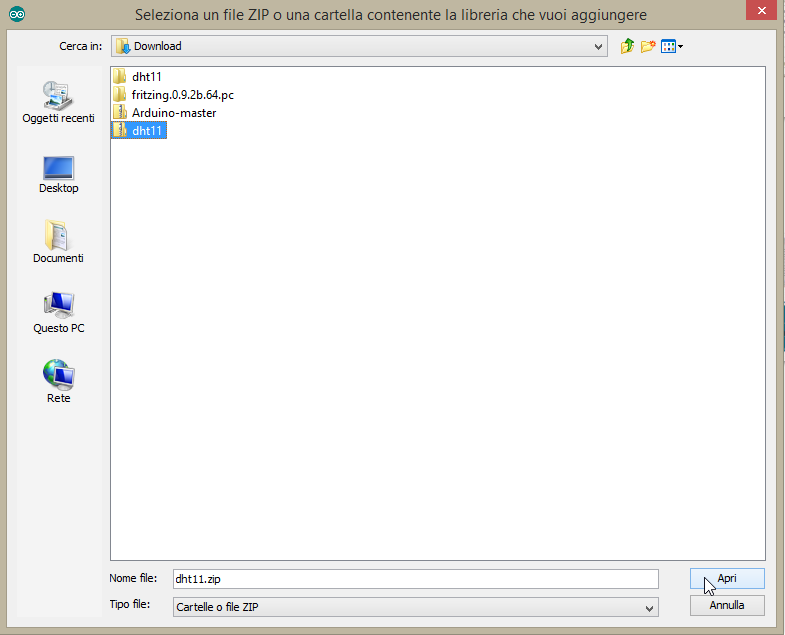
We're going to select the .zip file we downloaded it usually goes in the Download folder.
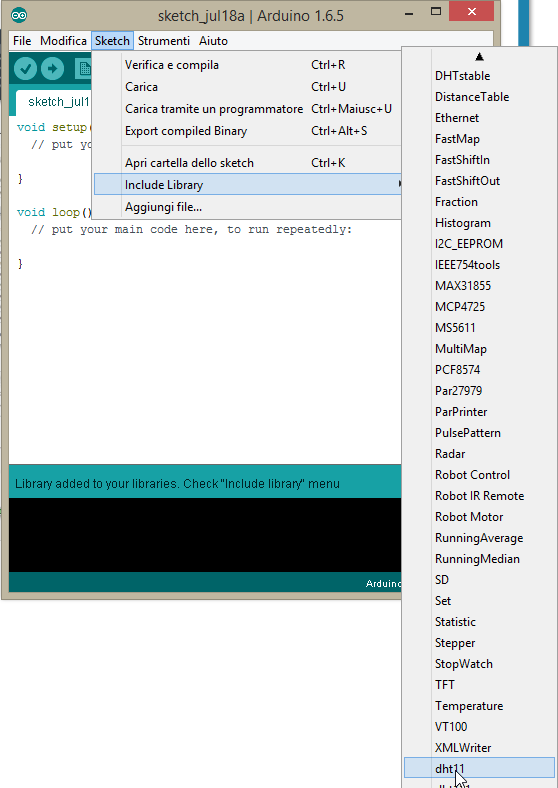
Confirm with the Open command, and here is that if we're going to make sure everything is successful we find the file DHT11 between libraries available.
With this procedure, files are extracted and stored not in the parent directory, but in C:\Users\username\ Documents\Arduino, where "username" will change depending on what you entered when you installed the operating system, in my case is C:\Users\CARMELO LA MONICA\Documents\Arduino. We have the required libraries installed; we turn now to writing code. We start the Arduino IDE and create a file Sketch called DHT11 Sample, and insert the following code.
#include <SPI.h>
#include <Ethernet.h>
#include <dht11.h>

// Ethernet shield MAC address (sticker in the back)
byte mac[] = { 0xDE, 0xAD, 0xBE, 0xEF, 0xFE, 0xED };

/*You can find this values in your Mobile Service dashboard
   server = namemobileservice.azure-mobile.net
   table_name = nametable
   ams_key = your keyvalue, find in home page mobile service, with a click on button MANAGE KEYS*/

const char* server = "sensorfarm.azure-mobile.net";
const char* table_name = "tabsensor";
const char* ams_key = "you can find it on mobile service with manage keys button";

EthernetClient client;
char buffer[64];
dht11 DHT;
#define  DHT11_PIN 4


/*This method use Mobile service REST API fot to write value*/
void write_sensorvalue(double tempvalue, double humidityvalue)
{
   if (client.connect(server, 80)) {

     /*Table name in Mobile service*/
     sprintf(buffer, "POST /tables/%s HTTP/1.1", table_name);
     client.println(buffer);

    /*Sever name in Mobile Service*/
     sprintf(buffer, "Host: %s", server);
     client.println(buffer);

    /*Mobile Services application key*/
     sprintf(buffer, "X-ZUMO-APPLICATION: %s", ams_key);
     client.println(buffer);

    // JSON content type for the information
     client.println("Content-Type: application/json");

    /*Write values of temperature and humidity from DHT11 sensor*/
     sprintf(buffer, "{\"tempvalue\":\"%f\",\"humidityvalue\":\"%f\"}", tempvalue, humidityvalue);

    // Content length
     client.print("Content-Length: ");
     client.println(strlen(buffer));

    // End of headers
     client.println();

    // Request body
     client.println(buffer);

  }

   else
   {
     Serial.println("no connection available!");
   }
     client.stop();
}

/*-------------------------------------------------------*/
/*Setup method*/
/*-------------------------------------------------------*/
void setup()
{
   Serial.begin(9600);

  if (Ethernet.begin(mac) == 0)
   {
     Serial.println("ethernet shield failed");
     for (;;);
   }

   // Ethernet shield initialization:
   delay(1000);
}

/*-------------------------------------------------------*/
/*Loop method*/
/*-------------------------------------------------------*/
void loop()
{
   /*Read value from sensor input*/
   int chk = DHT.read(DHT11_PIN);

  /*Call method writ_sensorvalue and pass sensor parameter for to save on mobile service*/
   write_sensorvalue((DHT.temperature), (DHT.humidity));

  /*Time wait for new input data*/
   delay(10000);
}
Let's see how the code works. We include in this case the library installed for the sensor DHT11, in this case the file dht11.h, while the other two libraries were already in the previous article. There are three variables of type const char *, which are nothing more than the name of the table, the server name and the code key, all you need to upload the data.
#include <dht11.h>
const char* server = "sensorfarm.azure-mobile.net";
const char* table_name = "tabsensor";
const char* ams_key = " you can find it on mobile service with manage keys button ";
We're going to declare yet another three variables
char buffer[64];
dht11 DHT;
#define  DHT11_PIN 4
Where the first will be the data buffer in upload, the second represents the file where DHT11 by the methods and other variables we will be able to read the values of temperature and humidity by the sensor. Last variable does is set the pin 4 of Arduino Two as input to the sensor, so we have to necessarily connect the pin "Signal" sensor DHT11 on pin 4 of the board. The method write_sensorvalue, is the most interesting, since it deals to upload data on Azure, we see the most significant pieces of code.
/*Table name in Mobile service*/
     sprintf(buffer, "POST /tables/%s HTTP/1.1", table_name);
     client.println(buffer);

    /*Sever name in Mobile Service*/
     sprintf(buffer, "Host: %s", server);
     client.println(buffer);

    /*Mobile Services application key*/
     sprintf(buffer, "X-ZUMO-APPLICATION: %s", ams_key);
     client.println(buffer);
We perform an HTTP request and a call POST, where we have to indicate the name of the table previously, the name of the Server and code key, this in order to allow the correct upload all data.
// JSON content type for the information
client.println("Content-Type: application/json");

/*Write values of temperature and humidity from DHT11 sensor*/
sprintf(buffer, "{\"tempvalue\":\"%f\",\"humidityvalue\":\"%f\"}", tempvalue, humidityvalue);
With the above code, we specify in what format we are sending data, and then type JSON, and the last piece of code we specify the pattern, or what will meet in the table tabsensor when we're going to see if the data has been loaded properly. The Setup method we have already seen in the previous article, and more interesting and the Loop method.
void loop()
{
   /*Read value from sensor input*/
   int chk = DHT.read(DHT11_PIN);

  /*Call method writ_sensorvalue and pass sensor parameter for to save on mobile service*/
   write_sensorvalue((DHT.temperature), (DHT.humidity));

  /*Time wait for new input data*/
   delay(10000);
}
Declare a variable of type int, which does nothing but read the status of the sensor temperature and humidity, this means that the read method as a parameter requires the input pin. We recall then the method write_sensorvalue passing as parameters the values of temperature and humidity with DHT.temperature and DHT.humidity. The last instruction code is nothing more than a waiting time of ten seconds before starting a new reading. We have now completed the part relating to the code, we are now ready to perform the function tests, but first we have to load the sketch code on the Arduino Due, to this procedure refer you to previous article.
Test application.
Let's take a look now inside the table tabsensor, we will find this situation.
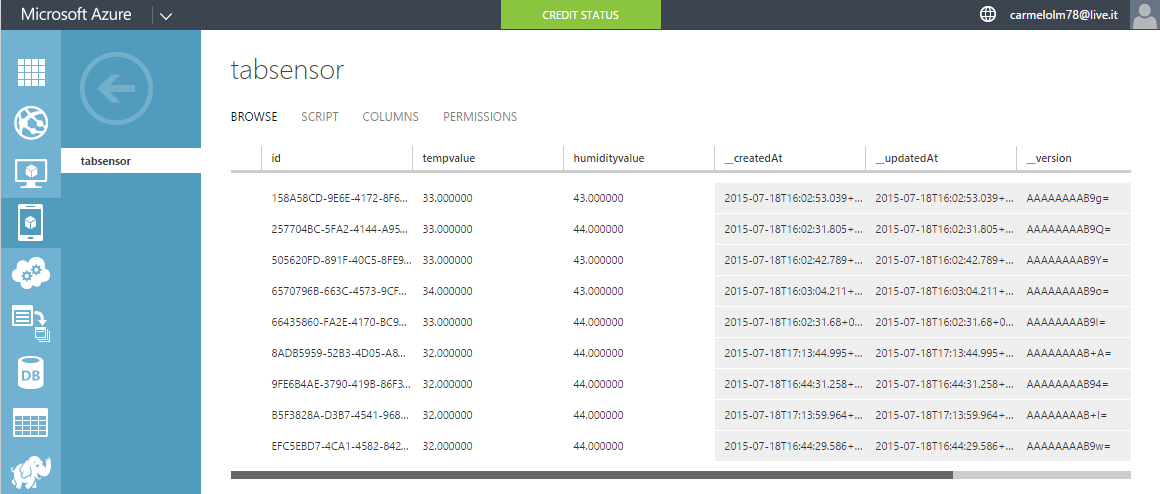
This is because we have not defined any record within it, but also any column. We can feed now Arduino Due in different ways, or with its power supply, or by attacking the USB port of our pc, where we are now because we have previously uploaded the sketch code. If all goes correctly you should see the green LEDS flash card Ethernet Shield, this means that it went into operation, but especially when we go on the Azure portal and check if the data has been loaded, and if all are done properly here is what we will see.
We note that from the services of Azure has added for us humidityvalue and tempvalue fields with other fields, id, timestamp, and version, the latter are not part of our code but are added automatically when you insert a new record in tabsensor table, in other words we have not had to worry us of this, we thought Azure for us.
Conclusion.
In this second article, we saw how to Arduino and can interact with Microsoft Azure and Mobile Service, by creating a simple circuit where we read through sensor DHT11 values of temperature and humidity, and then go to save the data in the table tabsensor. In the next article, we will create an application Windows Phone 8.1 that will make sure to display the data and then take a specific action.

