Provide help text, hyperlinks, or web content on a work item form
Azure DevOps Server 2022 - Azure DevOps Server 2019 | TFS 2018 - TFS 2013
When you customize your work item form, you may want to provide information or links to content that helps your team define the fields in the form. If you embed information in the form or make it easily available, team members will be better able to track useful data.
By using the form controls that are described in this topic, you can add tooltip text for individual fields, stand-alone text, or hyperlinks to Web pages, or embed HTML content or Web content in the form.
To modify an existing WIT, you modify the XML definition file for the WIT and then import it to your project based on the process model you use.
Tip
With witadmin, you can import and export definition files. Other tools you can use include the Process Editor (requires that you have installed a version of Visual Studio). Install TFS Power Tools. Or, you can use the TFS Team Project Manager, an open-source client available from GitHub.
Provide help text or tooltip text
You can provide Help text in one of two ways. In the first method, you add the HELPTEXT element as a child to the FIELD element in the FIELDS section of the type definition. By using HELPTEXT, you create the tooltip for the field. You are limited to 255 characters with this method.
<FIELD name="Sub-Title" refname="ACME.ACE.ImpactStatement" type="HTML" >
<HELPTEXT>Provide information about the impact to the ACE organization. </HELPTEXT>
</FIELD>
In the second method, you specify stand-alone text by using the LabelText and Text child elements. In this method, you can add as much information as you want, and the text is always present on the form. No user action is required. You can also add an optional link by using the Link element to more information, as shown in the following example.
<Control FieldName=" ACME.ACE.ImpactStatement" Type="HTMLControl" Label="Impact" LabelPosition="Left">
      <LabelText>
      <Text>Provide information about the impact to the ACE organization. Specifically address the following: customer segment, target strategic opportunity, resources required, and time dependencies. For more detailed information, see the Impact Statement specification at:
         <Link OpenInNewWindow="true" UrlRoot=http://ACE.ImpactStatement.aspx />
      </Text>
      </LabelText>
</Control>
Add stand-alone text and hyperlink field labels
You can add text to a work item form that is not associated with any work item field by using the Type attribute LabelControl option of the Control element. The text can be plain or provide a hyperlink. Also, you can attach a hyperlink to an added field label by using the FieldControl option.
Example: plain text label
The following example adds the plain text "Fill in the details of the bug here. Fields that are not required are recommended to be filled in." to the work item field.
<Control Type="LabelControl" Label="Fill in the details of the bug here. Fields that are not required are recommended to be filled in." />
Example: hyperlink field label
The following example illustrates how to add a hyperlink to a field label.
<Control Type="FieldControl" FieldName="System.Title" LabelPosition="Left" Label="Title 1"
      <LabelText>
      <Text>
         <Link UrlRoot="http://www.live.com/" />
               Title 2
      </Text>
      </LabelText>
</Control>
Note
For Team Foundation clients who have not upgraded to the latest version, the Label attribute text appears. For Visual Studio 2012 clients, the Text tag is displayed as a hyperlink in which the URL is defined by the Link tag.
Example: field label with hyperlink for part of the text
The following example illustrates how to add a hyperlink to part of a field label. In this example, the URL is determined by the values that are assigned to the Param elements based on the specific work item.
<Control Type="FieldControl" FieldName="System.IterationPath">
      <LabelText LabelPosition="Left">
      <Text>
         <Link UrlRoot="@ProcessGuidance" UrlPath="{0}.html">
               <Param Index="0" vValue"System.WorkItemType"/>         </Link>
               Iteration Path
      </Text>
      <Text> (must be 3 levels deep)</Text>
      </LabelText>
</Control>
Example: hyperlink text label

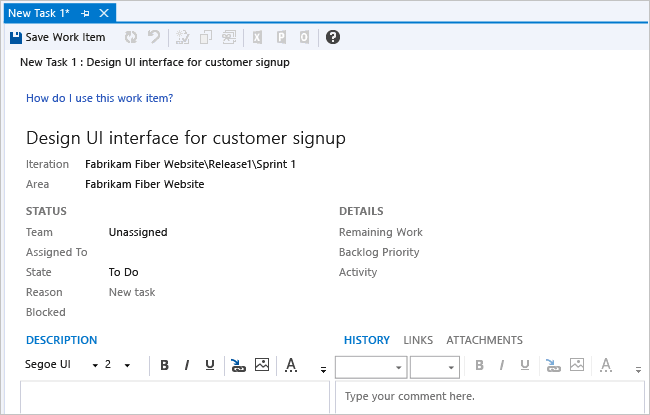
Hyperlink Text Label
The following example illustrates how to add a hyperlink to displayed text in a work item form.
<Group>
      <Column PercentWidth="100">
      <!-- Standalone label control 2 -->
      <Control Type="LabelControl" Label="How do I use this work item?">
         <Link UrlRoot="http://www.live.com"></Link>
      </Control>
      </Column>
</Group>
Example: combining text and hyperlinks in a single label

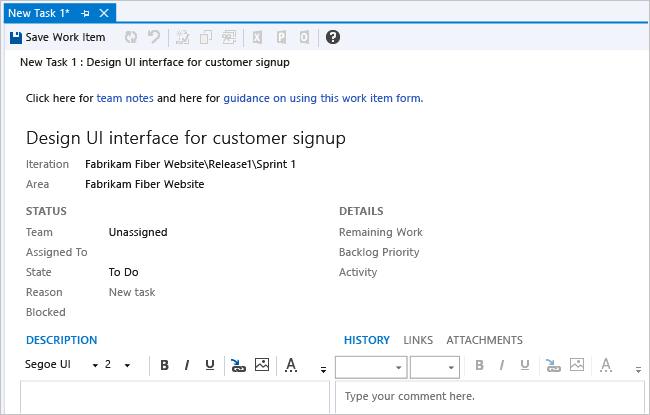
Combining Text and Hyperlinks in a Single Label
The following example illustrates how to add two hyperlinks to parts of a label on a work item form.
<Group>
      <Column PercentWidth="100">
      <!-- Standalone label control 3 -->
      <Control Type="LabelControl" Name="Microsoft.VSTS.Common.GuidanceLabel3">
         <LabelText>
               <Text>Click here for </Text>
               <Text>
               <Link UrlRoot="http://www.msn.com"></Link>
               work item guidance</Text>
               <Text> or here for </Text>
               <Text>
               <Link UrlRoot="http://www.msdn.com"></Link>
               process guidance
               </Text>
         </LabelText>
      </Control>
      </Column>
</Group>
Example: parameter-generated hyperlink field label
The following example illustrates how to add a hyperlink to a field label that is generated from parameter values that are evaluated for the open work item.
<Control Type="FieldControl" FieldName="System.State" Label="&State:" LabelPosition="Left">
      <Link OpenInNewWindow="true" UrlRoot="http://" UrlPath="myserver.com:8080/tfs/myproject/{0}/_workItems#_a=edit&id=">      <Param Index="0" Value="System.State" Type ="Original"/>
      </Link>
</Control>
Displaying web content
You can use the Type attribute WebpageControl option to display Web content in the work item form as a control instead of linking to a separate Web page. This display can be useful for providing metrics that support team members in viewing the contents of a report, dashboard, or other HTML-based content. You can provide a link to the content or embed the raw HTML content in a CDATA tag.
Example: display content provided by a URI
The following example shows how you can embed the content from a Web page by providing the URL to the page by using the WebpageControlOptions and Link elements.
      <Group>
      <Column PercentWidth="100">
         <Control Type="WebpageControl" Name="WssPortalPage" Label="WssPortalPage" LabelPosition="Top" >
               <WebpageControlOptions AllowScript="true">
               <Link UrlRoot="http://www.msdn.com" />
               </WebpageControlOptions>
         </Control>
      </Column>
      </Group>
Example: display content provided in a CDATA tag
The following example shows how you can add HTML content to a work item form that is contained in a CDATA tag.
<Control Type="WebpageControl">
      <WebpageControlOptions>
      <Content>
        <![CDATA[Place HTML Formatted Content Here ]]>
          </Content>
      </WebpageControlOptions>
</Control>
Embed process guidance
To make process guidance available on the work item form, you may want to add a tab that contains information about the workflow and usage of the work item type. You can do this by using the Type attribute WebpageControl option. This option provides support for embedding rich formatted text and images into the form by using the WebpageControlOptions and Content child elements.
Note
The TabGroup and Tab elements are deprecated in the new work item form.
<FORM>
. . .
<TabGroup>
. . .
      <Tab Label="Process Guidance">
      <Group>
         <Column PercentWidth="100">
               <Control Type="WebpageControl">
                 <WebpageControlOptions>
                       <Content>
                       <![CDATA[Place HTML Formatted Process Guidance Content Here ]]>
                  </Content>
                  </WebpageControlOptions>
               </Control>
         </Column>
      </Group>
      </Tab>
. . .
</TabGroup>
. . .
</FORM>