Step 1: Create a Project and Add Labels to Your Form
Note
This article applies to Visual Studio 2015. If you're looking for the latest Visual Studio documentation, see Visual Studio documentation. We recommend upgrading to the latest version of Visual Studio. Download it here
As the first steps in developing this quiz, you create the project, and you add labels, a button, and other controls to a form. You also set properties for each control that you add. The project will contain the form, the controls, and (later in the tutorial) code. The button starts the quiz, the labels show the quiz problems, and the other controls show the quiz answers and the time that remains to finish the quiz.
Note
This topic is part of a tutorial series about basic coding concepts. For an overview of the tutorial, see Tutorial 2: Create a Timed Math Quiz.
To create a project and set properties for a form
On the menu bar, choose File, New, Project.
In the Installed Templates list, choose either C# or Visual Basic.
In the list of templates, choose the Windows Forms Application template, name it Math Quiz, and then choose the OK button.
A form that's named Form1.cs or Form1.vb appears, depending on the programming language that you chose.
Choose the form, and then change its Text property to Math Quiz.
The Properties window contains properties for the form.
Change the size of the form to 500 pixels wide by 400 pixels tall.
You can resize the form by dragging its edges until the correct size appears in the lower-left corner of the integrated development environment (IDE). As an alternative, you can change the values of the Size property.
Change the value of the FormBorderStyle property to Fixed3D, and set the MaximizeBox property to False.
These values prevent quiz takers from resizing the form.
To create the Time Remaining box
Add a Label control from the Toolbox, and then set the value of its (Name) property to
timeLabel.This label will become a box in the upper-right corner that shows the number of seconds that remain in the quiz.
Change the AutoSize property to False so that you can resize the box.
Change the BorderStyle property to FixedSingle to draw a line around the box.
Set the Size property to 200, 30.
Move the label to the upper-right corner of the form, where blue spacer lines will appear.
These lines help you align controls on the form.
In the Properties window, choose the Text property, and then choose the Backspace key to clear its value.
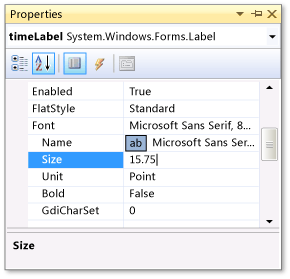
Choose the plus sign (+) next to the Font property, and then change the value of the Size property to 15.75.
You can change several font properties, as the following picture shows.
 Properties window showing font size
Add another Label control from the Toolbox, and then set its font size to 15.75.
Set the Text property to Time Left.
Move the label so that it lines up just to the left of the timeLabel label.
To add controls for the addition problems
Add a Label control from the Toolbox, and then set its Text property to ? (question mark).
Set the AutoSize property to False.
Set the Size property to 60, 50.
Set the font size to 18.
Set the TextAlign property to MiddleCenter.
Set the Location property to 50, 75 to position the control on the form.
Set the (Name) property to plusLeftLabel.
Choose the plusLeftLabel label, and then choose either the Ctrl+C keys or Copy on the Edit menu.
Paste the label three times by choosing either the Ctrl+V keys or Paste on the Edit menu.
Arrange the three new labels so that they are in a row to the right of the plusLeftLabel label.
You can use the spacer lines to space them out and line them up.
Set the value of the second label's Text property to + (plus sign).
Set the value of the third label's (Name) property to plusRightLabel.
Set the value of the fourth label's Text property to = (equal sign).
Add a NumericUpDown control from the Toolbox, set its font size to 18, and set its width to 100.
You'll learn more about this kind of control later.
Line up the NumericUpDown control with the label controls for the addition problem.
Change the value of the (Name) property for the NumericUpDown control to sum.
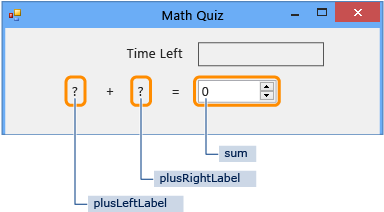
You've created the first row, as the following picture shows.
 First row of math quiz
To add controls for the subtraction, multiplication, and division problems
Copy all five controls for the addition problem (the four Label controls and the NumericUpDown control), and then paste them.
The form contains five new controls, which are still selected.
Move all of the controls into place so that they line up below the addition controls.
You can use the spacer lines to give enough distance between the two rows.
Change the value of the Text property for the second label to – (minus sign).
Name the first question-mark label minusLeftLabel.
Name the second question-mark label minusRightLabel.
Name the NumericUpDown control difference.
Paste the five controls two more times.
For the third row, name the first label timesLeftLabel, change the second label's Text property to × (multiplication sign), name the third label timesRightLabel, and name the NumericUpDown control product.
For the fourth row, name the first label dividedLeftLabel, change the second label's Text property to ÷ (division sign), name the third label dividedRightLabel, and name the NumericUpDown control quotient.
Note
You can copy the multiplication sign × and the division sign ÷ from this tutorial and paste them onto the form.
To add a start button and set the tab-index order
Add a Button control from the Toolbox, and then set its (Name) property to startButton.
Set the Text property to Start the quiz.
Set the font size to 14.
Set the AutoSize property to True, which causes the button to automatically resize to fit the text.
Center the button near the bottom of the form.
Set the value of the TabIndex property for the startButton control to 1.
Note
The TabIndex property sets the order of the controls when the quiz taker chooses the Tab key. To see how it works, open any dialog box (for example, on the menu bar, choose File, Open), and then choose the Tab key a few times. Watch how your cursor moves from control to control each time that you choose the Tab key. A programmer decided the order when creating that form.
Set the value of the TabIndex property for the NumericUpDown sum control to 2, for the difference control to 3, for the product control to 4, and for the quotient control to 5.
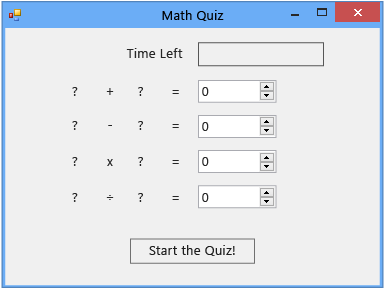
The form should look like the following illustration.
 Initial math quiz form
To verify whether the TabIndex property works as you expect, save and run your program by choosing the F5 key, or by choosing Debug, Start Debugging on the menu bar, and then choose the Tab key a few times.
To continue or review
To go to the next tutorial step, see Step 2: Create a Random Addition Problem.
To return to the overview topic, see Tutorial 2: Create a Timed Math Quiz.