Notifiche locali in Xamarin.Forms
Le notifiche locali sono avvisi inviati dalle applicazioni installate in un dispositivo mobile. Le notifiche locali vengono spesso usate per funzionalità come:
- Eventi del calendario
- Promemoria
- Trigger basati sulla posizione
Ogni piattaforma gestisce in modo diverso la creazione, la visualizzazione e l'utilizzo delle notifiche locali. Questo articolo illustra come creare un'astrazione multipiattaforma per inviare, pianificare e ricevere notifiche locali con Xamarin.Forms.
Creare un'interfaccia multipiattaforma
L'applicazione Xamarin.Forms deve creare e utilizzare le notifiche senza preoccuparsi delle implementazioni della piattaforma sottostanti. L'interfaccia seguente INotificationManager viene implementata nella libreria di codice condivisa e definisce un'API multipiattaforma che l'applicazione può usare per interagire con le notifiche:
public interface INotificationManager
{
    event EventHandler NotificationReceived;
    void Initialize();
    void SendNotification(string title, string message, DateTime? notifyTime = null);
    void ReceiveNotification(string title, string message);
}
Questa interfaccia verrà implementata in ogni progetto di piattaforma. L'evento NotificationReceived consente all'applicazione di gestire le notifiche in ingresso. Il Initialize metodo deve eseguire qualsiasi logica della piattaforma nativa necessaria per preparare il sistema di notifica. Il SendNotification metodo deve inviare una notifica, in corrispondenza di un oggetto facoltativo DateTime. Il ReceiveNotification metodo deve essere chiamato dalla piattaforma sottostante quando viene ricevuto un messaggio.
Utilizzare l'interfaccia in Xamarin.Forms
Dopo aver creato un'interfaccia, può essere utilizzata nel progetto condiviso Xamarin.Forms anche se le implementazioni della piattaforma non sono ancora state create. L'applicazione di esempio contiene un ContentPage oggetto denominato MainPage.xaml con il contenuto seguente:
<StackLayout Margin="0,35,0,0"
             x:Name="stackLayout">
    <Label Text="Click the button below to create a local notification."
           TextColor="Red"
           HorizontalOptions="Center"
           VerticalOptions="Start" />
    <Button Text="Create Notification"
            HorizontalOptions="Center"
            VerticalOptions="Start"
            Clicked="OnSendClick" />
    <Label Text="Click the button below to schedule a local notification for in 10 seconds time."
           TextColor="Red"
           HorizontalOptions="Center"
           VerticalOptions="Start" />
    <Button Text="Create Notification"
            HorizontalOptions="Center"
            VerticalOptions="Start"
            Clicked="OnScheduleClick" />
</StackLayout>
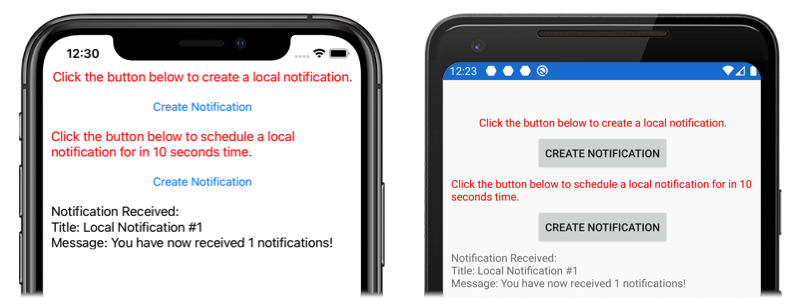
Il layout contiene Label elementi che illustrano le istruzioni e Button gli elementi che inviano o pianificano una notifica quando viene toccata.
Il code-behind della MainPage classe gestisce l'invio e la ricezione di notifiche:
public partial class MainPage : ContentPage
{
    INotificationManager notificationManager;
    int notificationNumber = 0;

    public MainPage()
    {
        InitializeComponent();

        notificationManager = DependencyService.Get<INotificationManager>();
        notificationManager.NotificationReceived += (sender, eventArgs) =>
        {
            var evtData = (NotificationEventArgs)eventArgs;
            ShowNotification(evtData.Title, evtData.Message);
        };
    }

    void OnSendClick(object sender, EventArgs e)
    {
        notificationNumber++;
        string title = $"Local Notification #{notificationNumber}";
        string message = $"You have now received {notificationNumber} notifications!";
        notificationManager.SendNotification(title, message);
    }

    void OnScheduleClick(object sender, EventArgs e)
    {
        notificationNumber++;
        string title = $"Local Notification #{notificationNumber}";
        string message = $"You have now received {notificationNumber} notifications!";
        notificationManager.SendNotification(title, message, DateTime.Now.AddSeconds(10));
    }

    void ShowNotification(string title, string message)
    {
        Device.BeginInvokeOnMainThread(() =>
        {
            var msg = new Label()
            {
                Text = $"Notification Received:\nTitle: {title}\nMessage: {message}"
            };
            stackLayout.Children.Add(msg);
        });
    }
}
Il MainPage costruttore della classe usa per Xamarin.FormsDependencyService recuperare un'istanza specifica della piattaforma dell'oggetto INotificationManager. I OnSendClick metodi e OnScheduleClicked usano l'istanza INotificationManager per inviare e pianificare nuove notifiche. Il ShowNotification metodo viene chiamato dal gestore eventi associato all'evento NotificationReceived e inserisce un nuovo Label oggetto nella pagina quando viene richiamato l'evento.
Il gestore eventi esegue il NotificationReceived cast degli argomenti dell'evento a NotificationEventArgs. Questo tipo è definito nel progetto condiviso Xamarin.Forms :
public class NotificationEventArgs : EventArgs
{
    public string Title { get; set; }
    public string Message { get; set; }
}
Per altre informazioni su Xamarin.FormsDependencyService, vedere Xamarin.Forms DependencyService.
Creare l'implementazione dell'interfaccia Android
Affinché l'applicazione Xamarin.Forms invii e riceva notifiche in Android, l'applicazione deve fornire un'implementazione dell'interfaccia INotificationManager .
Creare la classe AndroidNotificationManager
La AndroidNotificationManager classe implementa l'interfaccia INotificationManager :
using System;
using Android.App;
using Android.Content;
using Android.Graphics;
using Android.OS;
using AndroidX.Core.App;
using Xamarin.Forms;
using AndroidApp = Android.App.Application;

[assembly: Dependency(typeof(LocalNotifications.Droid.AndroidNotificationManager))]
namespace LocalNotifications.Droid
{
    public class AndroidNotificationManager : INotificationManager
    {
        const string channelId = "default";
        const string channelName = "Default";
        const string channelDescription = "The default channel for notifications.";

        public const string TitleKey = "title";
        public const string MessageKey = "message";

        bool channelInitialized = false;
        int messageId = 0;
        int pendingIntentId = 0;

        NotificationManager manager;

        public event EventHandler NotificationReceived;

        public static AndroidNotificationManager Instance { get; private set; }

        public AndroidNotificationManager() => Initialize();

        public void Initialize()
        {
            if (Instance == null)
            {
                CreateNotificationChannel();
                Instance = this;
            }
        }

        public void SendNotification(string title, string message, DateTime? notifyTime = null)
        {
            if (!channelInitialized)
            {
                CreateNotificationChannel();
            }

            if (notifyTime != null)
            {
                Intent intent = new Intent(AndroidApp.Context, typeof(AlarmHandler));
                intent.PutExtra(TitleKey, title);
                intent.PutExtra(MessageKey, message);

                PendingIntent pendingIntent = PendingIntent.GetBroadcast(AndroidApp.Context, pendingIntentId++, intent, PendingIntentFlags.CancelCurrent);
                long triggerTime = GetNotifyTime(notifyTime.Value);
                AlarmManager alarmManager = AndroidApp.Context.GetSystemService(Context.AlarmService) as AlarmManager;
                alarmManager.Set(AlarmType.RtcWakeup, triggerTime, pendingIntent);
            }
            else
            {
                Show(title, message);
            }
        }

        public void ReceiveNotification(string title, string message)
        {
            var args = new NotificationEventArgs()
            {
                Title = title,
                Message = message,
            };
            NotificationReceived?.Invoke(null, args);
        }

        public void Show(string title, string message)
        {
            Intent intent = new Intent(AndroidApp.Context, typeof(MainActivity));
            intent.PutExtra(TitleKey, title);
            intent.PutExtra(MessageKey, message);

            PendingIntent pendingIntent = PendingIntent.GetActivity(AndroidApp.Context, pendingIntentId++, intent, PendingIntentFlags.UpdateCurrent);

            NotificationCompat.Builder builder = new NotificationCompat.Builder(AndroidApp.Context, channelId)
                .SetContentIntent(pendingIntent)
                .SetContentTitle(title)
                .SetContentText(message)
                .SetLargeIcon(BitmapFactory.DecodeResource(AndroidApp.Context.Resources, Resource.Drawable.xamagonBlue))
                .SetSmallIcon(Resource.Drawable.xamagonBlue)
                .SetDefaults((int)NotificationDefaults.Sound | (int)NotificationDefaults.Vibrate);

            Notification notification = builder.Build();
            manager.Notify(messageId++, notification);
        }

        void CreateNotificationChannel()
        {
            manager = (NotificationManager)AndroidApp.Context.GetSystemService(AndroidApp.NotificationService);

            if (Build.VERSION.SdkInt >= BuildVersionCodes.O)
            {
                var channelNameJava = new Java.Lang.String(channelName);
                var channel = new NotificationChannel(channelId, channelNameJava, NotificationImportance.Default)
                {
                    Description = channelDescription
                };
                manager.CreateNotificationChannel(channel);
            }

            channelInitialized = true;
        }

        long GetNotifyTime(DateTime notifyTime)
        {
            DateTime utcTime = TimeZoneInfo.ConvertTimeToUtc(notifyTime);
            double epochDiff = (new DateTime(1970, 1, 1) - DateTime.MinValue).TotalSeconds;
            long utcAlarmTime = utcTime.AddSeconds(-epochDiff).Ticks / 10000;
            return utcAlarmTime; // milliseconds
        }
    }
}
L'attributo assembly sopra lo spazio dei nomi registra l'implementazione dell'interfaccia INotificationManager con .DependencyService
Android consente alle applicazioni di definire più canali per le notifiche. Il Initialize metodo crea un canale di base usato dall'applicazione di esempio per inviare notifiche. Il SendNotification metodo definisce la logica specifica della piattaforma necessaria per creare e inviare una notifica. Il ReceiveNotification metodo viene chiamato dal sistema operativo Android quando viene ricevuto un messaggio e richiama il gestore eventi.
Il SendNotification metodo crea immediatamente una notifica locale o in corrispondenza di un oggetto esatto DateTime. Una notifica può essere pianificata per un uso esatto DateTime della AlarmManager classe e la notifica verrà ricevuta da un oggetto che deriva dalla BroadcastReceiver classe :
[BroadcastReceiver(Enabled = true, Label = "Local Notifications Broadcast Receiver")]
public class AlarmHandler : BroadcastReceiver
{
    public override void OnReceive(Context context, Intent intent)
    {
        if (intent?.Extras != null)
        {
            string title = intent.GetStringExtra(AndroidNotificationManager.TitleKey);
            string message = intent.GetStringExtra(AndroidNotificationManager.MessageKey);

            AndroidNotificationManager manager = AndroidNotificationManager.Instance ?? new AndroidNotificationManager();
            manager.Show(title, message);
        }
    }
}
Importante
Per impostazione predefinita, le notifiche pianificate usando la classe non supereranno il AlarmManager riavvio del dispositivo. Tuttavia, è possibile progettare l'applicazione per riprogrammare automaticamente le notifiche se il dispositivo viene riavviato. Per altre informazioni, vedere Avviare un allarme quando il dispositivo viene riavviato in Pianificazione avvisi ripetuti in developer.android.com. Per informazioni sull'elaborazione in background in Android, vedere Guida all'elaborazione in background in developer.android.com.
Per altre informazioni sui ricevitori di trasmissione, vedere Ricevitori di trasmissione in Xamarin.Android.
Gestire le notifiche in ingresso in Android
La MainActivity classe deve rilevare le notifiche in ingresso e notificare all'istanza AndroidNotificationManager . L'attributo Activity nella MainActivity classe deve specificare un LaunchMode valore di LaunchMode.SingleTop:
[Activity(
        //...
        LaunchMode = LaunchMode.SingleTop]
    public class MainActivity : global::Xamarin.Forms.Platform.Android.FormsAppCompatActivity
    {
        // ...
    }
La SingleTop modalità impedisce l'avvio di più istanze di un oggetto Activity mentre l'applicazione è in primo piano. Questo LaunchMode potrebbe non essere appropriato per le applicazioni che avviano più attività in scenari di notifica più complessi. Per altre informazioni sui valori di LaunchMode enumerazione, vedere Android Activity LaunchMode.
MainActivity Nella classe viene modificata per ricevere le notifiche in ingresso:
protected override void OnCreate(Bundle savedInstanceState)
{
    // ...

    global::Xamarin.Forms.Forms.Init(this, savedInstanceState);
    LoadApplication(new App());
    CreateNotificationFromIntent(Intent);
}

protected override void OnNewIntent(Intent intent)
{
    CreateNotificationFromIntent(intent);
}

void CreateNotificationFromIntent(Intent intent)
{
    if (intent?.Extras != null)
    {
        string title = intent.GetStringExtra(AndroidNotificationManager.TitleKey);
        string message = intent.GetStringExtra(AndroidNotificationManager.MessageKey);
        DependencyService.Get<INotificationManager>().ReceiveNotification(title, message);
    }
}
Il CreateNotificationFromIntent metodo estrae i dati di notifica dall'argomento intent e li fornisce all'oggetto AndroidNotificationManager utilizzando il ReceiveNotification metodo . Il CreateNotificationFromIntent metodo viene chiamato sia dal metodo che dal OnCreate OnNewIntent metodo :
- Quando l'applicazione viene avviata dai dati di notifica, i
Intentdati verranno passati alOnCreatemetodo . - Se l'applicazione è già in primo piano, i
Intentdati verranno passati alOnNewIntentmetodo .
Android offre molte opzioni avanzate per le notifiche. Per altre informazioni, vedere Notifiche in Xamarin.Android.
Creare l'implementazione dell'interfaccia iOS
Affinché l'applicazione Xamarin.Forms invii e riceva notifiche in iOS, l'applicazione deve fornire un'implementazione di INotificationManager.
Creare la classe iOSNotificationManager
La iOSNotificationManager classe implementa l'interfaccia INotificationManager :
using System;
using Foundation;
using UserNotifications;
using Xamarin.Forms;

[assembly: Dependency(typeof(LocalNotifications.iOS.iOSNotificationManager))]
namespace LocalNotifications.iOS
{
    public class iOSNotificationManager : INotificationManager
    {
        int messageId = 0;
        bool hasNotificationsPermission;
        public event EventHandler NotificationReceived;

        public void Initialize()
        {
            // request the permission to use local notifications
            UNUserNotificationCenter.Current.RequestAuthorization(UNAuthorizationOptions.Alert, (approved, err) =>
            {
                hasNotificationsPermission = approved;
            });
        }

        public void SendNotification(string title, string message, DateTime? notifyTime = null)
        {
            // EARLY OUT: app doesn't have permissions
            if (!hasNotificationsPermission)
            {
                return;
            }

            messageId++;

            var content = new UNMutableNotificationContent()
            {
                Title = title,
                Subtitle = "",
                Body = message,
                Badge = 1
            };

            UNNotificationTrigger trigger;
            if (notifyTime != null)
            {
                // Create a calendar-based trigger.
                trigger = UNCalendarNotificationTrigger.CreateTrigger(GetNSDateComponents(notifyTime.Value), false);
            }
            else
            {
                // Create a time-based trigger, interval is in seconds and must be greater than 0.
                trigger = UNTimeIntervalNotificationTrigger.CreateTrigger(0.25, false);
            }

            var request = UNNotificationRequest.FromIdentifier(messageId.ToString(), content, trigger);
            UNUserNotificationCenter.Current.AddNotificationRequest(request, (err) =>
            {
                if (err != null)
                {
                    throw new Exception($"Failed to schedule notification: {err}");
                }
            });
        }

        public void ReceiveNotification(string title, string message)
        {
            var args = new NotificationEventArgs()
            {
                Title = title,
                Message = message
            };
            NotificationReceived?.Invoke(null, args);
        }

        NSDateComponents GetNSDateComponents(DateTime dateTime)
        {
            return new NSDateComponents
            {
                Month = dateTime.Month,
                Day = dateTime.Day,
                Year = dateTime.Year,
                Hour = dateTime.Hour,
                Minute = dateTime.Minute,
                Second = dateTime.Second
            };
        }
    }
}
L'attributo assembly sopra lo spazio dei nomi registra l'implementazione dell'interfaccia INotificationManager con .DependencyService
In iOS è necessario richiedere l'autorizzazione per usare le notifiche prima di tentare di pianificare una notifica. Il Initialize metodo richiede l'autorizzazione per l'uso delle notifiche locali. Il SendNotification metodo definisce la logica necessaria per creare e inviare una notifica. Il ReceiveNotification metodo verrà chiamato da iOS quando viene ricevuto un messaggio e richiama il gestore eventi.
Nota
Il SendNotification metodo crea immediatamente una notifica locale, usando un UNTimeIntervalNotificationTrigger oggetto o in corrispondenza di un oggetto con DateTime un UNCalendarNotificationTrigger oggetto .
Gestire le notifiche in ingresso in iOS
In iOS è necessario creare un delegato che sottoclassi gestisca i UNUserNotificationCenterDelegate messaggi in ingresso. L'applicazione di esempio definisce una iOSNotificationReceiver classe:
public class iOSNotificationReceiver : UNUserNotificationCenterDelegate
{
    public override void WillPresentNotification(UNUserNotificationCenter center, UNNotification notification, Action<UNNotificationPresentationOptions> completionHandler)
    {
        ProcessNotification(notification);
        completionHandler(UNNotificationPresentationOptions.Alert);
    }

    void ProcessNotification(UNNotification notification)
    {
        string title = notification.Request.Content.Title;
        string message = notification.Request.Content.Body;

        DependencyService.Get<INotificationManager>().ReceiveNotification(title, message);
    }
}
Questa classe usa per ottenere un'istanza DependencyService della iOSNotificationManager classe e fornisce dati di notifica in ingresso al ReceiveNotification metodo .
La AppDelegate classe deve specificare un iOSNotificationReceiver oggetto come delegato durante l'avvio UNUserNotificationCenter dell'applicazione. Questo si verifica nel FinishedLaunching metodo :
public override bool FinishedLaunching(UIApplication app, NSDictionary options)
{
    global::Xamarin.Forms.Forms.Init();

    UNUserNotificationCenter.Current.Delegate = new iOSNotificationReceiver();

    LoadApplication(new App());
    return base.FinishedLaunching(app, options);
}
iOS offre molte opzioni avanzate per le notifiche. Per altre informazioni, vedere Notifiche in Xamarin.iOS.
Testare l'applicazione
Dopo che i progetti della piattaforma contengono un'implementazione registrata dell'interfaccia INotificationManager , l'applicazione può essere testata in entrambe le piattaforme. Eseguire l'applicazione e fare clic su uno dei pulsanti Crea notifica per creare una notifica.
In Android le notifiche verranno visualizzate nell'area di notifica. Quando viene toccata la notifica, l'applicazione riceve la notifica e visualizza un messaggio:

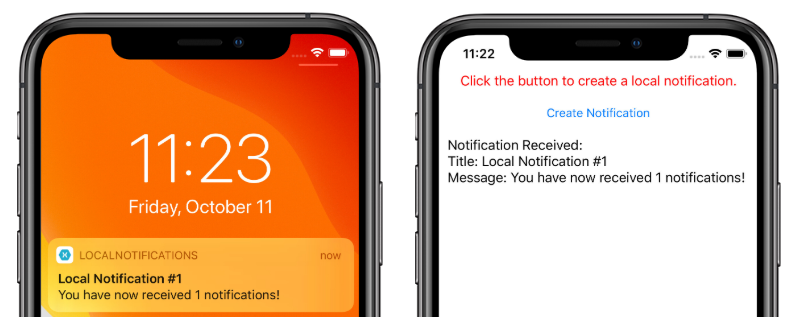
In iOS le notifiche in ingresso vengono ricevute automaticamente dall'applicazione senza richiedere l'input dell'utente. L'applicazione riceve la notifica e visualizza un messaggio:

