Come ritagliare una maschera geometrica
In questo argomento viene descritto come utilizzare una maschera geometrica per ritagliare un'area di un livello.
Per ritagliare un'area con una maschera geometrica
- Creare l'ID2D1Geometry che verrà usato per ritagliare l'area.
- Chiamare ID2D1RenderTarget::CreateLayer per creare un livello.
- Chiamare ID2D1RenderTarget::P ushLayer e passare la maschera geometrica definita nel passaggio 1.
- Disegnare il contenuto da ritagliare.
- Chiamare ID2D1RenderTarget::P opLayer per rimuovere il livello dalla destinazione di rendering.
Nell'esempio seguente viene utilizzata una maschera geometrica per ritagliare un'immagine e diversi rettangoli. La figura seguente mostra la bitmap originale a sinistra e la bitmap ritagliata alla maschera geometrica a destra.
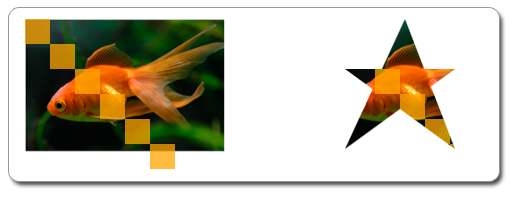
Per ritagliare il disegno come illustrato nella figura precedente, creare un oggetto ID2D1PathGeometry e usarlo per definire un star. A tal fine, osservare il codice indicato di seguito.
// Create the path geometry.
if (SUCCEEDED(hr))
{
    hr = m_pD2DFactory->CreatePathGeometry(&m_pPathGeometry);
}

// Write to the path geometry using the geometry sink to create a star.
if (SUCCEEDED(hr))
{
    hr = m_pPathGeometry->Open(&pSink);
}
if (SUCCEEDED(hr))
{
    pSink->SetFillMode(D2D1_FILL_MODE_WINDING);
    pSink->BeginFigure(D2D1::Point2F(20, 50), D2D1_FIGURE_BEGIN_FILLED);
    pSink->AddLine(D2D1::Point2F(130, 50));
    pSink->AddLine(D2D1::Point2F(20, 130));
    pSink->AddLine(D2D1::Point2F(80, 0));
    pSink->AddLine(D2D1::Point2F(130, 130));
    pSink->EndFigure(D2D1_FIGURE_END_CLOSED);

    hr = pSink->Close();
}

SafeRelease(&pSink);
Chiamare CreateLayer per creare un livello.
Nota
A partire da Windows 8, non è necessario chiamare CreateLayer. Nella maggior parte delle situazioni le prestazioni sono migliori se non si chiama questo metodo e Direct2D gestisce le risorse del livello.
Chiamare PushLayer con la maschera geometrica per spingere il livello. Disegnare il contenuto da ritagliare, quindi chiamare PopLayer per visualizzare il livello. In questo modo viene prodotto il disegno a forma di star. A tal fine, osservare il codice indicato di seguito.
HRESULT DemoApp::RenderWithLayer(ID2D1RenderTarget *pRT)
{
    HRESULT hr = S_OK;

    // Create a layer.
    ID2D1Layer *pLayer = NULL;
    hr = pRT->CreateLayer(NULL, &pLayer);

    if (SUCCEEDED(hr))
    {
        pRT->SetTransform(D2D1::Matrix3x2F::Translation(350, 50));

        // Push the layer with the geometric mask.
        pRT->PushLayer(
            D2D1::LayerParameters(D2D1::InfiniteRect(), m_pPathGeometry),
            pLayer
            );


        pRT->DrawBitmap(m_pOrigBitmap, D2D1::RectF(0, 0, 200, 133));
        pRT->FillRectangle(D2D1::RectF(0.f, 0.f, 25.f, 25.f), m_pSolidColorBrush);
        pRT->FillRectangle(D2D1::RectF(25.f, 25.f, 50.f, 50.f), m_pSolidColorBrush);
        pRT->FillRectangle(D2D1::RectF(50.f, 50.f, 75.f, 75.f), m_pSolidColorBrush);
        pRT->FillRectangle(D2D1::RectF(75.f, 75.f, 100.f, 100.f), m_pSolidColorBrush);
        pRT->FillRectangle(D2D1::RectF(100.f, 100.f, 125.f, 125.f), m_pSolidColorBrush);
        pRT->FillRectangle(D2D1::RectF(125.f, 125.f, 150.f, 150.f), m_pSolidColorBrush);


        pRT->PopLayer();
    }

    SafeRelease(&pLayer);

    return hr;
}
Argomenti correlati