ListView basics and virtualization concepts
ListView is one of the most important of all XAML controls: not only is it used in almost all Windows and Windows Phone applications, but it is a rich control with many possibilities… and therefore also many possibilities for the application developer to make mistakes which will kill application performance as ListView is generally used to display many items, which multiply the effects of bad practices. I’ll try to write a series of article around the ListView, going from standard usage to more advanced scenarios: this is the first article of this series and describe the basic usage of the ListView as well as the essential concepts around virtualization.
The first part of this post is a quick recap on ListView basic behavior. It can be skipped by developers who are already familiar with the ListView control and are only interested by virtualization concepts which are presented in the second part of the post.
Note: Starting with Windows Phone 8.1 and the concept of Universal Applications, XAML implementation is shared between Windows and Windows Phone (note: I am not speaking of Silverlight application for Windows Phone) and controls such as ListView which are available on both platforms just have a few behavior differences between the two platforms. I will almost exclusively use screenshots from a sample Windows Phone application but unless explicitly stated, everything I present applies to both platforms.
Also note that GridView and ListView are basically the same class and have only very few differences. The most obvious one is that ListView uses a linear panel while GridView uses… a grid panel.
ListView basics
As its names stands, ListView is made to display lists of items. These items can be in a flat list or in a grouped list (full trees of items are not supported and naïve implementations will kill performance; a later article in this series will illustrate some possible approaches to the tree scenario). As of today, ListView should be the preferred control to display these lists, i.e. ListBox should be considered as deprecated as most development efforts now focus on ListView and the associated panels.
In the simplest case, a ListView only needs its ItemsSource property to be set to a collection of objects. Each object is displayed inside a ListViewItem and these ListViewItems are positioned by a panel: it is typically the responsibility of the panel to generate a linear or a grid layout. This leads us to three important properties of the ListView:
- ItemTemplate:
this specifies how each ListViewItem should display the data it represents - ItemContainerStyle:
the ListViewItem’s template itself is responsible of the rendering of elements
linked to the usage of a list, such as the selection or some interaction
feedback (focused element, pointer down, etc). - ItemPanel:
specifies the layout of the ListViewItems.
Amongst these properties, ItemTemplate is the only one almost always set. ItemContainerStyle and ItemPanel defaults value are most of time the most efficient choices.
NOTE: between Window 8 and Windows 8.1, the default panel for ListView has been changed. New panels have been introduced, ItemsStackPanel and ItemsWrapGrid, and they bring a lot of performance improvements. If you are migrating a Windows 8 application to 8.1, you should double-check all ListView’s use of ItemPanel in order to take advantage of the new panels. This is explained with more details in the Virtualization section of this article.
Let’s say that we have this (simplified) Wine database model:
public class Designation{
public string Name { get; }
public Region Region { get; }
}
public class Region {
public string Name { get; }
public List<Designation> Designations { get; }
}
public class FlatModel {
public ObservableCollection<Designation> Designations { get; }
}
The XAML needed to display all wine designations in a flat list would typically be:
<Page
<Page.Resources>
<DataTemplate x:Name="DesignationFlatTemplate">
<StackPanel>
<TextBlock Text="{Binding Name}"
FontSize="28"/>
<TextBlock Text="{Binding Region.Name}"
FontSize="24" Foreground="LightGray"
Margin="16,0,0,0"/>
</StackPanel>
</DataTemplate>
<model:FlatModel x:Key="VM"/>
</Page.Resources>
<Grid>
<ListView x:Name="TheListView"
ItemsSource="{Binding Designations, Source={StaticResource VM}}"
ItemTemplate="{StaticResource DesignationFlatTemplate}"
/>
</Grid>
</Page>
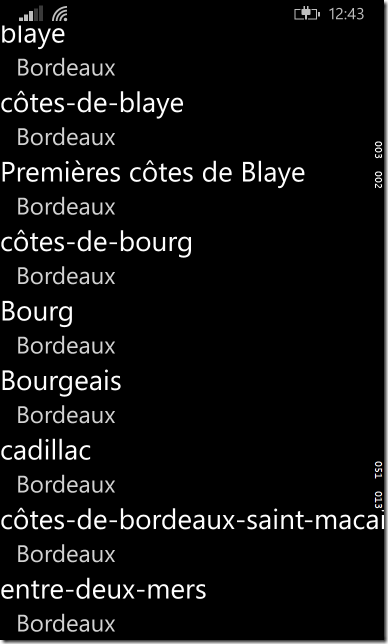
And this would lead to this rendering:
For a grouped list, it is necessary to specify the template to be used to display group headers. This is done through the GroupStyle property and specifically its HeaderTemplate:
<ListView.GroupStyle>
<GroupStyle HeaderTemplate="{StaticResource RegionTemplate}"
HeaderContainerStyle="{StaticResource RegionContainerStyle}"/>
</ListView.GroupStyle>
In order to display a grouped list of wine regions based on the model displayed above, the easiest way is to use a CollectionViewSource wrapper around this collection. The associated XAML would become:
<Page … >
<Page.Resources>
<Style x:Key="RegionContainerStyle" TargetType="ListViewHeaderItem">
<Setter Property="HorizontalContentAlignment" Value="Stretch"/>
</Style>
<DataTemplate x:Key="RegionTemplate">
<Border Background="Red">
<TextBlock Text="{Binding Name}" Foreground="White" FontSize="28"/>
</Border>
</DataTemplate>
<DataTemplate x:Name="DesignationTemplate">
<TextBlock Text="{Binding Name}" FontSize="24" />
</DataTemplate>
<model:GroupedModel x:Key="VM"/>
<CollectionViewSource x:Key="CVS" Source="{Binding Regions, Source={StaticResource VM}}"
IsSourceGrouped="True"
ItemsPath="Designations"/>
</Page.Resources>
<Grid>
<ListView x:Name="TheListView"
ItemsSource="{Binding Source={StaticResource CVS}}"
ItemTemplate="{StaticResource DesignationTemplate}"
>
<ListView.GroupStyle>
<GroupStyle HeaderTemplate="{StaticResource RegionTemplate}"
HeaderContainerStyle="{StaticResource RegionContainerStyle}"
/>
</ListView.GroupStyle>
</ListView>
</Grid>
</Page>
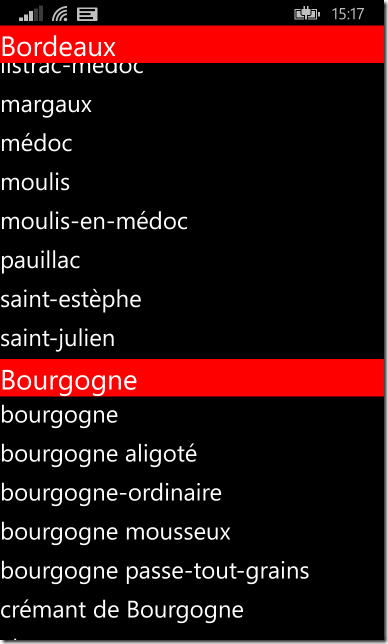
With this result:
Note that in this example, we have two differences between Windows Phone and Windows:
- Windows Phone grouped lists are using Sticky Headers: each group header stays on top of the ListView until it has to leave the place to the next header.
- Through HeaderContainerStyle property of the GroupStyle, it is possible on Windows Phone to have full width headers.
ListView Virtualization
What is virtualization?
What exactly is virtualization? The main idea is that even if a list contains hundreds of element, only a few of them are visible in the same time and therefore it is possible to reduce CPU and memory consumption by creating just the “right” number of graphical elements: in our wine designation sample, even if the list contains more than 300 designations, only a dozen are visible in the same time.
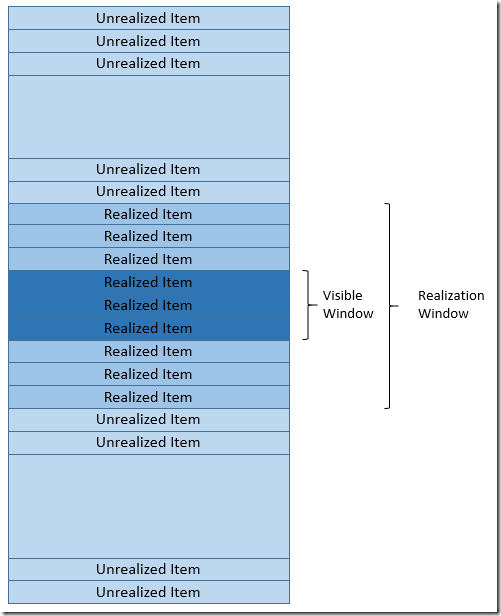
The operation of expanding a DataTemplate and assigning it values from the data list is named realization. In order to reduce the risk of visual glitch during a scroll operation (which would typically be displaying a black area before filling it with ListViewItems), the “realization window” is larger than the visible part of the ListView.
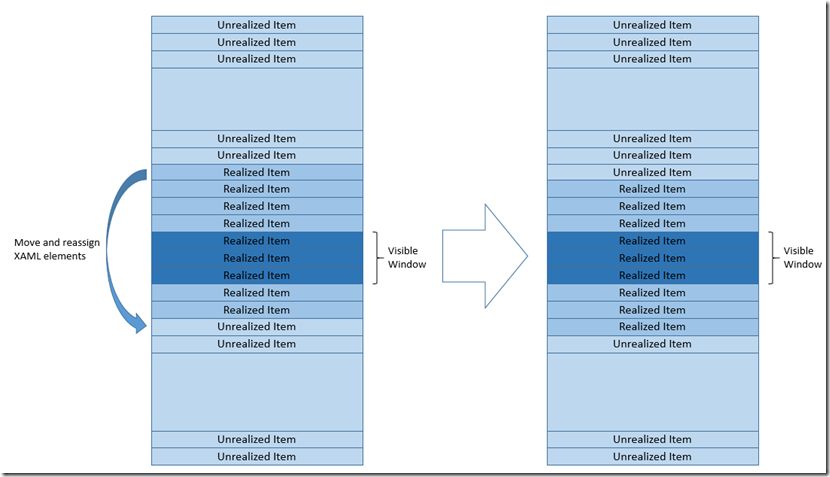
In addition to this notion of minimal or delayed realization of list items, virtualization also means recycling of the realized items: in the above figure, 9 items are realized. If the user scrolls down the list, visible items will change, for example:
The realization window then needs to be adjusted: the first item below this window needs to be realized while the first item above the window does not need to be realized anymore. In order to accelerate the adjustment of the realization window, the XAML elements associated to the latter item are recycled to display the former. It basically means that they are moved inside the associated panel and have their data context changed to the data item to be realized:
Of course, as scrolling is smooth and the visible window does not jump from one item to another, the real schema is slightly more complex and in some cases, it is necessary to instantiate a new set of XAML elements as no realized item may be available for recycling (an item partially overlapping the realization window cannot be reused).
For the ListView control, virtualization is implemented by the underlying panel. Different panels can have different virtualization strategies. Basically, the panel needs to know the actual size of the ListView control in order to start realizing items. It can then configure the ScrollViewer which is also part of the ListView’s template to specify its extent as well as its position. Then it registers a few event handlers to be notified when scrolling happens and requires the virtualization window to be updated.
Measuring Virtualization efficiency
ListView control has some virtual methods which may be used to analyze how virtualization works in a real application (of course, these methods can also be used for “real code” J):
- GetContainerForItemOverride is called when a new ListViewItem needs to be realized.
- PrepareContainerForItemOverride is called when a ListViewItem will be assigned new content
- ClearContainerForItemOverride is called when a ListViewItem will stop displaying its current content.
·
Basically, tracking the calls to GetContainerForItemOverride allows measuring how virtualization works. New panels such as ItemsStackPanel and ItemsWrapGrid also implement ETW tracing but old panels don’t and therefore, in the rest of this article, we will only use GetContainerForItemOverride to check how virtualization performs.
Let’s implement a “DebugListView” which overrides GetContainerForItemOverride and PrepareContainerForItemOverride and put it in the previous grouped list page, slightly modified to display statistics:
public class DebugListView : ListView {
public int GetContainerCount { get; set; }
public int PrepareContainerCount { get; set; }
protected override Windows.UI.Xaml.DependencyObject GetContainerForItemOverride()
{
GetContainerCount++;
return base.GetContainerForItemOverride();
}
protected override void PrepareContainerForItemOverride(Windows.UI.Xaml.DependencyObject element, object item)
{
PrepareContainerCount++;
base.PrepareContainerForItemOverride(element, item);
}
}
<Page …>
<Grid>
<Grid.RowDefinitions>
<RowDefinition/>
<RowDefinition Height="Auto"/>
</Grid.RowDefinitions>
<local:DebugListView x:Name="TheListView"
ItemsSource="{Binding Source={StaticResource CVS}}"
ItemTemplate="{StaticResource DesignationTemplate}"
>
<ListView.GroupStyle>
<GroupStyle HeaderTemplate="{StaticResource RegionTemplate}"
HeaderContainerStyle="{StaticResource RegionContainerStyle}"
/>
</ListView.GroupStyle>
</local:DebugListView>
<StackPanel Orientation="Horizontal" Grid.Row="1">
<Button x:Name="StatsButton" Content="Stats" VerticalAlignment="Center"
Click="StatsButton_Click"/>
<TextBlock x:Name="StatsTextBlock" VerticalAlignment="Center"/>
</StackPanel>
</Grid>
</Page>
And now, let’s scroll the ListView once and click on “Stats” button when we reach the bottom of the list:
- #of calls to GetContainerForItemOverride = 45
- #of calls to PrepareContainerForItemOverride = 303
If the list had had more items (for example a few thousands), only the number of calls to PrepareContainerForItemOverride would raise: preparing 50 items is enough to keep the realization window updated.
A quick count of the number of visible items shows that the realization window is three times higher than the ListView itself:
- This can be tuned by changing the CacheLength property of ItemsStackPanel or ItemsWrapGrid.
- And the default value is different in Windows and Windows Phone: the latter has stronger memory constraints and therefore the default value is 2 instead of 4.
Old panels
In the first part of this article, I briefly mentioned that ListView’s default panel had been changed between Windows 8 (VirtualizingStackPanel) and Windows 8.1 (ItemsStackPanel). One of the huge differences between these two panels is that ItemsStackPanel “understands” grouped list while VirtualizingStackPanel does not.
What does it mean? VirtualizingStackPanel only manages groups: when it detects that the virtualization window overlaps a group, it realizes this group. It means that if this group has many items, all of them will be realized in the same operation, even if only a few pixels from the group header really overlap the realization window. On the contrary, ItemsStackPanel is aware of the items inside groups and will only realize the items which are in the realization window.
Let’s run our simple virtualization analysis on a ListView configured to use a VirtualizingStackPanel:
- #of calls to GetContainerForItemOverride = 162
- #of calls to PrepareContainerForItemOverride = 327
These number tell a clear message: if you have a ListView (or a GridView), be sure that you are not explicitly setting the associated panel to a VirtualizingStackPanel.
Killing virtualization
There are several XAML constructions which can kill virtualization and hence performance. A XAML developer should be aware of these constructions and have the reflex to investigate the behavior of any ListView which seems to be sensible to the number of items in the data collection.
As already mentioned, the panel of a ListView virtualizes items by calculating the realization window based on the ListView’s actual size. All scenarios which break virtualization are in fact scenarios where the ListView is given all the space it needs to display all its items…
This is for example the case when the ListView is nested inside a non-constraining StackPanel, Grid or ScrollViewer. A typical scenario would be this kind of XAML:
<ScrollViewer>
<StackPanel>
<Border>
Some awesome header
</Border>
<ListView.../>
<Border>
A non less awesome footer
</Border>
</StackPanel>
</ScrollViewer>
The StackPanel is vertical and does not constrain its children in this direction. This is also the case for ScrollViewer which gives its child (here the StackPanel) all needed space and then positions it appropriately in its own limits. The ListView will therefore realize all its items (no constraints!) and the page will in the end behave correctly, even if slowly, because the encompassing ScrollViewer will ensure scrolling.
If we use our Virtualization analysis on this XAML construction, we get self-explaining numbers:
- #of calls to GetContainerForItemOverride = 303
- #of calls to PrepareContainerForItemOverride = 303
QED Each data item gets its own ListViewItem.
Another virtualization killing construction would be:
<Grid.RowDefinitions>
<RowDefinition Height="Auto"/>
<RowDefinition Height="Auto"/>
</Grid.RowDefinitions>
<local:DebugListView x:Name="TheListView" Grid.Row="1"…/>
As in the previous sample, the ListView is not constrained and will therefore realize all its items. The good news here is that this scenario is easier to detect than the previous one as the ListView won’t scroll… of course, this means that the developer has to test his application with more than a few items!


