Using the Package Support Framework with a Desktop Bridge application in Visual Studio
In the previous post we have seen how to use the Package Support Framework in a Desktop Bridge app to solve common issues without having to change the code.
In that post we have assumed you don't have access anymore to the code of the application, so we have used a manual approach to unpack the package, add the required files by the Package Support Framework and then repack it.
In this post, instead, we'll see how to do the same with Visual Studio, which gives you access to a better debugging experience and it makes easier to write your own runtime fixes.
Adding the runtime fixes project
We're going to start from a Visual Studio solution which contains our Win32 application. In my case, it's the project of the WPF app I've used in the previous post to demonstrate how to handle an application which tries to read or write files in the installation folder.
Let's start by adding a project that will contain our runtime fixes. We're going to leverage C++, since it allows to intercept low level Windows APIs in an easier way. Additionally, the Package Support Framework includes a set of C++ headers which helps to create new runtime fixes.
Right click on your Visual Studio solution and look for the template under Visual C++ -> Windows Desktop -> Dynamic-Link Library (DLL) .

Do you remember the NuGet package we have downloaded in the previous post to get access to the Package Support Frameworks executables and libraries? The same package contains the files we need to implement the fixes, so we need to add it to this new project. Right click on it, choose Manage NuGet packages, look for the package called Microsoft.PackageSupportFramework and install it.

If you want to leverage one of the existing runtime fixes, you can open the bin folder of the NuGet package (see the previous post to discover where to find it) and copy one or more DLL inside the project.
For example, let's say that, like in the previous post, we need to implement the file redirection fix, in order to make sure that our application is still able to update the app.json file, even if the original code performs this operation in the installation folder. Look for the FileRedirectionShim.dll file for your application's architecture (FileRedirectionShim32.dll for x86 or FileRedirectionShim64.dll for x64) and copy it inside your project. Then right click on it in Visual Studio, choose Properties and make sure Content is set to True.
The shim launcher
The next step is to define a new project, which will host our runtime fixes and the shim launcher. For this purpose we need to use the template under Visual C++ -> General -> Empty project.

Also in this case, the first step to do is to right click on it in Visual Studio, choose Manage NuGet packages and install the Microsoft.PackageSupportFramework package.
The next step is to add a reference to the previous project we have created with the fixes. Right click again on the project, choose Add reference and look for the project we have created in the previous step.

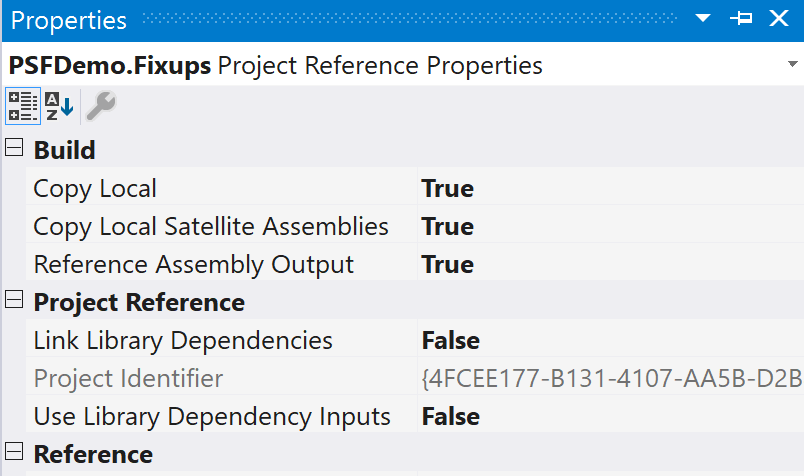
Once you have added the reference, click on it (under the References section), choose Properties and make sure the following properties are correctly set:
- Copy Local: True
- Copy local Satellite Assemblies: True
- Reference Assembly output: True
- Link Library Dependencies: False
- Use Library Dependency Inputs: False

This project won't contain any actual code. It will be used as a gateway for the shim launcher and our runtime fixes. As such, we need to change the Target Name of the project to execute the shim launcher provided by the NuGet package instead of the output of the project. To do this, we need to right click on the project, choose Properties and, under General, set Target Name to ShimLauncher32 (if it's a 32 bit application) or ShimLauncher64 (if it's a 64 bit application).

The Windows Application Packaging Project
The last step shouldn't be a surprise, since we're working with an application packaged with the Desktop Bridge. We need to add a Windows Application Packaging Project, in order to take our Win32 application and package it using the AppX format (MSIX in the future).
You can find it under Windows Universal -> Windows Application Packaging Project.
The difference compared to the standard approach is that, this time, we won't have to add a reference only to the Win32 app, but also to the shim launcher project. As such, right click on Applications and choose:
- The project which contains your Win32 app
- The project which hosts the shim launcher we have created in the previous step
For example, this is how my sample project looks like:

Right click on the shim launcher's project and choose Set as entry point. It will be the starting point of our application.
If you know how, under the hood, the Windows Application Packaging Project works, you will realize that however there's a mismatch between the package we're creating and the one we have created in the previous post.
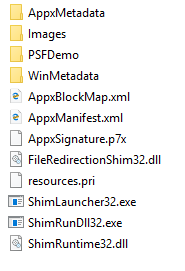
As a reminder, here is how the layout of the package we have created the last time looks like:

As you can see, the main application is stored inside a subfolder (PSFDemo), while the Package Support Framework files are stored in the root of the package.
However, when we use the Windows Application Packaging Project, the outcome is a package where all the referenced applications are stored inside a subfolder (the PSFDemo one). In our scenario, instead we need that the output of the shim launcher project is stored in the package's root.
In order to achieve this we need to tweak a bit the configuration of the packaging project. Right click on it and choose Edit project name.wapproj. This will open the XML representation of the project.

Move to the end and add the following lines:
 <Target Name="PSFRemoveSourceProject" AfterTargets="ExpandProjectReferences" BeforeTargets="_ConvertItems">
  <ItemGroup>
    <FilteredNonWapProjProjectOutput Include="@(_FilteredNonWapProjProjectOutput)">
      <SourceProject Condition="'%(_FilteredNonWapProjProjectOutput.SourceProject)'=='PSFDemo.Launcher'" />
    </FilteredNonWapProjProjectOutput>
    <_FilteredNonWapProjProjectOutput Remove="@(_FilteredNonWapProjProjectOutput)" />
    <_FilteredNonWapProjProjectOutput Include="@(FilteredNonWapProjProjectOutput)" />
  </ItemGroup>
</Target>
Make sure to replace PSFDemo.Launcher with the name of your shim launcher's project.
Setting up the Package Support Framework
The last step is to configure the Package Support Framework. In fact, we have set up the shim launcher as starting point, but we haven't instructed it which is the application to launch or which runtime fixes to apply.
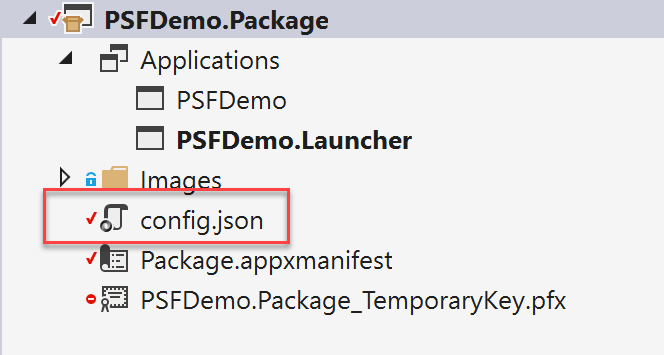
The way to do this is the same we have seen in the previous post. We need a config.json file in the package root. To fulfill this requirement, we need to add it directly in the Windows Application Packaging Project:

The way the configuration file works is the same regardless of how you have created your package, so I won't explain again how to create it. You can copy and paste the same one we have created in the previous post:
 {
  "applications": [
    {
      "id": "PSFDemo",
      "executable": "PSFDemo/PSFDemo.exe",
      "workingDirectory": "PSFDemo/"
    }
  ],
  "processes": [
    {
      "executable": "PSFDemo",
      "shims": [
        {
          "dll": "FileRedirectionShim.dll",
          "config": {
            "redirectedPaths": {
              "packageRelative": [
                {
                  "base": "PSFDemo/",
                  "patterns": [
                    ".*\\.json"
                  ]
                }
              ]
            }
          }
        }
      ]
    }
  ]
}
Testing our work
We're done! The advantage of this approach compared to the one we've seen in the previous post is that we don't have anymore to deal with manual packaging and signing of our application. We can just set the Windows Application Packaging Project as startup and press F5 in Visual Studio to deploy our application and test it.
If we did everything correctly, the outcome should be the same of the previous post. Our application will start and we'll be able to read and update the configuration file, despite it's stored inside the installation folder.
Create your own runtime fix
So far, we have used the runtime fixes project only to host existing ones, like the file redirection shim. However, we can use it also to host our own runtime fix.
Let's see how to create a very simple one, using the guidance shared by the official documentation.
The first thing we need to do is to enable support for the latest standard of the C++ language. The Package Support Framework, in fact, is based on the C++ 17 standard which, however, isn't enabled by default in Visual Studio.
Right click on the runtime fix project, choose Properties and, under, Language, set C++ Language Standard to ISO C++ 17 Standard.

Please note! Make sure to set the Configuration dropdown to All configurations and the Platform dropdown to All Platforms before making the change. This way you make sure that the correct C++ standard is used regardless of the CPU architecture and configuration mode you use.
Now you can expand the Source files section and open the CPP file with the same name of your project. This is how a runtime fix looks like:
 #include "stdafx.h"
#define SHIM_DEFINE_EXPORTS
#include <shim_framework.h>

using namespace std::literals;

// Intercept and customize MessageBox calls
auto MessageBoxWImpl = &::MessageBoxW;
int WINAPI MessageBoxWShim(
    _In_opt_ HWND hwnd,
    _In_opt_ LPCWSTR message,
    _In_opt_ LPCWSTR /*caption*/,
    _In_ UINT type)
{
    return MessageBoxWImpl(hwnd, message, L"Package Support Framework", type);
}
DECLARE_SHIM(MessageBoxWImpl, MessageBoxWShim);
First, you need to specify which is the API you want to override. In this code, we're changing the behavior of the MessageBoxW function, which is invoked by Windows when you want to display a message box to the user.
Then you need to declare a new function which will be invoked in replacement of the existing API. In this case, we have called it MessageBoxWShim. This function takes the original API and simply sets a fixed title for the message box (Package Support Framework).
In the end, we need to use a function provided by the Package Support Framework, called DECLARE_SHIM, to specify which is the original API we want to override (MessageBoxWImpl) and the replacement method (MessageBoxWShim).
Now let's use this API in our application, so that we can see the behavior. Let's add a message box in our WPF app. It will be displayed to the user when the operation to read the configuration file has been completed. This is the updated code of the method invoked when you click on the Read configuration file button:
 private void OnReadFile(object sender, RoutedEventArgs e)
{
    string filePath = $"{Environment.CurrentDirectory}/app.json";
    string json = File.ReadAllText(filePath);
    Config config = JsonConvert.DeserializeObject<Config>(json);
    AppName.Text = config.AppName;
    Version.Text = config.Version;

    MessageBox.Show("Configuration has been read successfully", "PSFDemo");
}
Now run again the application and read the configuration file. You should see the following message popping up:

As you can see, the title of the box is PSFDemo, which is the value we have specified in the code of the WPF app. This is expected. In fact, we have created the runtime fix, but we haven't configured the shim launcher to use it.
Let's return back to the config.json file inside the Windows Application Packaging Project and let's add the definition of a new shim below the file redirection one:
 {
  "applications": [
    {
      "id": "PSFDemo",
      "executable": "PSFDemo/PSFDemo.exe",
      "workingDirectory": "PSFDemo/"
    }
  ],
  "processes": [
    {
      "executable": "PSFDemo",
      "shims": [
        {
          "dll": "FileRedirectionShim.dll",
          "config": {
            "redirectedPaths": {
              "packageRelative": [
                {
                  "base": "PSFDemo/",
                  "patterns": [
                    ".*\\.json"
                  ]
                }
              ]
            }
          }
        },
        {
          "dll" : "PSFDemo.Fixups.dll"
        }
      ]
    }
  ]
}
We have added a new dll entry with the name of the DLL generated by our runtime fixes' project.
Now let's run the packaged application again and read the configuration file:

As you can notice our runtime fix has kicked in! Despite, in code, we have specified PSFDemo as title of the box, the displayed title is Package Support Framework, which is the fixed string we have specified in the runtime fix.
Configuring your runtime fix
Like the file redirection runtime fix supports a way to configure which writing operations we want to redirect, we can allow developers to configure also our own runtime fix.
We can implement it by using the ShimQueryCurrentDllConfig() API, which returns the JSON structure of the config section in the config.json file.
For example, let's say that we want developers to be able to customize the title displayed in the message box. As such, we add a new title property under the config section of our shim:
 {
  "dll": "PSFDemo.Fixups.dll",
  "config": {
    "title": "Sample title"
  }
We can use the following code to retrieve it:
 if (auto configRoot = ::ShimQueryCurrentDllConfig())
{
   auto& config = configRoot->as_object();

   if (auto titleValue = config.try_get("title"))
   {
      auto title = titleValue->as_string().wstring();
      //parse the title
   }
}
The configRoot property is populated with the content of the specific config section of our shim. In our case, it contains a property called title, which we try to retrieve using the try_get() method.
In order to parse the title we need a bit more code, because the APIs we're using to parse the JSON returns the value of the title property using a specific C++ 17 class (wstring_view), while the MessageBoxWImpl API requires a LPCWSTR object to represent the string.
This is the full implementation of our shim:
 #include "stdafx.h"
#define SHIM_DEFINE_EXPORTS
#include <shim_framework.h>
#include <winrt/Windows.Foundation.h>
#include <string_view>

using namespace std::literals;

std::wstring s2ws(const std::string& s)
{
    int len;
    int slength = (int)s.length() + 1;
    len = MultiByteToWideChar(CP_ACP, 0, s.c_str(), slength, 0, 0);
    wchar_t* buf = new wchar_t[len];
    MultiByteToWideChar(CP_ACP, 0, s.c_str(), slength, buf, len);
    std::wstring r(buf);
    delete[] buf;
    return r;
}

// Intercept and customize MessageBox calls
auto MessageBoxWImpl = &::MessageBoxW;
int WINAPI MessageBoxWShim(
    _In_opt_ HWND hwnd,
    _In_opt_ LPCWSTR message,
    _In_opt_ LPCWSTR /*caption*/,
    _In_ UINT type)
{

    if (auto configRoot = ::ShimQueryCurrentDllConfig())
    {
        auto& config = configRoot->as_object();

        if (auto titleValue = config.try_get("title"))
        {
            //parse the title
            auto title = titleValue->as_string().wstring();
            std::string myTitle = winrt::to_string(title);

            std::wstring temp = s2ws(myTitle);
            LPCWSTR result = temp.c_str();
            return MessageBoxWImpl(hwnd, message, result, type);
        }
    }

    return MessageBoxWImpl(hwnd, message, L"Package Support Framework", type);
}
DECLARE_SHIM(MessageBoxWImpl, MessageBoxWShim);
The s2ws is a helper method which helps us to convert the wstring_view into a wstring one. This type, in fact, supports an extension method called c_str() , which is able to convert the string into a LPCWSTR object.
Then we have replaced the fixed title Package Support Framework with the value from our configuration file.
If we compile and run the application again, this time, instead of the fixed string Package Support Framework we will see the one we have specified in the config file as title of the message box:

Wrapping up
In this blog post we have seen another approach to implement the Package Support Framework in our Desktop Bridge application. Compared to the approach we have seen in the previous post there are more steps to do, but it's easier to debug potential issues and to create new runtime fixes.
I strongly encourage you to read the full documentation. You will learn also some advanced debugging techniques in case your runtime fix isn't behaving as expected.
You can find the sample project used in this post on GitHub.
Happy packaging!