Configuring Phonetic/Nickname Search in SharePoint 2010
One of the new enterprise search feature added to SharePoint 2010 is the ability to search people by their ‘nicknames’. For example: You could search ‘aron’ for ‘aaron’ or ‘jon’ for ‘john’. We geeks call this Phonetic search ![]()
Below is a screen shot of the nickname search:

How does this work?
This is an enterprise search feature, meaning you should have SharePoint Standard (or SharePoint Enterprise) installed. It works in conjunction with the Microsoft Speech Server platform. This is one of the pre-requisite for SharePoint 2010. The pre-requisites installer installs the speech server for English US by default.
It basically has a list of ‘names’ and their associated ‘nicknames’ which is fed to the SharePoint 2010 Search to index. Once indexed, the search can then yield results for a nickname.
Configuring Phonetic Search
SharePoint 2010 already has this configured for you, but only for English US (en-US) locale. This means that if you are not using English US as your locale, you will not get any results for ‘nickname’ search.
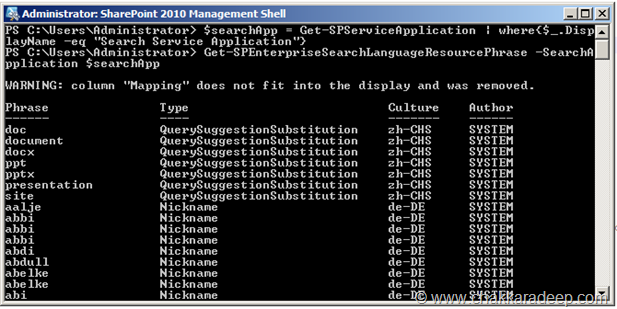
To check your current phrases (names and nicknames) you can use the following PowerShell cmdlet – Get-SPEnterpriseSearchLanguageResourcePhrase – This will display everything including QuerySuggestionBlockList, SpellingSuggestionBlockList etc.,
Below is how you can use the cmdlet to display all language resources:
$searchApp = Get-SPServiceApplication | where{$_.DisplayName -eq "Search Service Application"}
Get-SPEnterpriseSearchLanagueResourcePhrase -SearchApplication $searchApp
Below is the output:

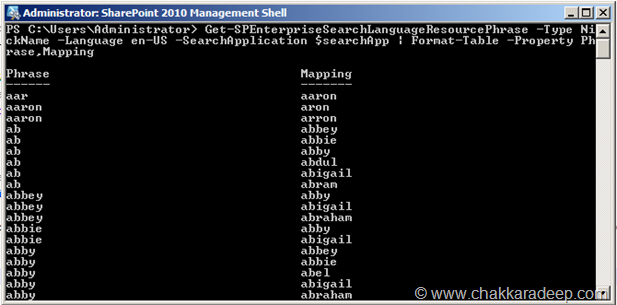
To get all phrases of ‘names’ and ‘nicknames’ for English US (en-US)":
Get-SPEnterpriseSearchLanguageResourcePhrase -Type NickName -Language en-US -SearchApplication $searchApp | Format-Table -Property Phrase,Mapping

Default Phrases
The list of default phrases are stored in a large text file which you can find here:
C:\Program Files\Microsoft Office Servers\14.0\Bin\languageresources.txt
The catch here is that if your locale is not en-US or if your browser locale is not set to en-US, the phonetic search will not work. This is because search does not have any nicknames registered for your locale (and/or language).
You can find your browser locale (in IE) by navigating to Tools –> Options and clicking on Languages button under Appearance:

Configuring Phonetic Search for your different English Locale (like, en-NZ/en-AU)
To make phonetic search work for your locale, you need to register your phrases for your locale.
One good place to start would be to extract the phrases from languageresources.txt file, corresponding to English language and register for your locale.
- Open the languageresources.txt in Excel
- Accept as Tab delimited file
- Select the Column D
- Navigate to Data tab in the Ribbon and click on Filter button
- In the Column D, click on the dropdown and select only ‘1033’
- This will show only the English phrases
- In the filter dropdown, select everything except ‘1033’
- Right click in the workbook and select Delete to delete all rows
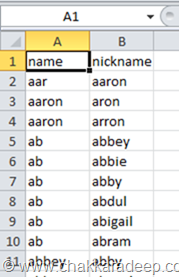
- You should now see only the English phrases
- Delete Column C, D, E, F
- Insert a column in the first row and type name in Column A and nickname in Column B
- Save the file as .CSV and call it languageresources-<your-locale>.csv. I called it languageresources-en-NZ.csv
You can add your own phrases if you cannot find one in the list.
I wrote a simple PowerShell script Set-SPPhoneticSearch.ps1 to register the phrases:
param(
[string]$SearchServiceApplication = $(throw "please specify the Search Service Application display name!"),
[string]$LanguageResources = $(throw "please specify the full path of the language resources csv path!"),
[string]$Language = $(throw "please specify the language")
)
# Get the search service application id
"Getting the search service application ..."
$searchApp = Get-SPServiceApplication | where{$_.DisplayName -eq $SearchServiceApplication}
# Impmort the CSV
"Importing the names and nicknames from $LanguageResources ..."
$phrases = Import-CSV $LanguageResources
# Register every name and nickname
"Registering the available names and nicknames ..."
"This will take some time. Please be patient!"
foreach($phrase in $phrases)
{
New-SPEnterpriseSearchLanguageResourcePhrase -Name $($phrase.name) -Language $Language -Type "Nickname" -Mapping $($phrase.nickname) -SearchApplication $searchApp
}
# Start the timer job
Start-SPTimerJob -Identity "Prepare query suggestions"
Now I can call this script by:
.\Set-SPPhoneticSearch.ps1 -SearchServiceApplication "Search Service Application"
-LanguageResources (Resolve-Path .\languageresources_en-NZ.csv)
-Language en-NZ
The SearchServiceApplication parameter is the display name of your search service application.
This will take at least an hour to complete, so just sit back and relax. I would suggest to go out for a coffee ![]()
The PowerShell cmdlet New-SPEnterpriseSearchLanaguageResourcePhrase adds a language resource phrase to the search application. Our script reads the phrases from the CSV file. The script also starts the timer job Prepare query suggestions – This timer job is responsible for preparing query suggestions.
Similarly you can use Remove-SPEnterpriseSearchLanguageResourcePhrase to remove language resource phrase from the search application.
Once the script completes registering the phrases, you should do a full crawl on the people content source. The phonetic search should now work for your locale!
What about other Languages?
You need to download the appropriate Speech Server runtime for your language. You can download them here. Once installed you can follow the steps above.
You can download the PowerShell script used in this post here: https://bit.ly/wqEW4w


