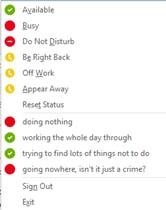
 Everyone who has used Skype for Business/Lync/OCS/LCS etc will be familiar with the power you get from having presence: seeing who is available, what they’re doing (to a degree) and the contextual knowledge of whether they are contactable; all very valuable. Everyone who has used Skype for Business/Lync/OCS/LCS etc will be familiar with the power you get from having presence: seeing who is available, what they’re doing (to a degree) and the contextual knowledge of whether they are contactable; all very valuable.
Many years back, OCS added the capability to present different custom states too – but it’s always been a bit of a faff to achieve consistently. Skype for Business doesn’t make it a great deal easier, but thanks to a few enterprising types, it is still possible to enable without too much trouble.
Custom presence allows users to have up to 4 custom status fields defined, in the status of Online, Busy or Do Not Disturb, which can be used to show even more context – like I’m in a meeting but can IM, or I’m busy presenting with customers so don’t disturb. There are a couple of ways to achieve said nirvana…
 Try running Skype for Business Presence Control – download this tool, save it locally, right-click on it and Run as administrator, thenenter your own Skype custom status in a dialog box. Try running Skype for Business Presence Control – download this tool, save it locally, right-click on it and Run as administrator, thenenter your own Skype custom status in a dialog box.
  After entering your chosen phrases, hit the Set … Presence button, then sign out of Skype for Business to apply the changes, which you’ll see next time you sign in. It’s that easy. After entering your chosen phrases, hit the Set … Presence button, then sign out of Skype for Business to apply the changes, which you’ll see next time you sign in. It’s that easy.
The downside is that the Presence Tool starts with 4 blank presence states, so you can’t easily modify what you have already – and setting 4 empty entries will clear all custom presence from the client. Also, it only lets you choose online or busy as the available status.
A more complex but more comprehensive approach would be to use a technique developed by MVP
Ståle Hansen, to use a PowerShell script to create the config file which sets presence states.
It’s relatively straightforward if you follow these steps:
- Save this script file to your PC then navigate to the folder where it’s stored (eg your Downloads folder)
- Right-click on the script and (unless you already have PowerShell editing capabilities) choose Open With –> Notepad
- Edit the custom presence states as appropriate – set the availability="do-not-disturb" or “busy” or “online”; you can define up to 4 custom states, with up to 64 characters to express yourself
- The neater among you might want to change the place where the config file gets created – if so, look for the line $CustomPresencePath="$env:SystemDrive/_CustomPresence" and modify as appropriate (eg $CustomPresencePath="$env:UserProfile/_CustomPresence")
- Save the file when done
- At the Start screen, type PowerShell, then right-click on the Windows PowerShell icon and choose Run as administrator
- In the script window, enter Get-ExecutionPolicy (tip: in PS, you don’t need to type the whole thing – it’ll fill the command in for you, so typing Get-Ex then pressing the TAB key will most likely do the trick)
- If the result is restricted then you’ll need to temporarily set the ability to run scripts; enter Set-ExecutionPolicy unrestricted and press Y to accept the change
- Double-check that it’s OK by re-running the Get-ExecutionPolicy command and look for it being unrestricted
 Change to the location where you saved the file – if it’s in your Downloads folder, then enter cd $env:userprofile\downloads then run the script file by entering set-CustomPresence.ps1 (as per earlier, just type set-C then tab) Change to the location where you saved the file – if it’s in your Downloads folder, then enter cd $env:userprofile\downloads then run the script file by entering set-CustomPresence.ps1 (as per earlier, just type set-C then tab)- Don’t worry if you see red text in the output – that’s to be expected. To make sure the script has run OK, press WindowsKey+R and enter %userprofile% to jump to your profile directory, and you should see a _CustomPresence subfolder.
- It’ll also have plonked a registry setting at HKLM\Policies\Microsoft\Office\16.0\Lync, pointing to the XML file that’s in the subfolder. If you want to go back and change the custom states at a future time, jump to that subfolder/XML file and edit it with Notepad. Save the result, sign out of Skype for Business and back in again to enjoy your results.
- Assuming everything is working OK, if you had to change Execution Policy in the step above then you should revert back – eg Set-ExecutionPolicy restricted
The benefit of using this script rather than manually configuring everything is that it can be easily shared with others, or just re-run across multiple PCs so you have a consistent set of presence options.
Now look at your friends in Skype for Business to see who has the most creative custom state …
NB: If the above doesn’t work (and you’ve checked the registry entry points to a correctly-formatted XML file etc etc) then it may be a policy on the server that’s preventing it. One possible solution would be to host the XML file on a suitable web site that lets you reference it directly using https:// and point to that in the registry instead. |


