クイック スタート:Spring Boot アプリに機能フラグを追加する
このクイックスタートでは、Azure App Configuration を Spring Boot Web アプリに組み込み、機能管理のエンドツーエンド実装を作成します。 App Configuration を使用し、すべての機能フラグを一箇所に格納し、その状態を制御できます。
Spring Boot 機能管理ライブラリは、包括的な機能フラグのサポートにより、フレームワークを拡張します。 これらのライブラリは、Azure のライブラリには一切依存しません。 また、Spring Boot 構成プロバイダーを介して、App Configuration とシームレスに統合されます。
前提条件
- アクティブなサブスクリプションが含まれる Azure アカウント。 無料で作成できます。
- App Configuration ストア。 ストアを作成する。
- バージョン 11 を含む、サポートされている Java Development Kit SDK。
- Apache Maven バージョン 3.0 以降。
機能フラグを追加する
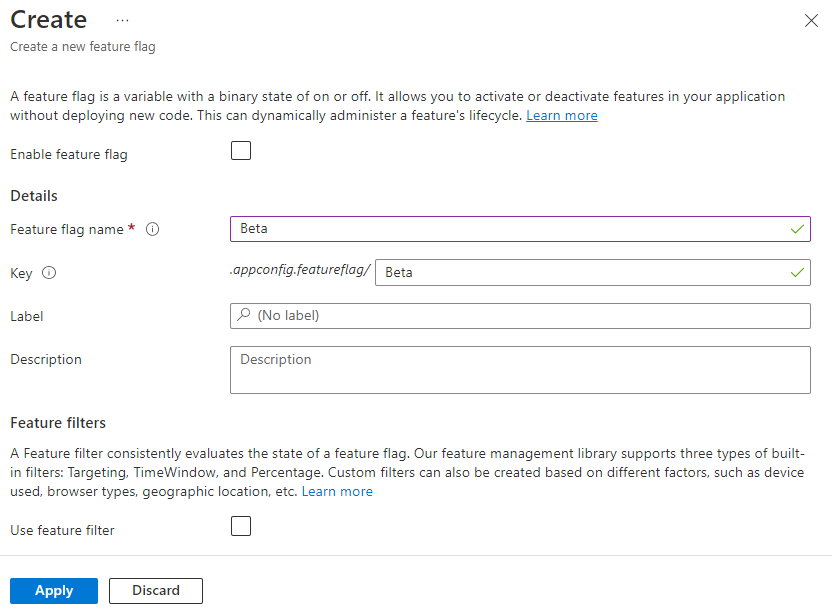
Beta という機能フラグを App Configuration ストアに追加し、[ラベル] と [説明] を既定値のままにします。 Azure portal または CLI を使用してストアに機能フラグを追加する方法の詳細については、「機能フラグを作成する」を参照してください。

Spring Boot アプリを作成する
新しい Spring Boot プロジェクトを作成する:
Spring Initializr に移動します。
次のオプションを指定します。
- Java で Maven プロジェクトを生成します。
- Spring Boot のバージョンとして、2.0 以降を指定します。
- アプリケーションのグループ (Group) と成果物 (Artifact) の名前を指定します。 この記事では、
com.exampleとdemoを使用します。 - Spring Web の依存関係を追加します。
前の各オプションを指定してから、 [プロジェクトの生成] を選択します。 メッセージが表示されたら、ローカル コンピューターにプロジェクトをダウンロードします。
機能管理を追加する
ファイルをローカル システム上に展開したら、Spring Boot アプリケーションの編集を開始できます。 アプリのルート ディレクトリで pom.xml を探します。
テキスト エディターで pom.xml ファイルを開き、
<dependencies>の一覧に以下を追加します。
<dependency>
    <groupId>com.azure.spring</groupId>
    <artifactId>spring-cloud-azure-appconfiguration-config-web</artifactId>
</dependency>
<dependency>
    <groupId>com.azure.spring</groupId>
    <artifactId>spring-cloud-azure-feature-management-web</artifactId>
</dependency>
<dependency>
    <groupId>org.springframework.boot</groupId>
    <artifactId>spring-boot-starter-thymeleaf</artifactId>
</dependency>

<dependencyManagement>
    <dependencies>
        <dependency>
        <groupId>com.azure.spring</groupId>
        <artifactId>spring-cloud-azure-dependencies</artifactId>
        <version>5.18.0</version>
        <type>pom</type>
        <scope>import</scope>
        </dependency>
    </dependencies>
</dependencyManagement>
Note
- Spring Web に依存しない非 Web 機能管理ライブラリが存在します。 相違点については、GitHub のドキュメントを参照してください。
App Configuration ストアに接続する
アプリの
resourcesディレクトリに移動し、bootstrap.propertiesを開きます。 ファイルが存在しない場合は、作成してください。 次の行をファイルに追加します。DefaultAzureCredentialを使って、App Configuration ストアに対する認証を行います。 手順に従って、資格情報に App Configuration データ閲覧者ロールを割り当てます。 アプリケーションを実行する前に、アクセス許可が伝わるのに十分な時間をおいてください。 AppConfigCredential.java という名前の新しいファイルを作成して、次の行を追加します。spring.cloud.azure.appconfiguration.stores[0].endpoint= ${APP_CONFIGURATION_ENDPOINT} spring.cloud.azure.appconfiguration.stores[0].feature-flags.enabled=trueさらに、マネージド ID を使う場合を除き、次のコードをプロジェクトに追加する必要があります。
import org.springframework.stereotype.Component;

import com.azure.data.appconfiguration.ConfigurationClientBuilder;
import com.azure.identity.DefaultAzureCredentialBuilder;
import com.azure.spring.cloud.appconfiguration.config.ConfigurationClientCustomizer;

@Component
public class AppConfigCredential implements ConfigurationClientCustomizer {

    @Override
    public void customize(ConfigurationClientBuilder builder, String endpoint) {
        builder.credential(new DefaultAzureCredentialBuilder().build());
    }
}
また、
resources/META-INFディレクトリにspring.factoriesファイルを作成して、次の行を追加し、com.example.MyApplicationを実際のアプリケーション名とパッケージで更新して、構成 BootstrapConfiguration を追加します。org.springframework.cloud.bootstrap.BootstrapConfiguration=\ com.example.MyApplication環境変数を設定します。
APP_CONFIGURATION_ENDPOINT という名前の環境変数に、Azure portal のストアの [概要] で見つかる App Configuration ストアのエンドポイントを設定します。
Windows コマンド プロンプトを使用する場合は、次のコマンドを実行してコマンド プロンプトを再起動し、変更が反映されるようにします。
setx APP_CONFIGURATION_ENDPOINT "endpoint-of-your-app-configuration-store"PowerShell を使っている場合は、次のコマンドを実行します。
$Env:APP_CONFIGURATION_ENDPOINT = "<endpoint-of-your-app-configuration-store>"macOS または Linux を使用する場合は、次のコマンドを実行します。
export APP_CONFIGURATION_ENDPOINT='<endpoint-of-your-app-configuration-store>'変更を有効にするために、コマンド プロンプトを再起動します。 環境変数の値を出力して、正しく設定されていることを確認します。
アプリのパッケージ ディレクトリに、HelloController.java という名前の新しい Java ファイルを作成します。
package com.example.demo;

import org.springframework.boot.context.properties.ConfigurationProperties;
import org.springframework.stereotype.Controller;
import org.springframework.ui.Model;

import com.azure.spring.cloud.feature.management.FeatureManager;
import org.springframework.web.bind.annotation.GetMapping;


@Controller
@ConfigurationProperties("controller")
public class HelloController {

    private FeatureManager featureManager;

    public HelloController(FeatureManager featureManager) {
        this.featureManager = featureManager;
    }

    @GetMapping("/welcome")
    public String mainWithParam(Model model) {
        model.addAttribute("Beta", featureManager.isEnabledAsync("Beta").block());
        return "welcome";
    }
}
アプリの templates ディレクトリに、welcome.html という名前の新しい HTML ファイルを作成します。
<!DOCTYPE html> <html lang="en" xmlns:th="http://www.thymeleaf.org"> <head> <meta charset="utf-8"> <meta name="viewport" content="width=device-width, initial-scale=1, shrink-to-fit=no"> <title>Feature Management with Spring Cloud Azure</title> <link rel="stylesheet" href="/css/main.css"> <link rel="stylesheet" href="https://stackpath.bootstrapcdn.com/bootstrap/4.3.1/css/bootstrap.min.css" integrity="sha384-ggOyR0iXCbMQv3Xipma34MD+dH/1fQ784/j6cY/iJTQUOhcWr7x9JvoRxT2MZw1T" crossorigin="anonymous"> <script src="https://code.jquery.com/jquery-3.6.0.min.js" integrity="sha256-/xUj+3OJU5yExlq6GSYGSHk7tPXikynS7ogEvDej/m4=" crossorigin="anonymous"></script> <script src="https://unpkg.com/@popperjs/core@2"></script> <script src="https://cdn.jsdelivr.net/npm/bootstrap@5.1.3/dist/js/bootstrap.bundle.min.js" integrity="sha384-ka7Sk0Gln4gmtz2MlQnikT1wXgYsOg+OMhuP+IlRH9sENBO0LRn5q+8nbTov4+1p" crossorigin="anonymous"></script> </head> <body> <header> <!-- Fixed navbar --> <nav class="navbar navbar-expand-md navbar-dark fixed-top bg-dark"> <a class="navbar-brand" href="#">TestFeatureFlags</a> <button class="navbar-toggler" aria-expanded="false" aria-controls="navbarCollapse" aria-label="Toggle navigation" type="button" data-target="#navbarCollapse" data-toggle="collapse"> <span class="navbar-toggler-icon"></span> </button> <div class="collapse navbar-collapse" id="navbarCollapse"> <ul class="navbar-nav mr-auto"> <li class="nav-item active"> <a class="nav-link" href="#">Home <span class="sr-only">(current)</span></a> </li> <li class="nav-item" th:if="${Beta}"> <a class="nav-link" href="#">Beta</a> </li> <li class="nav-item"> <a class="nav-link" href="#">Privacy</a> </li> </ul> </div> </nav> </header> <div class="container body-content"> <h1 class="mt-5">Welcome</h1> <p>Learn more about <a href="https://github.com/Azure/azure-sdk-for-java/tree/main/sdk/spring/spring-cloud-azure-feature-management/README.md">Feature Management with Spring Cloud Azure</a></p> </div> <footer class="footer"> <div class="container"> <span class="text-muted">© 2019 - Projects</span> </div> </footer> </body> </html>CSS という名前の新しいフォルダーを
staticの下に作成し、その中に main.css という名前の新しい CSS ファイルを作成します。html { position: relative; min-height: 100%; } body { margin-bottom: 60px; } .footer { position: absolute; bottom: 0; width: 100%; height: 60px; line-height: 60px; background-color: #f5f5f5; } body > .container { padding: 60px 15px 0; } .footer > .container { padding-right: 15px; padding-left: 15px; } code { font-size: 80%; }
アプリをビルドしてローカルで実行する
自分の Spring Boot アプリケーションを Maven でビルドし、実行します。
mvn clean package
mvn spring-boot:run
ブラウザー ウィンドウを開き、
http://localhost:8080/welcomeに移動します。
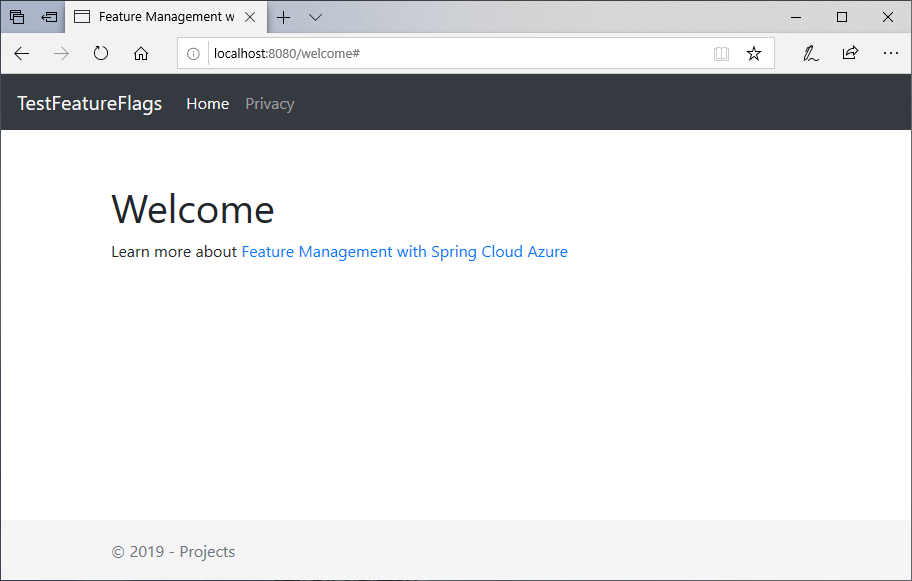
App Configuration ポータルで [Feature Manager](機能マネージャー) を選択し、 [Beta](ベータ) キーの状態を [On](オン) に変更します。
Key State ベータ On ブラウザー ページを最新の情報に更新して新しい構成設定を確認します。
![ウェルカム メッセージが表示され、[Beta]\(ベータ\) リンクが強調表示されたブラウザー ウィンドウを示すスクリーンショット。](media/quickstarts/spring-boot-feature-flag-local-after.png)
リソースをクリーンアップする
この記事で作成したリソースを継続して使用しない場合は、ここで作成したリソース グループを削除して課金されないようにしてください。
重要
リソース グループを削除すると、元に戻すことができません。 リソース グループとそのすべてのリソースは完全に削除されます。 間違ったリソース グループやリソースをうっかり削除しないようにしてください。 この記事のリソースを、保持したい他のリソースを含むリソース グループ内に作成した場合は、リソース グループを削除する代わりに、各リソースをそれぞれのペインから個別に削除します。
- Azure portal にサインインし、 [リソース グループ] を選択します。
- [名前でフィルター] ボックスにリソース グループの名前を入力します。
- 結果一覧でリソース グループ名を選択し、概要を表示します。
- [リソース グループの削除] を選択します。
- リソース グループの削除の確認を求めるメッセージが表示されます。 確認のためにリソース グループの名前を入力し、 [削除] を選択します。
しばらくすると、リソース グループとそのすべてのリソースが削除されます。
次のステップ
このクイックスタートでは、新しい App Configuration ストアを作成し、この構成ストアを使用して、機能管理ライブラリを介して Spring Boot Web アプリの機能を管理しました。
- ライブラリ リファレンス ドキュメント
- 機能管理の詳細を確認します。
- 機能フラグを管理します。
- Spring Boot Core アプリ内で機能フラグを使用します。