Azure VM Image Builder と Microsoft Dev Box を使用して開発ボックスを構成する
この記事では、Azure VM Image Builder を使用して、カスタマイズした開発ボックスを Microsoft Dev Box でテンプレートを利用して作成します。 テンプレートには、Visual Studio Code (VS Code) をインストールするためのカスタマイズ手順が含まれます。
組織は標準化された仮想マシン (VM) イメージを使用すると、より簡単にクラウドに移行でき、デプロイでの一貫性の確保に役立てることができます。 通常、イメージには、事前に定義されたセキュリティと構成設定と、必要なソフトウェアが含まれています。 独自のイメージング パイプラインを設定するには、時間、インフラストラクチャ、およびその他の詳細が必要です。 Azure VM Image Builder を使用すると、イメージを記述する構成を作成できます。 その後、サービスによってイメージがビルドされて開発ボックス プロジェクトに送信されます。
カスタム VM イメージは手動で、または他のツールを使用して作成できますが、プロセスは煩雑で信頼性が低いことがあります。 VM Image Builder は HashiCorp Packer に基づいて構築されているため、マネージド サービス固有のメリットがあります。
VM イメージの作成の複雑さを軽減するために、VM Image Builder は次のことを実現します。
VM イメージを作成するための複雑なツール、プロセス、手動の手順を使用する必要がなくなります。 VM Image Builder は、これらすべての詳細を抽象化し、イメージの一般化の必要性 (Sysprep) などの Azure 固有の要件を隠します。 また、高度なスキルを持つユーザーにこのような要件をオーバーライドする機能を提供します。
既存のイメージ ビルド パイプラインと連携して、クリック アンド ゴー エクスペリエンスを実現します。 パイプラインから VM Image Builder を呼び出すか、Azure VM Image Builder サービス DevOps タスクを使用できます。
さまざまなソースからカスタマイズ データをフェッチするため、すべてを 1 か所から収集する必要がなくなります。
Azure Compute Gallery と統合され、イメージをグローバルに配布、レプリケート、バージョン管理、スケーリングするためのイメージ管理システムが作成されます。 また、結果の同一イメージを、仮想ハード ディスクとして配布したり、1 つ以上のマネージド イメージとして配布したりできます。これらのイメージを最初から再構築する必要はありません。
重要
Microsoft Dev Box では、セキュリティの種類としてトラステッド起動対応を使用するイメージのみがサポートされます。
前提条件
VM Image Builder を使用して作成したカスタム イメージをプロビジョニングするには、以下が必要です。
- Azure PowerShell 6.0 以降。 PowerShell がインストールされていない場合は、「Windows に Azure PowerShell をインストールする」の手順に従います。
- Azure サブスクリプションまたは特定のリソース グループに対する所有者または共同作成者のアクセス許可。
- リソース グループ。
- ネットワーク接続を結び付けてあるデベロッパー センター。 お持ちでない場合は、「ネットワーク接続を構成して開発ボックスをリソースに接続する」の手順に従います。
Windows イメージを作成して Azure Compute Gallery に配布する
最初の手順は、Azure VM Image Builder と Azure PowerShell を使用して Azure Compute Gallery 内にイメージ バージョンを作成し、イメージをグローバルに配布することです。 このタスクは、Azure CLI を使用して実行することもできます。
VM Image Builder を使用するには、機能を登録する必要があります。
プロバイダー登録を確認してください。 指定した機能に対して各コマンドが
Registered返されていることを確認します。Get-AzResourceProvider -ProviderNamespace Microsoft.VirtualMachineImages | Format-table -Property ResourceTypes,RegistrationState Get-AzResourceProvider -ProviderNamespace Microsoft.Storage | Format-table -Property ResourceTypes,RegistrationState Get-AzResourceProvider -ProviderNamespace Microsoft.Compute | Format-table -Property ResourceTypes,RegistrationState Get-AzResourceProvider -ProviderNamespace Microsoft.KeyVault | Format-table -Property ResourceTypes,RegistrationState Get-AzResourceProvider -ProviderNamespace Microsoft.Network | Format-table -Property ResourceTypes,RegistrationStateプロバイダーの登録によって
Registeredが返されない場合は、以下のコマンドを実行してプロバイダーを登録します。Register-AzResourceProvider -ProviderNamespace Microsoft.VirtualMachineImages Register-AzResourceProvider -ProviderNamespace Microsoft.Storage Register-AzResourceProvider -ProviderNamespace Microsoft.Compute Register-AzResourceProvider -ProviderNamespace Microsoft.KeyVault Register-AzResourceProvider -ProviderNamespace Microsoft.NetworkPowerShell モジュールをインストールします。
'Az.ImageBuilder', 'Az.ManagedServiceIdentity' | ForEach-Object {Install-Module -Name $_ -AllowPrerelease}複数回使用する情報を格納する変数を作成します。
- 次のサンプル コードをコピーします。
<Resource group>は、デベロッパー センターの作成に使用したリソース グループに置き換えます。- PowerShell で更新されたコードを実行します。
# Get existing context
$currentAzContext = Get-AzContext

# Get your current subscription ID
$subscriptionID=$currentAzContext.Subscription.Id

# Destination image resource group
$imageResourceGroup="<Resource group>"

# Location
$location="eastus2"

# Image distribution metadata reference name
$runOutputName="aibCustWinManImg01"

# Image template name
$imageTemplateName="vscodeWinTemplate"
PowerShell で次のコードを実行して、ユーザー割り当て ID を作成し、リソース グループに対するアクセス許可を設定します。
VM Image Builder は、指定されたユーザー ID を使用して、Azure Compute Gallery にイメージを挿入します。 次の例では、イメージを配布するための特定のアクションを使用して、Azure ロールの定義を作成しています。 このロール定義はその後、ユーザー ID に割り当てられます。
# Set up role definition names, which need to be unique
$timeInt=$(get-date -UFormat "%s")
$imageRoleDefName="Azure Image Builder Image Def"+$timeInt
$identityName="aibIdentity"+$timeInt

# Add an Azure PowerShell module to support AzUserAssignedIdentity
Install-Module -Name Az.ManagedServiceIdentity

# Create an identity
New-AzUserAssignedIdentity -ResourceGroupName $imageResourceGroup -Name $identityName -Location $location

$identityNameResourceId=$(Get-AzUserAssignedIdentity -ResourceGroupName $imageResourceGroup -Name $identityName).Id
$identityNamePrincipalId=$(Get-AzUserAssignedIdentity -ResourceGroupName $imageResourceGroup -Name $identityName).PrincipalId
イメージを配布するための、ID のアクセス許可を割り当てます。
このコマンドを使用して Azure ロール定義テンプレートをダウンロードしてから、それを前に指定したパラメーターで更新します。
$aibRoleImageCreationUrl="https://raw.githubusercontent.com/azure/azvmimagebuilder/master/solutions/12_Creating_AIB_Security_Roles/aibRoleImageCreation.json"
$aibRoleImageCreationPath = "aibRoleImageCreation.json"

# Download the configuration
Invoke-WebRequest -Uri $aibRoleImageCreationUrl -OutFile $aibRoleImageCreationPath -UseBasicParsing
((Get-Content -path $aibRoleImageCreationPath -Raw) -replace '<subscriptionID>',$subscriptionID) | Set-Content -Path $aibRoleImageCreationPath
((Get-Content -path $aibRoleImageCreationPath -Raw) -replace '<rgName>', $imageResourceGroup) | Set-Content -Path $aibRoleImageCreationPath
((Get-Content -path $aibRoleImageCreationPath -Raw) -replace 'Azure Image Builder Service Image Creation Role', $imageRoleDefName) | Set-Content -Path $aibRoleImageCreationPath

# Create a role definition
New-AzRoleDefinition -InputFile  ./aibRoleImageCreation.json

# Grant the role definition to the VM Image Builder service principal
New-AzRoleAssignment -ObjectId $identityNamePrincipalId -RoleDefinitionName $imageRoleDefName -Scope "/subscriptions/$subscriptionID/resourceGroups/$imageResourceGroup"
ギャラリーを作成する
Azure Compute Gallery で VM Image Builder を使用するには、既存のギャラリーとイメージ定義が必要です。 VM Image Builder では、ギャラリーとイメージ定義は自動的には作成されません。
次のコマンドを実行して、新しいギャラリーとイメージ定義を作成します。
このコードは、信頼できる起動セキュリティの種類を持つ定義を作成し、Windows 365 イメージの要件を満たします。
# Gallery name
$galleryName= "devboxGallery"

# Image definition name
$imageDefName ="vscodeImageDef"

# Additional replication region
$replRegion2="eastus"

# Create the gallery
New-AzGallery -GalleryName $galleryName -ResourceGroupName $imageResourceGroup -Location $location

$SecurityType = @{Name='SecurityType';Value='TrustedLaunch'}
$features = @($SecurityType)

# Create the image definition
New-AzGalleryImageDefinition -GalleryName $galleryName -ResourceGroupName $imageResourceGroup -Location $location -Name $imageDefName -OsState generalized -OsType Windows -Publisher 'myCompany' -Offer 'vscodebox' -Sku '1-0-0' -Feature $features -HyperVGeneration "V2"
テンプレート定義を格納するファイル (c:/temp/mytemplate.txt など) を作成します。
VM Image Builder 用の次の Azure Resource Manger テンプレートを新しいテンプレート ファイルにコピーします。
このテンプレートで、ソース イメージと、適用されるカスタマイズを指定します。 Choco と VS Code がインストールされ、イメージの配布場所も示されます。
{
   "$schema": "http://schema.management.azure.com/schemas/2015-01-01/deploymentTemplate.json#",
   "contentVersion": "1.0.0.0",
   "parameters": {
     "imageTemplateName": {
      "type": "string"
     },
     "api-version": {
      "type": "string"
     },
     "svclocation": {
      "type": "string"
     }
   },
   "variables": {},
   "resources": [
     {
      "name": "[parameters('imageTemplateName')]",
      "type": "Microsoft.VirtualMachineImages/imageTemplates",
      "apiVersion": "[parameters('api-version')]",
      "location": "[parameters('svclocation')]",
      "dependsOn": [],
      "tags": {
        "imagebuilderTemplate": "win11multi",
        "userIdentity": "enabled"
      },
      "identity": {
        "type": "UserAssigned",
        "userAssignedIdentities": {
         "<imgBuilderId>": {}
        }
      },
      "properties": {
        "buildTimeoutInMinutes": 100,
        "vmProfile": {
         "vmSize": "Standard_DS2_v2",
         "osDiskSizeGB": 127
        },
      "source": {
         "type": "PlatformImage",
         "publisher": "MicrosoftWindowsDesktop",
         "offer": "Windows-11",
         "sku": "win11-21h2-ent",
         "version": "latest"
      },
        "customize": [
         {
            "type": "PowerShell",
            "name": "Install Choco and Vscode",
            "inline": [
               "Set-ExecutionPolicy Bypass -Scope Process -Force; [System.Net.ServicePointManager]::SecurityProtocol = [System.Net.ServicePointManager]::SecurityProtocol -bor 3072; iex ((New-Object System.Net.WebClient).DownloadString('https://community.chocolatey.org/install.ps1'))",
               "choco install -y vscode"
            ]
         }
        ],
         "distribute":
         [
            {
               "type": "SharedImage",
               "galleryImageId": "/subscriptions/<subscriptionID>/resourceGroups/<rgName>/providers/Microsoft.Compute/galleries/<sharedImageGalName>/images/<imageDefName>",
               "runOutputName": "<runOutputName>",
               "artifactTags": {
                  "source": "azureVmImageBuilder",
                  "baseosimg": "win11multi"
               },
               "replicationRegions": [
                 "<region1>",
                 "<region2>"
               ]
            }
         ]
      }
     }
   ]
  }
次の手順に進む前に、テンプレート ファイルを閉じます。
変数を使用して新しいテンプレートを構成します。
など
c:/temp/mytemplate、テンプレート ファイルの場所に置き換えます<Template Path>。$templateFilePath = <Template Path> (Get-Content -path $templateFilePath -Raw ) -replace '<subscriptionID>',$subscriptionID | Set-Content -Path $templateFilePath (Get-Content -path $templateFilePath -Raw ) -replace '<rgName>',$imageResourceGroup | Set-Content -Path $templateFilePath (Get-Content -path $templateFilePath -Raw ) -replace '<runOutputName>',$runOutputName | Set-Content -Path $templateFilePath (Get-Content -path $templateFilePath -Raw ) -replace '<imageDefName>',$imageDefName | Set-Content -Path $templateFilePath (Get-Content -path $templateFilePath -Raw ) -replace '<sharedImageGalName>',$galleryName| Set-Content -Path $templateFilePath (Get-Content -path $templateFilePath -Raw ) -replace '<region1>',$location | Set-Content -Path $templateFilePath (Get-Content -path $templateFilePath -Raw ) -replace '<region2>',$replRegion2 | Set-Content -Path $templateFilePath ((Get-Content -path $templateFilePath -Raw) -replace '<imgBuilderId>',$identityNameResourceId) | Set-Content -Path $templateFilePathテンプレートをサービスに送信します。
次のコマンドは、スクリプトなどの依存成果物をダウンロードし、ステージング リソース グループに格納します。 ステージング リソース グループには
IT_というプレフィックスが付きます。New-AzResourceGroupDeployment -ResourceGroupName $imageResourceGroup -TemplateFile $templateFilePath -Api-Version "2020-02-14" -imageTemplateName $imageTemplateName -svclocation $locationテンプレートでコマンドを
Run呼び出してイメージをビルドします。実行プロセスを確認するプロンプトで、「はい」と入力 します。
Invoke-AzResourceAction -ResourceName $imageTemplateName -ResourceGroupName $imageResourceGroup -ResourceType Microsoft.VirtualMachineImages/imageTemplates -ApiVersion "2020-02-14" -Action Run重要
イメージを作成して両方のリージョンにレプリケートするには、しばらく時間がかかる場合があります。 PowerShell と Azure portal の進行状況レポートに違いがある場合があります。 開発ボックス定義の作成を開始する前に、プロセスが完了するまで待ちます。
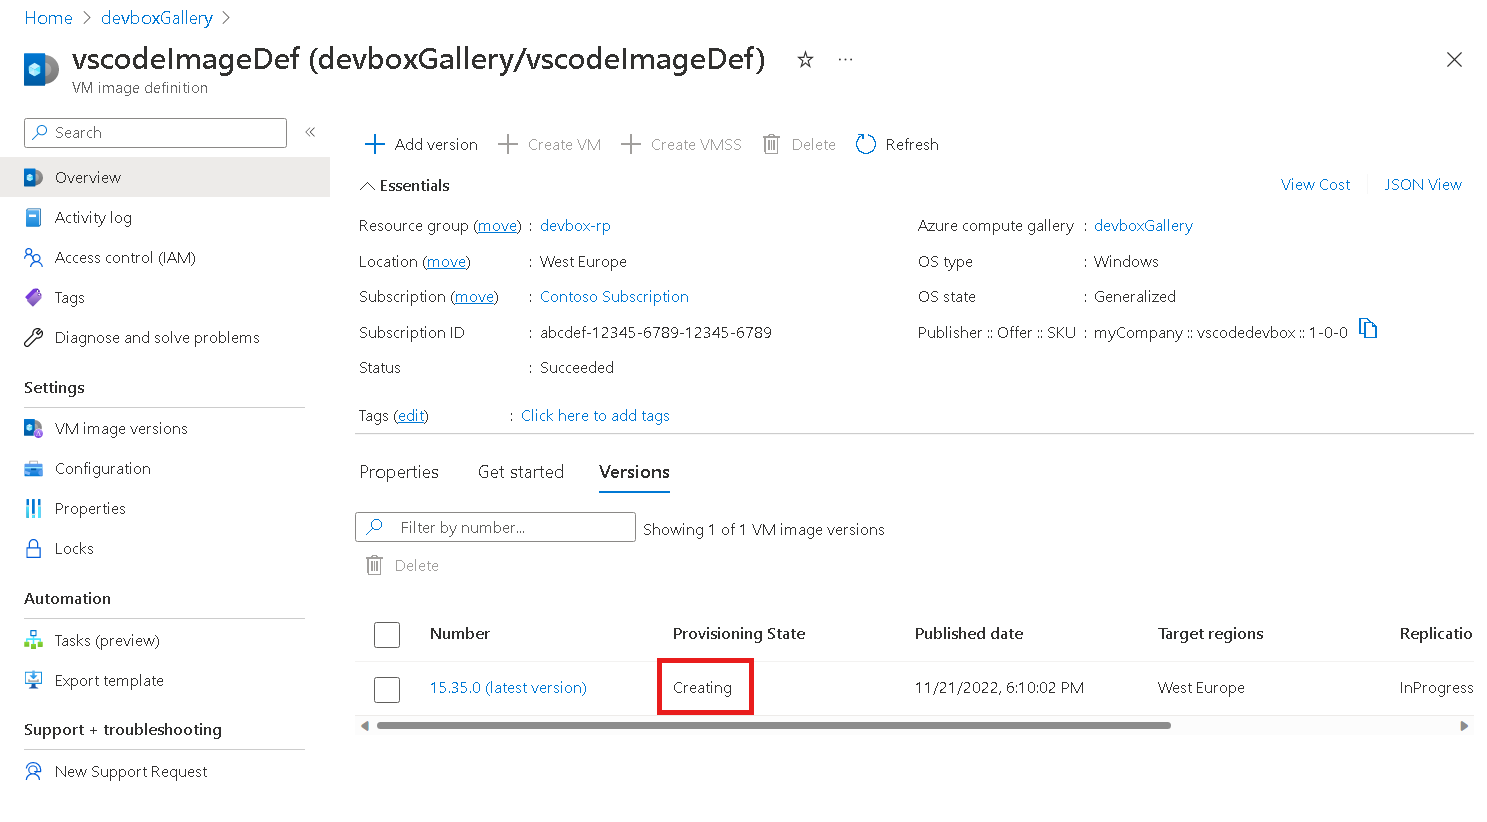
実行状態やプロビジョニング状態など、新しくビルドされたイメージに関する情報を取得します。
Get-AzImageBuilderTemplate -ImageTemplateName $imageTemplateName -ResourceGroupName $imageResourceGroup | Select-Object -Property Name, LastRunStatusRunState, LastRunStatusMessage, ProvisioningStateサンプル出力:
Name                 LastRunStatusRunState    LastRunStatusMessage   ProvisioningState
---------------------------------------------------------------------------------------
vscodeWinTemplate                                                    Creating
Azure portal でイメージのプロビジョニング状態を表示することもできます。 ギャラリーに移動し、イメージ定義を表示します。

ギャラリーを構成する
ギャラリーでカスタム イメージがプロビジョニングされたら、デベロッパー センターでイメージを使用するようにギャラリーを構成できます。 詳細については、Azure Compute Gallery の構成に関するページを参照してください。
カスタム イメージを使用して Microsoft Dev Box を設定する
デベロッパー センターでギャラリー イメージが使用可能になったら、Microsoft Dev Box でカスタム イメージを使用できます。 詳細については、「クイックスタート: Microsoft Dev Box を構成する」を参照してください。