Spring Security の Spring Cloud Azure サポート
この記事の対象: ✔️ バージョン 4.14.0 ✔️ バージョン 5.8.0
この記事では、Spring Cloud Azure と Spring Security を一緒に使用する方法について説明します。
Microsoft Entra ID の Spring Security
Web アプリケーションを構築する場合、ID とアクセス管理はいつでも基本的な要素です。
Azure にはアプリケーション開発の過程を民主化するための優れたプラットフォームがあり、クラウドベースの ID サービスを提供するだけでなく、Azure エコシステムの残りの部分とも緊密に統合されます。
Spring Security を使う、強力な抽象化と拡張可能なインターフェイスにより、Spring ベースのアプリケーションを簡単にセキュリティ保護できます。 ただし、Spring フレームワークは強力ですが、特定の ID プロバイダーに合わせて調整されているわけではありません。
spring-cloud-azure-starter-active-directory は、Web プリケーションを Microsoft Entra ID (略して Microsoft Entra ID) テナントに接続し、Microsoft Entra ID でリソース サーバーを保護するための最適な方法を提供します。 これは Oauth 2.0 プロトコルを使用して、Web アプリケーションとリソース サーバーを保護します。
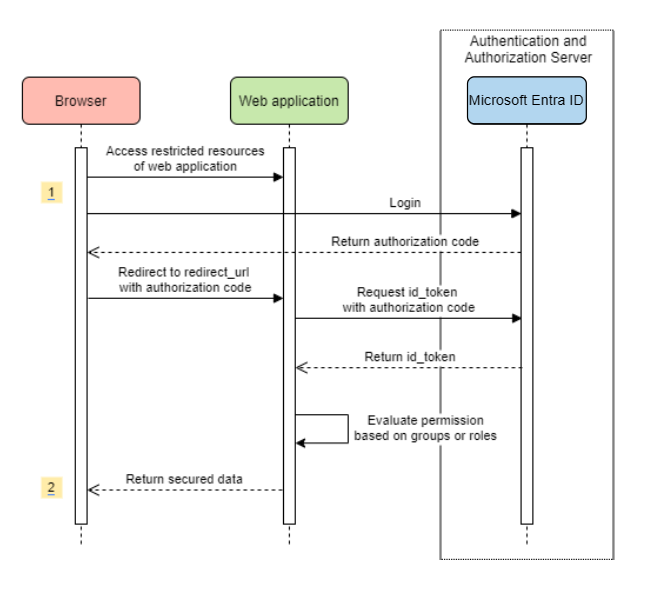
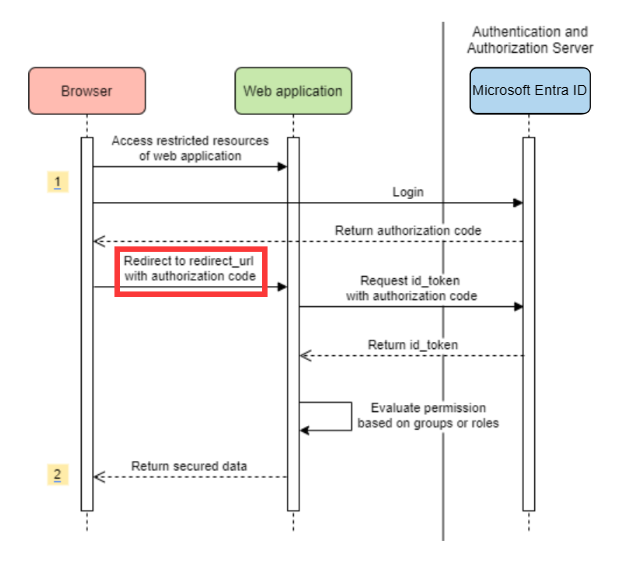
Web アプリケーションにアクセスする
このシナリオでは、OAuth 2.0 認可コード付与フローを使用して、ユーザーを Microsoft アカウントにログインさせます。
システム ダイアグラム
Azure で必要なリソースを作成する
アプリの登録を作成します。
AZURE_TENANT_ID、AZURE_CLIENT_ID、AZURE_CLIENT_SECRETを取得します。redirect URIをAPPLICATION_BASE_URI/login/oauth2/code/に設定します (例:http://localhost:8080/login/oauth2/code/)。 末尾の/が必要です。
必要な依存関係を追加する
<dependencies>
    <dependency>
        <groupId>com.azure.spring</groupId>
        <artifactId>spring-cloud-azure-starter-active-directory</artifactId>
    </dependency>
    <dependency>
        <groupId>org.springframework.boot</groupId>
        <artifactId>spring-boot-starter-oauth2-client</artifactId>
    </dependency>
</dependencies>
必要なプロパティを追加する
spring:
  cloud:
    azure:
      active-directory:
        enabled: true
        profile:
          tenant-id: <tenant>
        credential:
          client-id: ${AZURE_CLIENT_ID}
          client-secret: ${AZURE_CLIENT_SECRET}
Note
使用できる tenant-id 値は、次のとおりです。 common、 organizations、 consumers、またはテナント ID です。 これらの値の詳細については、「エラー AADSTS50020 - ID プロバイダーのユーザー アカウントがテナントに存在しない」の「間違ったエンドポイント (個人アカウントと組織アカウント) を使用する」セクションを参照してください。 シングルテナント アプリの変換の詳細については、「Microsoft Entra ID でシングルテナント アプリをマルチテナントに変換する」を参照してください。
次にアプリケーションを起動し、ブラウザからアプリケーションにアクセスします。 Microsoft のログイン ページにリダイレクトされます。
高度な使用法
セキュリティ構成をさらに追加する
@EnableWebSecurity
@EnableGlobalMethodSecurity(prePostEnabled = true)
public class AadOAuth2LoginSecurityConfig extends AadWebSecurityConfigurerAdapter {

    /**
     * Add configuration logic as needed.
     */
    @Override
    protected void configure(HttpSecurity http) throws Exception {
        super.configure(http);
        http.authorizeRequests()
                .anyRequest().authenticated();
        // Do some custom configuration
    }
}
アプリのロールでアクセスを承認する
Azure で必要なリソースを作成する
「アプリケーションにアプリ ロールを追加してトークンで受け取る」をお読みください。
次のパラメーターを使用してアプリ ロールを作成します。
- 表示名: Admin
- 許可されたメンバーの種類: ユーザー/グループ
- 値: Admin
- このアプリ ロールを有効にしますか: はい
Note
アプリ ロール ベースのアクセス制御を使用する場合は、role 要求にグループ名を含めることはできません。 詳細については、『アプリに省略可能な要求を提供する』「グループの省略可能な要求の構成」セクションを参照してください。
特定のメソッドを保護します。
class Demo {
   @GetMapping("Admin")
   @ResponseBody
   @PreAuthorize("hasAuthority('APPROLE_Admin')")
   public String admin() {
       return "Admin message";
   }
}
グループ名またはグループ ID でアクセスを承認する
関連する構成プロパティを追加します。
spring:
 cloud:
   azure:
     active-directory:
       enabled: true
       user-group:
         allowed-group-names: group1_name_1, group2_name_2
         # 1. If allowed-group-ids == all, then all group ID will take effect.
         # 2. If "all" is used, we should not configure other group ids.
         # 3. "all" is only supported for allowed-group-ids, not supported for allowed-group-names.
         allowed-group-ids: group_id_1, group_id_2
特定のメソッドを保護します。
@Controller
public class RoleController {
   @GetMapping("group1")
   @ResponseBody
   @PreAuthorize("hasRole('ROLE_group1')")
   public String group1() {
       return "group1 message";
   }

   @GetMapping("group2")
   @ResponseBody
   @PreAuthorize("hasRole('ROLE_group2')")
   public String group2() {
       return "group2 message";
   }

   @GetMapping("group1Id")
   @ResponseBody
   @PreAuthorize("hasRole('ROLE_<group1-id>')")
   public String group1Id() {
       return "group1Id message";
   }

   @GetMapping("group2Id")
   @ResponseBody
   @PreAuthorize("hasRole('ROLE_<group2-id>')")
   public String group2Id() {
       return "group2Id message";
   }
}
グローバル Azure ではなく国内 Azure を使用する
現在、グローバル Azure クラウドを除き、Microsoft Entra ID は次の国内クラウドにデプロイされています。
Azure Government
Azure China 21Vianet
Azure Germany
Azure China 21Vianet を使用したサンプルを次に示します。
spring:
  cloud:
    azure:
      active-directory:
        enabled: true
        base-uri: https://login.partner.microsoftonline.cn
        graph-base-uri: https://microsoftgraph.chinacloudapi.cn
詳細については、各国のクラウドのデプロイに関する記事をご覧ください。
リダイレクト URI テンプレートを構成する
開発者はリダイレクト URI をカスタマイズできます。
redirect-uri-template プロパティを application.yml ファイルに追加します 。
spring:
 cloud:
   azure:
     active-directory:
       enabled: true
       redirect-uri-template: ${REDIRECT-URI-TEMPLATE}
Azure portal でredirect-uri を更新します。

設定 redirect-uri-templateした後、セキュリティ ビルダーを更新する必要があります。
@EnableWebSecurity
@EnableGlobalMethodSecurity(prePostEnabled = true)
public class AadOAuth2LoginSecurityConfig extends AadWebSecurityConfigurerAdapter {
    /**
     * Add configuration logic as needed.
     */
    @Override
    protected void configure(HttpSecurity http) throws Exception {
        super.configure(http);
        http.oauth2Login()
                .loginProcessingUrl("${REDIRECT-URI-TEMPLATE}")
                .and()
            .authorizeRequests()
                .anyRequest().authenticated();
    }
}
プロキシ経由で Microsoft Entra ID に接続する
プロキシ経由で Microsoft Entra ID に接続するには、次の例に示すような RestTemplateCustomizer Bean を指定します。
@Configuration
class DemoConfiguration {
    @Bean
    public RestTemplateCustomizer proxyRestTemplateCustomizer() {
        return (RestTemplate restTemplate) -> {
            Proxy proxy = new Proxy(Proxy.Type.HTTP, new InetSocketAddress(PROXY_SERVER_HOST, PROXY_SERVER_PORT));
            SimpleClientHttpRequestFactory requestFactory = new SimpleClientHttpRequestFactory();
            requestFactory.setProxy(proxy);
            restTemplate.setRequestFactory(requestFactory);
        };
    }
}
サンプル
サンプル プロジェクト: aad-web-application。
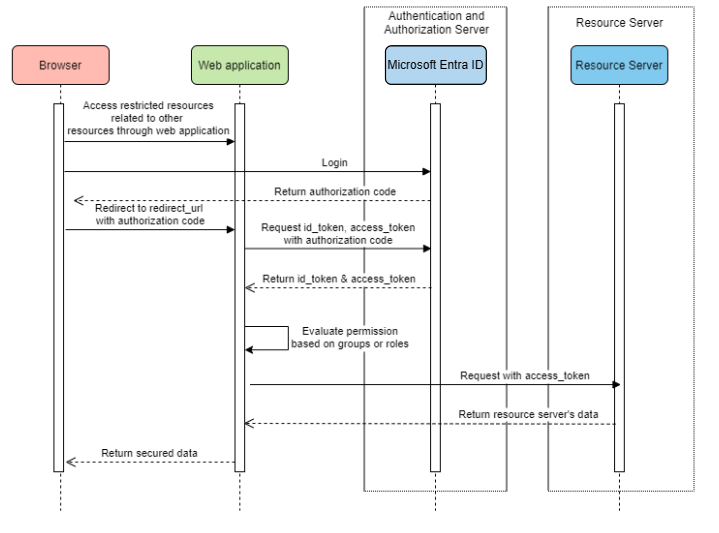
リソース サーバーにアクセスする Web アプリケーション
システム ダイアグラム
Azure で必要なリソースを作成する
アプリの登録を作成します。
AZURE_TENANT_ID、AZURE_CLIENT_ID、AZURE_CLIENT_SECRETを取得します。redirect URIをAPPLICATION_BASE_URI/login/oauth2/code/に設定します (例:http://localhost:8080/login/oauth2/code/)。 末尾の/が必要です。
必要な依存関係を追加する
<dependencies>
    <dependency>
        <groupId>com.azure.spring</groupId>
        <artifactId>spring-cloud-azure-starter-active-directory</artifactId>
    </dependency>
    <dependency>
        <groupId>org.springframework.boot</groupId>
        <artifactId>spring-boot-starter-oauth2-client</artifactId>
    </dependency>
</dependencies>
必要なプロパティを追加する
spring:
  cloud:
    azure:
      active-directory:
        enabled: true
        profile:
          tenant-id: <tenant>
        credential:
          client-id: ${AZURE_CLIENT_ID}
          client-secret: ${AZURE_CLIENT_SECRET}
        authorization-clients:
          graph:
            scopes: https://graph.microsoft.com/Analytics.Read, email
Note
使用できる tenant-id 値は、次のとおりです。 common、 organizations、 consumers、またはテナント ID です。 これらの値の詳細については、「エラー AADSTS50020 - ID プロバイダーのユーザー アカウントがテナントに存在しない」の「間違ったエンドポイント (個人アカウントと組織アカウント) を使用する」セクションを参照してください。 シングルテナント アプリの変換の詳細については、「Microsoft Entra ID でシングルテナント アプリをマルチテナントに変換する」を参照してください。
ここで、graph は OAuth2AuthorizedClient の名前であり、scopes はログイン時の同意に必要なスコープを意味します。
アプリケーションで OAuth2AuthorizedClient を使用する
public class Demo {
    @GetMapping("/graph")
    @ResponseBody
    public String graph(
    @RegisteredOAuth2AuthorizedClient("graph") OAuth2AuthorizedClient graphClient) {
        // toJsonString() is just a demo.
        // oAuth2AuthorizedClient contains access_token. We can use this access_token to access resource server.
        return toJsonString(graphClient);
    }
}
次にアプリケーションを起動し、ブラウザでアプリケーションにアクセスします。 すると、Microsoft のログイン ページにリダイレクトされます。
高度な使用法
クライアント資格情報フロー
既定のフローは承認コード フローです。クライアント資格情報フローを使用する場合は、次のように構成できます。
spring:
  cloud:
    azure:
      active-directory:
        enabled: true
        profile:
          tenant-id: <tenant>
        credential:
          client-id: ${AZURE_CLIENT_ID}
          client-secret: ${AZURE_CLIENT_SECRET}
        authorization-clients:
          graph:
            authorization-grant-type: client_credentials # Change type to client_credentials
            scopes: https://graph.microsoft.com/Analytics.Read, email
Note
使用できる tenant-id 値は、次のとおりです。 common、 organizations、 consumers、またはテナント ID です。 これらの値の詳細については、「エラー AADSTS50020 - ID プロバイダーのユーザー アカウントがテナントに存在しない」の「間違ったエンドポイント (個人アカウントと組織アカウント) を使用する」セクションを参照してください。 シングルテナント アプリの変換の詳細については、「Microsoft Entra ID でシングルテナント アプリをマルチテナントに変換する」を参照してください。
複数のリソース サーバーにアクセスする
1 つの Web アプリケーションで、次のように構成することで複数のリソース サーバーにアクセスできます。
spring:
  cloud:
    azure:
      active-directory:
        enabled: true
        profile:
          tenant-id: <tenant>
        credential:
          client-id: ${AZURE_CLIENT_ID}
          client-secret: ${AZURE_CLIENT_SECRET}
        authorization-clients:
          resource-server-1:
            scopes: # Scopes for resource-server-1
          resource-server-2:
            scopes: # Scopes for resource-server-2
Note
使用できる tenant-id 値は、次のとおりです。 common、 organizations、 consumers、またはテナント ID です。 これらの値の詳細については、「エラー AADSTS50020 - ID プロバイダーのユーザー アカウントがテナントに存在しない」の「間違ったエンドポイント (個人アカウントと組織アカウント) を使用する」セクションを参照してください。 シングルテナント アプリの変換の詳細については、「Microsoft Entra ID でシングルテナント アプリをマルチテナントに変換する」を参照してください。
その後、次のようなアプリケーションで OAuth2AuthorizedClient を使用できます
public class Demo {
    @GetMapping("/resource-server-1")
    @ResponseBody
    public String graph(
    @RegisteredOAuth2AuthorizedClient("resource-server-1") OAuth2AuthorizedClient client) {
        return callResourceServer1(client);
    }

    @GetMapping("/resource-server-2")
    @ResponseBody
    public String graph(
    @RegisteredOAuth2AuthorizedClient("resource-server-2") OAuth2AuthorizedClient client) {
        return callResourceServer2(client);
    }
}
サンプル
サンプル プロジェクト: aad-web-application。
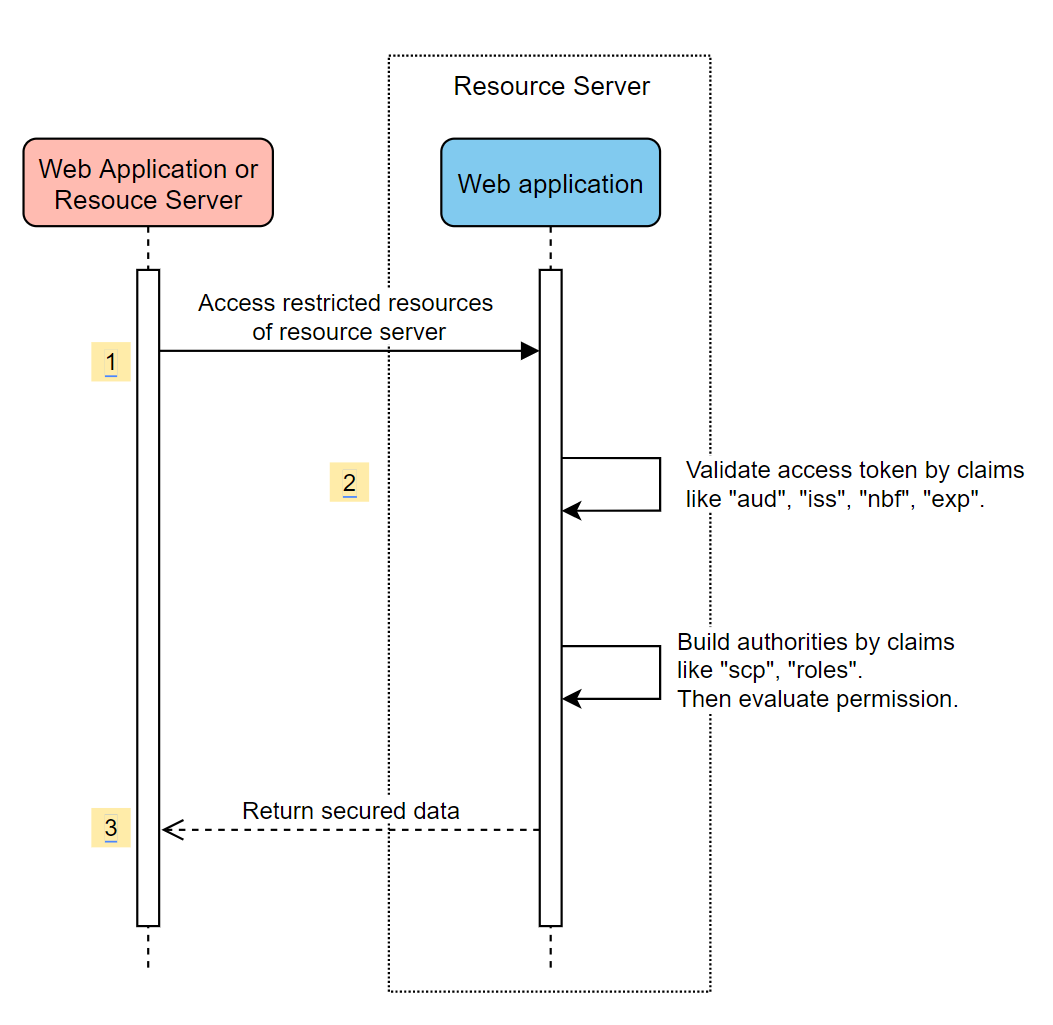
リソース サーバーへのアクセス
このシナリオではログインはサポートされておらず、アクセス トークンを検証することによってサーバーを保護するだけです。 アクセス トークンが有効な場合、サーバーによって要求が処理されます。
システム ダイアグラム
Azure で必要なリソースを作成する
アプリの登録を作成します。
AZURE_CLIENT_IDを取得します。「クイック スタート: Web API を公開するようにアプリケーションを構成する」をお読みください。
Scope-1という名前のスコープで Web API を公開します。
必要な依存関係を追加する
<dependencies>
    <dependency>
        <groupId>com.azure.spring</groupId>
        <artifactId>spring-cloud-azure-starter-active-directory</artifactId>
    </dependency>
    <dependency>
        <groupId>org.springframework.boot</groupId>
        <artifactId>spring-boot-starter-oauth2-resource-server</artifactId>
    </dependency>
</dependencies>
必要なプロパティを追加する
spring:
  cloud:
    azure:
      active-directory:
        enabled: true
        credential:
          client-id: ${AZURE_CLIENT_ID}
次に、アプリケーションを開始して、アプリケーションの Web API にアクセスします。
アクセス トークンがないと 401 が返されます。
アクセス トークンを使用してアプリケーションにアクセスします。 アクセス トークン内の次の要求が検証されます。
iss: アクセス トークンは、Microsoft Entra ID によって発行される必要があります。nbf: 現在の時刻をnbfより前にすることはできません。exp: 現在の時刻はexpより後にすることはできません。aud:spring.cloud.azure.active-directory.credential.client-idまたはspring.cloud.azure.active-directory.credential.app-id-uriが構成されている場合、対象ユーザーは構成されているclient-idまたはapp-id-uriと等しい必要があります。 2 つのプロパティが構成されていない場合、この要求は検証されません。
アクセス トークンの詳細については、Microsoft ID プラットフォーム アクセス トークンに関する MS ドキュメントを参照してください。
高度な使用法
セキュリティ構成をさらに追加する
@EnableWebSecurity
@EnableGlobalMethodSecurity(prePostEnabled = true)
public class AadOAuth2ResourceServerSecurityConfig extends AadResourceServerWebSecurityConfigurerAdapter {
    /**
     * Add configuration logic as needed.
     */
    @Override
    protected void configure(HttpSecurity http) throws Exception {
        super.configure(http);
        http.authorizeRequests((requests) -> requests.anyRequest().authenticated());
    }
}
スコープでアクセス許可を検証する
Azure で必要なリソースを作成します。
「クイック スタート: Web API を公開するようにアプリケーションを構成する」をお読みください。
Scope1という名前のスコープで Web API を公開します。
特定のメソッドを保護します。
class Demo {
    @GetMapping("scope1")
    @ResponseBody
    @PreAuthorize("hasAuthority('SCOPE_Scope1')")
    public String scope1() {
        return "Congratulations, you can access `scope1` endpoint.";
    }
}
こうすることで、/scope1 エンドポイントにアクセスすると、アクセス トークン内の次の要求が検証されます。
scp: 値にはScope1が含まれている必要があります。
アプリ ロールでアクセス許可を検証する
Azure で必要なリソースを作成します。
「アプリケーションにアプリ ロールを追加してトークンで受け取る」をお読みください。
次のパラメーターを使用してアプリ ロールを作成します。
- 表示名: AppRole1
- 許可されたメンバーの種類: ユーザー/グループ
- 値: AppRole1
- このアプリ ロールを有効にしますか: はい
特定のメソッドを保護します。
class Demo {
    @GetMapping("app-role1")
    @ResponseBody
    @PreAuthorize("hasAuthority('APPROLE_AppRole1')")
    public String appRole1() {
        return "Congratulations, you can access `app-role1` endpoint.";
    }
}
こうすることで、/app-role1 エンドポイントにアクセスすると、アクセス トークン内の次の要求が検証されます。
roles: 値にはAppRole1が含まれている必要があります。
JWT クライアント認証を使用する
クライアント認証に JSON Web Token (JWT) を使用するには、次の手順を使用します。
- 「Microsoft ID プラットフォーム アプリケーションの認証証明書資格情報」の「Microsoft ID プラットフォームに証明書を登録する」セクションを参照してください。
- Azure portal に登録されているアプリケーションに .pem 証明書をアップロードします。
- .PFX または .P12 証明書の証明書パスとパスワードを構成します。
- JWT クライアント認証を使用して認証するクライアントにプロパティ
spring.cloud.azure.active-directory.authorization-clients.azure.client-authentication-method=private_key_jwt構成を追加します。
次の構成ファイルの例は、Web アプリのシナリオ用です。 証明書の情報は、グローバル プロパティで構成されています。
spring:
  cloud:
    azure:
      credential:
        client-id: ${AZURE_CLIENT_ID}
        client-certificate-path: ${AZURE_CERTIFICATE_PATH}
        client-certificate-password: ${AZURE_CERTIFICATE_PASSWORD}
      profile:
        tenant-id: <tenant>
      active-directory:
        enabled: true
        user-group:
          allowed-group-names: group1,group2
          allowed-group-ids: <group1-id>,<group2-id>
        post-logout-redirect-uri: http://localhost:8080
        authorization-clients:
          azure:
            client-authentication-method: private_key_jwt
          arm:
            client-authentication-method: private_key_jwt
            scopes: https://management.core.windows.net/user_impersonation
          graph:
            client-authentication-method: private_key_jwt
            scopes:
              - https://graph.microsoft.com/User.Read
              - https://graph.microsoft.com/Directory.Read.All
          webapiA:
            client-authentication-method: private_key_jwt
            scopes:
              - ${WEB_API_A_APP_ID_URL}/Obo.WebApiA.ExampleScope
          webapiB:
            client-authentication-method: private_key_jwt
            scopes:
              - ${WEB_API_B_APP_ID_URL}/.default
            authorization-grant-type: client_credentials
Note
使用できる tenant-id 値は、次のとおりです。 common、 organizations、 consumers、またはテナント ID です。 これらの値の詳細については、「エラー AADSTS50020 - ID プロバイダーのユーザー アカウントがテナントに存在しない」の「間違ったエンドポイント (個人アカウントと組織アカウント) を使用する」セクションを参照してください。 シングルテナント アプリの変換の詳細については、「Microsoft Entra ID でシングルテナント アプリをマルチテナントに変換する」を参照してください。
次の例に示すように、active-directory サービス プロパティで証明書情報を構成することもできます。
spring:
  cloud:
    azure:
      active-directory:
        enabled: true
        credential:
          client-id: ${AZURE_CLIENT_ID}
          client-certificate-path: ${AZURE_CERTIFICATE_PATH}
          client-certificate-password: ${AZURE_CERTIFICATE_PASSWORD}
        profile:
          tenant-id: <tenant>
        user-group:
          allowed-group-names: group1,group2
          allowed-group-ids: <group1-id>,<group2-id>
        post-logout-redirect-uri: http://localhost:8080
        authorization-clients:
          azure:
            client-authentication-method: private_key_jwt
          arm:
            client-authentication-method: private_key_jwt
            scopes: https://management.core.windows.net/user_impersonation
          graph:
            client-authentication-method: private_key_jwt
            scopes:
              - https://graph.microsoft.com/User.Read
              - https://graph.microsoft.com/Directory.Read.All
          webapiA:
            client-authentication-method: private_key_jwt
            scopes:
              - ${WEB_API_A_APP_ID_URL}/Obo.WebApiA.ExampleScope
          webapiB:
            client-authentication-method: private_key_jwt
            scopes:
              - ${WEB_API_B_APP_ID_URL}/.default
            authorization-grant-type: client_credentials
Note
使用できる tenant-id 値は、次のとおりです。 common、 organizations、 consumers、またはテナント ID です。 これらの値の詳細については、「エラー AADSTS50020 - ID プロバイダーのユーザー アカウントがテナントに存在しない」の「間違ったエンドポイント (個人アカウントと組織アカウント) を使用する」セクションを参照してください。 シングルテナント アプリの変換の詳細については、「Microsoft Entra ID でシングルテナント アプリをマルチテナントに変換する」を参照してください。
プロキシ経由で Microsoft Entra ID に接続する
プロキシ経由で Microsoft Entra ID に接続するには、RestTemplateCustomizer Bean を指定します。 詳細については、「プロキシを使用した Microsoft Entra ID への接続」セクションを参照してください。
サンプル
サンプル プロジェクト: aad-resource-server。
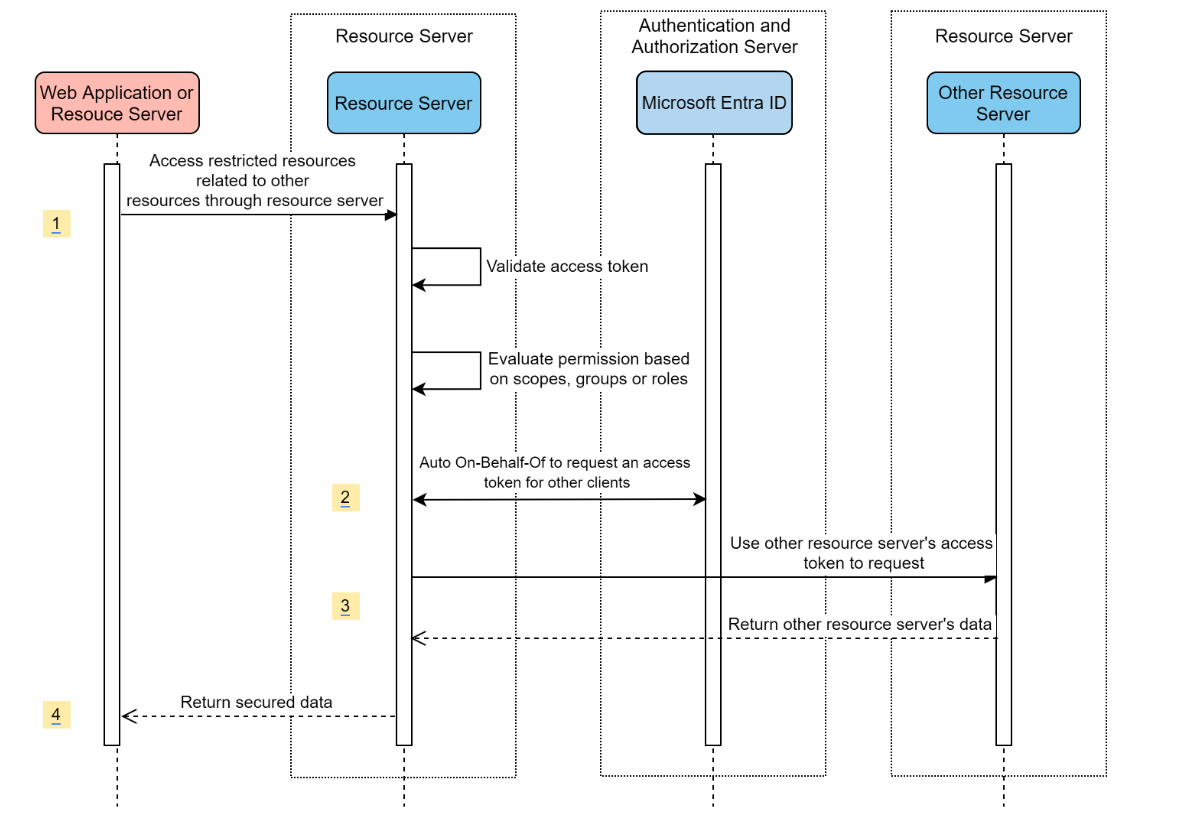
他のリソース サーバーにアクセスするリソース サーバー
システム ダイアグラム
Azure で必要なリソースを作成する
アプリの登録を作成します。
AZURE_TENANT_ID、AZURE_CLIENT_ID、AZURE_CLIENT_SECRETを取得します。
必要な依存関係を追加する
<dependencies>
    <dependency>
        <groupId>com.azure.spring</groupId>
        <artifactId>spring-cloud-azure-starter-active-directory</artifactId>
    </dependency>
    <dependency>
        <groupId>org.springframework.boot</groupId>
        <artifactId>spring-boot-starter-oauth2-resource-server</artifactId>
    </dependency>
    <dependency>
        <groupId>org.springframework.boot</groupId>
        <artifactId>spring-boot-starter-oauth2-client</artifactId>
    </dependency>
</dependencies>
必要なプロパティを追加する
spring:
  cloud:
    azure:
      active-directory:
        enabled: true
        profile:
          tenant-id: <tenant>
        credential:
          client-id: ${AZURE_CLIENT_ID}
          client-secret: ${AZURE_CLIENT_SECRET}
        authorization-clients:
          graph:
            scopes:
              - https://graph.microsoft.com/User.Read
Note
使用できる tenant-id 値は、次のとおりです。 common、 organizations、 consumers、またはテナント ID です。 これらの値の詳細については、「エラー AADSTS50020 - ID プロバイダーのユーザー アカウントがテナントに存在しない」の「間違ったエンドポイント (個人アカウントと組織アカウント) を使用する」セクションを参照してください。 シングルテナント アプリの変換の詳細については、「Microsoft Entra ID でシングルテナント アプリをマルチテナントに変換する」を参照してください。
アプリケーションで OAuth2AuthorizedClient を使用する
public class SampleController {
    @GetMapping("call-graph")
    public String callGraph(@RegisteredOAuth2AuthorizedClient("graph") OAuth2AuthorizedClient graph) {
        return callMicrosoftGraphMeEndpoint(graph);
    }
}
サンプル
サンプル プロジェクト: aad-resource-server-obo。
1 つのアプリケーション内の Web アプリケーションとリソース サーバー
Azure で必要なリソースを作成する
アプリの登録を作成します。
AZURE_TENANT_ID、AZURE_CLIENT_ID、AZURE_CLIENT_SECRETを取得します。
必要な依存関係を追加する
<dependencies>
    <dependency>
        <groupId>com.azure.spring</groupId>
        <artifactId>spring-cloud-azure-starter-active-directory</artifactId>
    </dependency>
    <dependency>
        <groupId>org.springframework.boot</groupId>
        <artifactId>spring-boot-starter-oauth2-resource-server</artifactId>
    </dependency>
    <dependency>
        <groupId>org.springframework.boot</groupId>
        <artifactId>spring-boot-starter-oauth2-client</artifactId>
    </dependency>
</dependencies>
必要なプロパティを追加する
spring.cloud.azure.active-directory.application-type プロパティを web_application_and_resource_server に設定し、各承認クライアントの承認の種類を指定します。
spring:
  cloud:
    azure:
      active-directory:
        enabled: true
        profile:
          tenant-id: <tenant>
        credential:
          client-id: ${AZURE_CLIENT_ID}
          client-secret: ${AZURE_CLIENT_SECRET}
        app-id-uri: ${WEB_API_ID_URI}
        application-type: web_application_and_resource_server  # This is required.
        authorization-clients:
          graph:
            authorizationGrantType: authorization_code # This is required.
            scopes:
              - https://graph.microsoft.com/User.Read
              - https://graph.microsoft.com/Directory.Read.All
Note
使用できる tenant-id 値は、次のとおりです。 common、 organizations、 consumers、またはテナント ID です。 これらの値の詳細については、「エラー AADSTS50020 - ID プロバイダーのユーザー アカウントがテナントに存在しない」の「間違ったエンドポイント (個人アカウントと組織アカウント) を使用する」セクションを参照してください。 シングルテナント アプリの変換の詳細については、「Microsoft Entra ID でシングルテナント アプリをマルチテナントに変換する」を参照してください。
SecurityFilterChain の定義
複数の SecurityFilterChain インスタンスを構成します。 AadWebApplicationAndResourceServerConfig には、リソース サーバーと Web アプリケーション用の 2 つのセキュリティ フィルター チェーン構成が含まれています。
@EnableWebSecurity
@EnableGlobalMethodSecurity(prePostEnabled = true)
public class AadWebApplicationAndResourceServerConfig {

    @Order(1)
    @Configuration
    public static class ApiWebSecurityConfigurationAdapter extends AadResourceServerWebSecurityConfigurerAdapter {
        protected void configure(HttpSecurity http) throws Exception {
            super.configure(http);
            // All the paths that match `/api/**`(configurable) work as `Resource Server`, other paths work as `Web application`.
            http.antMatcher("/api/**")
                .authorizeRequests().anyRequest().authenticated();
        }
    }

    @Configuration
    public static class HtmlWebSecurityConfigurerAdapter extends AadWebSecurityConfigurerAdapter {

        @Override
        protected void configure(HttpSecurity http) throws Exception {
            super.configure(http);
            // @formatter:off
            http.authorizeRequests()
                    .antMatchers("/login").permitAll()
                    .anyRequest().authenticated();
            // @formatter:on
        }
    }
}
構成
spring-cloud-azure-starter-active-directory の構成可能なプロパティ:
| 名前 | 説明 |
|---|---|
| spring.cloud.azure.active-directory.app-id-uri | アプリ ID URI。id_token の "aud" 要求で使用される可能性があります。 |
| spring.cloud.azure.active-directory.application-type | Microsoft Entraアプリケーションのタイプ。 |
| spring.cloud.azure.active-directory.authenticate-additional-parameters | 承認 URL のパラメーターを追加します。 |
| spring.cloud.azure.active-directory.authorization-clients | OAuth2 承認クライアント。 |
| spring.cloud.azure.active-directory.credential.client-id | Azure でサービス プリンシパル認証を実行するときに使用するクライアント ID。 |
| spring.cloud.azure.active-directory.credential.client-secret | Azure でサービス プリンシパル認証を実行するときに使用するクライアント シークレット。 |
| spring.cloud.azure.active-directory.jwk-set-cache-lifespan | キャッシュされた JWK セットの有効期限が切れるまでの有効期限。既定値は 5 分です。 |
| spring.cloud.azure.active-directory.jwk-set-cache-refresh-time | キャッシュされた JWK セットの有効期限が切れるまでの更新時間。既定値は 5 分です。 |
| spring.cloud.azure.active-directory.jwt-connect-timeout | JWKSet リモート URL 呼び出しの接続タイムアウト。 |
| spring.cloud.azure.active-directory.jwt-read-timeout | JWKSet リモート URL 呼び出しの読み取りタイムアウト。 |
| spring.cloud.azure.active-directory.jwt-size-limit | JWKSet リモート URL 呼び出しのサイズ制限 (バイト単位)。 |
| spring.cloud.azure.active-directory.post-logout-redirect-uri | ログアウト後のリダイレクト URI。 |
| spring.cloud.azure.active-directory.profile.cloud-type | 接続先の Azure クラウドの名前。 サポートされている種類は、AZURE、AZURE_CHINA、AZURE_GERMANY、AZURE_US_GOVERNMENT、OTHER です。 |
| spring.cloud.azure.active-directory.profile.environment | Microsoft Entra エンドポイントのプロパティ。 |
| spring.cloud.azure.active-directory.profile.tenant-id | Azure Tenant ID。 使用できる tenant-id 値は、次のとおりです。 common、 organizations、 consumers、またはテナント ID です。 |
| spring.cloud.azure.active-directory.redirect-uri-template | リソース所有者のユーザー エージェントを介して承認資格情報などの応答をクライアントに返すために、承認サーバーによって使用されるリダイレクト エンドポイント。 既定値は {baseUrl}/login/oauth2/code/ です。 |
| spring.cloud.azure.active-directory.resource-server.claim-to-authority-prefix-map | GrantedAuthority のビルドに使用する要求と、GrantedAuthority の文字列値を構成します。 既定値は "scp" -> "SCOPE_"、"roles" -> "APPROLE_" です。 |
| spring.cloud.azure.active-directory.resource-server.principal-claim-name | アクセス トークン内どの要求を AuthenticatedPrincipal#getName で返すかを設定します。 既定値は "sub" です。 |
| spring.cloud.azure.active-directory.session-stateless | true の場合、ステートレス認証フィルター AadAppRoleStatelessAuthenticationFilter がアクティブになります。 既定値は false で、AadAuthenticationFilter がアクティブになります。 |
| spring.cloud.azure.active-directory.user-group.allowed-group-ids | グループ ID を使用して GrantedAuthority を構築できます。 |
| spring.cloud.azure.active-directory.user-group.allowed-group-names | グループ名を使用して GrantedAuthority を構築できます。 |
| spring.cloud.azure.active-directory.user-group.use-transitive-members | "true" の場合は、"v1.0/me/transitiveMemberOf" を使用してメンバーを取得します。 それ以外の場合は、"v1.0/me/memberOf" を使用します。 既定値は false です。 |
| spring.cloud.azure.active-directory.user-name-attribute | プリンシパルの名前を指定する要求を決定します。 |
これらのプロパティを使用する方法の例を次に示します。
アプリケーションの種類
アプリケーションのタイプは、依存関係 spring-security-oauth2-client または spring-security-oauth2-resource-serverから推論できます。 推論された値が目的の値でない場合は、アプリケーションのタイプを指定できます。 有効な値と推定値の表を次に示します。
spring-cloud-azure-starter-active-directory のアプリケーションのタイプ:
依存関係 spring-security-oauth2-client があります |
依存関係 spring-security-oauth2-resource-server があります |
アプリケーションの種類の有効な値 | 推論される値 |
|---|---|---|---|
| はい | 番号 | web_application |
web_application |
| 番号 | イエス | resource_server |
resource_server |
| イエス | はい | web_application, resource_server, resource_server_with_obo, web_application_and_resource_server |
resource_server_with_obo |
Azure Active Directory B2C での Spring Security
Azure Active Directory (Azure AD) B2C は、アプリケーション使用時の顧客のサインアップ、サインイン、プロファイル管理をカスタマイズして制御できる ID 管理サービスです。 Azure AD B2C は、これらのアクションを可能にする一方で、同時に顧客の ID を保護します。
依存関係のセットアップ
<dependencies>
    <dependency>
        <groupId>com.azure.spring</groupId>
        <artifactId>spring-cloud-azure-starter-active-directory-b2c</artifactId>
    </dependency>
</dependencies>
構成
spring-cloud-azure-starter-active-directory-b2c の構成可能なプロパティ:
| 名前 | 説明 |
|---|---|
| spring.cloud.azure.active-directory.b2c.app-id-uri | トークンの "aud" 要求で使用される可能性があるアプリ ID URI。 |
| spring.cloud.azure.active-directory.b2c.authenticate-additional-parameters | 認証用の追加パラメーター。 |
| spring.cloud.azure.active-directory.b2c.authorization-clients | クライアント構成を指定します。 |
| spring.cloud.azure.active-directory.b2c.base-uri | Azure AD B2C エンドポイントのベース URI。 |
| spring.cloud.azure.active-directory.b2c.credential | Azure AD B2C の資格情報。 |
| spring.cloud.azure.active-directory.b2c.jwt-connect-timeout | JWKSet リモート URL 呼び出しの接続タイムアウト。 |
| spring.cloud.azure.active-directory.b2c.jwt-read-timeout | JWKSet リモート URL 呼び出しの読み取りタイムアウト。 |
| spring.cloud.azure.active-directory.b2c.jwt-size-limit | JWKSet リモート URL 呼び出しのサイズ制限 (バイト単位)。 |
| spring.cloud.azure.active-directory.b2c.login-flow | プライマリ サインイン フロー キーを指定します。 既定値は sign-up-or-sign-in です。 |
| spring.cloud.azure.active-directory.b2c.logout-success-url | ログアウト後のリダイレクト URL。 既定値は http://localhost:8080/login です。 |
| spring.cloud.azure.active-directory.b2c.profile | Azure AD B2C プロファイル情報。 |
| spring.cloud.azure.active-directory.b2c.reply-url | 認証コード取得後に URL に応答します。 既定値は {baseUrl}/login/oauth2/code/ です。 |
| spring.cloud.azure.active-directory.b2c.user-flows | ユーザー フロー。 |
| spring.cloud.azure.active-directory.b2c.user-name-attribute-name | ユーザー名の属性名。 |
完全な構成については、Spring Cloud Azure 構成プロパティをご確認ください。
基本的な使用方法
Web アプリケーションとは、ユーザーが Microsoft Entra ID でログインできるようにする Web ベースのアプリケーションですが、リソース サーバーは、Microsoft Entra ID から取得したアクセス トークンを検証した後、アクセスを許可または拒否します。 このガイドでは、4つのシナリオについて説明します。
Web アプリケーションにアクセスします。
リソース サーバーにアクセスする Web アプリケーション。
リソース サーバーへのアクセス。
他のリソース サーバーにアクセスするリソース サーバー。
使用法 1: Web アプリケーションへのアクセス
このシナリオでは、OAuth 2.0 承認コード付与フローを使用して、Azure AD B2C ユーザーでユーザーをログインさせます。
ポータル メニューから [Azure AD B2C] を選択し、[アプリケーション]、[追加] の順にクリックします。
アプリケーションの [名前] (webapp など) を指定し、http://localhost:8080/login/oauth2/code/ を [応答 URL] に追加し、アプリケーション ID を WEB_APP_AZURE_CLIENT_ID として記録して [保存] をクリックします。
ご使用のアプリケーションから [キー] を選択し、[キーの生成] を選択して WEB_APP_AZURE_CLIENT_SECRET を生成してから [保存] を選択します。
左側の [ユーザー フロー] を選択し、[新しいユーザー フロー] を選択します。
[サインアップまたはサインイン]、[Profile editing]\(プロファイル編集\)、[パスワードのリセット] を選択し、それぞれユーザー フローを作成します。 ユーザー フローの [名前] と [ユーザー属性と要求] を指定し、[作成] を選択します。
[APIのアクセス許可>]、[アクセス許可>]、[Microsoft API] を選択し、[Microsoft Graph] を選択し、[委任されたアクセス許可] を選択し、[offline_access] と [openid] のアクセス許可を選択し、次に [アクセス許可の追加] を選択して、プロセスを完了します。
Graph アクセス許可に対して管理者の同意を与えます。

pom.xml ファイルに次の依存関係を追加します。
<dependencies>
   <dependency>
       <groupId>com.azure.spring</groupId>
       <artifactId>azure-spring-boot-starter-active-directory-b2c</artifactId>
   </dependency>
   <dependency>
       <groupId>org.springframework.boot</groupId>
       <artifactId>spring-boot-starter-web</artifactId>
   </dependency>
   <dependency>
       <groupId>org.springframework.boot</groupId>
       <artifactId>spring-boot-starter-thymeleaf</artifactId>
   </dependency>
   <dependency>
       <groupId>org.springframework.boot</groupId>
       <artifactId>spring-boot-starter-security</artifactId>
   </dependency>
   <dependency>
       <groupId>org.thymeleaf.extras</groupId>
       <artifactId>thymeleaf-extras-springsecurity5</artifactId>
   </dependency>
</dependencies>
次の例に示すように、前に作成した値を使用してapplication.yml ファイルにプロパティを追加します。
spring:
 cloud:
   azure:
     active-directory:
       b2c:
         enabled: true
         authenticate-additional-parameters:
           domain_hint: xxxxxxxxx         # optional
           login_hint: xxxxxxxxx          # optional
           prompt: [login,none,consent]   # optional
         base-uri: ${BASE_URI}
         credential:
           client-id: ${WEBAPP_AZURE_CLIENT_ID}
           client-secret: ${WEBAPP_AZURE_CLIENT_SECRET}
         login-flow: ${LOGIN_USER_FLOW_KEY}               # default to sign-up-or-sign-in, will look up the user-flows map with provided key.
         logout-success-url: ${LOGOUT_SUCCESS_URL}
         user-flows:
           ${YOUR_USER_FLOW_KEY}: ${USER_FLOW_NAME}
         user-name-attribute-name: ${USER_NAME_ATTRIBUTE_NAME}
Java コードを記述します。
コントローラーのコードについては、次の例を参照してください。
@Controller
public class WebController {

   private void initializeModel(Model model, OAuth2AuthenticationToken token) {
       if (token != null) {
           final OAuth2User user = token.getPrincipal();
           model.addAllAttributes(user.getAttributes());
           model.addAttribute("grant_type", user.getAuthorities());
           model.addAttribute("name", user.getName());
       }
   }

   @GetMapping(value = { "/", "/home" })
   public String index(Model model, OAuth2AuthenticationToken token) {
       initializeModel(model, token);
       return "home";
   }
}
セキュリティ構成コードについては、次の例を参照してください。
@EnableWebSecurity
public class WebSecurityConfiguration extends WebSecurityConfigurerAdapter {

   private final AadB2cOidcLoginConfigurer configurer;

   public WebSecurityConfiguration(AadB2cOidcLoginConfigurer configurer) {
       this.configurer == configurer;
   }

   @Override
   protected void configure(HttpSecurity http) throws Exception {
       // @formatter:off
       http.authorizeRequests()
               .anyRequest().authenticated()
               .and()
           .apply(configurer);
       // @formatter:off
   }
}
home.html を aad-b2c-web-application サンプルからコピーし、PROFILE_EDIT_USER_FLOW と PASSWORD_RESET_USER_FLOW を前に使用したユーザー フロー名に置き換えます。
アプリをビルドしてテストします。 ポート 8080 で Webapp を実行します。
Maven でアプリケーションをビルドし、起動したら、Web ブラウザーで http://localhost:8080/ を開きます。 ログイン ページにリダイレクトされます。
ログイン ユーザー フローのリンクを選択します。 Azure AD B2C にリダイレクトされ、認証プロセスが開始されるはずです。
正常にログインすると、ブラウザーにサンプルの home page が表示されます。
使用法 2: リソース サーバーにアクセスする Web アプリケーション
このシナリオは、アプリケーションが他のリソースにアクセスできるようにするためのWeb アプリケーションへのアクセスのシナリオに基づいています。 このシナリオは、OAuth 2.0 クライアント資格情報付与 フローです。
ポータル メニューから [Azure AD B2C] を選択し、[アプリケーション]、[追加] の順にクリックします。
アプリケーション の名前 (webApiA など) を指定し、アプリケーション ID を WEB_API_A_AZURE_CLIENT_ID として記録してから、[保存] を選択します。
ご使用のアプリケーションから [キー] を選択し、[キーの生成] を選択して WEB_API_A_AZURE_CLIENT_SECRET を生成してから [保存] を選択します。
ナビゲーション ウィンドウから [API の公開] を選択し、[設定] を選択します。 アプリケーション ID URI を自分の WEB_API_A_APP_ID_URL として記録し、[保存] を選択します。
ナビゲーション ウィンドウから [マニフェスト] を選択し、次の JSON セグメントを appRoles 配列に貼り付けます。 アプリケーション ID URI を自分の WEB_API_A_APP_ID_URL として記録し、アプリ ロールの値を自分の WEB_API_A_ROLE_VALUE の値として記録してから、[保存] を選択します。
{
 "allowedMemberTypes": [
   "Application"
 ],
 "description": "WebApiA.SampleScope",
 "displayName": "WebApiA.SampleScope",
 "id": "04989db0-3efe-4db6-b716-ae378517d2b7",
 "isEnabled": true,
 "value": "WebApiA.SampleScope"
}

[APIのアクセス許可>] の [アクセス許可の追加>] の [マイAPI] を選択し、[WebApiA] アプリケーション名を選択し、[アプリケーションのアクセス許可] を選択し、[WebApiA.SampleScope] アクセス許可を選択し、[アクセス許可の追加] を選択してプロセスを完了します。
WebApiA のアクセス許可の管理者の同意を付与します。

Webアプリケーションへのアクセスのシナリオに基づいて、次の依存関係を追加します。
<dependency>
 <groupId>org.springframework.boot</groupId>
 <artifactId>spring-boot-starter-webflux</artifactId>
</dependency>
Webアプリケーションへのアクセスのシナリオに基づいて、次の構成を追加します。
spring:
 cloud:
   azure:
     active-directory:
       b2c:
         enabled: true
         base-uri: ${BASE_URI}             # Such as: https://xxxxb2c.b2clogin.com
         profile:
           tenant-id: <tenant>
         authorization-clients:
           ${RESOURCE_SERVER_A_NAME}:
             authorization-grant-type: client_credentials
             scopes: ${WEB_API_A_APP_ID_URL}/.default
Note
使用できる tenant-id 値は、次のとおりです。 common、 organizations、 consumers、またはテナント ID です。 これらの値の詳細については、「エラー AADSTS50020 - ID プロバイダーのユーザー アカウントがテナントに存在しない」の「間違ったエンドポイント (個人アカウントと組織アカウント) を使用する」セクションを参照してください。 シングルテナント アプリの変換の詳細については、「Microsoft Entra ID でシングルテナント アプリをマルチテナントに変換する」を参照してください。
Webapp Java コードを記述します。
コントローラーのコードについては、次の例を参照してください。
class Demo {
   /**
    * Access to protected data from Webapp to WebApiA through client credential flow. The access token is obtained by webclient, or
    * <p>@RegisteredOAuth2AuthorizedClient("webApiA")</p>. In the end, these two approaches will be executed to
    * DefaultOAuth2AuthorizedClientManager#authorize method, get the access token.
    *
    * @return Respond to protected data from WebApi A.
    */
   @GetMapping("/webapp/webApiA")
   public String callWebApiA() {
       String body = webClient
           .get()
           .uri(LOCAL_WEB_API_A_SAMPLE_ENDPOINT)
           .attributes(clientRegistrationId("webApiA"))
           .retrieve()
           .bodyToMono(String.class)
           .block();
       LOGGER.info("Call callWebApiA(), request '/webApiA/sample' returned: {}", body);
       return "Request '/webApiA/sample'(WebApi A) returned a " + (body != null ? "success." : "failure.");
   }
}
セキュリティー構成コードは、Webアプリケーションへのアクセスのシナリオと同じです。 次のように別の Bean webClient を追加します。
public class SampleConfiguration {
   @Bean
   public WebClient webClient(OAuth2AuthorizedClientManager oAuth2AuthorizedClientManager) {
       ServletOAuth2AuthorizedClientExchangeFilterFunction function =
           new ServletOAuth2AuthorizedClientExchangeFilterFunction(oAuth2AuthorizedClientManager);
       return WebClient.builder()
                       .apply(function.oauth2Configuration())
                       .build();
   }
}
WebApiA Java コードを記述するには、「リソース サーバーへのアクセス」のセクションを参照してください。
アプリをビルドしてテストします。 ポート 8080 と 8081 で Webapp と WebApiA をそれぞれ実行します。 Webapp および WebApiA アプリケーションを起動します。 正常にログインした後、ホーム ページに戻ります。 その後、http://localhost:8080/webapp/webApiA にアクセスして WebApiAリソース応答を取得できます。
使用法 3: リソース サーバーへのアクセス
このシナリオでは、ログインはサポートされていません。 アクセス トークンを検証してサーバーを保護し、有効な場合はリクエストを処理します。
WebApiA アクセス許可をビルドするには、「使用法2: リソース サーバー にアクセスするWebアプリケーション」を参照してください。
WebApiA アクセス許可を追加し、Web アプリケーションの管理者の同意を付与します。
pom.xml ファイルに次の依存関係を追加します。
<dependencies>
   <dependency>
       <groupId>com.azure.spring</groupId>
       <artifactId>azure-spring-boot-starter-active-directory-b2c</artifactId>
   </dependency>
   <dependency>
       <groupId>org.springframework.boot</groupId>
       <artifactId>spring-boot-starter-web</artifactId>
   </dependency>
</dependencies>
次の構成を追加します。
spring:
 cloud:
   azure:
     active-directory:
       b2c:
         enabled: true
         base-uri: ${BASE_URI}             # Such as: https://xxxxb2c.b2clogin.com
         profile:
           tenant-id: <tenant>
         app-id-uri: ${APP_ID_URI}         # If you're using v1.0 token, configure app-id-uri for `aud` verification
         credential:
           client-id: ${AZURE_CLIENT_ID}           # If you're using v2.0 token, configure client-id for `aud` verification
         user-flows:
           sign-up-or-sign-in: ${SIGN_UP_OR_SIGN_IN_USER_FLOW_NAME}
Note
使用できる tenant-id 値は、次のとおりです。 common、 organizations、 consumers、またはテナント ID です。 これらの値の詳細については、「エラー AADSTS50020 - ID プロバイダーのユーザー アカウントがテナントに存在しない」の「間違ったエンドポイント (個人アカウントと組織アカウント) を使用する」セクションを参照してください。 シングルテナント アプリの変換の詳細については、「Microsoft Entra ID でシングルテナント アプリをマルチテナントに変換する」を参照してください。
Java コードを記述します。
コントローラーのコードについては、次の例を参照してください。
class Demo {
   /**
    * webApiA resource api for web app
    * @return test content
    */
   @PreAuthorize("hasAuthority('APPROLE_WebApiA.SampleScope')")
   @GetMapping("/webApiA/sample")
   public String webApiASample() {
       LOGGER.info("Call webApiASample()");
       return "Request '/webApiA/sample'(WebApi A) returned successfully.";
   }
}
セキュリティ構成コードについては、次の例を参照してください。
@EnableWebSecurity
@EnableGlobalMethodSecurity(prePostEnabled = true)
public class ResourceServerConfiguration extends WebSecurityConfigurerAdapter {

   @Override
   protected void configure(HttpSecurity http) throws Exception {
       http.authorizeRequests((requests) -> requests.anyRequest().authenticated())
           .oauth2ResourceServer()
           .jwt()
               .jwtAuthenticationConverter(new AadJwtBearerTokenAuthenticationConverter());
   }
}
アプリをビルドしてテストします。 ポート 8081 で WebApiA を実行します。 webApiA リソースのアクセス トークンを取得し、Bearer 承認ヘッダーとして http://localhost:8081/webApiA/sample にアクセスします。
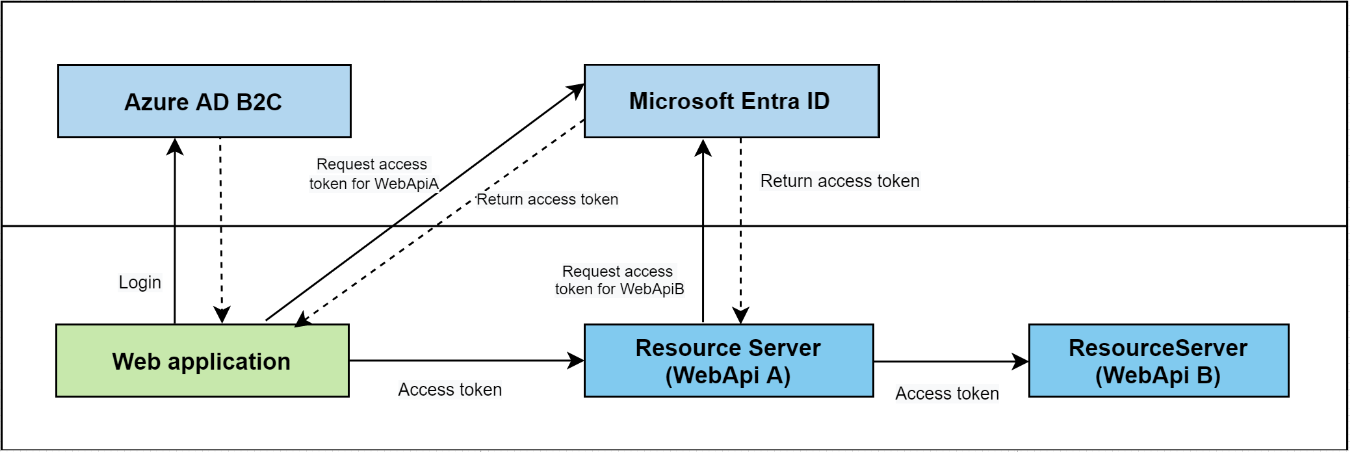
使用法 4: 他のリソース サーバーにアクセスするリソース サーバー
このシナリオは、リソース・サーバーへのアクセスのアップグレードであり、OAuth2 クライアント資格情報フローに基づいて、他のアプリケーション・リソースへのアクセスをサポートします。
前の手順を参照して、WebApiB アプリケーションを作成し、アプリケーションのアクセス許可 WebApiB.SampleScope を公開します。
{
   "allowedMemberTypes": [
       "Application"
   ],
   "description": "WebApiB.SampleScope",
   "displayName": "WebApiB.SampleScope",
   "id": "04989db0-3efe-4db6-b716-ae378517d2b7",
   "isEnabled": true,
   "lang": null,
   "origin": "Application",
   "value": "WebApiB.SampleScope"
}

WebApiB アクセス許可に対して管理者の同意を与えます。

リソース サーバーへのアクセスに基づいて、次の依存関係を pom.xml ファイルに追加します。
<dependency>
<groupId>org.springframework.boot</groupId>
<artifactId>spring-boot-starter-webflux</artifactId>
</dependency>
リソース・サーバーへのアクセスシナリオ構成に基づいて、以下の構成を追加します。
spring:
 cloud:
   azure:
     active-directory:
       b2c:
         enabled: true
         credential:
           client-secret: ${WEB_API_A_AZURE_CLIENT_SECRET}
         authorization-clients:
           ${RESOURCE_SERVER_B_NAME}:
             authorization-grant-type: client_credentials
             scopes: ${WEB_API_B_APP_ID_URL}/.default
Java コードを記述します。
WebApiA コントローラーのコードについては、次の例を参照してください。
public class SampleController {
   /**
    * Access to protected data from WebApiA to WebApiB through client credential flow. The access token is obtained by webclient, or
    * <p>@RegisteredOAuth2AuthorizedClient("webApiA")</p>. In the end, these two approaches will be executed to
    * DefaultOAuth2AuthorizedClientManager#authorize method, get the access token.
    *
    * @return Respond to protected data from WebApi B.
    */
   @GetMapping("/webApiA/webApiB/sample")
   @PreAuthorize("hasAuthority('APPROLE_WebApiA.SampleScope')")
   public String callWebApiB() {
       String body = webClient
           .get()
           .uri(LOCAL_WEB_API_B_SAMPLE_ENDPOINT)
           .attributes(clientRegistrationId("webApiB"))
           .retrieve()
           .bodyToMono(String.class)
           .block();
       LOGGER.info("Call callWebApiB(), request '/webApiB/sample' returned: {}", body);
       return "Request 'webApiA/webApiB/sample'(WebApi A) returned a " + (body != null ? "success." : "failure.");
   }
}
WebApiB コントローラーのコードについては、次の例を参照してください。
public class SampleController {
   /**
    * webApiB resource api for other web application
    * @return test content
    */
   @PreAuthorize("hasAuthority('APPROLE_WebApiB.SampleScope')")
   @GetMapping("/webApiB/sample")
   public String webApiBSample() {
       LOGGER.info("Call webApiBSample()");
       return "Request '/webApiB/sample'(WebApi B) returned successfully.";
   }
}
セキュリティ構成コードは「リソース サーバーへのアクセス」シナリオと同じですが、次のように別の Bean webClient を追加します
public class SampleConfiguration {
   @Bean
   public WebClient webClient(OAuth2AuthorizedClientManager oAuth2AuthorizedClientManager) {
       ServletOAuth2AuthorizedClientExchangeFilterFunction function =
           new ServletOAuth2AuthorizedClientExchangeFilterFunction(oAuth2AuthorizedClientManager);
       return WebClient.builder()
                       .apply(function.oauth2Configuration())
                       .build();
   }
}
アプリをビルドしてテストします。 WebApiA と WebApiB を、それぞれポート 8081 と 8082 で実行します。 WebApiA と WebApiB アプリケーションを起動し、webApiA リソースのアクセス トークンを取得し、Bearer 認証ヘッダーとして http://localhost:8081/webApiA/webApiB/sample にアクセスします。
サンプル
詳細については、spring-cloud-azure-starter-active-directory-b2c のサンプルを参照してください。