TileBrush の概要
TileBrush オブジェクトを使用すると、イメージ、Drawing、または Visual で領域を塗りつぶす方法を細かく制御できます。 ここでは、TileBrush の機能を使用して、ImageBrush、DrawingBrush、または VisualBrush で領域を塗りつぶす方法を詳細に制御する方法について説明します。
必須コンポーネント
このトピックを理解するには、ImageBrush、DrawingBrush、または VisualBrush の各クラスの基本的な機能の使用方法について理解しておくと役立ちます。 これらの型の概要については、「イメージ、描画、およびビジュアルによる塗りつぶし」を参照してください。
タイルで領域を塗りつぶす
ImageBrush、DrawingBrush、および VisualBrush は、TileBrush オブジェクトの種類です。 タイル ブラシを使用すると、イメージ、描画、またはビジュアルで領域を塗りつぶす方法を細かく制御できます。 たとえば、単一のイメージを引き伸ばして領域を塗りつぶすだけではなく、一連のイメージ タイルでパターンを作って領域を塗りつぶすことができます。
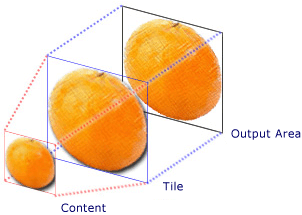
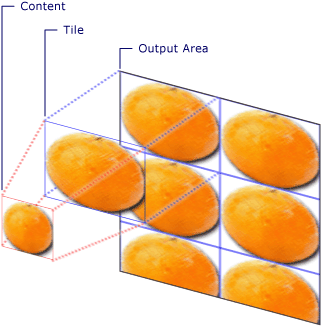
タイル ブラシによる領域の塗りつぶしには、コンテンツ、基本タイル、および出力領域の 3 つのコンポーネントが含まれます。

1 つのタイルを使用する TileBrush のコンポーネント

Tile の TileMode を使用する TileBrush のコンポーネント
出力領域とは、Ellipse の Fill や Button の Background など、塗りつぶされる領域のことです。 次のセクションでは、TileBrush の他の 2 つのコンポーネントについて説明します。
ブラシのコンテンツ
TileBrush には 3 つの種類があり、それぞれが異なる種類のコンテンツを使用して塗りつぶしを行います。
ブラシが ImageBrush の場合、このコンテンツはイメージです。ImageSource プロパティで ImageBrush のコンテンツを指定します。
ブラシが DrawingBrush の場合、このコンテンツは描画です。 Drawing プロパティで DrawingBrush のコンテンツを指定します。
ブラシが VisualBrush の場合、このコンテンツはビジュアルです。 Visual プロパティで VisualBrush のコンテンツを指定します。
Viewbox プロパティを使用して、TileBrush のコンテンツの位置とサイズを指定できます。ただし、この Viewbox は、通常は既定値のままにしておきます。 既定では、Viewbox は、ブラシのコンテンツを完全に含むように構成されます。 Viewbox の構成の詳細については、Viewbox プロパティのページを参照してください。
基本タイル
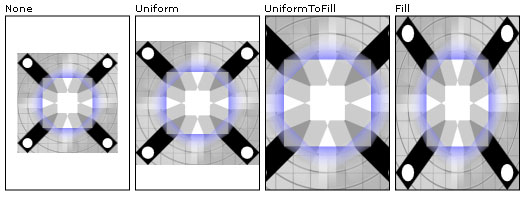
TileBrush は、そのコンテンツを基本タイルに投影します。 Stretch プロパティにより、TileBrush のコンテンツを引き伸ばして基本タイルを塗りつぶす方法を制御します。 Stretch プロパティは、Stretch 列挙型によって定義される次の値を受け取ります。
None:ブラシのコンテンツは、タイルを塗りつぶすために引き伸ばされません。
Fill:ブラシのコンテンツは、タイルに合わせて拡大縮小されます。 コンテンツの高さと幅は別々にスケーリングされるため、コンテンツの元の縦横比が維持されない場合があります。 つまり、出力タイルを完全に塗りつぶすために、ブラシのコンテンツがいびつになることがあります。
Uniform:ブラシのコンテンツは、タイル内に完全に収まるように拡大縮小されます。 コンテンツの縦横比は維持されます。
UniformToFill:ブラシのコンテンツは、コンテンツの元の縦横比を維持しながら、出力領域を完全に塗りつぶすように拡大縮小されます。
Stretch のさまざまな設定を次のイメージに示します。

次の例では、ImageBrush のコンテンツは、出力領域を塗りつぶすために引き伸ばされない設定になっています。
<Rectangle
  Width="125" Height="175"
  Stroke="Black"
  StrokeThickness="1"
  Margin="0,0,5,0">
  <Rectangle.Fill>
    <ImageBrush
      Stretch="None"
      ImageSource="sampleImages\testImage.gif"/>
  </Rectangle.Fill>
</Rectangle>
// Create a rectangle.
Rectangle myRectangle = new Rectangle();
myRectangle.Width = 125;
myRectangle.Height = 175;
myRectangle.Stroke = Brushes.Black;
myRectangle.StrokeThickness = 1;
myRectangle.Margin = new Thickness(0,5,0,0);

// Load the image.
BitmapImage theImage =
    new BitmapImage(
        new Uri("sampleImages\\testImage.gif", UriKind.Relative));
ImageBrush myImageBrush = new ImageBrush(theImage);

// Configure the brush so that it
// doesn't stretch its image to fill
// the rectangle.
myImageBrush.Stretch = Stretch.None;

// Use the ImageBrush to paint the rectangle's background.
myRectangle.Fill = myImageBrush;
' Create a rectangle.
Dim myRectangle As New Rectangle()
With myRectangle
    .Width = 125
    .Height = 175
    .Stroke = Brushes.Black
    .StrokeThickness = 1
    .Margin = New Thickness(0, 5, 0, 0)
End With

' Load the image.
Dim theImage As New BitmapImage(New Uri("sampleImages\testImage.gif", UriKind.Relative))
Dim myImageBrush As New ImageBrush(theImage)

' Configure the brush so that it
' doesn't stretch its image to fill
' the rectangle.
myImageBrush.Stretch = Stretch.None

' Use the ImageBrush to paint the rectangle's background.
myRectangle.Fill = myImageBrush
既定では、TileBrush は 1 つのタイル (基本タイル) を生成し、出力領域が完全に塗りつぶされるようにそのタイルを引き伸ばします。 基本タイルのサイズと位置は、Viewport プロパティおよび ViewportUnits プロパティを設定して変更できます。
基本タイルのサイズ
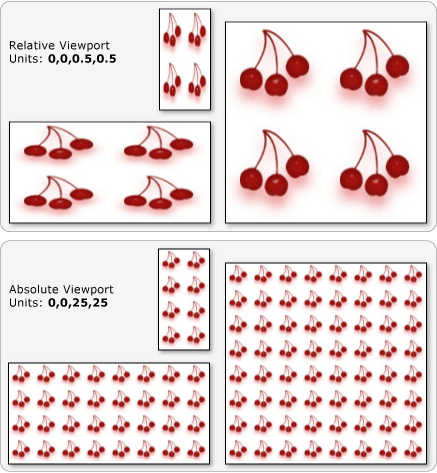
Viewport プロパティは基本タイルのサイズと位置を決定し、ViewportUnits プロパティは Viewport で絶対座標と相対座標のどちらを使用するかを決定します。 座標が相対的な場合、座標は出力領域のサイズに対して相対的になります。 点 (0,0) は出力領域の左上隅を表し、(1,1) は出力領域の右下隅を表します。 Viewport プロパティで絶対座標を使用するように指定するには、ViewportUnits プロパティを Absolute に設定します。
TileBrush の ViewportUnits で相対座標を指定した場合と絶対座標を指定した場合の出力の違いを次の図に示します。 どの図も、並べて表示するパターンを示しています。次のセクションでは、パターンの指定方法について説明します。

次の例では、イメージを使用して幅と高さが 50% のタイルを作成しています。 基本タイルは、出力領域の (0,0) の位置にあります。
<Rectangle
 Width="50" Height="100">
  <Rectangle.Fill>

    <!-- Paints an area with 4 tiles. -->
    <ImageBrush ImageSource="sampleImages\cherries_larger.jpg"
      Viewport="0,0,0.5,0.5"
      ViewportUnits="RelativeToBoundingBox"
      TileMode="Tile" />
  </Rectangle.Fill>
</Rectangle>
// Create a rectangle.
Rectangle myRectangle = new Rectangle();
myRectangle.Width = 50;
myRectangle.Height = 100;

// Load the image.
BitmapImage theImage =
    new BitmapImage(
        new Uri("sampleImages\\cherries_larger.jpg", UriKind.Relative));
ImageBrush myImageBrush = new ImageBrush(theImage);

// Create tiles that are 1/4 the size of
// the output area.
myImageBrush.Viewport = new Rect(0,0,0.25,0.25);
myImageBrush.ViewportUnits = BrushMappingMode.RelativeToBoundingBox;

// Set the tile mode to Tile.
myImageBrush.TileMode = TileMode.Tile;

// Use the ImageBrush to paint the rectangle's background.
myRectangle.Fill = myImageBrush;
' Create a rectangle.
Dim myRectangle As New Rectangle()
myRectangle.Width = 50
myRectangle.Height = 100

' Load the image.
Dim theImage As New BitmapImage(New Uri("sampleImages\cherries_larger.jpg", UriKind.Relative))
Dim myImageBrush As New ImageBrush(theImage)

' Create tiles that are 1/4 the size of
' the output area.
myImageBrush.Viewport = New Rect(0, 0, 0.25, 0.25)
myImageBrush.ViewportUnits = BrushMappingMode.RelativeToBoundingBox

' Set the tile mode to Tile.
myImageBrush.TileMode = TileMode.Tile

' Use the ImageBrush to paint the rectangle's background.
myRectangle.Fill = myImageBrush
次の例では、ImageBrush のタイルを 25 x 25 のデバイスに依存しないピクセルに設定します。 ViewportUnits は絶対値であるため、ImageBrush のタイルは、塗りつぶす領域のサイズに関係なく常に 25 x 25 ピクセルになります。
<Rectangle
 Width="50" Height="100">
  <Rectangle.Fill>

    <!-- Paints an area with 25 x 25 tiles. -->
    <ImageBrush ImageSource="sampleImages\cherries_larger.jpg"
      Viewport="0,0,25,25"
      ViewportUnits="Absolute"
      TileMode="Tile" />
  </Rectangle.Fill>
</Rectangle>
// Create a rectangle.
Rectangle myRectangle = new Rectangle();
myRectangle.Width = 50;
myRectangle.Height = 100;

// Load the image.
BitmapImage theImage =
    new BitmapImage(
        new Uri("sampleImages\\cherries_larger.jpg", UriKind.Relative));
ImageBrush myImageBrush = new ImageBrush(theImage);

// Create tiles that are 25 x 25, regardless of the size
// of the output area.
myImageBrush.Viewport = new Rect(0, 0, 25, 25);
myImageBrush.ViewportUnits = BrushMappingMode.Absolute;

// Set the tile mode to Tile.
myImageBrush.TileMode = TileMode.Tile;

// Use the ImageBrush to paint the rectangle's background.
myRectangle.Fill = myImageBrush;
' Create a rectangle.
Dim myRectangle As New Rectangle()
myRectangle.Width = 50
myRectangle.Height = 100

' Load the image.
Dim theImage As New BitmapImage(New Uri("sampleImages\cherries_larger.jpg", UriKind.Relative))
Dim myImageBrush As New ImageBrush(theImage)

' Create tiles that are 25 x 25, regardless of the size
' of the output area.
myImageBrush.Viewport = New Rect(0, 0, 25, 25)
myImageBrush.ViewportUnits = BrushMappingMode.Absolute

' Set the tile mode to Tile.
myImageBrush.TileMode = TileMode.Tile

' Use the ImageBrush to paint the rectangle's background.
myRectangle.Fill = myImageBrush
並べて表示する動作
TileBrush が並べて表示するパターンを生成するのは、基本タイルが出力領域を完全に塗りつぶさず、並べて表示するモードが None 以外に設定されている場合です。 タイル ブラシのタイルが出力領域を完全に塗りつぶさない場合、TileMode プロパティにより、出力領域を塗りつぶすために基本タイルを繰り返すかどうかを指定します。繰り返す場合は、繰り返し方法も指定します。 TileMode プロパティは、TileMode 列挙型によって定義される次の値を受け取ります。
None:基本タイルのみが描画されます。
Tile:基本タイルが描画され、残りの領域は基本タイルの繰り返しによって塗りつぶされます。つまり、1 つのタイルの右端が次のタイルの左端に隣接し、同様に上端と下端も隣接します。
並べて表示するさまざまなモードを次のイメージに示します。

次の例では、幅と高さが 100 ピクセルの四角形がイメージを使用して塗りつぶされます。 ブラシの Viewport を 0,0,0.25,0.25 に設定することにより、ブラシの基本タイルは出力領域の 1/4 のサイズになります。 ブラシの TileMode は FlipXY に設定されます。 そのため、四角形はタイルの行で塗りつぶされます。
<Rectangle
 Width="100" Height="100" >
  <Rectangle.Fill>
    <ImageBrush ImageSource="sampleImages\triangle.jpg"
      Viewport="0,0,0.25,0.25"
      TileMode="FlipXY"
      />
  </Rectangle.Fill>
</Rectangle>
// Create a rectangle.
Rectangle myRectangle = new Rectangle();
myRectangle.Width = 100;
myRectangle.Height = 100;

// Load the image.
BitmapImage theImage =
    new BitmapImage(
        new Uri("sampleImages\\triangle.jpg", UriKind.Relative));
ImageBrush myImageBrush = new ImageBrush(theImage);

// Create tiles that are 1/4 the size of
// the output area.
myImageBrush.Viewport = new Rect(0,0,0.25,0.25);

// Set the tile mode to FlipXY.
myImageBrush.TileMode = TileMode.FlipXY;

// Use the ImageBrush to paint the rectangle's background.
myRectangle.Fill = myImageBrush;
' Create a rectangle.
Dim myRectangle As New Rectangle()
myRectangle.Width = 100
myRectangle.Height = 100

' Load the image.
Dim theImage As New BitmapImage(New Uri("sampleImages\triangle.jpg", UriKind.Relative))
Dim myImageBrush As New ImageBrush(theImage)

' Create tiles that are 1/4 the size of
' the output area.
myImageBrush.Viewport = New Rect(0, 0, 0.25, 0.25)

' Set the tile mode to FlipXY.
myImageBrush.TileMode = TileMode.FlipXY

' Use the ImageBrush to paint the rectangle's background.
myRectangle.Fill = myImageBrush
関連項目
.NET Desktop feedback
