Application Insights への拡張イベントの記録
この記事では、Commerce Runtime (CRT) POS 拡張機能から顧客の Application Insights にイベントを記録する方法について説明します。
イベントを Application Insights に記録します
- Microsoft Azureポータル で Application Insights を設定し、インストルメンテーション キーを生成します。
- CRT を拡張して、生成した インストルメンテーション キー を使用して イベントを Application Insights に記録します。
メモ
RetailLogger クラス はサポートされなくなりました。 このクラスを使用している既存の拡張機能は、新しいモデルに移行する必要があります。
Azureでの Application Insights の設定と構成
Application Insights リソースの作成 の手順に従って、インストルメンテーション キーまたは接続文字列を生成します。
CRT で使用するインストルメンテーション キーをコピーします。 イベントを記録するための最新の更新と新しい推奨オプションについては、Azure の Application Insights ドキュメント を参照してください。
CRT 拡張プロジェクトを拡張して、イベントを Application Insights に記録します。
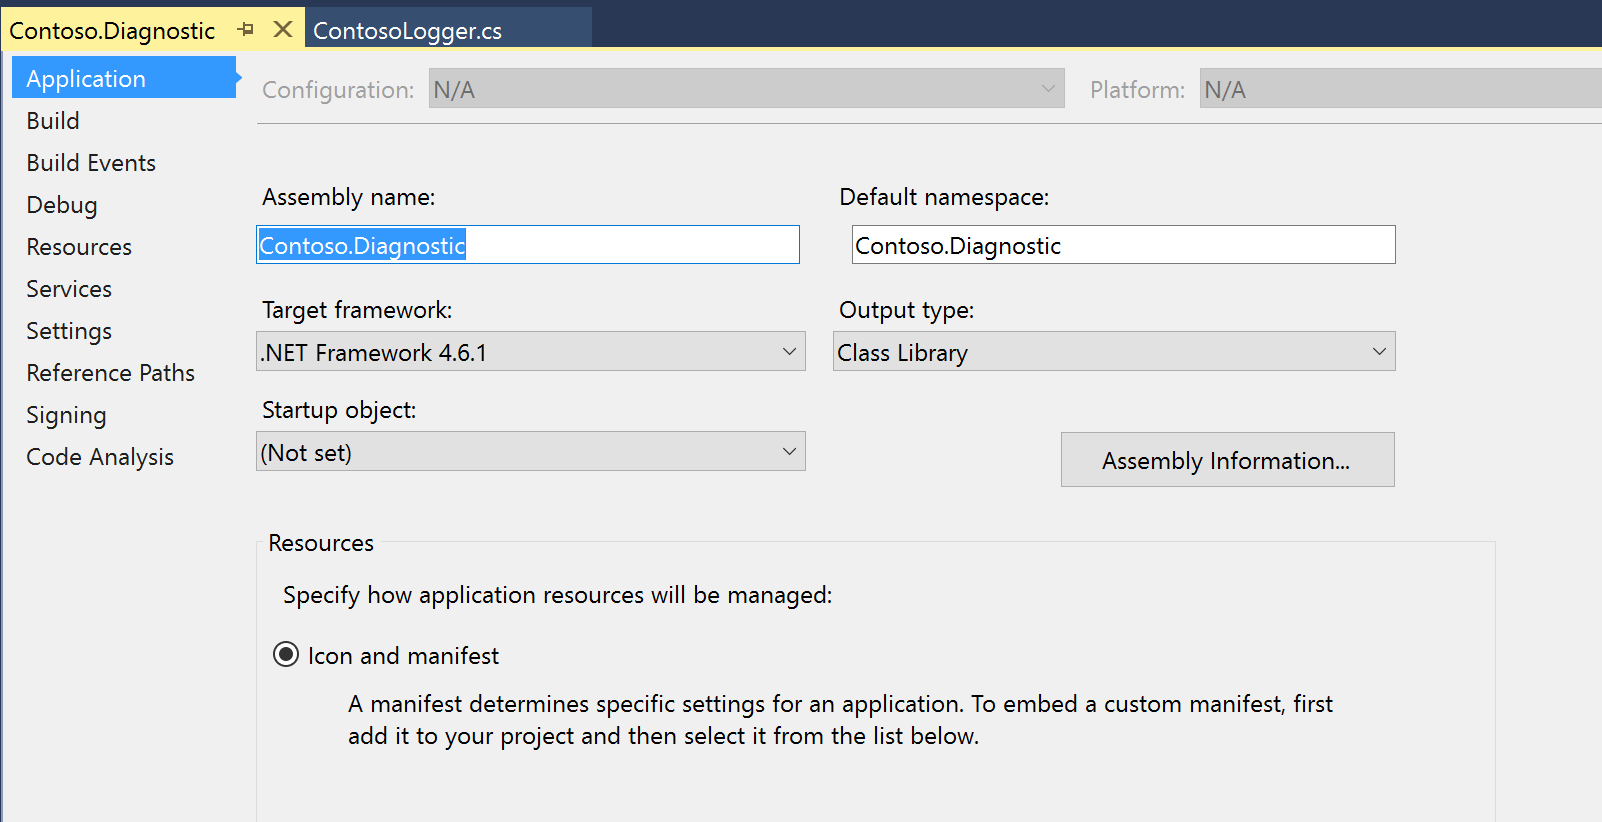
新しい C# クラス ライブラリ プロジェクトを作成し、Contoso.Diagnostic という名前を付けます。

NuGet パッケージ参照を次のライブラリに追加します。
- Microsoft.ApplicationInsights
- Netstandard
- Microsoft.Dynamics.Commerce.Runtime.Framework
メモ
Microsoft.ApplicationInsights アセンブリ参照をインストールするには、 ASP.NET Core 用の Application Insights SDK をインストールします。 Microsoft.Dynamics.Commerce.Runtime.Framework への参照は、 ..\RetailSDK\参照 フォルダ から追加することができます。
ContosoLogger という名前の新規クラス ファイルを追加し、次のコードをコピーします。
using Microsoft.ApplicationInsights;
using Microsoft.ApplicationInsights.Extensibility;
using Microsoft.Dynamics.Commerce.Runtime;
using Microsoft.Dynamics.Commerce.Runtime.Extensions;
namespace Contoso.Diagnostic
{
    public static class ContosoLogger
    {
        private static readonly object lockObject = new object();
        private static TelemetryClient client = null;
        public static TelemetryClient GetLogger(RequestContext context)
        {
            if (client == null)
            {
                lock (lockObject)
                {
                    if (client == null)
                    {
                        string key = context.Runtime.Configuration.GetSettingValue("ext.AppInsightsKey") ?? string.Empty;
                        client = new TelemetryClient(new TelemetryConfiguration(key));
                    }
                }
            }
            return client;
        }
    }
}
プロジェクトを構築し、出力ライブラリと Microsoft.ApplicationInsights.dll ファイルを ..\RetailServer\webroot\bin\Ext にコピーし、これを使用して配置とテストを手動で行います。
..\RetailServer\webroot\bin\Ext フォルダで、CommerceRuntime.Ext.config ファイルを開き、事前に生成した Applications Insights のインストルメンテーション キーで <settings> セクションを更新します。 次に例を示します。
<add name="ext.AppInsightsKey" value="xxxxxxx"/>Commerce Scale Unit を再起動します。
CRT 拡張機能でロガーを使用する
拡張機能で ContosoLogger を使用するには、 ContosoDiagnostic と Microsoft.ApplicationInsights のアセンブリ参照を拡張機能プロジェクトに追加します。
イベントを記録するには、 TraceTelemetry クラスを使用し、トレースを作成します。 次に例を示します。
using Contoso.Diagnostic;
using Microsoft.ApplicationInsights.DataContracts;
var trace = new TraceTelemetry("CRT executing request", SeverityLevel.Information);
trace.Properties.Add("CustomDimensionColumn1", request.RequestContext.GetTerminalId().ToString());
trace.Properties.Add("CustomDimensionColumn2", "CRT demo - Save Cart request");
ContosoLogger.GetLogger(request.RequestContext).TrackTrace(trace);
メモ
トレースプロパティは、クエリをトレースするにあたって簡単に追加することができるユーザー定義の分析コードです。
追跡イベントの検証
Azure ポータル を開き、Azure の サブスクリプション資格情報を使用してサイン インします。
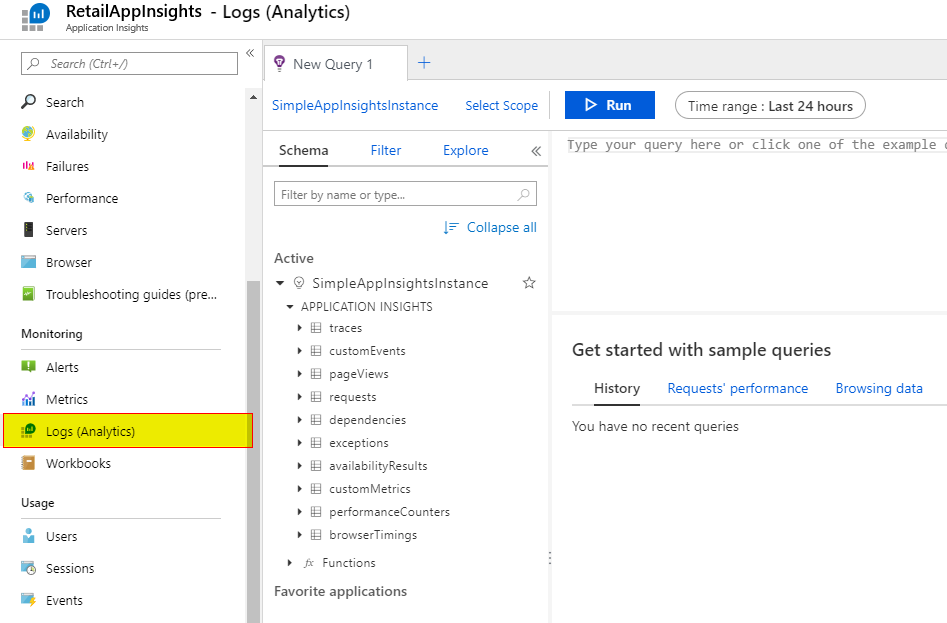
Application Insights インスタンスに移動し、 監視 配下の ログ (分析) を選択して、新しいクエリ エディターを開きます。

スキーマ タブで、 追跡 をダブル クリックしてクエリ エディターに追加します。 既定ては時間の範囲は、直近の24時間 となっています。

実行 を選択してクエリを実行してください。 記録されたイベントが結果として表示されます。

配置可能なパッケージを作成します。
配置可能パッケージの作成方法の詳細については、 配置可能なパッケージを作成する を参照してください。
Contoso.Diagnostic と Microsoft.ApplicationInsights のアセンブリを \RetailSDK\参照 フォルダーにコピーします。
BuildTools\Customization.settings ファイルを更新し、<ItemGroup> セクションに次のエントリを追加します。
<ISV_CommerceRuntime_CustomizableFile Include="$(SdkReferencesPath)\\Contoso.Diagnostic.dll" />
<ISV_CommerceRuntime_CustomizableFile Include="$(SdkReferencesPath)\\Microsoft.ApplicationInsights.dll" />;
Microsoft Visual Studio 2015 の MSBuild Command Prompt ウィンドウを開いて、Retail SDK フォルダのルートにある 作成 コマンドを実行します。
配備可能なパッケージを生成するには、次のコマンドを入力します。
msbuild /t:rebuildRetailSDK\Packages\RetailDeployablePackage フォルダーで、配置可能パッケージを検索します。 content.folder フォルダに移動して、3つのファイルがパッケージに含まれていることを確認します。(Packages\RetailDeployablePackage\content.folder\RetailServer\Code\bin\ext)
展開可能パッケージを Microsoft Dynamics Lifecycle Services (LCS) の共有されたアセット ライブラリにアップロードします。
LCS で、ご利用の環境のメイン ページを開き、環境機能>Retail および Commerce>管理を選択します。
拡張機能の適用 を選択し、ライブラリから拡張機能を選択します。
拡張機能が正常に展開された後、Commerce Scale Unit に対して有効化された Store Commerce のインスタンスを開きます。
ユーザー定義の Application Insights 記録処理 を使用する拡張シナリオを実行します。
Application Insights のクエリを更新し、拡張機能からのトレースが正しく記録されていることを確認します。
POS 拡張プロジェクトで、イベントを Application Insights に記録する
RetailSDK\POS\Extensions フォルダーで、ライブラリという名前の新しいフォルダを作成します。
コマンド プロンプトを開き、ライブラリ フォルダーに移動します。
Npm をインストールします。 Npm パッケージは、OpenJS からダウンロードしてインストールすることができます。
このコマンドを実行して、JavaScript Application Insights パッケージの Npm パッケージをインストールします。
npm i --save @microsoft/applicationinsights-web@2.5.8
メモ
ここに記載されているサンプルは、applicationinsights-web npm パッケージのバージョン 2.5.8 に基づいて作成されています。 このサンプルは、更新された applicationinsights-web パッケージでは動作しない可能性があります。
パッケージをインストールした後に、POS/Extensions/ライブラリ フォルダに node_modules フォルダが含まれている必要があります。 node_modules フォルダには Application Insights ライブラリ ファイルが含まれています。
POS/Extensions/Libraries/node_modules/@microsoft/applicationinsights-web/dist/applicationinsights-web.js ファイルがライブラリに存在することを確認してください。
ファイル名は、Application Insights ライブラリの将来のバージョンで変更される可能性があります。 パスが変更された場合は、手順 8 と 10 のライブラリ パスをメインの Application Insights ライブラリをポイントするパスに更新します。
RetailSDK\POS から ModernPOS.sln、または CloudPos.sln を開きます。
POS.Extensions プロジェクトにある tsconfig.json ファイルを開きます。 除外セクションで、エントリをライブラリ フォルダに追加します。
"exclude": [
    "Libraries"
  ],
POS.Extensions プロジェクトにある tsconfig.json ファイルを開きます。 compilerOptions セクションで、次のプロパティを追加します。
"baseUrl": "./",
"paths": {
    "applicationinsights-web": [ "Libraries/node_modules/@microsoft/applicationinsights-web/dist/applicationinsights-web" ]
}
CopyPosExtensionsFiles セクションで、Pos.Extensions.csproj を編集します。 次のターゲットを追加して、Application Insights ライブラリを POS アプリケーションにコピーすることにより、ターゲットを拡張コードで使用できるようにします。
<JavaScriptFileList Include="Libraries\\**\\*.js">
    <InProject>false</InProject>
    <Visible>false</Visible>
</JavaScriptFileList>
Application Insights ライブラリを消費している POS 拡張機能フォルダ (パッケージ) の manifest.json ファイルに次のノードを含めます。
{
  "dependencies": [
    {
      "alias": "applicationinsights-web",
      "format": "amd",
      "modulePath": "../Libraries/node_modules/@microsoft/applicationinsights-web/dist/applicationinsights-web"
    }
  ]
}
これで、Application Insights ライブラリを POS で使用する準備が整いました。
ライブラリ イベントとログ イベントの使用
RetailSDK\POS から ModernPOS.sln、または CloudPos.sln を開きます。
POS 拡張機能フォルダ (パッケージ) 内に新しい TypeScript ファイルを作成し、そのファイルに AppInsights.ts という名前を付けます。
次のコードをファイルに貼り付けます。 コードは、Application Insights を使用してイベントを追跡するために拡張機能によって使用されます。 Azure App Insights で作成したインストルメンテーション キーを使用します。
import { ApplicationInsights } from "applicationinsights-web";

/**
 * Example implementation of an Application Insights singleton that can be used to log events and metrics on Application Insights.
 */
export class AppInsights {
    private static _instance: AppInsights = null;
    private _applicationInsights: ApplicationInsights = null;

    /**
     * Gets a global reference to an Application Insights reference that can be used by other extension code.
     * @returns {ApplicationInsights} The ApplicationInsights instance that can be used to log events.
     */
    public static get instance(): ApplicationInsights {
        if (AppInsights._instance === null) {
            AppInsights._instance = new AppInsights();
        }

        return AppInsights._instance._applicationInsights;
    }

    /**
     * Initializes a new instance of AppInsights.
     */
    constructor() {
        this._applicationInsights = new ApplicationInsights({
            config: {
                instrumentationKey: 'YOUR_INSTRUMENTATION_KEY_GOES_HERE'
                /* ...Other Configuration Options... */
            }
        });
        this._applicationInsights.loadAppInsights();
    }
}
拡張機能コードで、次のコード例に示すように、AppInsights クラスを呼び出してイベントをログに記録します。
AppInsights.instance.trackEvent({
    name: "extensionTest",
    properties: {
        "property1": "value1",
        "property2": "value2",
    },
    measurements: {
        "measurement1": 1,
        "measurement2": 2,
    },
});