Using C++ AMP code in a C++ CLR project
In a previous blog post I showed how to call a native function implemented using C++ AMP located within a native DLL from a C++ CLR application. Some out there may feel that managing two projects (a native DLL and a managed assembly) is overkill just to be able to use C++ AMP from managed code. It triggers my “something smells fishy” sensor too. This post will show how to setup a C++ CLR project to include native source files containing C++ AMP code into a single assembly.
Workaround Overview
Visual Studio C++ project files contain the global settings to compile all files in the project. Visual Studio also allows individual C++ files to be compiled with different settings than those set globally at the project level. So while a project has turned on support for the CLR, an individual file can be set to not use it as this is a compile-time setting and not a link-time setting. Therefore, the individual cpp files can be compiled with their own settings, generate an obj file and get linked together with all other obj files by the linker. The assembly that is created is a Mixed (native and managed) Assembly that can be referenced by other projects, including .NET projects. The /clr compiler option provides different types of components and applications with varying advantages and limitations to each kind. This post only covers the regular /clr option.
This is great for the C++ AMP developer since C++ AMP is not supported when using the CLR and therefore must be compiled to native code. The native files using C++ AMP can be set to compile with support for the CLR turned off, while the rest of the project is compiled with the CLR turned on.
General Steps
Here are the general steps to setup a C++ CLR project so it can compile native code files:
- Create or open a C++ CLR Project (e.g. CLR Class Library or CLR Console App)
- Add a cpp file which should be compiled as native code (in our case, to use C++ AMP)
- Modify compile-time settings for the native file:
- Turn off support for the CLR (remove /clr)
- Turn off precompiled header (if project uses them)
- Add managed wrapper APIs that expose the native functionality (C++ Interop)
- If the C++ CLR project is a library, reference it in another .NET project as you would any .NET assembly.
Create or open a C++ CLR Project
This technique can be used with any C++ CLR project. If you already have an existing one, then open it. Otherwise, create a new one. For the purposes of this blog, I’ll assume the project is a C++ CLR Class Library project with the name of SampleCLRLibrary. In my sample library I’ve only kept a few of the files generated by the project wizard: AssemblyInfo.cpp, Stdafx.h and Stdafx.cpp.
Add native code
Next, add the following files from the attached zip:
SampleCLRLibrary\large_vector.h
SampleCLRLibrary\large_vector.cpp
These files declare and define native functions that operate on large vectors. The details of the C++ AMP code in large_vector.cpp should be quite self-explanatory if you’ve seen the other C++ AMP samples in our previous blog posts. I won’t cover the details here as it’s not the point of this blog post.
Modify compilation settings for native code
Since large_vector.cpp includes amp.h, the compiler will throw an error if the file is being compiled with /clr. The error will look something like:
... fatal error C1189: #error : ... is not supported when compiling /clr or /clr:pure.
* Note: To see this error you may need to disable precompiled headers for this file first. See the next section for more information.
This is not a surprise since we have already established that you cannot compile a cpp file that uses C++ AMP when the /clr flag is specified. So make the file compile as native code using the following steps:
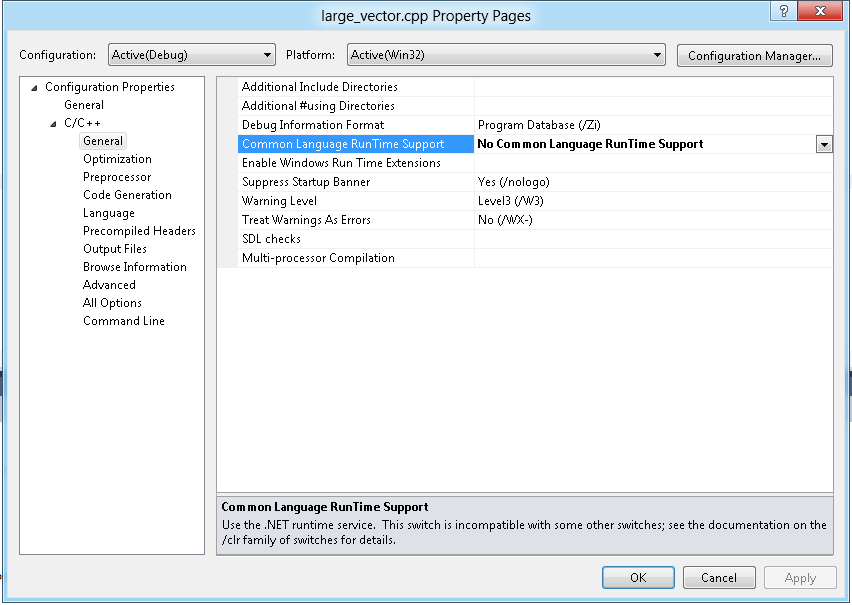
- Right-click on large_vector.cpp -> Properties
- In the dropdown for “Configuration” select “All Configurations”
- Go to the property page for C/C++ -> General
- Set the “Common Language RunTime Support” (from /clr) to “No Common Language RunTime Support”
- Repeat for all files that should be compiled to native code
Disable precompiled header for native code
If your C++ CLR project uses precompiled headers (this looks to be true by default for new CLR projects) then you’ll have to turn it off for the native code files. Otherwise, if you were to include “stdafx.h” in large_vector.cpp you would get the following compiler error:
fatal error C1852: 'Debug\SampleCLRLibrary.pch' is not a valid precompiled header file
The reason for this is that the default precompiled header was compiled with the /clr switch being specified but large_vector.cpp is compiled without it. This is one of those settings that must be the same for when the precompiled header file (pch) is created (with /Yc) and when used (with /Yu).
To fix this you have a few potential options (listed in order of complexity):
- Disable precompiled headers for the whole project
- Disable precompiled headers for each code file with incompatible compiler switches (e.g. native code files in a CLR project as we have here)
- Come up with a way to tweak your project to use a 2nd precompiled header for your native files
Option #1 is by far the simplest to setup but results in longer compilation time. Option #3 is possible but too lengthy to describe in this post. So, I will show option #2 as it’s easy enough to do and can be done on an as needed basis.
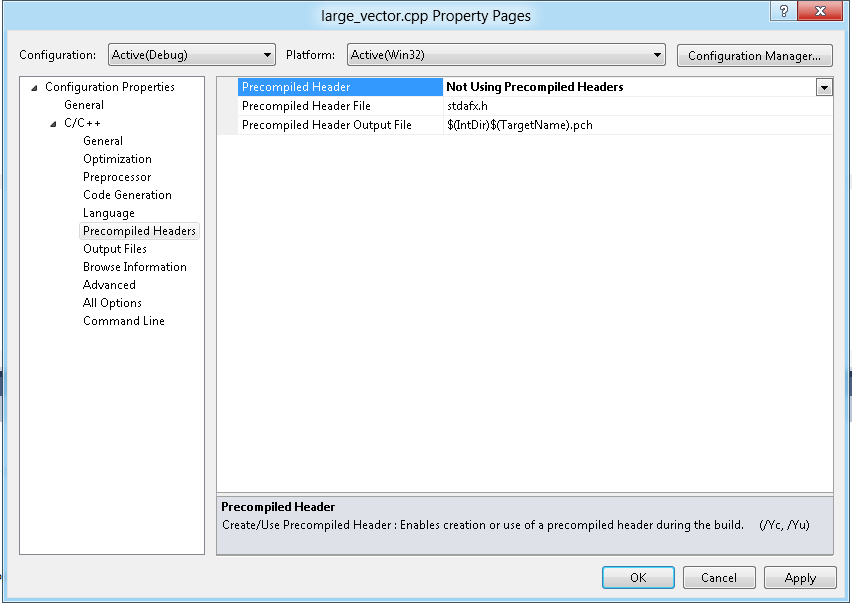
- Right-click on large_vector.cpp -> Properties
- In the dropdown for “Configuration” select “All Configurations”
- Go to the property page for C/C++ -> Precompiled Headers
- Set the “Precompiled Header” setting from “Use (/Yu)” to “Not Using Precompiled Headers”
- Repeat for all cpp files not using compatible compiler switches (e.g. all native code files in a CLR project)
Add managed API layer
Next, we’ll add a managed API that will handle calling the native functions and marshaling of data using C++ Interop. The effect is that the .NET developer who references the CLR assembly does not need to even know that the implementation is using native code.
Add the following files from the attached zip:
SampleCLRLibrary\LargeVector.h
SampleCLRLibrary\LargeVector.cpp
These files provide a thin layer over the native implementation and use C++ Interop to pin the managed array data so it can be accessed by the native layer. To see more about the approach I used, see my previous blog post where I briefly discuss C++ Interop and pinning managed data.
Reference the C++ CLR project from another .NET project
If your C++ CLR project is a C++ CLR Class Library Project (like my example is) then you can reference this project (or the assembly it creates) in any other .NET project. This is one of the core advantages of this approach: native features are abstracted away from the project referencing it.
In the attached sample solution I created a C# console application (named CSharpConsoleApp) that performs a simple CPU vs. GPU unit test to verify the SampleCLRLibrary works correctly. I referenced the SampleCLRLibrary project via the C# project’s References dialog.
Summary
Once you get used to where the settings are located this technique is actually quite simple and easily maintained from within a Visual Studio C++ project.
I would love to hear your thoughts on this approach in the comments below or our MSDN forum!


