Windows: How to Add OEM/Company Logo to System Information using Group Policy
Applies to
Windows Vista, Windows 7, Windows 8, Windows Server 2008, 2008 R2 and 2012
Requirement
You would like to add Company Logo to the System Information section on Every computer using Group Policy
Background
** **A question has been posted in the Group Policy forum about a year ago on this. I happened to come across that thread today and thought of posting an article. In my reply to the forum question, I had mentioned it might be possible to set OEM Logo using GPP however, I hadn't tried at that time. However, it's indeed possible and works like a charm :-) Please see the procedure below on step by step instructions.
Details
** **By editing and updating registry string values, OEM Logo and some other information can be updated on System Information section of the operating Systems.
For more details, please refer below linked article by Ramesh Srinivasan (MVP)
How to Add OEM Logo and Information to the System Information Applet in Windows 7 and Vista - This is the oldest article (May be first published ?) which I could find on this aspect.
Procedure
Alright, before editing GPO, you need to create a registry string Logo with Value as** REG_SZ** in** ** HKEY_LOCAL_MACHINE \ SOFTWARE \ Microsoft \ Windows \ CurrentVersion \ OEMInformation ****on the local machine from where you are going to edit the GPO.
Open up regedit on any of the computer (Windows Vista and above with RSAT installed), navigate to HKEY_LOCAL_MACHINE \ SOFTWARE \ Microsoft \ Windows \ CurrentVersion \ OEMInformation and create a registry string Logo (Do not set any value yet

Now, open up Group Policy Management snap-in on the computer wherein RSAT is installed (Windows Vista or newer OS). Select an existing GPO or create a new GPO as appropriate (**Note: **To edit GPOs, our user account should have necessary permissions to edit/modify GPOs). Click on Edit to start working on further.

Group Policy Management Editor will show up. Now, expand Computer Configuration, Preferences, Registry. Right click on Registry, click on New, Registry Wizard.

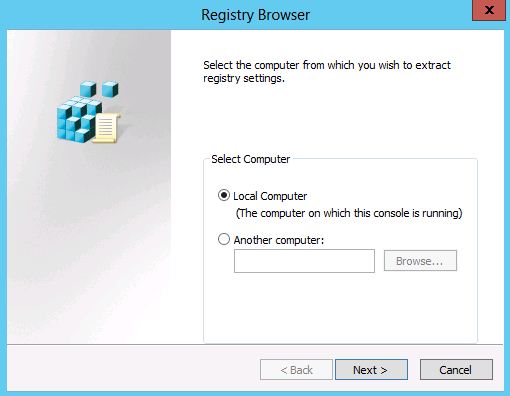
GPP Registry Browser will open up as shown below, select Local Computer and click on Next.
Navigate to HKEY_LOCAL_MACHINE \ SOFTWARE \ Microsoft \ Windows \ CurrentVersion \ OEMInformation \ Logo , click on Finish

Now expand the keys and update REG_SZ value for Logo as shown below

P.S. OEM or Company Logo which you would like to use should be of .bmp picture and with the dimensions less than or equal to 120 X 120 Pixels.
Since you would like this logo to be available on all or the desired machines, you need to place the Logo file in a shared folder from where machines have read access to the log file e.g. \Server\Share\Logo.bmp. In this example, I had placed Logo file in \DC\Netlogon share.
Once above step is completed, close Group Policy Management Editor and refresh Group Policy Management snap-in.
Link the GPO to an OU which contains the Computer objects. Wait for next group policy refresh or to verify if GPO is applied successfully, on a sample machine, run gpupdate /force.
On successful GPO refresh, you should see OEM/Company Logo displayed on System Information as shown below.

In case of Windows XP and Windows Server 2003, you need to install group policy client side extensions to get benefits of GPP. Please refer below linked article by Alan Burchill (MVP) to know more about Group Policy Preferences Prerequisites.
References
Group Policy FAQ #1: What are the Group Policy Preferences Prerequisites?