Windows: CSV and HTML Disk Space Report using PowerShell
Abstract
Monitoring disk space utilization of server(s) is a critical and important job for any administrator. Keeping things organized might improve application availability and server availability. Being a database administrator for 10 years, I have faced and handled/managed lot of issues with disk space. This article takes us through the in-detail steps to read each drive and report every drive details based on threshold values. The output is integrated with HTML tags. The step by step process quickly take us through the disk space utilization details of the server(s). You'll basically feed a list of servers to watch over, and it will report back on these for you, meaning you could also use it as a more general "daily server disk space report"
Introduction
This article talks about the use of credentials. The credentials can be used to query external servers which has a trust relationship between the domains. Also, list various methods to secure the password. The process iterates through a list of servers and drives that you have listed in a CSV file. Checking for disk space status of every listed drive and its status may fall under one of the four statuses that are defined as critical, warning, low and good. The nice thing about this script is that it will consolidate health status of each listed disks and gives a summary that needs your attention (you set the threshold as per requirement because the size of the drive may vary from server to server).
Querying WMI objects - Win32_LogicalDisks
- Using Credentials
- Without using Credentials
Using Credentials
Get-credential always pop-up dialog box for entering a password, however, you can save your securestring password to a file or directly feed the password. The problem with this is that the password will be exposed to anyone with access to the file.
- Using Get-Credential cmdlet - Pop up dialog box
- Directly using password
- Using secured file
Using Get-Credential cmdlet - Pop dialog box
The Get-Credential displays a window to enter credential details. This will appear every time when you run the script.The $credential variable store the user name and password. It's then fed to the respective queries for further processing.
  clear
  $credential = Get-Credential
  foreach ( $args in get-Content c:\server.txt ) {
  get-WmiObject win  32  _logicaldisk -Credential $credential -ComputerName $args -Filter   "Drivetype=3"  |
  ft SystemName,DeviceID,VolumeName,@{Label=  "Total SIze"  ;Expression={$_.Size /   1  gb -as [int] }},@{Label=  "Free Size"  ;Expression={$_.freespace /   1  gb -as [int] }} -autosize
  }

Hard code the credentials
The password is hard coded in the script. Of course, the problem with this is that your password will be exposed to anyone with access to the script file.
  $User =   'hqnt\abcd'
     $Pass = ConvertTo-SecureString   'abcd@2015' -AsPlainText -Force
     $Credentials = New-Object -TypeName System.Management.Automation.PSCredential -ArgumentList $User,$Pass
     foreach ( $args in get-Content c:\server.txt ) {
  get-WmiObject win  32  _logicaldisk -ComputerName $args -Credential $Credentials -Filter   "Drivetype=3"  |
  ft SystemName,DeviceID,VolumeName,@{Label=  "Total SIze"  ;Expression={$_.Size /   1  gb -as [int] }},@{Label=  "Free Size"  ;Expression={$_.freespace /   1  gb -as [int] }} -autosize
  }

Using Secured file
First, Password has to be written to a file
ps:\>read-host -AsSecureString |ConvertFrom-SecureString |Out-File C:\SecurePassword.txt

Second, The credentials are read from the file using PSCredential class. You don't need to re-enter the password over and over again.
  clear
  $User =   'hqnt\abcdv'
  $pass= cat C:\passwordstring.txt |ConvertTo-SecureString
  $Credentials = New-Object -TypeName System.Management.Automation.PSCredential -ArgumentList $User,$Pass
  foreach ( $args in get-Content c:\server.txt ) {
  get-WmiObject win  32  _logicaldisk -ComputerName $args -Credentials $cred -Filter   "Drivetype=3"  |

  ft SystemName,DeviceID,VolumeName,@{Label=  "Total SIze"  ;Expression={$_.Size /   1  gb -as [int] }},@{Label=  "Free Size"  ;Expression={$_.freespace /   1  gb -as [int] }} -autosize

  }

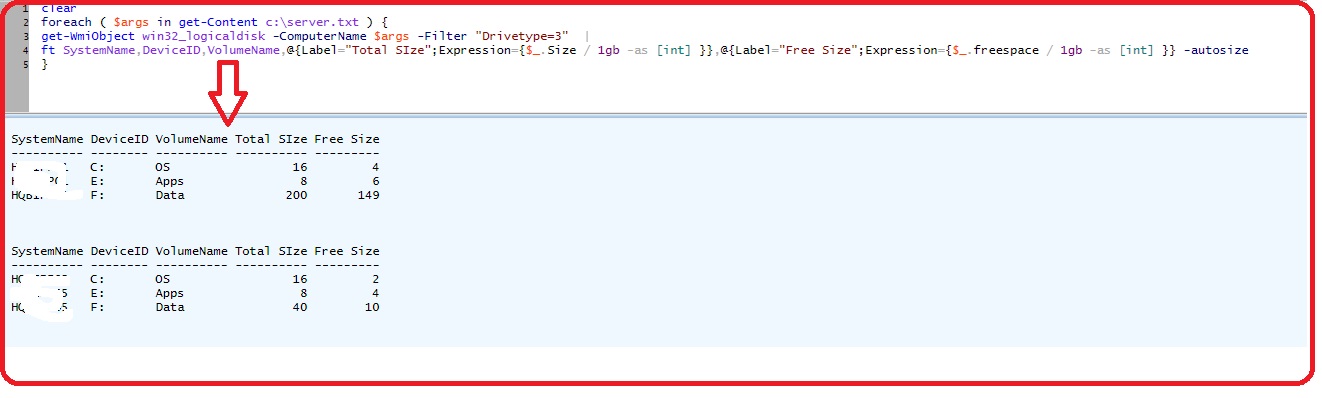
Without using Credentials
You don't need to use the credential parameter in any of the cmdlet execution.
clear
foreach ( $args in get-Content c:\server.txt ) {
get-WmiObject win32_logicaldisk -ComputerName $args -Filter "Drivetype=3"  |
ft SystemName,DeviceID,VolumeName,@{Label="Total SIze";Expression={$_.Size / 1gb -as [int] }},@{Label="Free Size";Expression={$_.freespace / 1gb -as [int] }} -autosize
}
Download - Gallery link
PosH- DiskSpace -CSV Input and HTML Output
Code in detail
This section describes the coding and other details
Input File
The template of server.csv is given below. Change the content as per your requirement/environment
Server,Drive,LowTh,WarnTh,CritTh
HQDBSP008,E:,8,5,3
HQDBSP008,F:,8,20,3
HQDBSP0018,G:,8,5,3
HQSPDB9901,E:,8,5,3
HQSPDB0901,F:,20,5,3
HQSPDB8001,G:,8,5,3

Output filename
The below code defines the output file location and filename. Change the location or filename as per your requirement.
$filename= "c:\freespace.htm" New-Item -ItemType file $freeSpaceFileName -Force
The New-item cmdlet creates an item.
-Force
Forces this cmdlet to create an item that writes over an existing read-only item. Implementation varies from provider to provider. For more information, see about_Providers. Even using the Force parameter, the cmdlet cannot override security restrictions.
Prepare HTML file using CSS
The Add-Content cmdlet is used to prepare CSS HTML file. The cmdlet is to append the data to a text file. In this case, it's going to be an HTML file.
There are two ways of preparing HTML output. One is through ConvertTo-HTML and using cssri parameter which accepts style sheet path as its input and another one is through manually defining the CSS tags and building an HTML file. It's like building an HTML file with values and tags to be displayed in a file. If one has a little bit of knowledge over CSS will help a lot in this case.
The below code has modularized for simple understanding and easy to enhance the code if one has to make any changes to a template.
The following four functions are used to generate the HTML document:
- fileHeader - It defines the style and heading as how the output should look as it in-house all the required tags. It acts as a template for an HTML document.
- tableHeader - Defines the column heading for the HTML data
- writeTableData - Manipulated data written to a respective column header of HTML document
- tableFooter - Encloses the HTML document with corresponding closing tags
The references section lists all the required information about the tags used to prepare this HTML.
For example,
<!DOCTYPE html>
<html>
<head>
<style>
td {
font-family: Tahoma;font-size: 11px;
border-top: 1px solid darkGray;border-right: 1px solid darkGray;border-bottom: 1px solid darkGray;border-left: 1px solid darkGray;
padding-top: 0px;padding-right: 0px;padding-bottom: 0px;padding-left: 0px;
}
body {
margin-left: 5px;margin-top: 5px;margin-right: 0px;margin-bottom: 10px;
}
-->
</style>
</head>
<body>
<h2>The Sample data</h2>
<table>
 <tr><th>Firstname</th><th>Lastname</th>
 </tr><tr><td>Peter</td><td>Geelan</td></tr>
 </tr><tr> <td>Ed</td><td>Price</td></tr>
</body>
</html>

The $status variable defines the color combination for each drive status
- Critical - Red
- Warning - DarkGoldenRod
- Low - Aquamarine
- Good - DarkGreen
Function writeHtmlHeader
{
param($fileName)
$date = ( get-date ).ToString('yyyy/MM/dd')
Add-Content $fileName "<html>"
Add-Content $fileName "<head>"
Add-Content $fileName "<meta http-equiv='Content-Type' content='text/html; charset=iso-8859-1'>"
Add-Content $fileName '<title>DiskSpace Report</title>'
add-content $fileName '<STYLE TYPE="text/css">'
add-content $fileName  "<!--"
add-content $fileName  "td {"
add-content $fileName  "font-family: Tahoma;"
add-content $fileName  "font-size: 11px;"
add-content $fileName  "border-top: 1px solid darkGray;"
add-content $fileName  "border-right: 1px solid darkGray;"
add-content $fileName  "border-bottom: 1px solid darkGray;"
add-content $fileName  "border-left: 1px solid darkGray;"
add-content $fileName  "padding-top: 0px;"
add-content $fileName  "padding-right: 0px;"
add-content $fileName  "padding-bottom: 0px;"
add-content $fileName  "padding-left: 0px;"
add-content $fileName  "}"
add-content $fileName  "body {"
add-content $fileName  "margin-left: 5px;"
add-content $fileName  "margin-top: 5px;"
add-content $fileName  "margin-right: 0px;"
add-content $fileName  "margin-bottom: 10px;"
add-content $fileName  ""
add-content $fileName  "-->"
add-content $fileName  "</style>"
add-Content $fileName "</head>"
add-Content $fileName "<body>"
add-content $fileName  "<table width='100%'>"
add-content $fileName  "<tr bgcolor='cadetBlue'>"
add-content $fileName  "<td colspan='9' height='25'  width=5% align='left'>"
add-content $fileName  "<font face='tahoma' color='black' size='5'><center><strong>DiskSpace Report - $date</strong></center></font>"
add-content $fileName  "</td>"
add-content $fileName  "</tr>"

}

# Function to write the HTML Header to the file
Function writeTableHeader
{
param($fileName)
Add-Content $fileName "<tr bgcolor=cadetBlue>"
Add-Content $fileName "<td><b>Server</b></td>"
Add-Content $fileName "<td><b>Drive</b></td>"
Add-Content $fileName "<td><b>Drive Label</b></td>"
Add-Content $fileName "<td><b>Total Capacity(GB)</b></td>"
Add-Content $fileName "<td><b>Used Capacity(GB)</b></td>"
Add-Content $fileName "<td><b>Free Space(GB)</b></td>"
Add-Content $fileName "<td><b>FreeSpace % </b></td>"
Add-Content $fileName "<td><b>Status </b></td>"
Add-Content $fileName "</tr>"
}

Function writeHtmlFooter
{
param($fileName)

Add-Content $fileName "</body>"
Add-Content $fileName "</html>"
}

Function writeDiskInfo
{
param($fileName,$server,$DeviceID,$VolumeName,$TotalSizeGB,$UsedSpaceGB,$FreeSpaceGB,$FreePer,$status)
if ($status -eq  'warning')
{
Add-Content $fileName "<tr>"
Add-Content $fileName "<td >$server</td>"
Add-Content $fileName "<td >$DeviceID</td>"
Add-Content $fileName "<td >$VolumeName</td>"
Add-Content $fileName "<td >$TotalSizeGB</td>"
Add-Content $fileName "<td >$UsedSpaceGB</td>"
Add-Content $fileName "<td >$FreeSpaceGB</td>"
Add-Content $fileName "<td  bgcolor='darkGoldenrod' >$FreePer</td>"
Add-Content $fileName "<td >$status</td>"
Add-Content $fileName "</tr>"
}
elseif ($status -eq 'critical')
{
Add-Content $fileName "<tr>"
Add-Content $fileName "<td >$server</td>"
Add-Content $fileName "<td >$DeviceID</td>"
Add-Content $fileName "<td >$VolumeName</td>"
Add-Content $fileName "<td >$TotalSizeGB</td>"
Add-Content $fileName "<td >$UsedSpaceGB</td>"
Add-Content $fileName "<td >$FreeSpaceGB</td>"
Add-Content $fileName "<td bgcolor='red' >$FreePer</td>"
Add-Content $fileName "<td >$status</td>"
Add-Content $fileName "</tr>"

}
elseif ($status -eq 'low')
{
Add-Content $fileName "<tr>"
Add-Content $fileName "<td >$server</td>"
Add-Content $fileName "<td >$DeviceID</td>"
Add-Content $fileName "<td >$VolumeName</td>"
Add-Content $fileName "<td >$TotalSizeGB</td>"
Add-Content $fileName "<td >$UsedSpaceGB</td>"
Add-Content $fileName "<td >$FreeSpaceGB</td>"
Add-Content $fileName "<td bgcolor='aquamarine' >$FreePer</td>"
Add-Content $fileName "<td >$status</td>"
Add-Content $fileName "</tr>"
}
elseif ($status -eq 'good')
{
Add-Content $fileName "<tr>"
Add-Content $fileName "<td >$server</td>"
Add-Content $fileName "<td >$DeviceID</td>"
Add-Content $fileName "<td >$VolumeName</td>"
Add-Content $fileName "<td >$TotalSizeGB</td>"
Add-Content $fileName "<td >$UsedSpaceGB</td>"
Add-Content $fileName "<td >$FreeSpaceGB</td>"
Add-Content $fileName "<td bgcolor='darkGreen' >$FreePer</td>"
Add-Content $fileName "<td >$status</td>"
Add-Content $fileName "</tr>"
}
}
Import Server and Drive details
This part of the code read values from CSV file. The CSV file has five columns Server, Drive, LowTh, WarnTh, CritTh. The server.csv file shown in the below figure has a specific set of values for each server as well as for each drive. The code reads values and loop through every server.After reading from CSV file, the values are assigned to a local variable and then its used to query WMI query by filtering on -computername and ***-DeviceID. ***
The next part is connectivity test using Test-Connection cmdlet. It does a basic connectivity test and once it's successful it goes to the next steps.
The next part is to calculate the "free %" and writing data to a sheet.The status column is populated based on input threshold values. The $percentageFree will be used to identify the status of the drive. The four status of each drive are Critical, Warning, Low and Good. The three input parameters $clowth, $cwarnth,$ccritth compared with $percentageFree variable which yields a result to a status column.
The last part of the code calls the function writeDiskInfo. This function used to prepare HTML body using HTML tags.

Code
<# .SYNOPSIS            Name :  Disk Space Utilization Report (Get-DiskSpaceHTML.ps1)    Description : Get disk space usage information from remote server(s) with WMI and output HTML file      Author : Prashanth Jayaram         * Select list of servers from a CSV file    * Get remote Servers information with WMI and Powershell :    * Disk (Disk type, letter, capacity in GB, free space in GB, % free , Status + display a HTML output)     .INPUT    .csv file with servers to activate .OUTPUTS    Console outputs : You can alter the code to write the data to file or console     .NOTES    Version:        1.0    Author:         Prashanth Jayaram    Creation Date:  2016-26-09    Purpose/Change: Initial script development   .EXAMPLE    .\Get-DiskSpaceHTML.ps1#>#############################################################################
#  Check disk space usage and generate HTML file
#  Author: Prashanth Jayaram
#  Date:  9/23/2016
##############################################################################

#########################################################################################
#DirectoryPath - Make sure you have enough rights to write to that path
# color combination refer this link http://www.w/3schools.com/tags/ref_colornames.asp
#########################################################################################

$freeSpaceFileName = "C:\FreeSpace.htm"

New-Item -ItemType file $freeSpaceFileName -Force
# Getting the freespace info using WMI
#Get-WmiObject win32_logicaldisk  | Where-Object {$_.drivetype -eq 3 -OR $_.drivetype -eq 2 } | format-table DeviceID, VolumeName,status,Size,FreeSpace | Out-File FreeSpace.txt
# Function to write the HTML Header to the file
Function writeHtmlHeader
{
param($fileName)
$date = ( get-date ).ToString('yyyy/MM/dd')
Add-Content $fileName "<html>"
Add-Content $fileName "<head>"
Add-Content $fileName "<meta http-equiv='Content-Type' content='text/html; charset=iso-8859-1'>"
Add-Content $fileName '<title>DiskSpace Report</title>'
add-content $fileName '<STYLE TYPE="text/css">'
add-content $fileName  "<!--"
add-content $fileName  "td {"
add-content $fileName  "font-family: Tahoma;"
add-content $fileName  "font-size: 11px;"
add-content $fileName  "border-top: 1px solid darkGray;"
add-content $fileName  "border-right: 1px solid darkGray;"
add-content $fileName  "border-bottom: 1px solid darkGray;"
add-content $fileName  "border-left: 1px solid darkGray;"
add-content $fileName  "padding-top: 0px;"
add-content $fileName  "padding-right: 0px;"
add-content $fileName  "padding-bottom: 0px;"
add-content $fileName  "padding-left: 0px;"
add-content $fileName  "}"
add-content $fileName  "body {"
add-content $fileName  "margin-left: 5px;"
add-content $fileName  "margin-top: 5px;"
add-content $fileName  "margin-right: 0px;"
add-content $fileName  "margin-bottom: 10px;"
add-content $fileName  ""
add-content $fileName  "table {"
add-content $fileName  "border: thin solid black;"
add-content $fileName  "}"
add-content $fileName  "table { "
add-content $fileName "border-spacing: 10 px;"
add-content $fileName "border-collapse: separate;"
add-content $fileName "}"
add-content $fileName  "-->"
add-content $fileName  "</style>"
Add-Content $fileName "</head>"
Add-Content $fileName "<body>"
add-content $fileName  "<table width='100%'>"
add-content $fileName  "<tr bgcolor='cadetBlue'>"
add-content $fileName  "<td colspan='9' height='25'  width=5% align='left'>"
add-content $fileName  "<font face='tahoma' color='black' size='5'><center><strong>DiskSpace Report - $date</strong></center></font>"
add-content $fileName  "</td>"
add-content $fileName  "</tr>"

}

# Function to write the HTML Header to the file
Function writeTableHeader
{
param($fileName)
Add-Content $fileName "<tr bgcolor=cadetBlue>"
Add-Content $fileName "<td><b>Server</b></td>"
Add-Content $fileName "<td><b>Drive</b></td>"
Add-Content $fileName "<td><b>Drive Label</b></td>"
Add-Content $fileName "<td><b>Total Capacity(GB)</b></td>"
Add-Content $fileName "<td><b>Used Capacity(GB)</b></td>"
Add-Content $fileName "<td><b>Free Space(GB)</b></td>"
Add-Content $fileName "<td><b>FreeSpace % </b></td>"
Add-Content $fileName "<td><b>Status </b></td>"
Add-Content $fileName "</tr>"
}

Function writeHtmlFooter
{
param($fileName)

Add-Content $fileName "</body>"
Add-Content $fileName "</html>"
}

Function writeDiskInfo
{
param($fileName,$server,$DeviceID,$VolumeName,$TotalSizeGB,$UsedSpaceGB,$FreeSpaceGB,$FreePer,$status)
if ($status -eq  'warning')
{
Add-Content $fileName "<tr>"
Add-Content $fileName "<td >$server</td>"
Add-Content $fileName "<td >$DeviceID</td>"
Add-Content $fileName "<td >$VolumeName</td>"
Add-Content $fileName "<td >$TotalSizeGB</td>"
Add-Content $fileName "<td >$UsedSpaceGB</td>"
Add-Content $fileName "<td >$FreeSpaceGB</td>"
Add-Content $fileName "<td  bgcolor='darkGoldenrod' >$FreePer</td>"
Add-Content $fileName "<td >$status</td>"
Add-Content $fileName "</tr>"
}
elseif ($status -eq 'critical')
{
Add-Content $fileName "<tr>"
Add-Content $fileName "<td >$server</td>"
Add-Content $fileName "<td >$DeviceID</td>"
Add-Content $fileName "<td >$VolumeName</td>"
Add-Content $fileName "<td >$TotalSizeGB</td>"
Add-Content $fileName "<td >$UsedSpaceGB</td>"
Add-Content $fileName "<td >$FreeSpaceGB</td>"
Add-Content $fileName "<td bgcolor='red' >$FreePer</td>"
Add-Content $fileName "<td >$status</td>"
Add-Content $fileName "</tr>"

}
elseif ($status -eq 'low')
{
Add-Content $fileName "<tr>"
Add-Content $fileName "<td >$server</td>"
Add-Content $fileName "<td >$DeviceID</td>"
Add-Content $fileName "<td >$VolumeName</td>"
Add-Content $fileName "<td >$TotalSizeGB</td>"
Add-Content $fileName "<td >$UsedSpaceGB</td>"
Add-Content $fileName "<td >$FreeSpaceGB</td>"
Add-Content $fileName "<td bgcolor='aquamarine' >$FreePer</td>"
Add-Content $fileName "<td >$status</td>"
Add-Content $fileName "</tr>"
}
elseif ($status -eq 'good')
{
Add-Content $fileName "<tr>"
Add-Content $fileName "<td >$server</td>"
Add-Content $fileName "<td >$DeviceID</td>"
Add-Content $fileName "<td >$VolumeName</td>"
Add-Content $fileName "<td >$TotalSizeGB</td>"
Add-Content $fileName "<td >$UsedSpaceGB</td>"
Add-Content $fileName "<td >$FreeSpaceGB</td>"
Add-Content $fileName "<td bgcolor='darkGreen' >$FreePer</td>"
Add-Content $fileName "<td >$status</td>"
Add-Content $fileName "</tr>"
}
}

writeHtmlHeader $freeSpaceFileName
writeTableHeader $freeSpaceFileName
Import-Csv C:\server.csv|%{
$cserver = $_.Server
$cdrivelt = $_.Drive
$clowth = $_.LowTh
$cwarnth = $_.WarnTh
$ccritth = $_.CritTh
$status=''
if(Test-Connection -ComputerName $cserver -Count 1 -ea 0) {
$diskinfo= Get-WmiObject -Class Win32_LogicalDisk -ComputerName $cserver  -Filter "DeviceID='$cdrivelt'"
ForEach ($disk in $diskinfo)
{
If ($diskinfo.Size -gt 0) {$percentFree = [Math]::round((($diskinfo.freespace/$diskinfo.size) * 100))}
Else {$percentFree = 0}
#Process each disk in the collection and write to spreadsheet
    $server=$disk.__Server
     $deviceID=$disk.DeviceID
     $Volume=$disk.VolumeName
     $TotalSizeGB=[math]::Round(($disk.Size /1GB),2)
     $UsedSpaceGB=[math]::Round((($disk.Size - $disk.FreeSpace)/1GB),2)
     $FreeSpaceGB=[math]::Round(($disk.FreeSpace / 1GB),2)
     $FreePer=("{0:P}" -f ($disk.FreeSpace / $disk.Size))

    #Determine if disk needs to be flagged for warning or critical alert
    If ($percentFree -le  $ccritth) {
        $status = "Critical"
             } ElseIf ($percentFree -gt $ccritth -AND $percentFree -le $cwarnth) {
        $status = "Warning"
              }
     ElseIf ($percentFree -ge $cwarnth -AND $percentFree -lt $clowth) {
        $status = "Low"

    } Else {
        $status = "Good"
           }
  }
write-host  $server $DeviceID  $Volume $TotalSizeGB  $UsedSpaceGB $FreeSpaceGB $FreePer $status
writeDiskInfo $freeSpaceFileName $server $DeviceID  $Volume $TotalSizeGB  $UsedSpaceGB $FreeSpaceGB $FreePer $status
}
}
Add-Content $freeSpaceFileName "</table>"
writeHtmlFooter $freeSpaceFileName
Output

HTML file as an email attachment
To initiate email message we'll use.Net class library System.Net.Mail.MailMessage. This basically uses SMTP client to sent mail messages.The mail body can be HTML or string or an attachment. In this case, we are sending an email attachment.
$email = New-Object System.Net.Mail.MailMessage
Create the new MailMessage object $email, using this variable assign to and From addresses, subject line and body of an email.
$email.From = $emailFrom
$email.To.Add($emailTo)
$email.Subject = $subject
$email.Body = $body
To add an email attachment one has to invoke System.Net.Mail.Attachment class
$emailAttach = New-Object System.Net.Mail.Attachment $filePath
The object has been instantiated by adding the attachment
$email.Attachments.Add($emailAttach)
Initiate sending email. The final step is to create the SmtpClient object and send the mail message.
$smtp = new-object Net.Mail.SmtpClient($smtpServer)
$smtp.Send($email)
Function sendEmail([string]$emailFrom, [string]$emailTo, [string]$subject,[string]$body,[string]$smtpServer,[string]$filePath)
{
#initate message
#For this we'll use .Net class library System.Net.Mail.MailMessage. This basically uses SMTP client to sent mail messages.The mail body can be HTML or string or an attachment. In this case we are sending email attachment.
$email = New-Object System.Net.Mail.MailMessage
#we create the new MailMessage object $email, using this variable assign to and From addresses, subject line and body of email.
$email.From = $emailFrom
$email.To.Add($emailTo)
$email.Subject = $subject
$email.Body = $body
# initiate email attachment, This can be done using System.Net.Mail.Attachment class.
$emailAttach = New-Object System.Net.Mail.Attachment $filePath
#Add  the attachment to an object
$email.Attachments.Add($emailAttach)
#initiate sending email . The final step is to create the SmtpClient object and send the mail message.
$smtp = new-object Net.Mail.SmtpClient($smtpServer)
$smtp.Send($email)
}

#Call Function

$message = @"
Hi Team,

The Disk Space Usage details Report.

Autogenerated Email!!! Please do not reply.

Thank you,
xyz.com

"@
$date=get-date

sendEmail -emailFrom $fromEmail -emailTo $ToEmail -subject "Disk Space Usage Report -$($date)"  -body $message -smtpServer $SMTPMail -filePath $filename
HTML as an Email body
Function sendEmail
{
param($from,$to,$subject,$smtphost,$htmlFileName)
#Assigning multiple recipients to $recipient string
[string]$recipients="$to"
#Reading the content of HTML source
$body = Get-Content $htmlFileName
#we create the new MailMessage object $email, using this variable assign to and From addresses, subject line and body of email.
$body = New-Object System.Net.Mail.MailMessage $from, $recipients, $subject, $body
#setting the message body to be HTML.
$body.isBodyhtml = $true
$smtpServer = $MailServer
$smtp = new-object Net.Mail.SmtpClient($smtphost)
$smtp.Send($body)
}
Conclusion
- CSV input - Easy to maintain and manage
- Customization can be done at each drive level as the threshold value may vary on every server and most of the drive depending on the size of each drive
- HTML Disk Space Usage Utilization report
- The simplest way to keep a cap on every drive to set threshold value
- Proactive monitoring and alerting respective teams may avoid unforeseen disk space issues
- Email can be sent as an attachment or it can be integrated to the body of the mail message
References
Technet
PoSH : Disk Space Monitoring Guide
