기능 정보 표시
참고 항목
Azure Maps Android SDK 사용 중지
이제 Android용 Azure Maps 네이티브 SDK는 더 이상 사용되지 않으며 2025년 3월 31일에 사용 중지됩니다. 서비스 중단을 방지하려면 2025년 3월 31일까지 Azure Maps 웹 SDK로 마이그레이션합니다. 자세한 내용은 Azure Maps Android SDK 마이그레이션 가이드를 참조하세요.
공간 데이터는 종종 점, 선 및 다각형을 사용하여 표현됩니다. 이 데이터는 연결된 메타데이터 정보를 포함하는 경우가 많습니다. 예를 들어, 점은 식당의 위치를 나타낼 수 있으며 해당 식당에 대한 메타데이터는 해당 이름, 주소 및 사용되는 음식의 종류가 될 수 있습니다. 이 메타데이터는 GeoJSON Feature의 속성으로 추가할 수 있습니다. 다음 코드에서는 값이 "Hello World!"인 title 속성이 있는 단순한 요소 기능을 만듭니다.
//Create a data source and add it to the map.
DataSource source = new DataSource();
map.sources.add(source);

//Create a point feature.
Feature feature = Feature.fromGeometry(Point.fromLngLat(-122.33, 47.64));

//Add a property to the feature.
feature.addStringProperty("title", "Hello World!");

//Create a point feature, pass in the metadata properties, and add it to the data source.
source.add(feature);
//Create a data source and add it to the map.
val source = DataSource()
map.sources.add(source)

//Create a point feature.
val feature = Feature.fromGeometry(Point.fromLngLat(-122.33, 47.64))

//Add a property to the feature.
feature.addStringProperty("title", "Hello World!")

//Create a point feature, pass in the metadata properties, and add it to the data source.
source.add(feature)
데이터를 만들고 맵에 추가하는 방법에 대한 자세한 내용은 데이터 원본 만들기를 참조하세요.
사용자가 맵의 기능과 상호 작용하는 경우 이벤트를 사용하여 해당 작업에 대응할 수 있습니다. 일반적인 시나리오는 사용자가 상호 작용한 기능의 메타데이터 속성으로 메시지를 표시하는 것입니다. OnFeatureClick 이벤트는 사용자가 맵의 기능을 탭할 때 감지에 사용되는 기본 이벤트입니다. OnLongFeatureClick 이벤트도 있습니다. OnFeatureClick 이벤트가 맵에 추가되면 이를 제한할 계층의 ID를 전달하여 단일 계층으로 제한할 수 있습니다. 계층 ID가 전달되지 않은 경우에는 해당 계층에 관계 없이 맵의 임의 기능을 눌러 이 이벤트를 발생시킬 수 있습니다. 다음 코드에서는 맵에서 요소 데이터를 렌더링할 기호 계층을 만든 다음 OnFeatureClick 이벤트를 추가하고 이를 이 기호 계층으로 제한합니다.
//Create a symbol and add it to the map.
SymbolLayer layer = new SymbolLayer(source);
map.layers.add(layer);

//Add a feature click event to the map.
map.events.add((OnFeatureClick) (features) -> {
    //Retrieve the title property of the feature as a string.
    String msg = features.get(0).getStringProperty("title");

    //Do something with the message.

    //Return a boolean indicating if event should be consumed or continue bubble up.
    return false;
}, layer.getId());    //Limit this event to the symbol layer.
//Create a symbol and add it to the map.
val layer = SymbolLayer(source)
map.layers.add(layer)

//Add a feature click event to the map.
map.events.add(OnFeatureClick { features: List<Feature> ->
    //Retrieve the title property of the feature as a string.
    val msg = features[0].getStringProperty("title")

    //Do something with the message.

    //Return a boolean indicating if event should be consumed or continue bubble up.
    return false
}, layer.getId()) //Limit this event to the symbol layer.
알림 메시지 표시
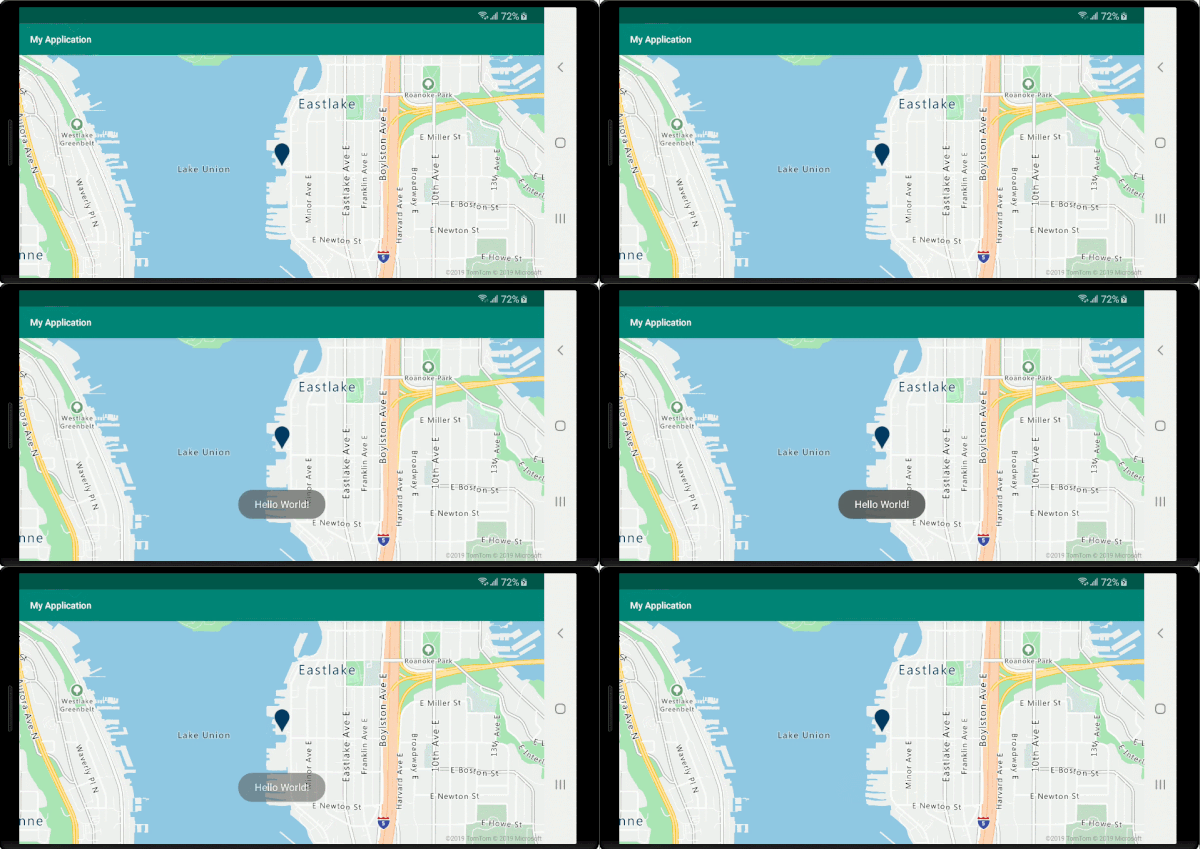
알림 메시지는 사용자에게 정보를 표시하는 가장 쉬운 방법 중 하나이며 모든 버전의 Android에서 사용할 수 있습니다. 사용자 입력 형식을 지원하지 않으며 짧은 시간 동안만 표시됩니다. 사용자가 누른 항목에 대한 정보를 신속하게 알리려면 알림 메시지가 좋은 옵션이 될 수 있습니다. 다음 코드에서는 알림 메시지를 OnFeatureClick 이벤트와 함께 사용할 수 있는 방법을 보여 줍니다.
//Add a feature click event to the map.
map.events.add((OnFeatureClick) (features) -> {
    //Retrieve the title property of the feature as a string.
    String msg = features.get(0).getStringProperty("title");

    //Display a toast message with the title information.
    Toast.makeText(this, msg, Toast.LENGTH_SHORT).show();

    //Return a boolean indicating if event should be consumed or continue bubble up.
    return false;
}, layer.getId());    //Limit this event to the symbol layer.
//Add a feature click event to the map.
map.events.add(OnFeatureClick { features: List<Feature> ->
    //Retrieve the title property of the feature as a string.
    val msg = features[0].getStringProperty("title")

    //Display a toast message with the title information.
    Toast.makeText(this, msg, Toast.LENGTH_SHORT).show()

    //Return a boolean indicating if event should be consumed or continue bubble up.
    return false
}, layer.getId()) //Limit this event to the symbol layer.

알림 메시지 외에도 다음과 같은 다양한 방법으로 기능의 메타데이터 속성을 표시할 수 있습니다.
- Snackbar 위젯 -
Snackbars은 작업에 대한 간단한 피드백을 제공합니다. 모바일에서 화면 아래쪽에 짧은 메시지를 표시하고 더 큰 디바이스에서는 왼쪽 아래에 표시합니다.Snackbars는 화면의 다른 모든 요소 위에 표시되며 한 번에 하나만 표시할 수 있습니다. - 대화 상자 - 대화 상자는 사용자에게 결정을 하거나 추가 정보를 입력하라는 메시지를 표시하는 작은 창입니다. 대화 상자는 화면을 채우지 않으며 작업을 계속하기 전에 사용자가 작업을 수행해야 하는 모달 이벤트에 일반적으로 사용됩니다.
- 현재 활동에 조각을 추가합니다.
- 다른 활동 또는 보기로 이동합니다.
팝업 표시
Azure Maps Android SDK는 맵의 위치에 고정된 UI 주석 요소를 쉽게 만들 수 있도록 하는 Popup 클래스를 제공합니다. 팝업의 경우에는 상대적인 레이아웃을 포함하는 보기를 팝업의 content 옵션에 전달해야 합니다. 다음은 배경 위에 짙은 텍스트를 표시하는 간단한 레이아웃 예제입니다.
<?xml version="1.0" encoding="utf-8"?>
<RelativeLayout xmlns:android="http://schemas.android.com/apk/res/android"
    android:layout_width="match_parent"
    android:orientation="vertical"
    android:background="#ffffff"
    android:layout_margin="8dp"
    android:padding="10dp"

    android:layout_height="match_parent">

    <TextView
        android:id="@+id/message"
        android:layout_width="wrap_content"
        android:text=""
        android:textSize="18dp"
        android:textColor="#222"
        android:layout_height="wrap_content"
        android:width="200dp"/>

</RelativeLayout>
위의 레이아웃이 앱의 res -> layout 폴더에서 popup_text.xml이라는 파일에 저장되어 있다고 가정하면 다음 코드는 팝업을 만들어 맵에 추가합니다. 기능을 클릭하면 popup_text.xml 레이아웃을 사용하여 title 속성을 표시하며, 이 레이아웃의 아래쪽 가운데는 맵에서 지정된 위치에 고정됩니다.
//Create a popup and add it to the map.
Popup popup = new Popup();
map.popups.add(popup);

map.events.add((OnFeatureClick)(feature) -> {
    //Get the first feature and it's properties.
    Feature f = feature.get(0);
    JsonObject props = f.properties();

    //Retrieve the custom layout for the popup.
    View customView = LayoutInflater.from(this).inflate(R.layout.popup_text, null);

    //Access the text view within the custom view and set the text to the title property of the feature.
    TextView tv = customView.findViewById(R.id.message);
    tv.setText(props.get("title").getAsString());

    //Get the position of the clicked feature.
    Position pos = MapMath.getPosition((Point)cluster.geometry());

    //Set the options on the popup.
    popup.setOptions(
        //Set the popups position.
        position(pos),

        //Set the anchor point of the popup content.
        anchor(AnchorType.BOTTOM),

        //Set the content of the popup.
        content(customView)

        //Optionally, hide the close button of the popup.
        //, closeButton(false)

        //Optionally offset the popup by a specified number of pixels.
        //pixelOffset(new Pixel(10, 10))
    );

    //Open the popup.
    popup.open();

    //Return a boolean indicating if event should be consumed or continue bubble up.
    return false;
});
//Create a popup and add it to the map.
val popup = Popup()
map.popups.add(popup)

map.events.add(OnFeatureClick { feature: List<Feature> ->
    //Get the first feature and it's properties.
    val f = feature[0]
    val props = f.properties()

    //Retrieve the custom layout for the popup.
    val customView: View = LayoutInflater.from(this).inflate(R.layout.popup_text, null)

    //Access the text view within the custom view and set the text to the title property of the feature.
    val tv: TextView = customView.findViewById(R.id.message)
    tv.text = props!!["title"].asString

    //Get the position of the clicked feature.
    val pos = MapMath.getPosition(f.geometry() as Point?);

    //Set the options on the popup.
    popup.setOptions(
        //Set the popups position.
        position(pos),

        //Set the anchor point of the popup content.
        anchor(AnchorType.BOTTOM),

        //Set the content of the popup.
        content(customView)

        //Optionally, hide the close button of the popup.
        //, closeButton(false)

        //Optionally offset the popup by a specified number of pixels.
        //pixelOffset(Pixel(10, 10))
    )

    //Open the popup.
    popup.open()

    //Return a boolean indicating if event should be consumed or continue bubble up.
    false
})
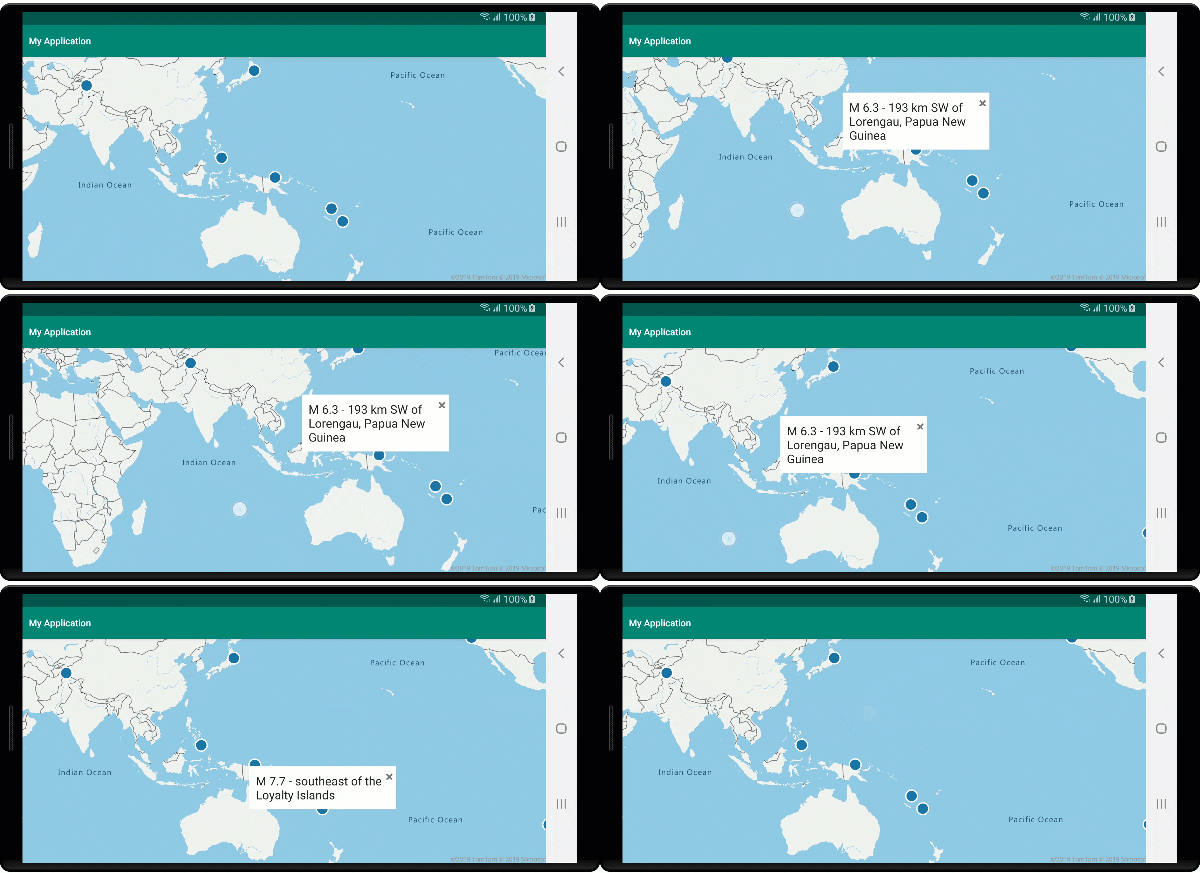
다음 화면 캡처는 기능을 클릭하고 맵의 이동 시 지정된 위치에 고정되어 있을 때 나타나는 팝업을 보여줍니다.

다음 단계
원본에 더 많은 데이터 추가: