자습서: Jupyter Notebooks(Python)를 사용하여 센서 데이터를 일기 예보 데이터와 조인
풍력은 기후 변화에 맞서기 위해 화석 연료를 대체할 수 있는 에너지원입니다. 바람은 본질적으로 일관되지 않으므로 풍력 연산자는 ML(기계 학습) 모델을 빌드하여 풍력 용량을 예측해야 합니다. 이 예측은 전기 수요를 충족하고 그리드 안정성을 보장하기 위해 필요합니다. 이 자습서에서는 Azure Maps 날씨 예측 데이터가 날씨 판독값이 있는 데모 데이터와 결합되는 방식을 안내합니다. 날씨 예측 데이터는 Azure Maps 날씨 서비스를 호출하여 요청됩니다.
이 자습서에서는 다음을 수행합니다.
참고 항목
이 프로젝트의 Jupyter Notebook 파일은 기상도 Juppyter Notebook 리포지토리에서 다운로드할 수 있습니다.
필수 조건
Azure 구독이 없는 경우 시작하기 전에 체험 계정을 만듭니다.
- Azure Maps 계정
- 구독 키
- Visual Studio Code
- VS Code의 Jupyter Notebook에 대한 실무 지식
- Jupyter Notebook에서 Python과 함께 작동하도록 설정된 환경입니다. 자세한 내용은 환경 설정을 참조하세요.
참고 항목
Azure Maps의 인증에 대한 자세한 내용은 Azure Maps의 인증 관리를 참조하세요.
프로젝트 수준 패키지 설치
EV 라우팅 및 도달 가능한 범위 프로젝트에는 aiohttp 및 IPython python 라이브러리에 대한 종속성이 있습니다. pip를 사용하여 Visual Studio 터미널에 설치할 수 있습니다.
pip install aiohttp
pip install ipython
pip install pandas
Visual Studio Code에서 Jupyter Notebook 열기
다운로드한 후 이 자습서에 사용된 Notebook을 엽니다.
GitHub의 AzureMapsJupyterSamples 리포지토리에서 weatherDataMaps.ipynb 파일을 엽니다.
화면의 오른쪽 위 모서리에서 원시 파일 다운로드 단추를 선택하여 파일을 로컬로 저장합니다.

파일을 마우스 오른쪽 단추로 클릭한 다음 Visual Studio Code에서 열기를 선택하거나 VS Code 파일 탐색기 통해 Visual Studio Code에서 다운로드한 Notebook을 엽니다>.
필요한 모듈 및 프레임워크 로드
코드가 추가되면 셀 왼쪽의 실행 아이콘을 사용하여 셀을 실행할 수 있으며 출력은 코드 셀 아래에 표시됩니다.
다음 스크립트를 실행하여 필요한 모든 모듈 및 프레임워크를 로드합니다.
import aiohttp
import pandas as pd
import datetime
from IPython.display import Image, display

날씨 데이터 가져오기
이 자습서에서는 4개의 서로 다른 풍력 터빈에 설치된 센서의 날씨 데이터 판독값을 사용합니다. 샘플 데이터는 30일의 날씨 판독값으로 구성됩니다. 이러한 판독값은 각 터빈 위치 근처의 날씨 데이터 센터에서 수집됩니다. 데모 데이터에는 기온, 풍속 및 풍향에 대한 데이터 판독값이 포함되어 있습니다. GitHub에서 weather_dataset_demo.csv에 포함된 데모 데이터를 다운로드할 수 있습니다. 다음 스크립트는 데모 데이터를 Azure Notebook으로 가져옵니다.
df = pd.read_csv("./data/weather_dataset_demo.csv")
일일 예측 데이터 요청
시나리오에서는 각 센서 위치에 대한 일일 예측을 요청하려고 합니다. 다음 스크립트는 Azure Maps 날씨 서비스의 Daily Forecast API를 호출합니다. 이 API는 현재 날짜로부터 다음 15일 동안 각 풍력 터빈에 대한 날씨 예보를 반환합니다.
subscription_key = "Your Azure Maps key"

# Get a lists of unique station IDs and their coordinates
station_ids = pd.unique(df[['StationID']].values.ravel())
coords = pd.unique(df[['latitude','longitude']].values.ravel())

years,months,days = [],[],[]
dates_check=set()
wind_speeds, wind_direction = [], []

# Call azure maps Weather services to get daily forecast data for 15 days from current date
session = aiohttp.ClientSession()
j=-1
for i in range(0, len(coords), 2):
    wind_speeds.append([])
    wind_direction.append([])

    query = str(coords[i])+', '+str(coords[i+1])
    forecast_response = await(await session.get("https://atlas.microsoft.com/weather/forecast/daily/json?query={}&api-version=1.0&subscription-key={Your-Azure-Maps-Subscription-key}&duration=15".format(query, subscription_key))).json()
    j+=1
    for day in range(len(forecast_response['forecasts'])):
            date = forecast_response['forecasts'][day]['date'][:10]
            wind_speeds[j].append(forecast_response['forecasts'][day]['day']['wind']['speed']['value'])
            wind_direction[j].append(forecast_response['forecasts'][day]['day']['windGust']['direction']['degrees'])

            if date not in dates_check:
                year,month,day= date.split('-')
                years.append(year)
                months.append(month)
                days.append(day)
                dates_check.add(date)

await session.close()
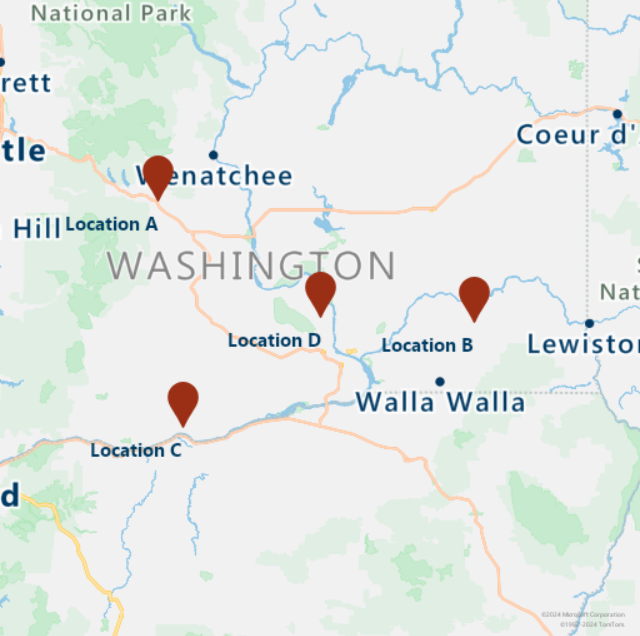
다음 스크립트는 맵 이미지 가져오기 서비스를 호출하여 맵에 터빈 위치를 렌더링합니다.
# Render the turbine locations on the map by calling the Azure Maps Get Map Image service
session = aiohttp.ClientSession()
pins="default|la-25+60|ls12|lc003C62|co9B2F15||'Location A'{} {}|'Location B'{} {}|'Location C'{} {}|'Location D'{} {}".format(coords[1],coords[0],coords[3],coords[2],coords[5],coords[4], coords[7],coords[6])
image_response = "https://atlas.microsoft.com/map/static/png?subscription-key={Your-Azure-Maps-Subscription-key}&api-version=1.0&layer=basic&style=main&zoom=6¢er={},{}&pins={}".format(subscription_key,coords[7],coords[6],pins)
static_map_response = await session.get(image_response)
poi_range_map = await static_map_response.content.read()
await session.close()
display(Image(poi_range_map))

스테이션 ID를 기반으로 하는 데모 데이터를 사용하여 예측 데이터를 그룹화합니다. 스테이션 ID는 날씨 데이터 센터용입니다. 이 그룹화는 예측 데이터를 사용하여 데모 데이터를 보강합니다.
# Group forecasted data for all locations
df = df.reset_index(drop=True)
forecast_data = pd.DataFrame(columns=['StationID','latitude','longitude','Year','Month','Day','DryBulbCelsius','WetBulbFarenheit','WetBulbCelsius','DewPointFarenheit','DewPointCelsius','RelativeHumidity','WindSpeed','WindDirection'])

for i in range(len(station_ids)):
    loc_forecast = pd.DataFrame({'StationID':station_ids[i], 'latitude':coords[0], 'longitude':coords[1], 'Year':years, 'Month':months, 'Day':days, 'WindSpeed':wind_speeds[i], 'WindDirection':wind_direction[i]})
    forecast_data = pd.concat([forecast_data,loc_forecast], axis=0, sort=False)

combined_weather_data = pd.concat([df,forecast_data])
grouped_weather_data = combined_weather_data.groupby(['StationID'])
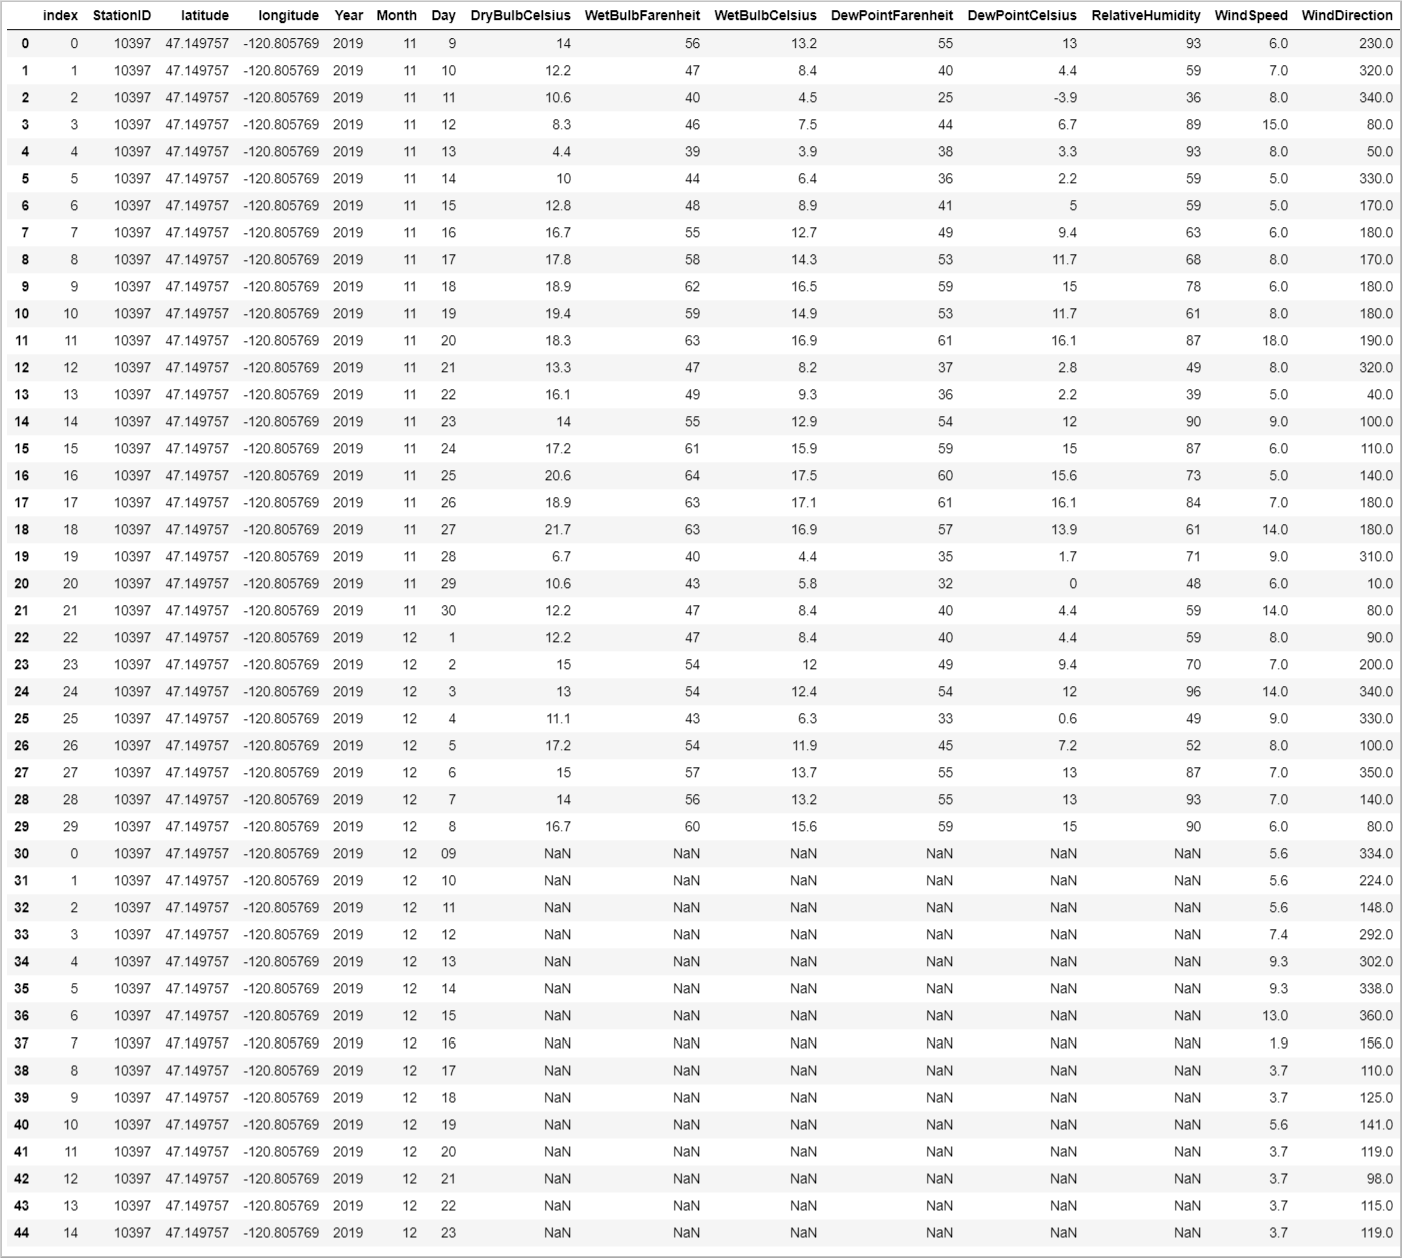
다음 테이블에는 터빈 위치 중 하나에 대한 기록 데이터와 예측 데이터가 결합되어 있습니다.
# Display data for first location
grouped_weather_data.get_group(station_ids[0]).reset_index()

예측 데이터 그리기
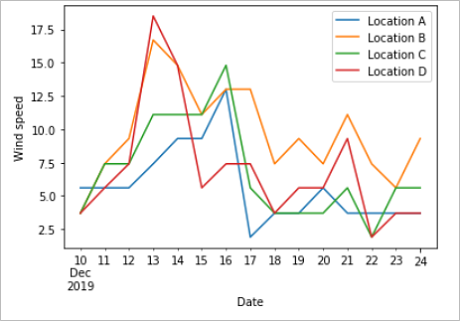
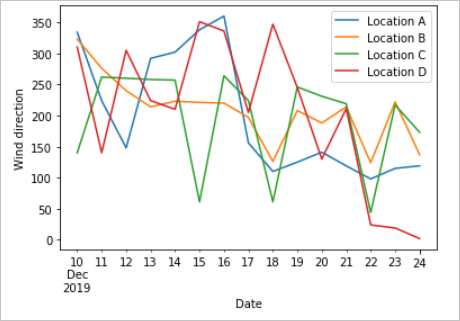
예측된 값을 예측한 날짜와 비교하여 표시합니다. 이 플롯을 사용하면 다음 15일 동안 풍속 및 풍향 변화를 확인할 수 있습니다.
# Plot wind speed
curr_date = datetime.datetime.now().date()
windsPlot_df = pd.DataFrame({ 'Location A': wind_speeds[0], 'Location B': wind_speeds[1], 'Location C': wind_speeds[2], 'Location D': wind_speeds[3]}, index=pd.date_range(curr_date,periods=15))
windsPlot = windsPlot_df.plot.line()
windsPlot.set_xlabel("Date")
windsPlot.set_ylabel("Wind speed")
#Plot wind direction
windsPlot_df = pd.DataFrame({ 'Location A': wind_direction[0], 'Location B': wind_direction[1], 'Location C': wind_direction[2], 'Location D': wind_direction[3]}, index=pd.date_range(curr_date,periods=15))
windsPlot = windsPlot_df.plot.line()
windsPlot.set_xlabel("Date")
windsPlot.set_ylabel("Wind direction")
다음 그래프는 예측 데이터를 시각화합니다. 풍속 변화의 경우 왼쪽 그래프를 참조하세요. 풍향 변화의 경우 오른쪽 그래프를 참조하세요. 이 데이터는 데이터가 요청된 날짜로부터 다음 15일 동안의 예측입니다.


이 자습서에서 Azure Maps REST API를 호출하여 날씨 예측 데이터를 가져오는 방법을 알아보았습니다. 또한 데이터를 그래프로 시각화하는 방법을 알아보았습니다.
이 자습서에서 사용되는 Azure Maps API를 살펴보려면 다음을 참조하세요.
Azure Maps REST API의 전체 목록은 Azure Maps REST API를 참조하세요.