빠른 시작: UI 라이브러리를 사용하여 채팅 추가
Azure Communication Services UI 라이브러리를 시작하여 통신 환경을 애플리케이션에 빠르게 통합합니다. 이 빠른 시작에서는 UI 라이브러리 채팅 복합을 애플리케이션에 통합하고 앱 사용자를 위한 환경을 설정하는 방법을 알아봅니다.
Azure Communication Services UI 라이브러리는 애플리케이션에서 바로 전체 채팅 환경을 렌더링합니다. Azure Communication Services 채팅 서비스에 연결하는 작업을 처리하고 참가자의 현재 상태를 자동으로 업데이트합니다. 개발자는 앱의 사용자 환경에서 채팅 환경을 시작하고 필요에 따라 Azure Communication Services 리소스만 만들 위치를 결정해야 합니다.
참고 항목
웹 UI 라이브러리에 대한 자세한 설명서 및 빠른 시작은 웹 UI 라이브러리 스토리북을 참조하세요.
필수 조건
- 활성 구독이 있는 Azure 계정. 체험 계정을 만듭니다.
- 배포된 Azure Communication Services 리소스. Azure Communication Services 리소스를 만듭니다.
- Azure Communication Services 토큰입니다. 이 예제를 참조하세요.
이러한 빠른 시작에 액세스
이러한 스토리북에 액세스
Important
Azure Communication Services의 이 기능은 현재 미리 보기 상태입니다.
미리 보기 API 및 SDK는 서비스 수준 계약 없이 제공됩니다. 프로덕션 워크로드에는 사용하지 않는 것이 좋습니다. 일부 기능은 지원되지 않거나 기능이 제한될 수 있습니다.
자세한 내용은 Microsoft Azure 미리 보기에 대한 보충 사용 약관을 검토하세요.
Android용 오픈 소스 Azure Communication Services UI 라이브러리에서 이 빠른 시작에 대한 샘플 Android 애플리케이션을 가져옵니다.
필수 조건
- Azure 계정 및 활성 Azure 구독. 체험 계정을 만듭니다.
- Android Studio를 실행하는 OS.
- 배포된 Azure Communication Services 리소스. 엔드포인트 URL을 확인합니다.
- Azure Communication Services 액세스 토큰 및 사용자 식별자
- 이전 단계의 사용자와 Azure Communication Services 채팅 스레드 가 추가되었습니다.
프로젝트 설정
다음 섹션을 완료하여 빠른 시작 프로젝트를 설정합니다.
새 Android 프로젝트 만들기
Android Studio에서 새 프로젝트를 만듭니다.
[파일] 메뉴에서 [새 프로젝트 새로>만들기]를 선택합니다.
새 프로젝트에서 빈 작업 프로젝트 템플릿을 선택합니다.
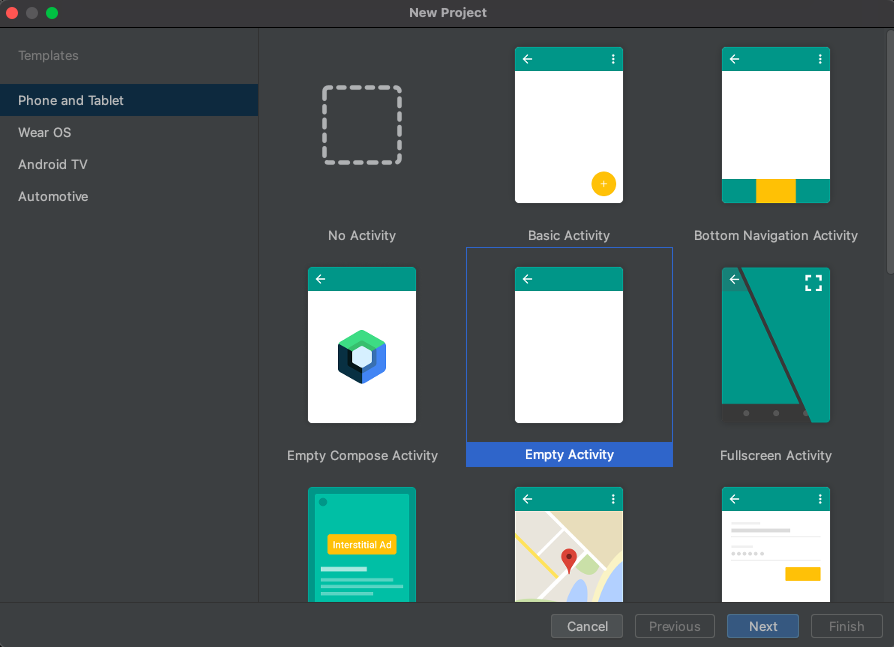
다음을 선택합니다.
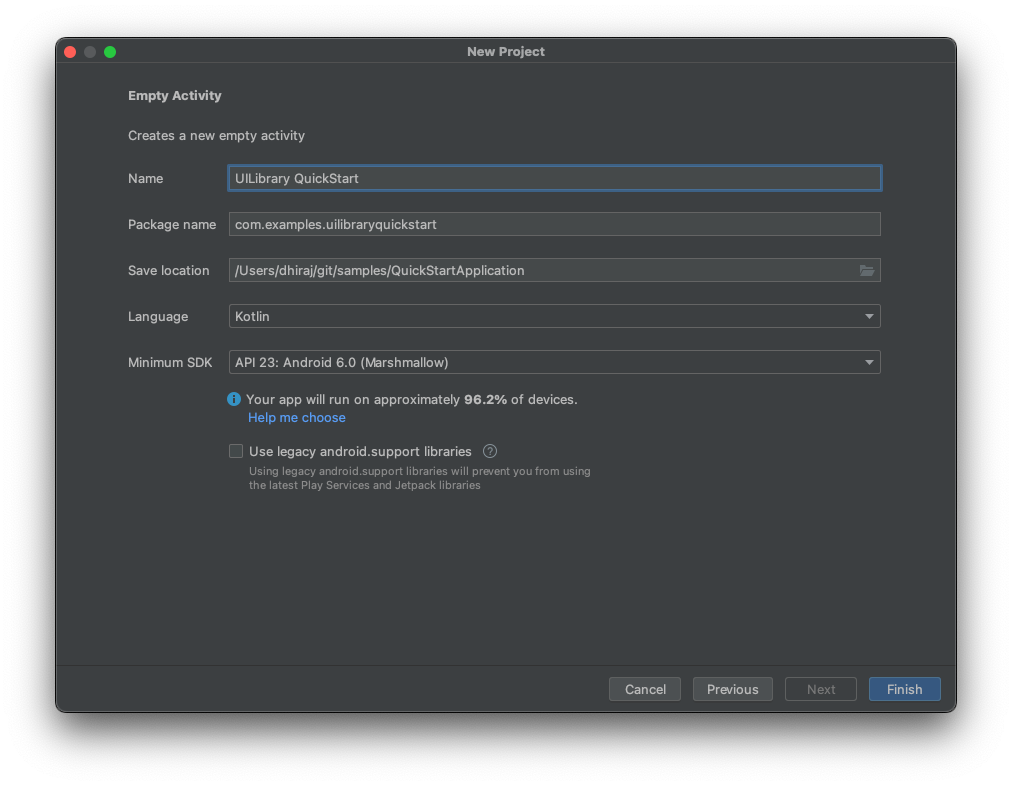
빈 작업에서 프로젝트 이름을 UILibraryQuickStart로 지정합니다. 언어에 대해 Java/Kotlin을 선택합니다. 최소 SDK에 대해 API 23: Android 6.0(Marshmallow) 이상을 선택합니다.
마침을 선택합니다.
패키지 설치
다음 섹션을 완료하여 필요한 애플리케이션 패키지를 설치합니다.
종속성 추가
앱 수준 UILibraryQuickStart/app/build.gradle 파일(앱 폴더에 있음)에서 다음 종속성을 추가합니다.
dependencies {
    ...
    implementation 'com.azure.android:azure-communication-ui-chat:+'
    ...
}
Maven 리포지토리 추가
라이브러리를 통합하려면 Azure 패키지 리포지토리가 필요합니다.
리포지토리를 추가하려면 다음을 수행합니다.
프로젝트 Gradle 스크립트에서 다음 리포지토리가 추가되었는지 확인합니다. Android Studio(2020.*)의 경우
repositories는settings.gradle의dependencyResolutionManagement(Gradle version 6.8 or greater)아래에 있습니다. 이전 버전의 Android Studio(4.*)의 경우repositories는allprojects{}아래의 프로젝트 수준build.gradle에 있습니다.// dependencyResolutionManagement repositories { ... maven { url "https://pkgs.dev.azure.com/MicrosoftDeviceSDK/DuoSDK-Public/_packaging/Duo-SDK-Feed/maven/v1" } ... }프로젝트를 Gradle 파일과 동기화합니다. 프로젝트를 동기화하려면 파일 메뉴에서 프로젝트와 Gradle 파일 동기화를 선택합니다.
activity_main.xml에 단추 추가
app/src/main/res/layout/activity_main.xml 레이아웃 파일에서 다음 코드를 추가하여 복합을 시작하는 단추를 만듭니다.
<?xml version="1.0" encoding="utf-8"?>
<androidx.constraintlayout.widget.ConstraintLayout xmlns:android="http://schemas.android.com/apk/res/android"
    xmlns:app="http://schemas.android.com/apk/res-auto"
    xmlns:tools="http://schemas.android.com/tools"
    android:layout_width="match_parent"
    android:layout_height="match_parent"
    tools:context=".MainActivity">

    <Button
        android:id="@+id/startButton"
        android:layout_width="wrap_content"
        android:layout_height="wrap_content"
        android:text="Launch"
        app:layout_constraintBottom_toBottomOf="parent"
        app:layout_constraintLeft_toLeftOf="parent"
        app:layout_constraintRight_toRightOf="parent"
        app:layout_constraintTop_toTopOf="parent" />

</androidx.constraintlayout.widget.ConstraintLayout>
복합 초기화
복합을 초기화하려면 다음을 수행합니다.
MainActivity(으)로 이동합니다.다음 코드를 추가하여 호출에 대한 복합 구성 요소를 초기화합니다. 속성() 또는 함수(
kotlinjava)의 문자열 값을 ,acsIdentity,displayNameaccessToken및ThreadId.에 대한endpoint문자열 값으로 바꿉니다.endpoint를 Azure Communication Services에서 제공한 리소스의 URL로 바꿉니다.accessToken액세스 토큰을 만들 때 Azure Communication Services에서 제공하는 값으로 바꾸고acsIdentity관련displayName값을 사용합니다.ThreadId를 스레드를 만들 때 반환된 값으로 바꿉니다. 빠른 시작 샘플을 실행하기 전에 REST API 호출 또는 az 명령줄 인터페이스 클라이언트를 통해 스레드에 사용자를 추가합니다. 그렇지 않으면 클라이언트가 스레드 조인에 대한 액세스가 거부됩니다.
package com.example.uilibraryquickstart

import android.os.Bundle
import android.view.View
import android.view.ViewGroup
import android.widget.Button
import androidx.appcompat.app.AlertDialog
import androidx.appcompat.app.AppCompatActivity
import com.azure.android.communication.common.CommunicationTokenCredential
import com.azure.android.communication.common.CommunicationTokenRefreshOptions
import com.azure.android.communication.common.CommunicationUserIdentifier
import com.azure.android.communication.ui.chat.ChatAdapter
import com.azure.android.communication.ui.chat.ChatAdapterBuilder
import com.azure.android.communication.ui.chat.presentation.ChatThreadView

class MainActivity : AppCompatActivity() {
    private lateinit var chatAdapter: ChatAdapter

    override fun onCreate(savedInstanceState: Bundle?) {
        super.onCreate(savedInstanceState)
        setContentView(R.layout.activity_main)
        val startButton = findViewById<Button>(R.id.startButton)
        startButton.setOnClickListener { l: View? ->
            val communicationTokenRefreshOptions =
                CommunicationTokenRefreshOptions(
                    { accessToken }, true
                )
            val communicationTokenCredential =
                CommunicationTokenCredential(communicationTokenRefreshOptions)
            chatAdapter = ChatAdapterBuilder()
                .endpoint(endpoint)
                .credential(communicationTokenCredential)
                .identity(CommunicationUserIdentifier(acsIdentity))
                .displayName(displayName)
                .threadId(threadId)
                .build()
            try {
                chatAdapter.connect(this@MainActivity).get()
                val chatView: View = ChatThreadView(this@MainActivity, chatAdapter)
                addContentView(
                    chatView,
                    ViewGroup.LayoutParams(
                        ViewGroup.LayoutParams.MATCH_PARENT,
                        ViewGroup.LayoutParams.MATCH_PARENT
                    )
                )
            } catch (e: Exception) {
                var messageCause: String? = "Unknown error"
                if (e.cause != null && e.cause!!.message != null) {
                    messageCause = e.cause!!.message
                }
                showAlert(messageCause)
            }
        }
    }

    /**
     *
     * @return String endpoint URL from Azure Communication Services Admin UI, "https://example.domain.com/"
     */
    private val endpoint: String?
        get() = "https://example.domain.com/"

    /**
     *
     * @return String identity of the user joining the chat
     * Looks like "8:acs:a6aada1f-0b1e-47ac-866a-91aae00a1c01_00000015-45ee-bad7-0ea8-923e0d008a89"
     */
    private val acsIdentity: String?
        get() = ""

    /**
     *
     * @return String display name of the user joining the chat
     */
    private val displayName: String?
        get() = ""

    /**
     *
     * @return String secure Azure Communication Services access token for the current user
     */
    private val accessToken: String?
        get() = ""

    /**
     *
     * @return String id of Azure Communication Services chat thread to join
     * Looks like "19:AVNnEll25N4KoNtKolnUAhAMu8ntI_Ra03saj0Za0r01@thread.v2"
     */
    private val threadId: String?
        get() = ""

    fun showAlert(message: String?) {
        runOnUiThread {
            AlertDialog.Builder(this@MainActivity)
                .setMessage(message)
                .setTitle("Alert")
                .setPositiveButton(
                    "OK"
                ) { _, i -> }
                .show()
        }
    }
}
코드 실행
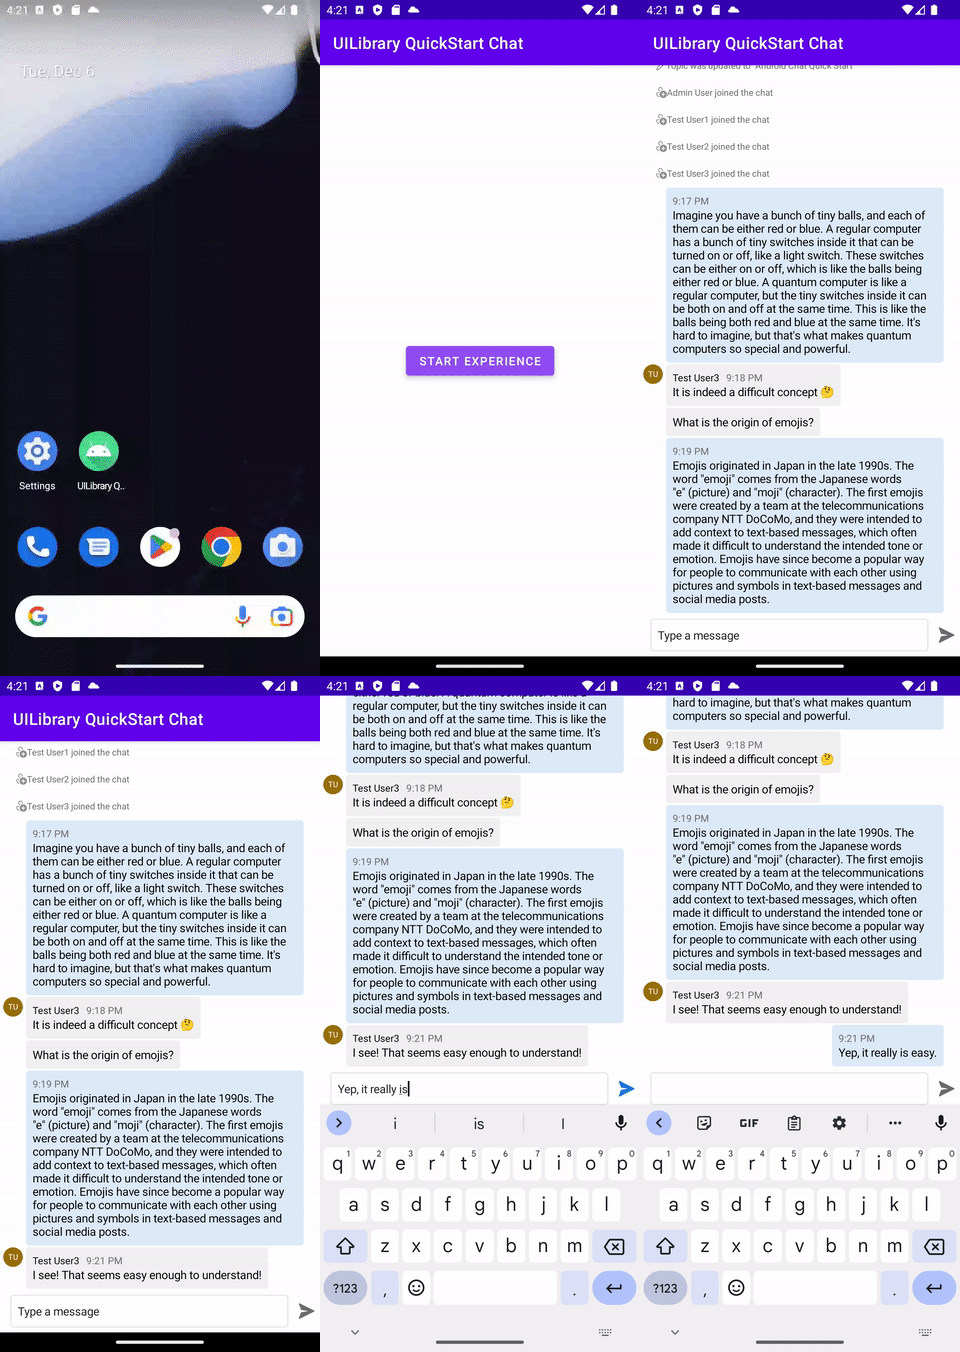
Android Studio에서 애플리케이션을 빌드하고 시작합니다.
- 환경 시작을 선택합니다.
- 채팅 클라이언트가 채팅 스레드에 조인하면 메시지 입력 및 보내기를 시작할 수 있습니다.
- 클라이언트가 스레드
chatJoin에 조인할 수 없고 오류가 표시되는 경우 사용자의 액세스 토큰이 유효하고 REST API 호출 또는 명령줄 인터페이스를 사용하여az사용자가 채팅 스레드에 추가되었는지 확인합니다.
Important
Azure Communication Services의 이 기능은 현재 미리 보기 상태입니다.
미리 보기 API 및 SDK는 서비스 수준 계약 없이 제공됩니다. 프로덕션 워크로드에는 사용하지 않는 것이 좋습니다. 일부 기능은 지원되지 않거나 기능이 제한될 수 있습니다.
자세한 내용은 Microsoft Azure 미리 보기에 대한 보충 사용 약관을 검토하세요.
iOS용 오픈 소스 Azure Communication Services UI 라이브러리에서 이 빠른 시작에 대한 샘플 iOS 애플리케이션을 가져옵니다.
필수 조건
- Azure 계정 및 활성 Azure 구독. 체험 계정을 만듭니다.
- Xcode 13 이상을 실행하는 Mac 및 키체인에 설치된 유효한 개발자 인증서. 종속성을 페치하려면 CocoaPods도 설치해야 합니다.
- 배포된 Azure Communication Services 리소스. 엔드포인트 URL을 확인합니다.
- Azure Communication Services 액세스 토큰 및 사용자 식별자
- Azure Communication Services 채팅 스레드. 이전 단계에서 만든 사용자를 이 채팅 스레드에 추가합니다.
프로젝트 설정
다음 섹션을 완료하여 빠른 시작 프로젝트를 설정합니다.
새 Xcode 프로젝트 만들기
Xcode에서 새 프로젝트를 만듭니다.
파일 메뉴에서 새>프로젝트를 선택합니다.
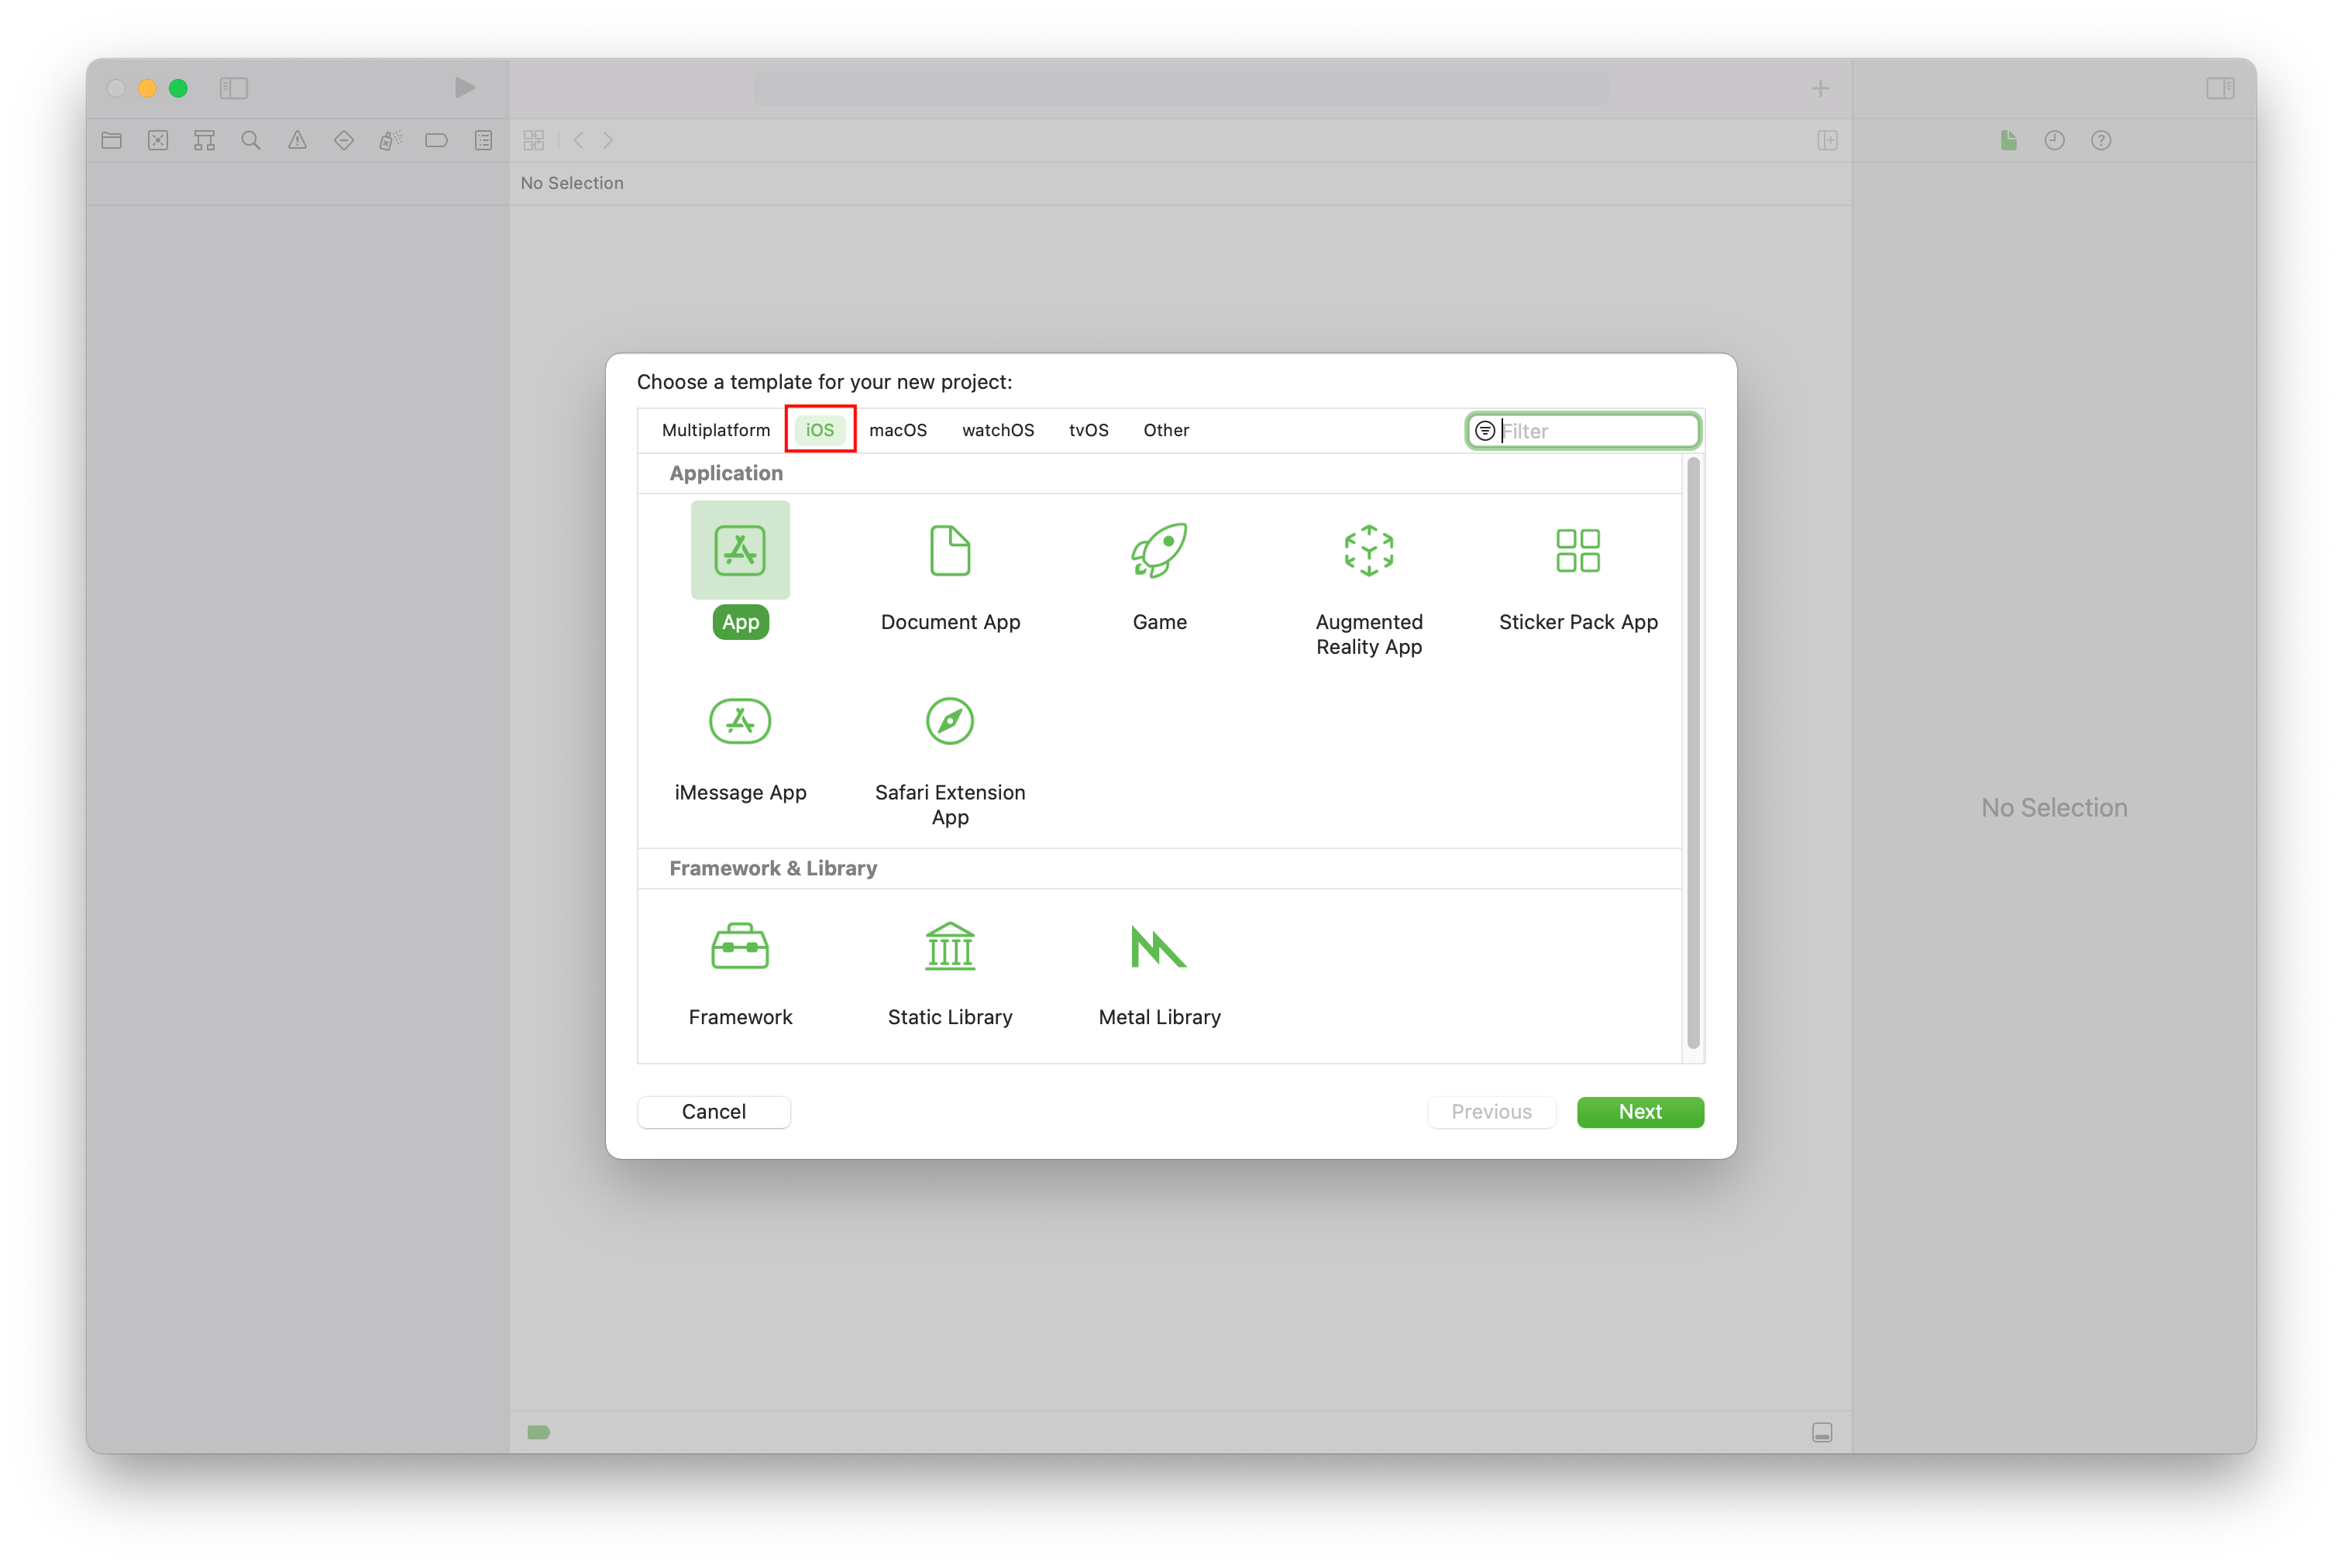
새 프로젝트에 대한 템플릿 선택에서 iOS 플랫폼을 선택하고 앱 애플리케이션 템플릿을 선택합니다. 빠른 시작에서는 UIKit 스토리보드를 사용합니다.
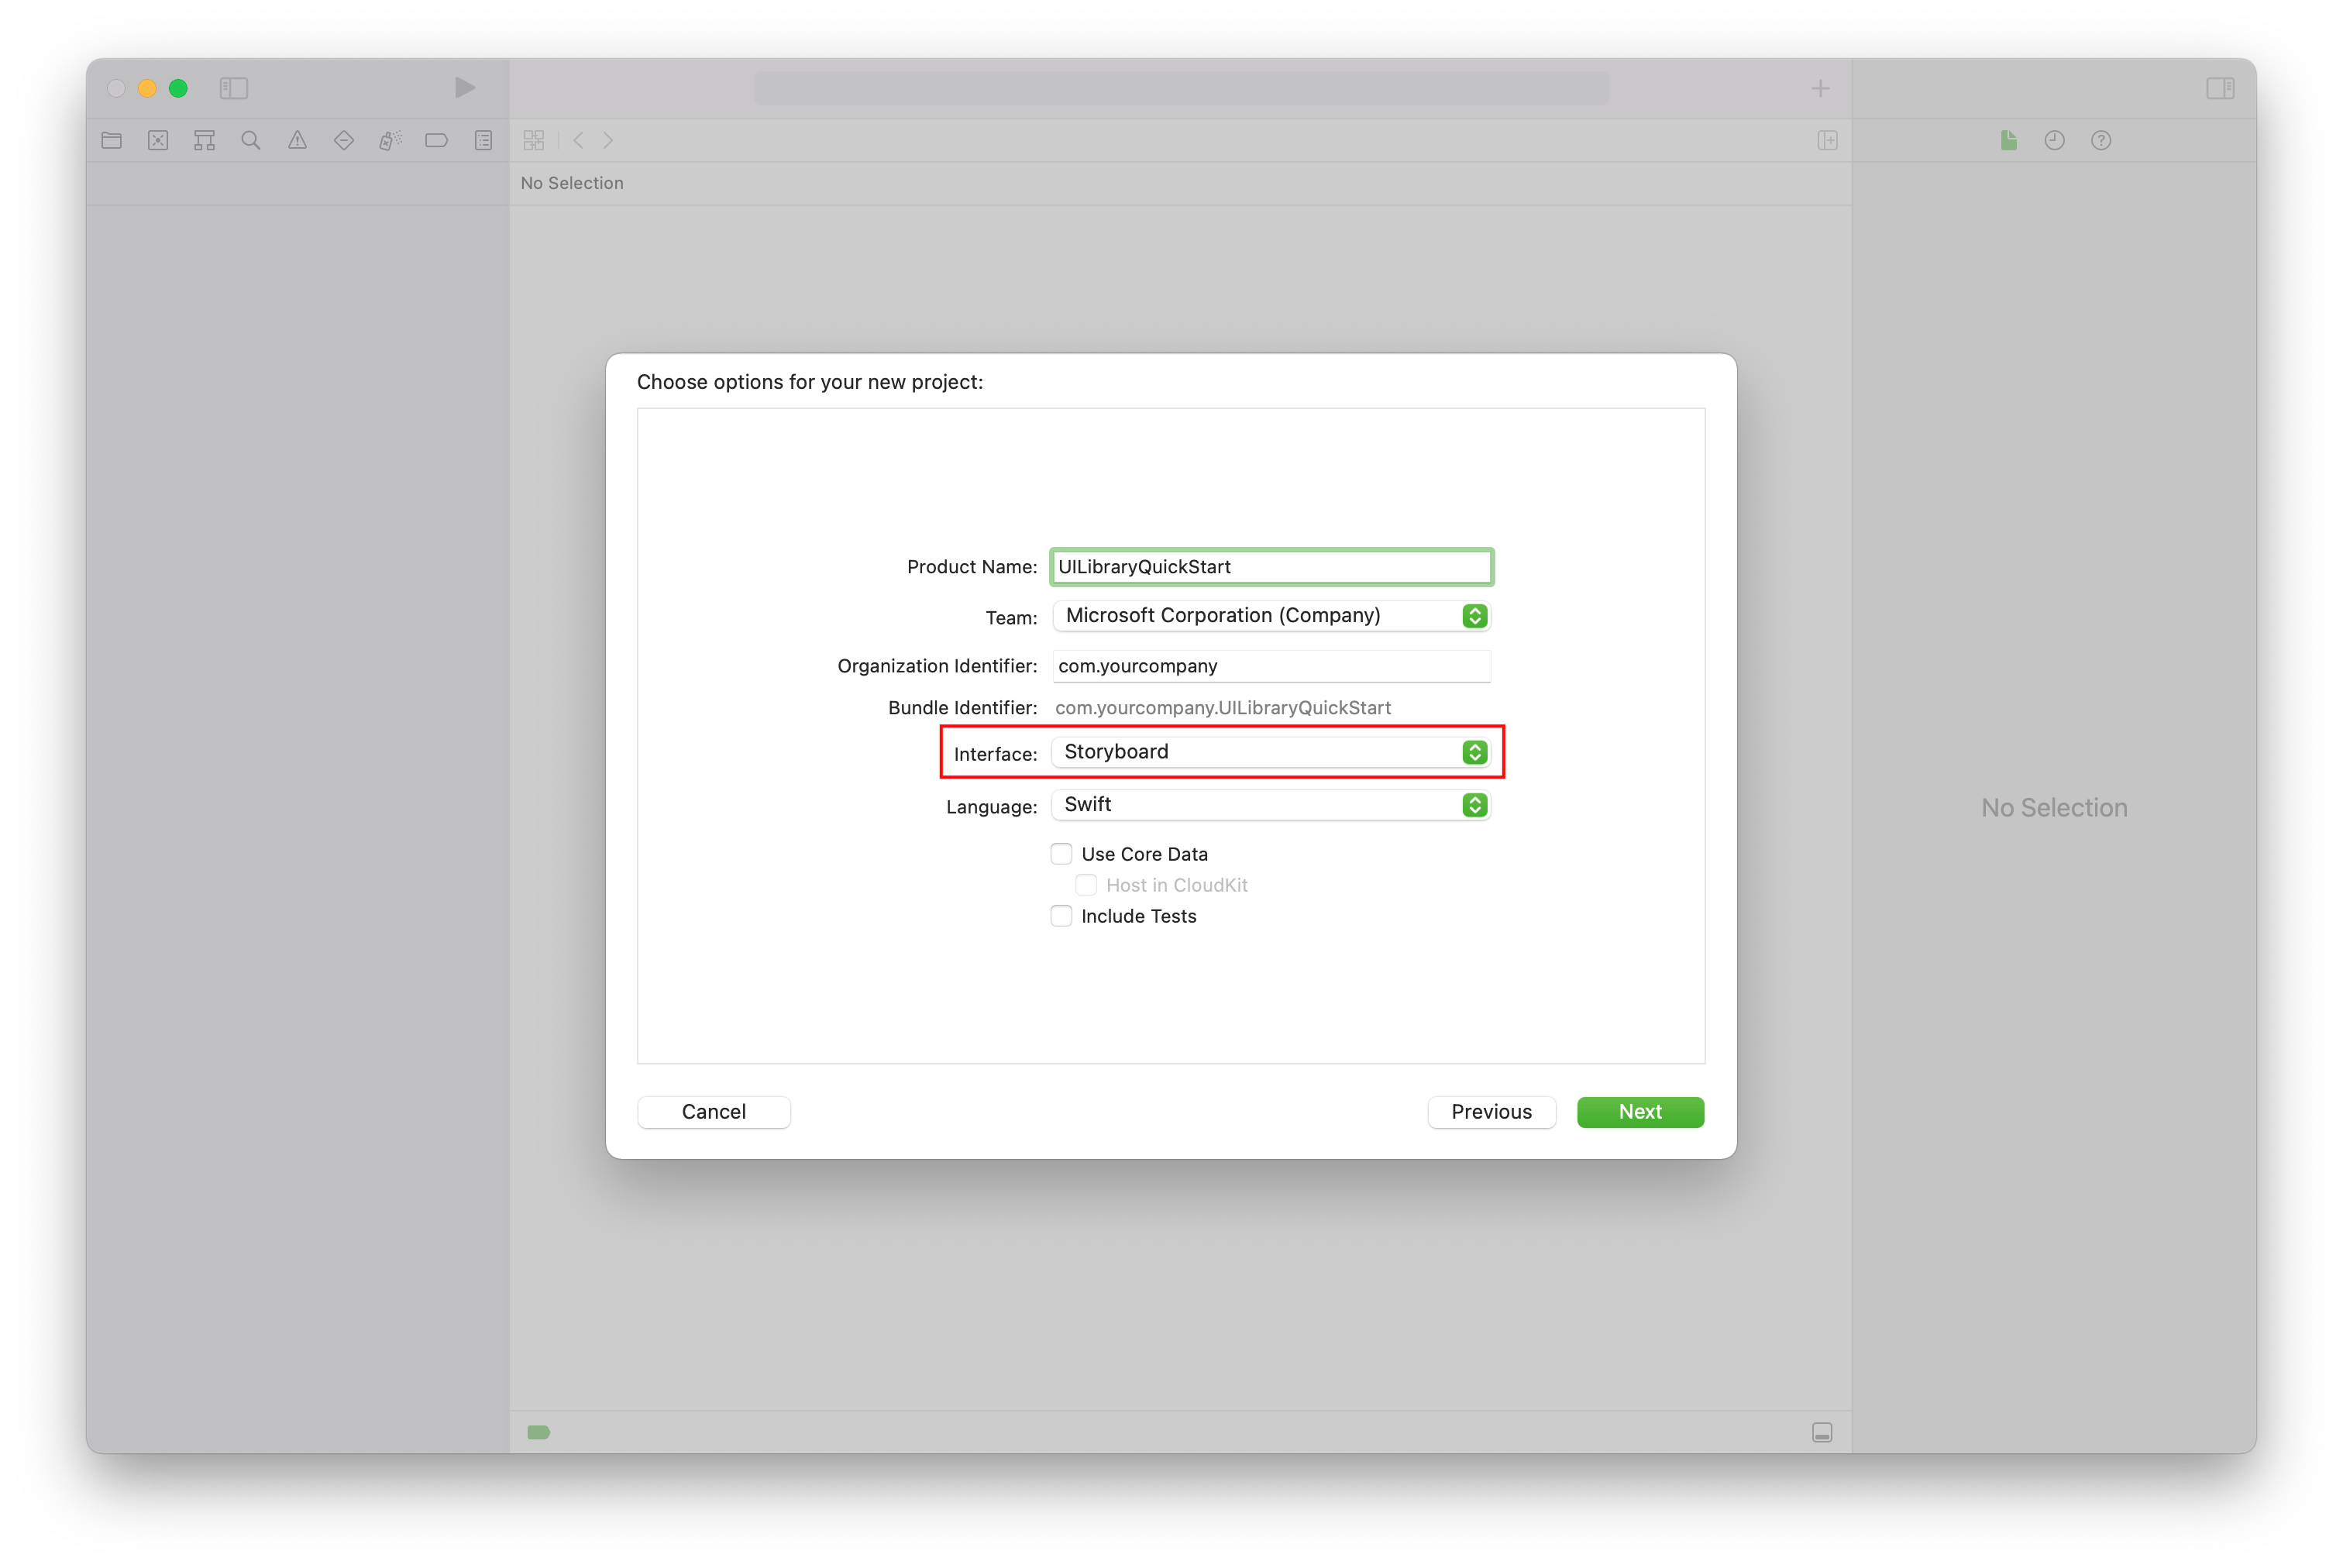
새 프로젝트에 대한 옵션 선택에서 제품 이름에 UILibraryQuickStart를 입력합니다. 인터페이스에 대해 스토리보드를 선택합니다. 빠른 시작에서는 테스트를 만들지 않으므로 테스트 포함 확인란의 선택을 취소할 수 있습니다.
패키지 및 해당 종속성 설치
(선택 사항) M1이 있는 MacBook의 경우 Xcode에서 Rosetta를 설치하고 사용하도록 설정합니다.
프로젝트 루트 디렉터리에서
pod init를 실행하여 Podfile을 만듭니다. 오류가 발생하면 CocoaPods를 현재 버전으로 업데이트합니다.다음 코드를 Podfile에 추가합니다.
UILibraryQuickStart를 프로젝트 이름으로 대체합니다.platform :ios, '14.0' target 'UILibraryQuickStart' do use_frameworks! pod 'AzureCommunicationUIChat', '1.0.0-beta.4' endpod install --repo-update를 실행합니다.Xcode에서 생성된 .xcworkspace 파일을 엽니다.
Bitcode 해제
Xcode 프로젝트의 빌드 설정 아래에서 Bitcode 사용 옵션을 아니요로 설정합니다. 설정을 찾으려면 필터를 기본에서 모두로 변경하거나 검색 창을 사용합니다.

복합 초기화
복합을 초기화하려면 다음을 수행합니다.
ViewController(으)로 이동합니다.채팅 복합 구성 요소를 초기화하는 다음 코드를 추가합니다.
<USER_ID>를 사용자 식별자로 바꿉니다.<USER_ACCESS_TOKEN>을 액세스 토큰으로 바꿉니다.<ENDPOINT_URL>을 엔드포인트 URL로 바꿉니다.<THREAD_ID>를 채팅 스레드 ID로 바꿉니다.<DISPLAY_NAME>을 사용자의 이름으로 바꿉니다. (<DISPLAY_NAME>의 문자열 길이 제한은 256자입니다.)import UIKit import AzureCommunicationCommon import AzureCommunicationUIChat class ViewController: UIViewController { var chatAdapter: ChatAdapter? override func viewDidLoad() { super.viewDidLoad() let button = UIButton() button.contentEdgeInsets = UIEdgeInsets(top: 10.0, left: 20.0, bottom: 10.0, right: 20.0) button.layer.cornerRadius = 10 button.backgroundColor = .systemBlue button.setTitle("Start Experience", for: .normal) button.addTarget(self, action: #selector(startChatComposite), for: .touchUpInside) button.translatesAutoresizingMaskIntoConstraints = false self.view.addSubview(button) button.widthAnchor.constraint(equalToConstant: 200).isActive = true button.heightAnchor.constraint(equalToConstant: 50).isActive = true button.centerXAnchor.constraint(equalTo: view.centerXAnchor).isActive = true button.centerYAnchor.constraint(equalTo: view.centerYAnchor).isActive = true } @objc private func startChatComposite() { let communicationIdentifier = CommunicationUserIdentifier("<USER_ID>") guard let communicationTokenCredential = try? CommunicationTokenCredential( token: "<USER_ACCESS_TOKEN>") else { return } self.chatAdapter = ChatAdapter( endpoint: "<ENDPOINT_URL>", identifier: communicationIdentifier, credential: communicationTokenCredential, threadId: "<THREAD_ID>", displayName: "<DISPLAY_NAME>") Task { @MainActor in guard let chatAdapter = self.chatAdapter else { return } try await chatAdapter.connect() let chatCompositeViewController = ChatCompositeViewController( with: chatAdapter) let closeItem = UIBarButtonItem( barButtonSystemItem: .close, target: nil, action: #selector(self.onBackBtnPressed)) chatCompositeViewController.title = "Chat" chatCompositeViewController.navigationItem.leftBarButtonItem = closeItem let navController = UINavigationController(rootViewController: chatCompositeViewController) navController.modalPresentationStyle = .fullScreen self.present(navController, animated: true, completion: nil) } } @objc func onBackBtnPressed() { self.dismiss(animated: true, completion: nil) Task { @MainActor in self.chatAdapter?.disconnect(completionHandler: { [weak self] result in switch result { case .success: self?.chatAdapter = nil case .failure(let error): print("disconnect error \(error)") } }) } } }화면 크기보다 작은 프레임에 채팅 보기를 배치하도록 선택하는 경우 최소 너비 250과 최소 높이 300을 사용하는 것이 좋습니다.
코드 실행
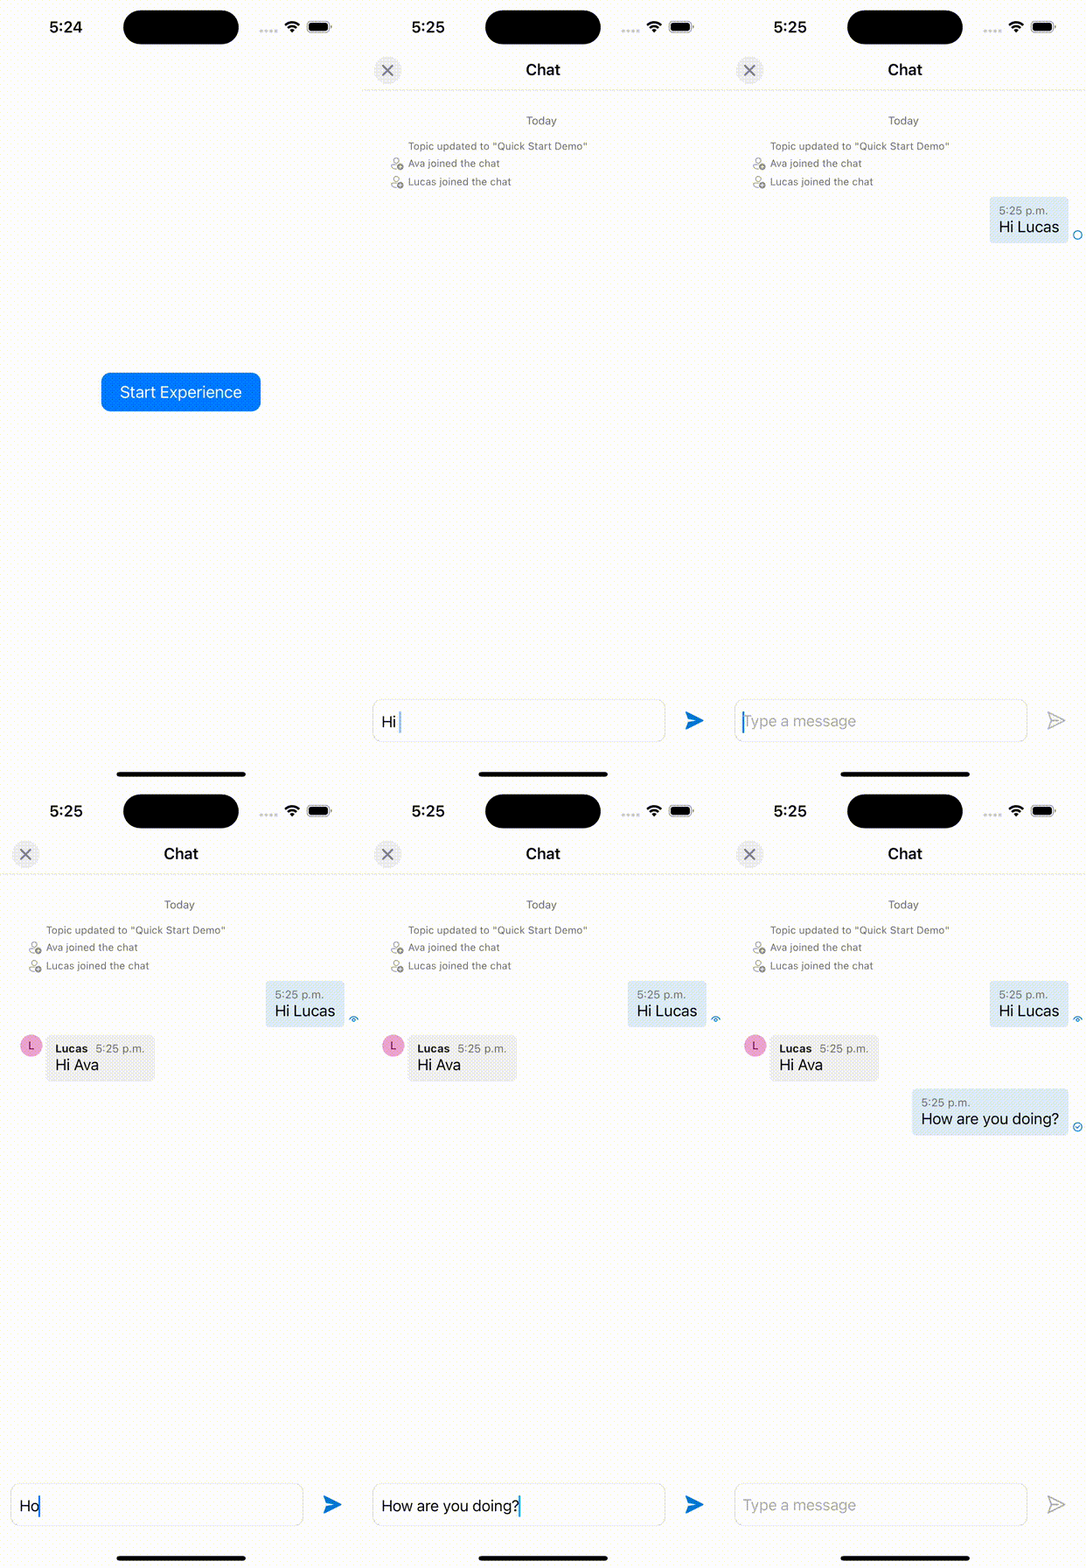
iOS 시뮬레이터에서 앱을 빌드하고 실행하려면 제품>실행을 선택합니다. (⌘-R) 바로 가기 키를 사용할 수도 있습니다. 그런 다음 시뮬레이터에서 채팅 환경을 사용해 봅니다.
- 환경 시작을 선택합니다.
- 채팅 클라이언트가 채팅 스레드에 조인하면 메시지 입력 및 보내기를 시작할 수 있습니다.
- 클라이언트가 스레드
chatJoin에 조인할 수 없고 오류가 표시되는 경우 사용자의 액세스 토큰이 유효하고 REST API 호출 또는 az 명령줄 인터페이스를 사용하여 사용자가 채팅 스레드에 추가되었는지 확인합니다.
리소스 정리
Azure Communication Services 구독을 정리하고 제거하려면 리소스 또는 리소스 그룹을 삭제할 수 있습니다.
리소스 그룹을 삭제하면 해당 리소스 그룹에 연결된 다른 모든 리소스가 함께 삭제됩니다.
리소스 정리에 대해 자세히 알아보세요.