자습서: Azure IoT Operations 클러스터에 OPC UA 자산 추가
이 자습서에서는 Azure IoT Operations 클러스터에 OPC UA 자산을 수동으로 추가합니다. 이러한 자산은 Azure IoT 작업 클러스터의 MQTT 브로커에 메시지를 게시합니다. 일반적으로 OT 사용자는 이러한 단계를 완료합니다.
자산은 디바이스, 컴퓨터, 시스템, 프로세스 중 하나를 나타내는 물리적 디바이스 또는 논리 엔터티입니다. 예를 들어 물리적 자산이라 하면 펌프, 모터, 탱크, 생산 라인이 가리킬 수 있습니다. 정의한 논리 자산은 속성을 갖거나, 원격 분석 데이터를 스트리밍하거나, 이벤트를 생성할 수 있습니다.
OPC UA 서버는 자산과 통신하는 소프트웨어 애플리케이션입니다. OPC UA 태그는 OPC UA 서버가 노출하는 데이터 포인트입니다. OPC UA 태그는 자산의 상태, 성능, 품질, 조건에 대한 실시간 데이터 또는 기록 데이터를 제공할 수 있습니다.
이 자습서에서는 작업 환경 웹 UI를 사용하여 자산을 만듭니다. Azure CLI를 사용하여 이러한 작업 중 일부를 완료할 수도 있습니다.
필수 조건
Kubernetes 클러스터에 배포된 Azure IoT Operations의 인스턴스입니다. 인스턴스를 만들려면 다음 중 하나를 사용하여 Azure IoT Operations를 배포합니다.
- 빠른 시작: K3s 를 사용하여 GitHub Codespaces에서 Azure IoT 작업을 실행하면 자습서에 사용할 수 있는 Azure IoT Operations 인스턴스를 배포하는 간단한 지침을 제공합니다.
- 배포 개요 는 K3s를 사용하여 Azure Kubernetes Service Edge Essentials 또는 Ubuntu를 사용하여 Windows에서 Azure IoT Operations 인스턴스를 배포하는 자세한 지침을 제공합니다.
작업 환경 웹 UI에 로그인하려면 Kubernetes - Azure Arc 인스턴스를 포함하는 리소스 그룹에 대한 기여자 권한이 있는 Microsoft Entra ID 계정이 필요합니다. 자세한 내용은 운영 환경 웹 UI를 참조하세요.
달리 명시되지 않은 경우 Bash 또는 PowerShell 환경에서 이 자습서의 콘솔 명령을 실행할 수 있습니다.
어떤 문제를 해결할 수 있나요?
OPC UA 서버가 노출하는 데이터는 구조가 복잡하고 이해하기 어려울 수 있습니다. Azure IoT Operations는 OPC UA 자산을 태그, 이벤트, 속성으로 모델링하는 방법을 제공합니다. 이 모델링을 사용하면 데이터를 더 쉽게 이해하고 MQTT 브로커 및 데이터 흐름과 같은 다운스트림 프로세스에서 사용할 수 있습니다.
OPC PLC 시뮬레이터 배포
이 자습서에서는 OPC PLC 시뮬레이터를 사용하여 샘플 데이터를 생성합니다. OPC PLC 시뮬레이터를 배포하려면 다음 명령을 실행합니다.
kubectl apply -f https://raw.githubusercontent.com/Azure-Samples/explore-iot-operations/main/samples/quickstarts/opc-plc-deployment.yaml
다음 코드 조각은 적용한 YAML 파일을 보여 줍니다.
apiVersion: apps/v1
kind: Deployment
metadata:
  name: opc-plc-000000
  namespace: azure-iot-operations
  labels:
    app.kubernetes.io/component: opcplc-000000
spec:
  replicas: 1
  selector:
    matchLabels:
      app.kubernetes.io/component: opcplc-000000
  template:
    metadata:
      labels:
        app.kubernetes.io/component: opcplc-000000
    spec:
      containers:
      - name: opc-plc
        image: mcr.microsoft.com/iotedge/opc-plc:latest
        args:
          - "--ph=opcplc-000000"
          - "--cdn=opcplc-000000"
          - "--ut"
          - "--sn=25"
          - "--sr=10"
          - "--fn=2000"
          - "--veryfastrate=1000"
          - "--gn=5"
          - "--pn=50000"
          - "--maxsessioncount=100"
          - "--maxsubscriptioncount=100"
          - "--maxqueuedrequestcount=2000"
          - "--ses"
          - "--alm"
          - "--at=FlatDirectory"
          - "--drurs"
          - "--ll-debug"
          - "--nodesfile"
          - "/app/config/nodesfile.json"
        ports:
        - containerPort: 50000
        volumeMounts:
          - name: opc-plc-default-application-cert
            mountPath: /app/pki/own
          - name: opc-plc-trust-list
            mountPath: /app/pki/trusted
          - name: config-volume
            mountPath: /app/config
      volumes:
        - name: opc-plc-default-application-cert
          secret:
            secretName: opc-plc-default-application-cert
        - name: opc-plc-trust-list
          secret:
            secretName: opc-plc-trust-list
        - name: config-volume
          configMap:
            name: opc-plc-config
      serviceAccountName: opcplc-000000-service-account
---
apiVersion: v1
kind: ConfigMap
metadata:
  name: opc-plc-config
  namespace: azure-iot-operations
  labels:
    app.kubernetes.io/component: opcplc-000000
data:
  nodesfile.json: |
    {
      "Folder": "MyTelemetry",
      "NodeList": [
        {
          "NodeId": "ns=3;s=FastUInt100",
          "Name": "Fryer Temperature",
          "DataType": "Double",
          "ValueRank": -1,
          "AccessLevel": "CurrentReadOrWrite",
          "Description": "Fryer Temperature with spikes",
          "Anomaly": "Spike",
          "MinValue": 150.0,
          "MaxValue": 200.0
        }
      ]
    }
---
apiVersion: v1
kind: Service
metadata:
  name: opcplc-000000
  namespace: azure-iot-operations
  labels:
    app.kubernetes.io/component: opcplc-000000
spec:
  type: ClusterIP
  selector:
    app.kubernetes.io/component: opcplc-000000
  ports:
    - port: 50000
      protocol: TCP
      targetPort: 50000
---
apiVersion: cert-manager.io/v1
kind: Issuer
metadata:
  name: opc-plc-self-signed-issuer
  namespace: azure-iot-operations
  labels:
    app.kubernetes.io/component: opcplc-000000
spec:
  selfSigned: {}
---
apiVersion: cert-manager.io/v1
kind: Certificate
metadata:
  name: opc-plc-default-application-cert
  namespace: azure-iot-operations
  labels:
    app.kubernetes.io/component: opcplc-000000
spec:
  secretName: opc-plc-default-application-cert
  duration: 2160h # 90d
  renewBefore: 360h # 15d
  issuerRef:
    name: opc-plc-self-signed-issuer
    kind: Issuer
  commonName: OpcPlc
  dnsNames:
    - opcplc-000000
    - opcplc-000000.azure-iot-operations.svc.cluster.local
    - opcplc-000000.azure-iot-operations
  uris:
    - urn:OpcPlc:opcplc-000000
  usages:
    - digital signature
    - key encipherment
    - data encipherment
    - server auth
    - client auth
  privateKey:
    algorithm: RSA
    size: 2048
  encodeUsagesInRequest: true
  isCA: false
---
apiVersion: v1
kind: Secret
metadata:
  name: opc-plc-trust-list
  namespace: azure-iot-operations
  labels:
    app.kubernetes.io/component: opcplc-000000
data: {}
---
apiVersion: batch/v1
kind: Job
metadata:
  name: opcplc-000000-execute-mutual-trust
  namespace: azure-iot-operations
  labels:
    app.kubernetes.io/component: opcplc-000000
spec:
  backoffLimit: 1
  template:
    spec:
      containers:
      - name: kubectl
        image: mcr.microsoft.com/oss/kubernetes/kubectl:v1.27.1
        imagePullPolicy: Always
        command: ["/bin/sh"]
        args: ["/scripts/execute-commands.sh"]
        volumeMounts:
        - name: scripts
          mountPath: /scripts
          readOnly: true
      restartPolicy: Never
      serviceAccountName: opcplc-000000-service-account
      volumes:
      - name: scripts
        configMap:
          name: opcplc-000000-execute-commands-script
---
apiVersion: v1
kind: ConfigMap
metadata:
  name: opcplc-000000-execute-commands-script
  namespace: azure-iot-operations
  labels:
    app.kubernetes.io/component: opcplc-000000
data:
  execute-commands.sh: |
    #!/bin/sh

    # wait 20 seconds for the resources to be created
    sleep 20

    # Extract the OPC UA connector application instance certificate and add it to the OPC PLC trust list
    cert=$(kubectl -n azure-iot-operations get secret aio-opc-opcuabroker-default-application-cert -o jsonpath='{.data.tls\.crt}' | base64 -d)
    data=$(kubectl create secret generic temp --from-literal=opcuabroker.crt="$cert" --dry-run=client -o jsonpath='{.data}')
    kubectl patch secret opc-plc-trust-list -n azure-iot-operations -p "{\"data\": $data}"

    # Extract the OPC PLC application instance certificate and add it to the OPC UA connector trust list
    cert=$(kubectl -n azure-iot-operations get secret opc-plc-default-application-cert -o jsonpath='{.data.tls\.crt}' | base64 -d)
    data=$(kubectl create secret generic temp --from-literal=opcplc-000000.crt="$cert" --dry-run=client -o jsonpath='{.data}')
    kubectl patch secret aio-opc-ua-broker-trust-list -n azure-iot-operations -p "{\"data\": $data}"
---
apiVersion: v1
kind: ServiceAccount
metadata:
  name: opcplc-000000-service-account
  namespace: azure-iot-operations
  labels:
    app.kubernetes.io/component: opcplc-000000
---
apiVersion: rbac.authorization.k8s.io/v1
kind: Role
metadata:
  name: opc-plc-000000-secret-access-role
  namespace: azure-iot-operations
rules:
- apiGroups: [""]
  resources: ["secrets"]
  verbs: ["get", "patch"]
---
apiVersion: rbac.authorization.k8s.io/v1
kind: RoleBinding
metadata:
  name: opc-plc-000000-secret-access-rolebinding
  namespace: azure-iot-operations
subjects:
- kind: ServiceAccount
  name: opcplc-000000-service-account
  namespace: azure-iot-operations
roleRef:
  kind: Role
  name: opc-plc-000000-secret-access-role
  apiGroup: rbac.authorization.k8s.io
주의
이 구성은 안전하지 않습니다. 프로덕션 환경에서는 이 구성을 사용하지 마세요.
운영 환경에 로그인
자산 엔드포인트, 자산을 만들고 OPC UA 태그와 이벤트를 구독하려면 운영 환경을 사용합니다.
브라우저에서 운영 환경으로 이동하여 Microsoft Entra ID 자격 증명을 사용하여 로그인합니다.
사이트 선택
사이트는 Azure IoT 작업 인스턴스의 컬렉션입니다. 사이트는 일반적으로 물리적 위치별로 인스턴스를 그룹화하여 OT 사용자가 자산을 더 쉽게 찾고 관리할 수 있도록 합니다. IT 관리자가 사이트를 만들고 해당 사이트에 Azure IoT 작업 인스턴스를 할당합니다. 새 배포를 사용 중이므로 아직 사이트가 없습니다. 할당되지 않은 인스턴스 보기를 선택하여 이전에 만든 클러스터를 찾을 수 있습니다. 운영 환경에서 인스턴스는 Azure IoT 작업을 배포한 클러스터를 나타냅니다.
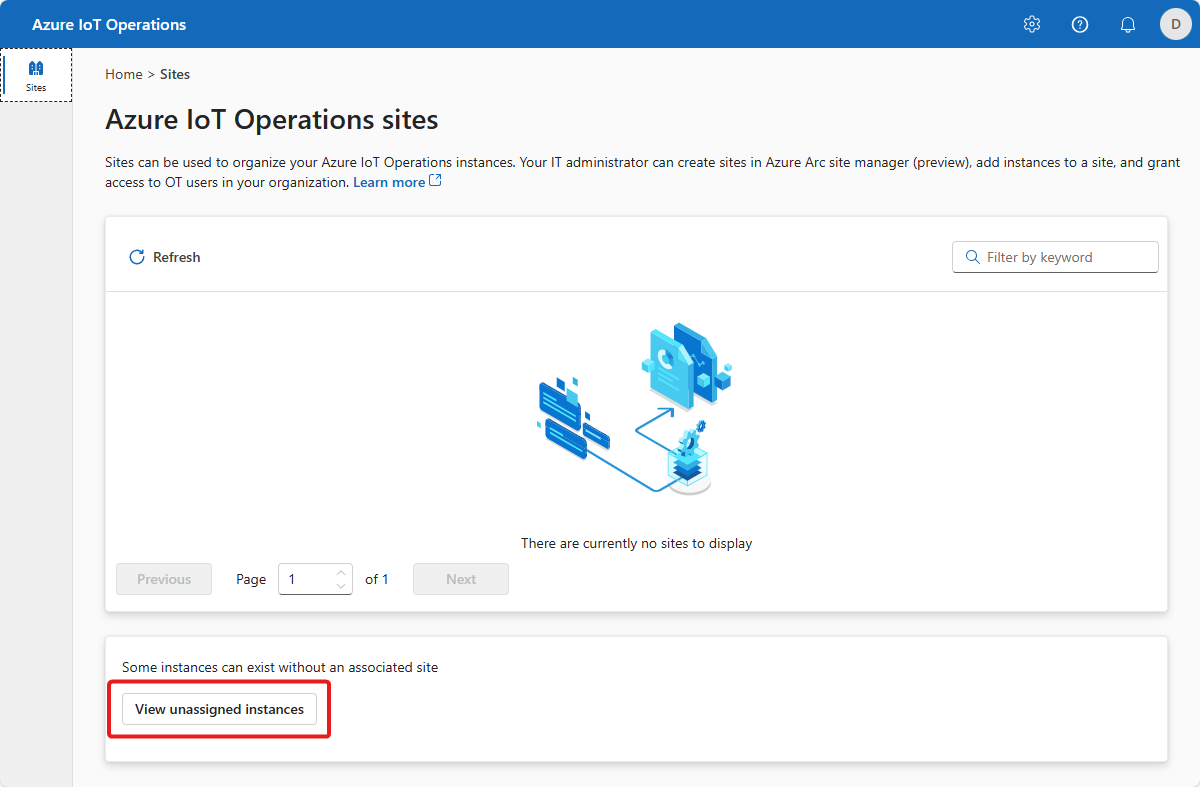
인스턴스 선택
이전 자습서에서 Azure IoT 작업을 배포한 인스턴스를 선택합니다.
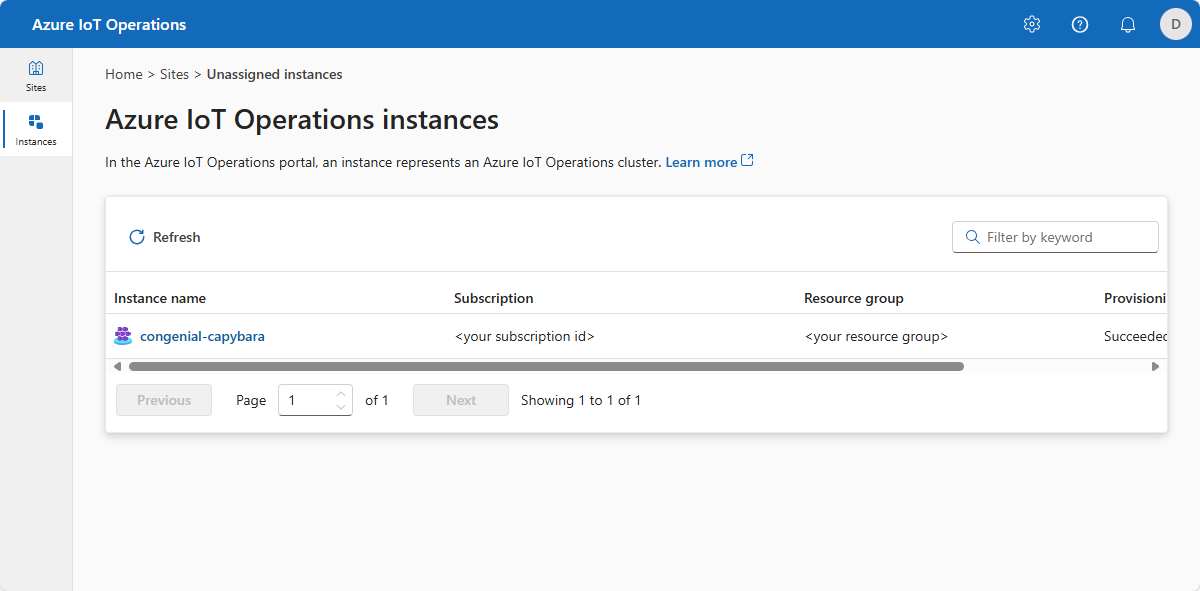
팁
인스턴스가 표시되지 않으면 올바른 Microsoft Entra ID 테넌트에 있지 않을 수 있습니다. 운영 환경의 오른쪽 위 메뉴에서 테넌트를 변경할 수 있습니다.
자산 엔드포인트 추가
이전 문서에서 Azure IoT 작업을 배포할 때 기본 제공 OPC PLC 시뮬레이터를 포함했습니다. 이 단계에서는 OPC PLC 시뮬레이터에 연결할 수 있는 자산 엔드포인트를 추가합니다.
자산 엔드포인트를 추가하려면 다음을 수행합니다.
자산 엔드포인트를 선택한 다음, 자산 엔드포인트 만들기를 선택합니다.
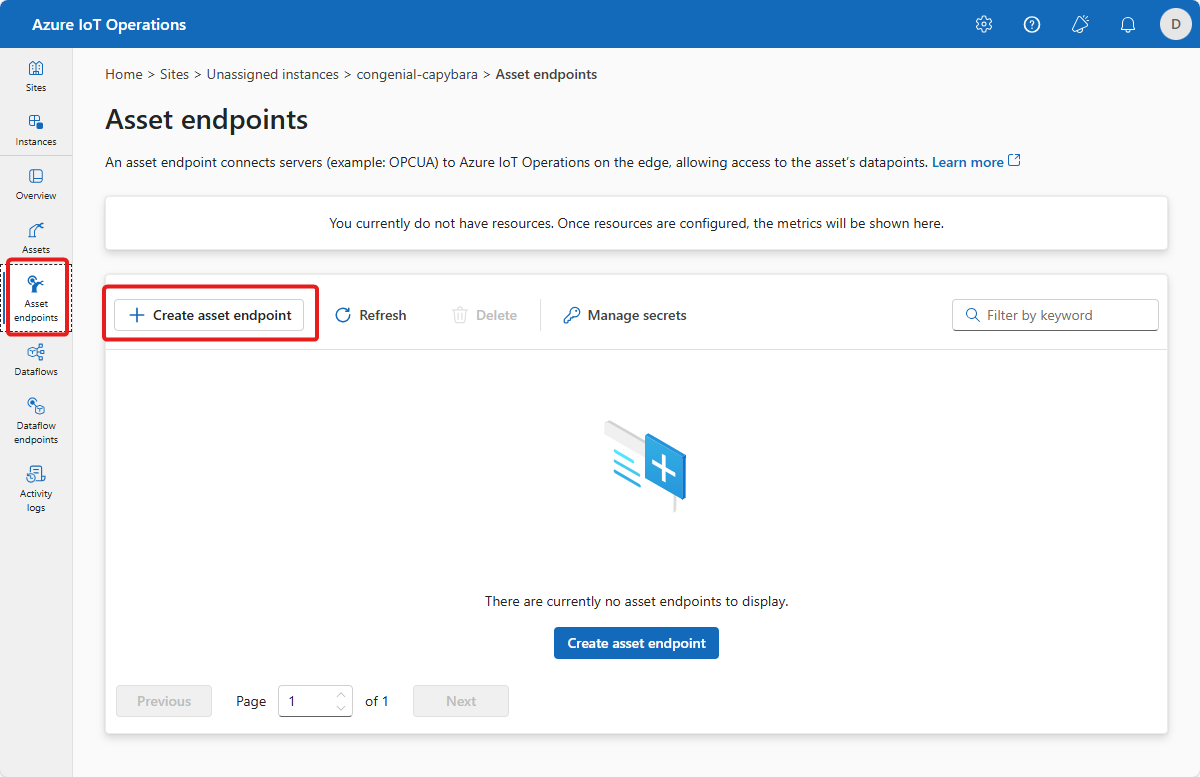
다음 엔드포인트 정보를 입력합니다.
필드 값 엔드포인트 이름 설정 opc-ua-connector-0OPC UA 서버 URL opc.tcp://opcplc-000000:50000사용자 인증 모드 Anonymous정의를 저장하려면 만들기를 선택합니다.
이 구성은
opc-ua-connector-0이라는 새 자산 엔드포인트를 클러스터에 배포합니다.kubectl를 사용하여 자산 엔드포인트를 볼 수 있습니다.kubectl get assetendpointprofile -n azure-iot-operations
자산 관리
운영 환경에서 인스턴스를 선택하면 자산 페이지에서 사용 가능한 자산 목록이 표시됩니다. 아직 자산이 없으면 이 목록은 비어 있습니다.
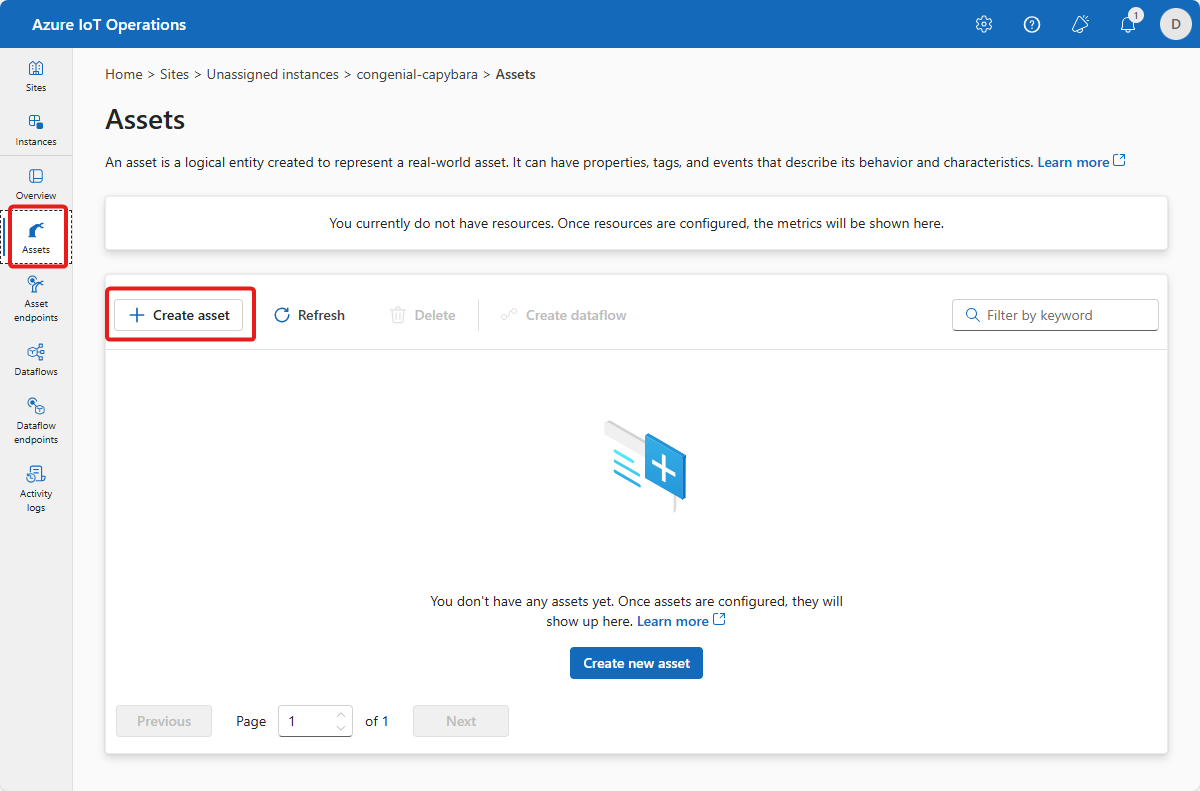
자산 생성
자산을 만들려면 자산 만들기를 선택합니다. 그리고 다음 자산 정보를 입력합니다.
| 필드 | 값 |
|---|---|
| 자산 엔드포인트 | opc-ua-connector-0 |
| 자산 이름 | thermostat |
| 설명 | A simulated thermostat asset |
| 기본 MQTT 항목 | azure-iot-operations/data/thermostat |
기존 사용자 지정 속성을 제거하고 다음 사용자 지정 속성을 추가합니다. 이후 자습서 쿼리에서 Power BI 템플릿으로 정확한 속성 이름을 사용해야 합니다.
| Property name | 속성 세부 정보 |
|---|---|
| 배치 | 102 |
| 고객 | Contoso |
| equipment | 보일러 |
| isSpare | true |
| location | Seattle |
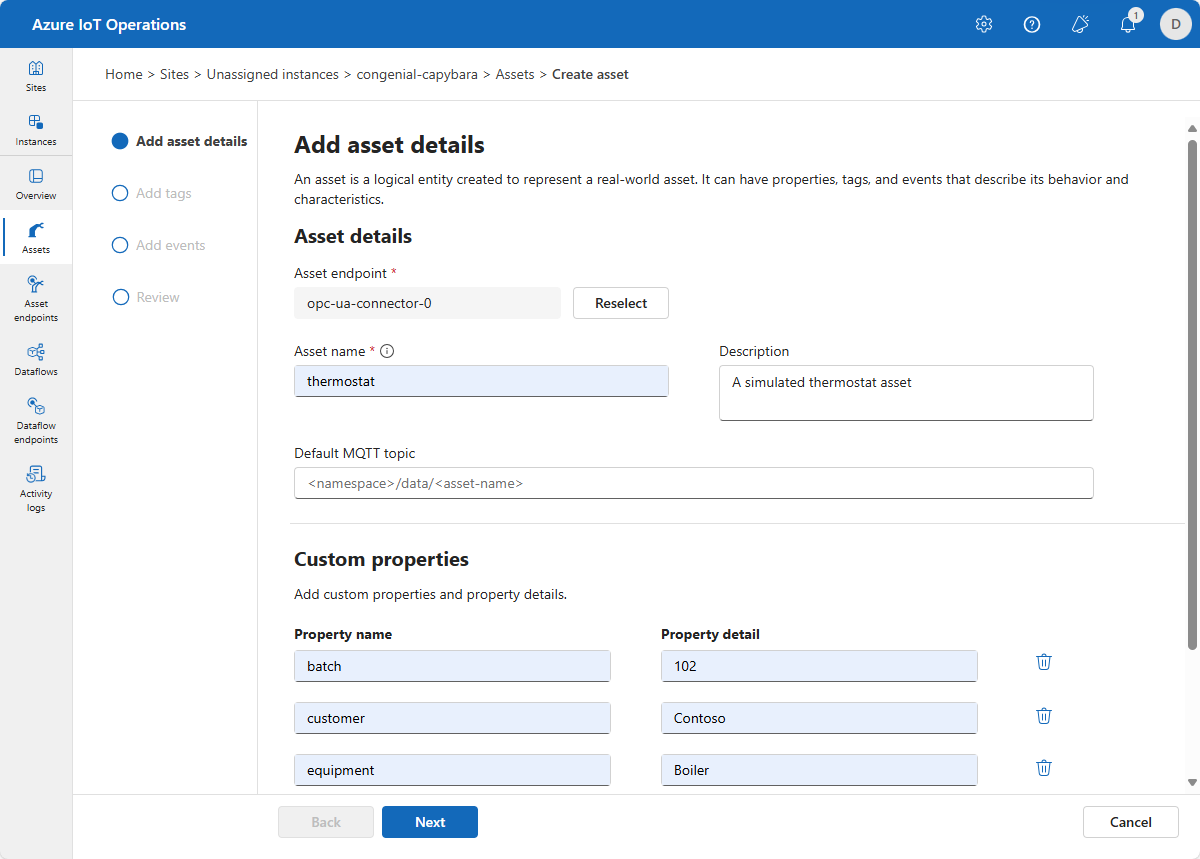
다음을 선택하여 태그 추가 페이지로 이동합니다.
OPC UA 태그 만들기
태그 추가 페이지에서 두 개의 OPC UA 태그를 추가합니다. 각 태그를 추가하려면 태그 또는 CSV 추가를 선택한 다음 태그 추가를 선택합니다. 다음 표에 표시된 태그 세부 정보를 입력합니다.
| 노드 ID | 태그 이름 | 가시성 모드 |
|---|---|---|
| ns=3;s=FastUInt10 | 온도 | None |
| ns=3;s=FastUInt100 | 태그 10 | None |
관찰 모드는 None, Gauge, Counter, Histogram 또는 Log 값 중 하나입니다.
기본 설정 관리를 선택하면 각 태그의 기본 샘플링 간격과 큐 크기를 변경할 수 있습니다.

다음을 선택하여 이벤트 추가 페이지로 이동한 후 다음을 선택하여 검토 페이지로 이동합니다.
검토
자산 및 태그 세부 정보를 검토하고 만들기를 선택하기 전에 필요한 모든 조정을 수행합니다.
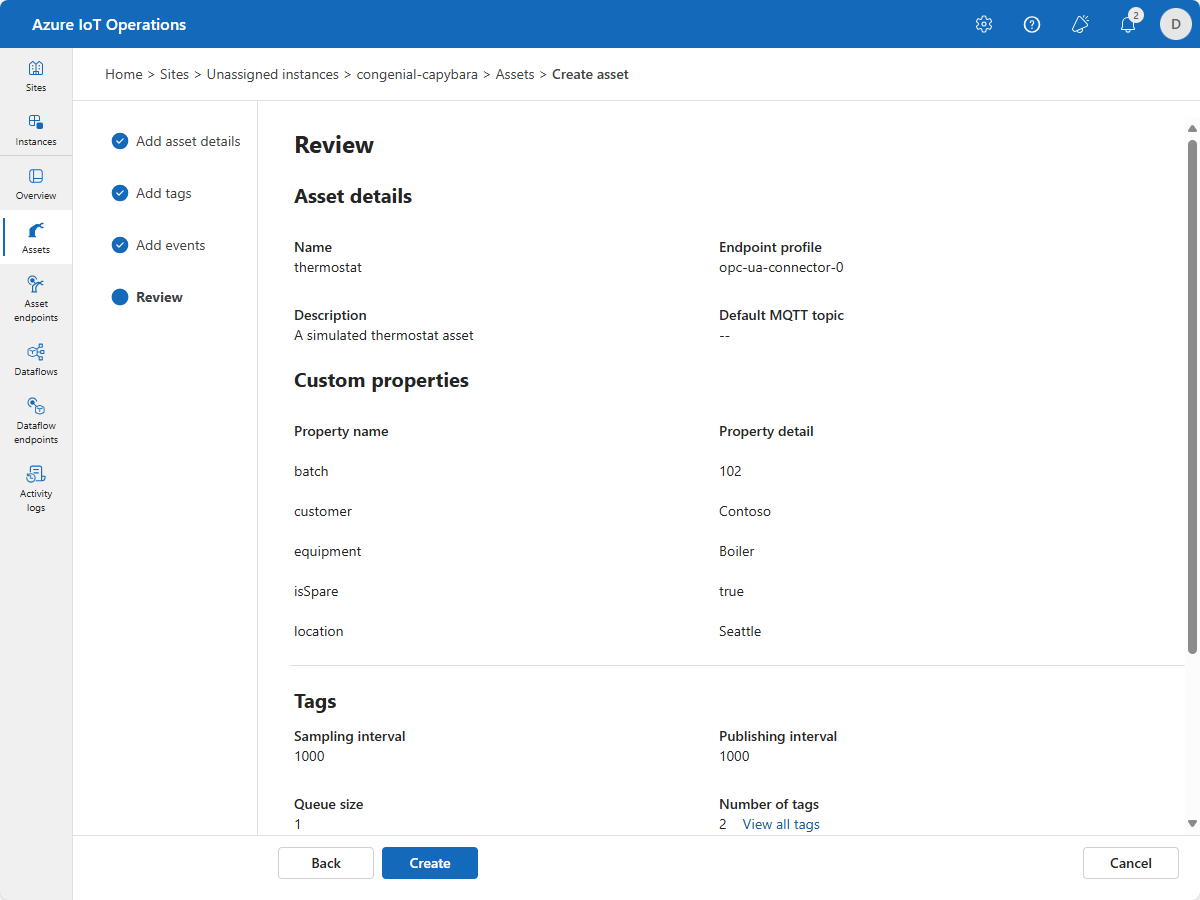
이 구성은 클러스터에 호출 thermostat 된 새 자산을 배포합니다. 자산을 보는 데 사용할 kubectl 수 있습니다.
kubectl get assets -n azure-iot-operations
Azure Portal에서 리소스 보기
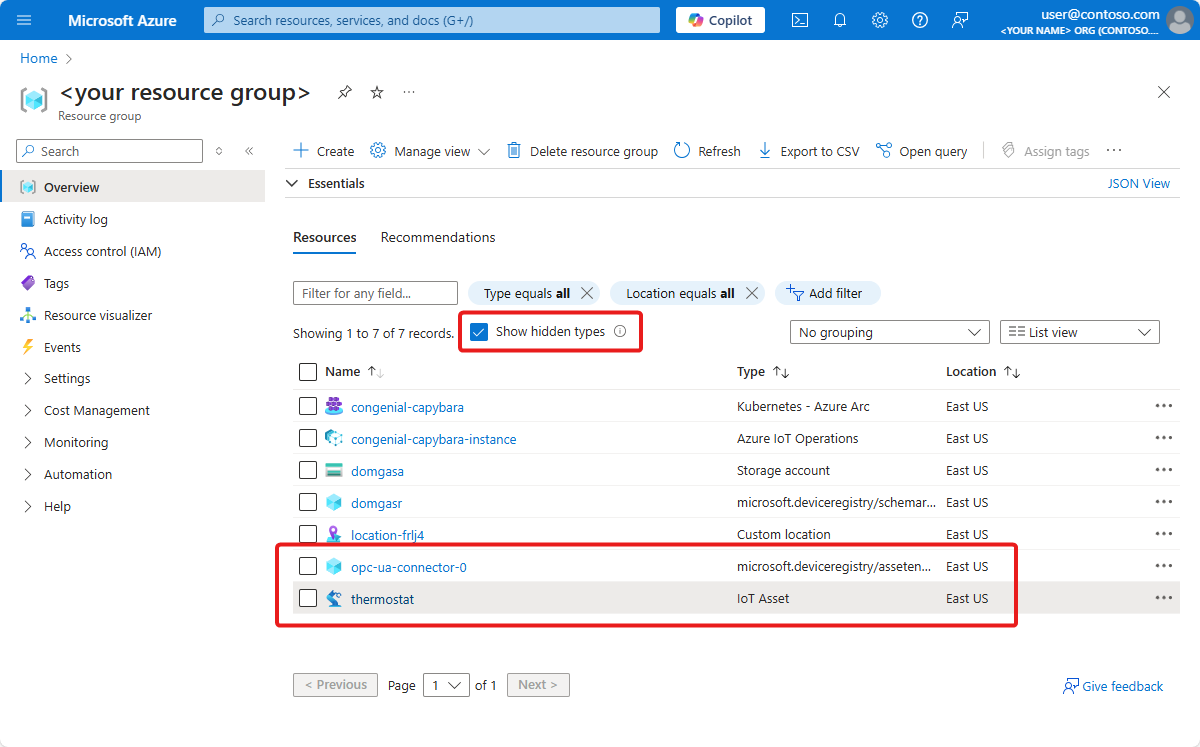
Azure Portal에서 만든 자산 엔드포인트 및 자산을 보려면 Azure IoT Operations 인스턴스가 포함된 리소스 그룹으로 이동합니다. Azure IoT Operations 리소스 그룹에서 자동 온도 조절기 자산을 볼 수 있습니다 . 숨겨진 형식 표시를 선택하면 자산 엔드포인트도 볼 수 있습니다.
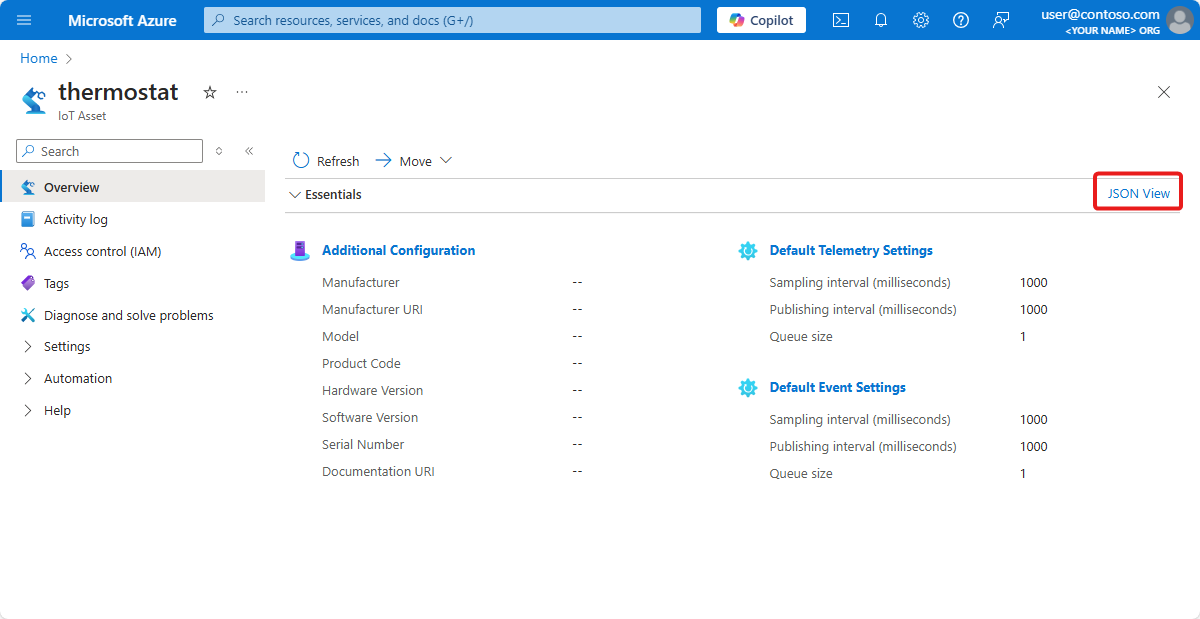
포털을 사용하면 자산 세부 정보를 볼 수 있습니다. 자세한 내용은 JSON 보기를 선택합니다.
데이터 흐름 확인
mosquitto_sub 도구를 사용하여 데이터가 MQTT 브로커로 흐르는지 확인합니다. 이 예에서는 Kubernetes 클러스터 내에서 mosquitto_sub 도구를 실행합니다.
클러스터의 MQTT 브로커와 상호 작용하는 데 유용한 mosquitto_pub 및 mosquitto_sub 도구가 포함된 Pod를 배포하려면 다음 명령을 실행합니다.
kubectl apply -f https://raw.githubusercontent.com/Azure-Samples/explore-iot-operations/main/samples/quickstarts/mqtt-client.yaml다음 코드 조각은 적용한 YAML 파일을 보여 줍니다.
# Important: do not use in production environments
# Create a service account
apiVersion: v1
kind: ServiceAccount
metadata:
  name: mqtt-client
  namespace: azure-iot-operations
---
# Creates a pod with mosquitto-clients and mqttui utilities in your cluster
apiVersion: v1
kind: Pod
metadata:
  name: mqtt-client
  # The namespace must match the IoT MQ BrokerListener's namespace
  # Otherwise use the long hostname: aio-broker.azure-iot-operations.svc.cluster.local
  namespace: azure-iot-operations
spec:
  # Use the "mqtt-client" service account which comes with default deployment
  # Otherwise create it with `kubectl create serviceaccount mqtt-client -n azure-iot-operations`
  serviceAccountName: mqtt-client
  containers:
    # Install mosquitto and mqttui utilities on Alpine linux
  - image: alpine
    name: mqtt-client
    command: ["sh", "-c"]
    args: ["apk add mosquitto-clients mqttui && sleep infinity"]
    resources:
      limits:
        cpu: 500m
        memory: 200Mi
      requests:
        cpu: 100m
        memory: 100Mi
    volumeMounts:
    - name: broker-sat
      mountPath: /var/run/secrets/tokens
    - name: trust-bundle
      mountPath: /var/run/certs
  volumes:
  - name: broker-sat
    projected:
      sources:
      - serviceAccountToken:
          path: broker-sat
          audience: aio-internal # Must match audience in BrokerAuthentication
          expirationSeconds: 86400
  - name: trust-bundle
    configMap:
      name: azure-iot-operations-aio-ca-trust-bundle # Default root CA cert
주의
이 구성은 안전하지 않습니다. 프로덕션 환경에서는 이 구성을 사용하지 마세요.
mqtt-client Pod가 실행 중일 때 다음 명령을 실행하여 만든 Pod에 셸 환경을 만듭니다.
kubectl exec --stdin --tty mqtt-client -n azure-iot-operations -- shmqtt-client Pod의 Bash 셸에서 다음 명령을 실행하여 토픽을 구독한 mosquitto_sub 도구를 사용하여 MQTT broker에
data/thermostat연결합니다.mosquitto_sub --host aio-broker --port 18883 --topic "azure-iot-operations/data/#" -v --debug --cafile /var/run/certs/ca.crt -D CONNECT authentication-method 'K8S-SAT' -D CONNECT authentication-data $(cat /var/run/secrets/tokens/broker-sat)이 명령은 Ctrl+C를 눌러 중지할 때까지 계속 실행되며
data/thermostat항목에 도착하는 메시지를 표시합니다. 셸 환경을 종료하려면 .를 입력합니다exit.
추가한 자동 온도 조절기 자산이 데이터를 게시하고 있는지 확인하려면 azure-iot-operations/data 토픽에서 원격 분석을 확인합니다.
Client $server-generated/05a22b94-c5a2-4666-9c62-837431ca6f7e received PUBLISH (d0, q0, r0, m0, 'azure-iot-operations/data/thermostat', ... (152 bytes))
{"temperature":{"SourceTimestamp":"2024-07-29T15:02:17.1858435Z","Value":4558},"Tag 10":{"SourceTimestamp":"2024-07-29T15:02:17.1858869Z","Value":4558}}
Client $server-generated/05a22b94-c5a2-4666-9c62-837431ca6f7e received PUBLISH (d0, q0, r0, m0, 'azure-iot-operations/data/thermostat', ... (152 bytes))
{"temperature":{"SourceTimestamp":"2024-07-29T15:02:18.1838125Z","Value":4559},"Tag 10":{"SourceTimestamp":"2024-07-29T15:02:18.1838523Z","Value":4559}}
Client $server-generated/05a22b94-c5a2-4666-9c62-837431ca6f7e received PUBLISH (d0, q0, r0, m0, 'azure-iot-operations/data/thermostat', ... (152 bytes))
{"temperature":{"SourceTimestamp":"2024-07-29T15:02:19.1834363Z","Value":4560},"Tag 10":{"SourceTimestamp":"2024-07-29T15:02:19.1834879Z","Value":4560}}
Client $server-generated/05a22b94-c5a2-4666-9c62-837431ca6f7e received PUBLISH (d0, q0, r0, m0, 'azure-iot-operations/data/thermostat', ... (152 bytes))
{"temperature":{"SourceTimestamp":"2024-07-29T15:02:20.1861251Z","Value":4561},"Tag 10":{"SourceTimestamp":"2024-07-29T15:02:20.1861709Z","Value":4561}}
Client $server-generated/05a22b94-c5a2-4666-9c62-837431ca6f7e received PUBLISH (d0, q0, r0, m0, 'azure-iot-operations/data/thermostat', ... (152 bytes))
{"temperature":{"SourceTimestamp":"2024-07-29T15:02:21.1856798Z","Value":4562},"Tag 10":{"SourceTimestamp":"2024-07-29T15:02:21.1857211Z","Value":4562}}
데이터 흐름이 없는 경우 aio-opc-opc.tcp-1 Pod를 다시 시작합니다.
다음 명령을 사용하여
aio-opc-opc.tcp-1Pod의 이름을 찾습니다.kubectl get pods -n azure-iot-operationsPod의 이름은
aio-opc-opc.tcp-1-849dd78866-vhmz6과 같습니다.다음 예제와 같은 명령을 사용하여
aio-opc-opc.tcp-1Pod를 다시 시작합니다. 이전 단계의aio-opc-opc.tcp-1Pod 이름을 사용합니다.kubectl delete pod aio-opc-opc.tcp-1-849dd78866-vhmz6 -n azure-iot-operations
이전 자습서에서 추가한 샘플 태그는 자산에서 다음 예제와 같은 메시지를 생성합니다.
{
    "temperature": {
        "SourceTimestamp": "2024-08-02T13:52:15.1969959Z",
        "Value": 2696
    },
    "Tag 10": {
        "SourceTimestamp": "2024-08-02T13:52:15.1970198Z",
        "Value": 2696
    }
}
문제를 어떻게 해결했나요?
이 자습서에서는 자산 엔드포인트를 추가한 다음 자산 및 태그를 정의했습니다. 자산과 태그는 MQTT 브로커 및 기타 다운스트림 프로세스에서 데이터를 더 쉽게 사용할 수 있도록 OPC UA 서버의 데이터를 모델링합니다. 다음 자습서에서 정의한 자동 온도 조절기 자산을 사용합니다.
리소스 정리
다음 자습서를 계속 진행하는 경우 모든 리소스를 유지합니다.
Azure IoT Operations 배포를 제거하지만 클러스터를 유지하려면 az iot ops delete 명령을 사용합니다.
az iot ops delete --cluster $CLUSTER_NAME --resource-group $RESOURCE_GROUP
이 빠른 시작을 위해 만든 모든 리소스를 삭제하려면 Azure IoT 작업을 배포한 Kubernetes 클러스터를 삭제한 다음 클러스터가 포함된 Azure 리소스 그룹을 제거합니다.
이러한 빠른 시작에서 Codespaces를 사용한 경우 GitHub에서 Codespace를 삭제합니다.
다음 단계
자습서: 데이터 흐름을 사용하여 클라우드에 자산 원격 분석을 보냅니다.