빠른 시작: 네트워크 보안 경계 만들기 - Azure PowerShell
Azure PowerShell을 사용하여 Azure Key Vault에 대한 네트워크 보안 경계를 만들어 네트워크 보안 경계를 시작합니다. 네트워크 보안 경계를 사용하면 Azure PaaS(Platform as a Service) 리소스가 명시적으로 신뢰할 수 있는 경계 내에서 통신할 수 있습니다. 네트워크 보안 경계 프로필에서 PaaS 리소스 연결을 만들고 업데이트합니다. 그런 다음 네트워크 보안 경계 액세스 규칙을 만들고 업데이트합니다. 완료되면 이 빠른 시작에서 만든 모든 리소스를 삭제합니다.
Important
네트워크 보안 경계는 공개 미리 보기로 제공되며 모든 Azure 퍼블릭 클라우드 지역에서 사용할 수 있습니다. 이 미리 보기 버전은 서비스 수준 계약 없이 제공되며 프로덕션 워크로드에는 사용하지 않는 것이 좋습니다. 특정 기능이 지원되지 않거나 기능이 제한될 수 있습니다. 자세한 내용은 Microsoft Azure Preview에 대한 추가 사용 약관을 참조하세요.
필수 조건
- 활성 구독이 있는 Azure 계정. 체험 계정을 만듭니다.
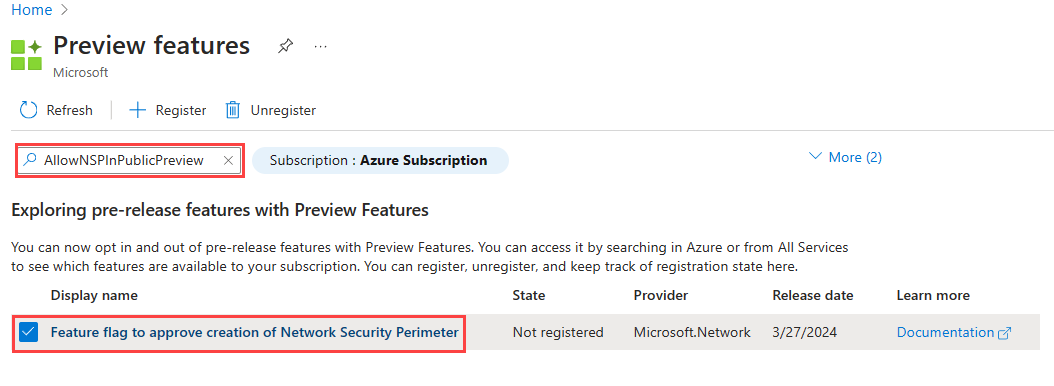
Azure 네트워크 보안 경계 공개 미리 보기 등록이 필요합니다. 등록하려면 구독에
AllowNSPInPublicPreview기능 플래그를 추가합니다.
기능 플래그를 추가하는 방법에 대한 자세한 내용은 Azure 구독에서 미리 보기 기능 설정을 참조하세요.
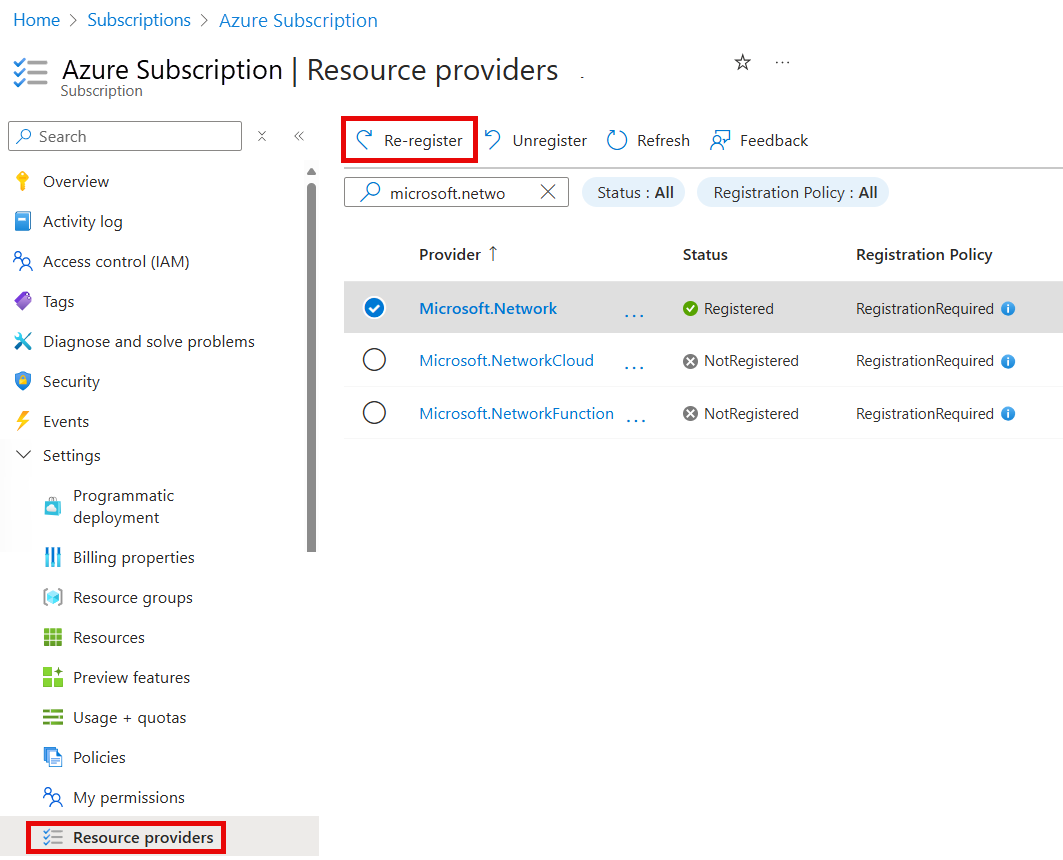
기능 플래그가 추가되면 구독에 리소스 공급자를
Microsoft.Network다시 등록해야 합니다.Azure Portal에서 리소스 공급자를
Microsoft.Network다시 등록하려면 구독을 선택한 다음 리소스 공급자를 선택합니다. 다시 등록을 검색Microsoft.Network하고 선택합니다.
리소스 공급자를
Microsoft.Network다시 등록하려면 다음 Azure PowerShell 명령을 사용합니다.
# Register the Microsoft.Network resource provider
Register-AzResourceProvider -ProviderNamespace Microsoft.Network
리소스 공급자를
Microsoft.Network다시 등록하려면 다음 Azure CLI 명령을 사용합니다.# Register the Microsoft.Network resource provider az provider register --namespace Microsoft.Network
리소스 공급자를 다시 등록하는 방법에 대한 자세한 내용은 Azure 리소스 공급자 및 유형을 참조 하세요.
네트워크 보안 경계를 위한 도구가 포함된 최신 버전의 Azure PowerShell 모듈입니다.
# Install the Az.Tools.Installer module
Install-Module -Name Az.Tools.Installer -Repository PSGallery
다음의 미리 보기 빌드를 설치하는 데 사용합니다
Az.Tools.Installer.Az.Network# Install the preview build of the Az.Network module Install-Module -Name Az.Tools.Installer -Repository PSGallery -allowprerelease -force # List the current versions of the Az.Network module available in the PowerShell Gallery Find-Module -Name Az.Network -Allversions -AllowPrerelease # Install the preview build of the Az.Network module using the Install-AzModule -Name Az.Network -AllowPrerelease -Force Install-AzModule -Path <previewVersionNumber>참고 항목
네트워크 보안 경계 기능을 사용하려면 Az.Network 모듈의 미리 보기 버전이 필요합니다. 최신 버전의 Az.Network 모듈은 PowerShell 갤러리 사용할 수 있습니다. 에서 끝나는 최신 버전을 찾습니다
-preview.Azure PowerShell을 로컬로 사용하도록 선택한 경우:
- 최신 버전의 Az PowerShell 모듈을 설치합니다.
- Connect-AzAccount cmdlet을 사용하여 Azure 계정에 로그인합니다.
Azure Cloud Shell을 사용하도록 선택한 경우:
- Azure Cloud Shell에 대한 자세한 내용은 Azure Cloud Shell 개요를 참조하세요.
PowerShell cmdlet에 대한 도움말을 보려면 다음
Get-Help명령을 사용합니다.# Get help for a specific command get-help -Name <powershell-command> - full # Example get-help -Name New-AzNetworkSecurityPerimeter - full
Azure 계정에 로그인하고 구독을 선택합니다.
구성을 시작하려면 Azure 계정에 로그인합니다.
# Sign in to your Azure account
Connect-AzAccount
그런 다음 구독에 연결합니다.
# List all subscriptions
Set-AzContext -Subscription <subscriptionId>

# Register the Microsoft.Network resource provider
Register-AzResourceProvider -ProviderNamespace Microsoft.Network
리소스 그룹 및 키 자격 증명 모음 만들기
네트워크 보안 경계를 만들려면 리소스 그룹 및 키 자격 증명 모음 리소스를 만들어야 합니다.
이 예제에서는 WestCentralUS 위치에 명명된 test-rg 리소스 그룹과 다음 명령을 사용하여 리소스 그룹에 명명된 demo-keyvault-<RandomValue> 키 자격 증명 모음을 만듭니다.
# Create a resource group
$rgParams = @{
    Name = "test-rg"
    Location = "westcentralus"
}
New-AzResourceGroup @rgParams

# Create a key vault
$keyVaultName = "demo-keyvault-$(Get-Random)"
$keyVaultParams = @{
    Name = $keyVaultName
    ResourceGroupName = $rgParams.Name
    Location = $rgParams.Location
}
$keyVault = New-AzKeyVault @keyVaultParams
네트워크 보안 경계 만들기
이 단계에서는 다음 New-AzNetworkSecurityPerimeter 명령을 사용하여 네트워크 보안 경계를 만듭니다.
참고 항목
네트워크 보안 경계 규칙 또는 기타 네트워크 보안 경계 구성에 개인 식별 가능 또는 중요한 데이터를 배치하지 마세요.
# Create a network security perimeter
$nsp = @{
        Name = 'demo-nsp'
        location = 'westcentralus'
        ResourceGroupName = $rgParams.name
        }

$demoNSP=New-AzNetworkSecurityPerimeter @nsp
$nspId = $demoNSP.Id
새 프로필과 PaaS 리소스의 연결 만들기 및 업데이트
이 단계에서는 새 프로필을 만들고 PaaS 리소스인 Azure Key Vault를 해당 및 명령을 사용하여 New-AzNetworkSecurityPerimeterProfile 프로필과 New-AzNetworkSecurityPerimeterAssociation 연결합니다.
다음 명령을 사용하여 네트워크 보안 경계에 대한 새 프로필을 만듭니다.
    # Create a new profile

    $nspProfile = @{
        Name = 'nsp-profile'
        ResourceGroupName = $rgParams.name
        SecurityPerimeterName = $nsp.name
        }

    $demoProfileNSP=New-AzNetworkSecurityPerimeterProfile @nspprofile
다음 명령을 사용하여 Azure Key Vault(PaaS 리소스)를 네트워크 보안 경계 프로필과 연결합니다.
    # Associate the PaaS resource with the above created profile

    $nspAssociation = @{
        AssociationName = 'nsp-association'
        ResourceGroupName = $rgParams.name
        SecurityPerimeterName = $nsp.name
        AccessMode = 'Learning'
        ProfileId = $demoProfileNSP.Id
        PrivateLinkResourceId = $keyVault.ResourceID
        }

    New-AzNetworkSecurityPerimeterAssociation @nspassociation | format-list
다음과 같이 액세스 모드
enforced를 명령으로Update-AzNetworkSecurityPerimeterAssociation변경하여 연결을 업데이트합니다.# Update the association to enforce the access mode $updateAssociation = @{ AssociationName = $nspassociation.AssociationName ResourceGroupName = $rgParams.name SecurityPerimeterName = $nsp.name AccessMode = 'Enforced' } Update-AzNetworkSecurityPerimeterAssociation @updateAssociation | format-list
네트워크 보안 경계 액세스 규칙 관리
이 단계에서는 공용 IP 주소 접두사를 사용하여 네트워크 보안 경계 액세스 규칙을 만들고 업데이트하고 삭제합니다.
    # Create an inbound access rule for a public IP address prefix
    $inboundRule = @{
        Name = 'nsp-inboundRule'
        ProfileName = $nspprofile.Name
        ResourceGroupName = $rgParams.Name
        SecurityPerimeterName = $nsp.Name
        Direction = 'Inbound'
        AddressPrefix = '192.0.2.0/24'
        }

    New-AzNetworkSecurityPerimeterAccessRule @inboundrule | format-list

    # Update the inbound access rule to add more public IP address prefixes
    $updateInboundRule = @{
        Name = $inboundrule.Name
        ProfileName = $nspprofile.Name
        ResourceGroupName = $rgParams.Name
        SecurityPerimeterName = $nsp.Name
        AddressPrefix = @('192.0.2.0/24','198.51.100.0/24')
        }
    Update-AzNetworkSecurityPerimeterAccessRule @updateInboundRule | format-list
참고 항목
관리 ID를 지원하는 리소스에 할당되지 않은 경우 동일한 경계 내의 다른 리소스에 대한 아웃바운드 액세스가 거부됩니다. 이 리소스의 액세스를 허용하기 위한 구독 기반 인바운드 규칙은 적용되지 않습니다.
모든 리소스 삭제
네트워크 보안 경계가 더 이상 필요하지 않은 경우 네트워크 보안 경계와 연결된 모든 리소스를 제거하고 경계를 제거한 다음 리소스 그룹을 제거합니다.
    # Retrieve the network security perimeter and place it in a variable
    $nsp= Get-AzNetworkSecurityPerimeter -Name demo-nsp -ResourceGroupName $rg.Params.Name

    # Delete the network security perimeter and all associated resources
    $removeNsp = @{
        Name = 'nsp-association'
        ResourceGroupName = $rgParams.Name
        SecurityPerimeterName = $nsp.Name
        }
    Remove-AzNetworkSecurityPerimeterAssociation @removeNsp

    Remove-AzNetworkSecurityPerimeter -Name $nsp.Name -ResourceGroupName $rgParams.Name

    # Remove the resource group
    Remove-AzResourceGroup -Name $rgParams.Name -Force
참고 항목
네트워크 보안 경계에서 리소스 연결을 제거하면 액세스 제어가 기존 리소스 방화벽 구성으로 대체됩니다. 이로 인해 리소스 방화벽 구성에 따라 액세스가 허용/거부될 수 있습니다. PublicNetworkAccess가 SecuredByPerimeter로 설정되고 연결이 삭제된 경우 리소스는 잠긴 상태가 됩니다. 자세한 내용은 Azure에서 네트워크 보안 경계로의 전환을 참조하세요.