메트릭 수집
이 문서의 적용 대상: ✔️ .NET Core 3.1 이상 ✔️ .NET Framework 4.6.1 이상
계측된 코드는 수치 측정값을 기록할 수 있지만 모니터링에 유용한 메트릭을 생성하려면 일반적으로 측정값을 집계, 전송 및 저장해야 합니다. 데이터를 모아서 전송하고 저장하는 과정을 컬렉션이라고 합니다. 이 자습서에서는 메트릭 수집에 대한 몇 가지 예를 보여 줍니다.
- OpenTelemetry 및 Prometheus를 사용하여 Grafana에서 메트릭 채우기
dotnet-counters를 사용하여 실시간으로 메트릭 보기- 기본 .NET MeterListener API를 사용하여 사용자 지정 수집 도구 만들기
사용자 지정 메트릭 도구 및 옵션에 대한 자세한 내용은 메트릭 API 비교를 참조하세요.
필수 조건
예제 앱 만들기
메트릭을 수집하려면 먼저 측정값을 생성해야 합니다. 이 자습서에서는 기본 메트릭 계측이 포함된 앱을 만듭니다. .NET 런타임에는 다양한 메트릭이 기본 제공됩니다. System.Diagnostics.Metrics.Meter API를 사용하여 새 메트릭을 만드는 방법에 대한 자세한 내용은 계측 자습서을 참조하세요.
dotnet new console -o metric-instr
cd metric-instr
dotnet add package System.Diagnostics.DiagnosticSource
Program.cs의 내용을 다음 코드로 바꿉니다.
using System.Diagnostics.Metrics;

class Program
{
    static Meter s_meter = new("HatCo.HatStore", "1.0.0");
    static Counter<int> s_hatsSold = s_meter.CreateCounter<int>("hats-sold");

    static void Main(string[] args)
    {
        var rand = Random.Shared;
        Console.WriteLine("Press any key to exit");
        while (!Console.KeyAvailable)
        {
            //// Simulate hat selling transactions.
            Thread.Sleep(rand.Next(100, 2500));
            s_hatsSold.Add(rand.Next(0, 1000));
        }
    }
}
앞의 코드는 임의의 간격과 임의의 시간에 모자 판매를 시뮬레이션합니다.
dotnet-counters를 사용하여 메트릭 보기
dotnet-counters는 필요에 따라 .NET Core 앱에 대한 라이브 메트릭을 볼 수 있는 명령줄 도구입니다. 설정이 필요하지 않으므로 임시 조사나 메트릭 계측이 작동하는지 확인하는 데 유용합니다. System.Diagnostics.Metrics 기반 API 및 EventCounters 모두에서 작동합니다.
dotnet-counters 도구가 설치되지 않은 경우 다음 명령을 실행합니다.
dotnet tool update -g dotnet-counters
예제 앱이 시작되는 동안 dotnet-counters를 시작합니다. 다음 명령은 HatCo.HatStore 미터에서 모든 메트릭을 모니터링하는 dotnet-counters의 예를 보여 줍니다. 미터 이름은 대/소문자를 구분입니다. 샘플 앱은 metric-instr.exe였습니다. 이를 샘플 앱의 이름으로 대체합니다.
dotnet-counters monitor -n metric-instr HatCo.HatStore
다음과 비슷한 출력이 표시됩니다.
Press p to pause, r to resume, q to quit.
    Status: Running

[HatCo.HatStore]
    hats-sold (Count / 1 sec)                          4
dotnet-counters는 다양한 메트릭 집합으로 실행되어 .NET 런타임에서 기본 제공된 계측 중 일부를 볼 수 있습니다.
dotnet-counters monitor -n metric-instr
다음과 비슷한 출력이 표시됩니다.
Press p to pause, r to resume, q to quit.
    Status: Running

[System.Runtime]
    % Time in GC since last GC (%)                                 0
    Allocation Rate (B / 1 sec)                                8,168
    CPU Usage (%)                                                  0
    Exception Count (Count / 1 sec)                                0
    GC Heap Size (MB)                                              2
    Gen 0 GC Count (Count / 1 sec)                                 0
    Gen 0 Size (B)                                         2,216,256
    Gen 1 GC Count (Count / 1 sec)                                 0
    Gen 1 Size (B)                                           423,392
    Gen 2 GC Count (Count / 1 sec)                                 0
    Gen 2 Size (B)                                           203,248
    LOH Size (B)                                             933,216
    Monitor Lock Contention Count (Count / 1 sec)                  0
    Number of Active Timers                                        1
    Number of Assemblies Loaded                                   39
    ThreadPool Completed Work Item Count (Count / 1 sec)           0
    ThreadPool Queue Length                                        0
    ThreadPool Thread Count                                        3
    Working Set (MB)                                              30
자세한 내용은 dotnet 카운터를 참조하세요. .NET의 메트릭에 대해 자세히 알아보려면 기본 제공 메트릭을 참조하세요.
OpenTelemetry 및 Prometheus를 사용하여 Grafana에서 메트릭 보기
개요
- Cloud Native Computing Foundation에서 지원하는 공급업체 중립적 오픈 소스 프로젝트입니다.
- 클라우드 기반 소프트웨어에 대한 원격 분석 생성 및 수집을 표준화합니다.
- .NET 메트릭 API를 사용하여 .NET에서 작동합니다.
- Azure Monitor 및 많은 APM 공급업체의 보증을 받았습니다.
이 자습서에서는 OSS Prometheus 및 Grafana 프로젝트를 사용하여 OpenTelemetry 메트릭에 사용할 수 있는 통합 중 하나를 보여 줍니다. 메트릭 데이터 흐름:
.NET 메트릭 API는 예제 앱의 측정값을 기록합니다.
앱에서 실행되는 OpenTelemetry 라이브러리는 측정값을 집계합니다.
Prometheus exporter 라이브러리는 HTTP 메트릭 엔드포인트를 통해 집계된 데이터를 사용할 수 있게 합니다. 'Exporter'는 OpenTelemetry가 공급업체별 백 엔드에 원격 분석을 전송하는 라이브러리라고 부르는 것입니다.
Prometheus 서버:
- 메트릭 엔드포인트를 폴링합니다.
- 데이터를 읽습니다.
- 장기간 지속성을 위해 데이터를 데이터베이스에 저장합니다. Prometheus는 엔드포인트를 스크래핑하는 것으로 데이터를 읽고 저장하는 것을 말합니다.
- 다른 컴퓨터에서 실행 가능
Grafana 서버:
- Prometheus에 저장된 데이터를 쿼리하여 웹 기반 모니터링 대시보드에 표시합니다.
- 다른 컴퓨터에서 실행할 수 있습니다.
OpenTelemetry의 Prometheus 내보내기 도구를 사용하도록 예제 앱 구성
OpenTelemetry Prometheus exporter에 대한 참조를 예제 앱에 추가합니다.
dotnet add package OpenTelemetry.Exporter.Prometheus.HttpListener --prerelease
참고 항목
이 자습서에서는 빌드 당시 사용 가능한 OpenTelemetry Prometheus 지원의 시험판 빌드를 사용합니다.
OpenTelemetry 구성으로 Program.cs를 업데이트합니다.
using OpenTelemetry;
using OpenTelemetry.Metrics;
using System.Diagnostics.Metrics;

class Program
{
    static Meter s_meter = new("HatCo.HatStore", "1.0.0");
    static Counter<int> s_hatsSold = s_meter.CreateCounter<int>(
        name: "hats-sold",
        unit: "Hats",
        description: "The number of hats sold in our store");

    static void Main(string[] args)
    {
        using MeterProvider meterProvider = Sdk.CreateMeterProviderBuilder()
                .AddMeter("HatCo.HatStore")
                .AddPrometheusHttpListener(options => options.UriPrefixes = new string[] { "http://localhost:9184/" })
                .Build();

        var rand = Random.Shared;
        Console.WriteLine("Press any key to exit");
        while (!Console.KeyAvailable)
        {
            //// Simulate hat selling transactions.
            Thread.Sleep(rand.Next(100, 2500));
            s_hatsSold.Add(rand.Next(0,1000));
        }
    }
}
위의 코드에서
AddMeter("HatCo.HatStore")는 앱에 정의된 미터가 수집한 모든 메트릭을 전송하도록 OpenTelemetry를 구성합니다.AddPrometheusHttpListener는 OpenTelemetry를 다음과 같이 구성합니다.- 포트
9184에서 Prometheus의 메트릭 엔드포인트를 노출합니다. - HttpListener를 사용합니다.
- 포트
OpenTelemetry 구성 옵션에 대한 자세한 내용은 OpenTelemetry 설명서를 참조하세요. OpenTelemetry 설명서에는 ASP.NET 앱에 대한 호스팅 옵션이 나와 있습니다.
측정값을 수집할 수 있도록 앱을 실행하고 실행 상태로 둡니다.
dotnet run
Prometheus 설정 및 구성
Prometheus 첫 번째 단계에 따라 Prometheus 서버를 설정하고 작동하는지 확인합니다.
Prometheus가 예제 앱이 노출하는 메트릭 엔드포인트를 스크랩하도록 prometheus.yml 구성 파일을 수정합니다. scrape_configs 섹션에 다음 강조 표시된 텍스트를 추가합니다.
# my global config
global:
  scrape_interval: 15s # Set the scrape interval to every 15 seconds. Default is every 1 minute.
  evaluation_interval: 15s # Evaluate rules every 15 seconds. The default is every 1 minute.
  # scrape_timeout is set to the global default (10s).

# Alertmanager configuration
alerting:
  alertmanagers:
    - static_configs:
        - targets:
          # - alertmanager:9093

# Load rules once and periodically evaluate them according to the global 'evaluation_interval'.
rule_files:
  # - "first_rules.yml"
  # - "second_rules.yml"

# A scrape configuration containing exactly one endpoint to scrape:
# Here it's Prometheus itself.
scrape_configs:
  # The job name is added as a label `job=<job_name>` to any timeseries scraped from this config.
  - job_name: "prometheus"

    # metrics_path defaults to '/metrics'
    # scheme defaults to 'http'.

    static_configs:
      - targets: ["localhost:9090"]

  - job_name: 'OpenTelemetryTest'
    scrape_interval: 1s # poll very quickly for a more responsive demo
    static_configs:
      - targets: ['localhost:9184']
Prometheus 시작
구성을 다시 로드하거나 Prometheus 서버를 다시 시작합니다.
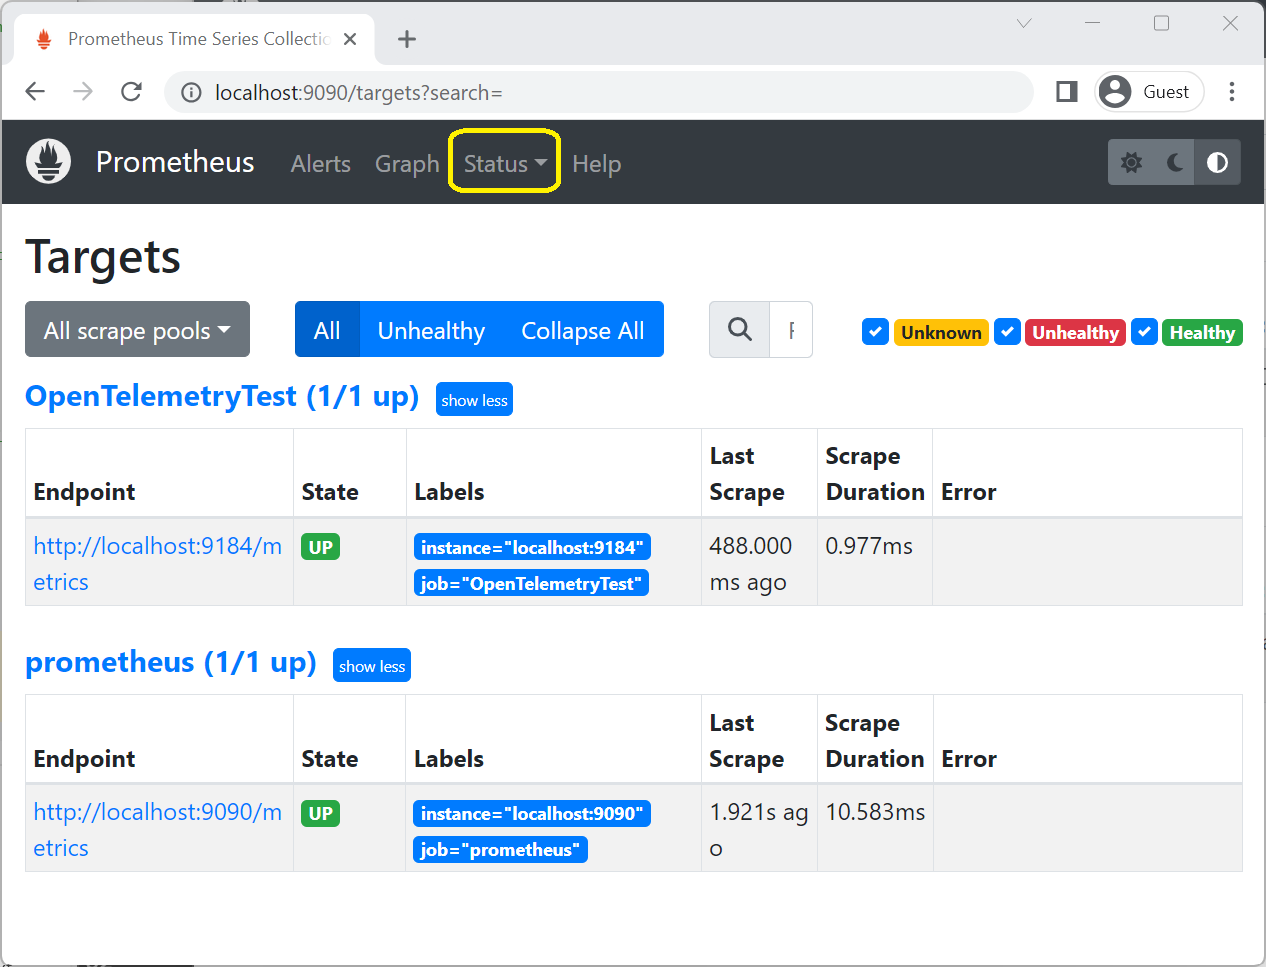
Prometheus 웹 포털의 상태>대상 페이지에서 OpenTelemetryTest가 UP 상태인지 확인합니다.
Prometheus 웹 포털의 Graph 페이지에서 식 텍스트 상자에
hats를 입력하고hats_sold_Hats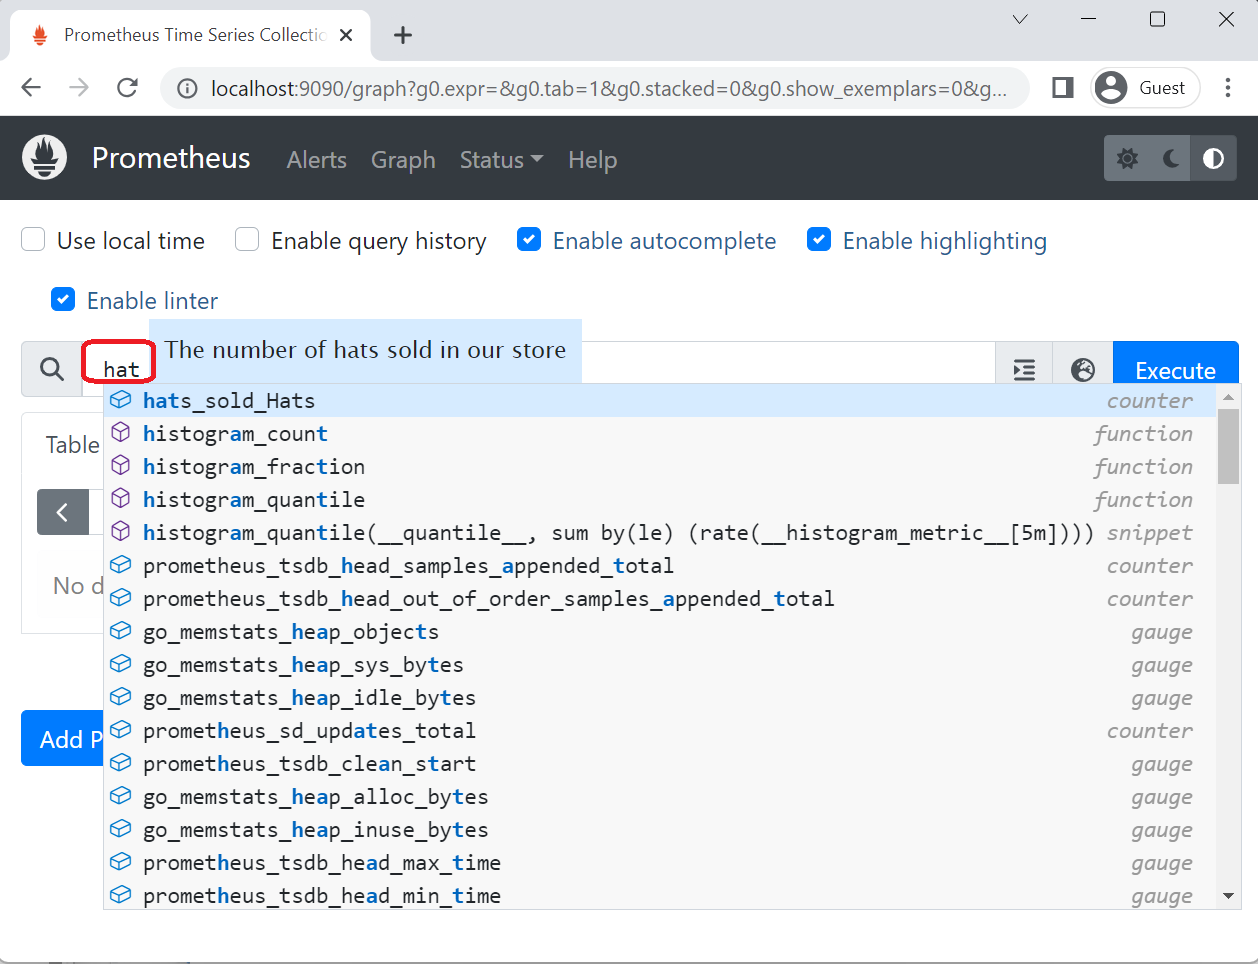 를 선택합니다. 그래프 탭에서 Prometheus는 예제 앱에서 발생하는 "hats-sold" 카운터의 증가하는 값을 보여줍니다.
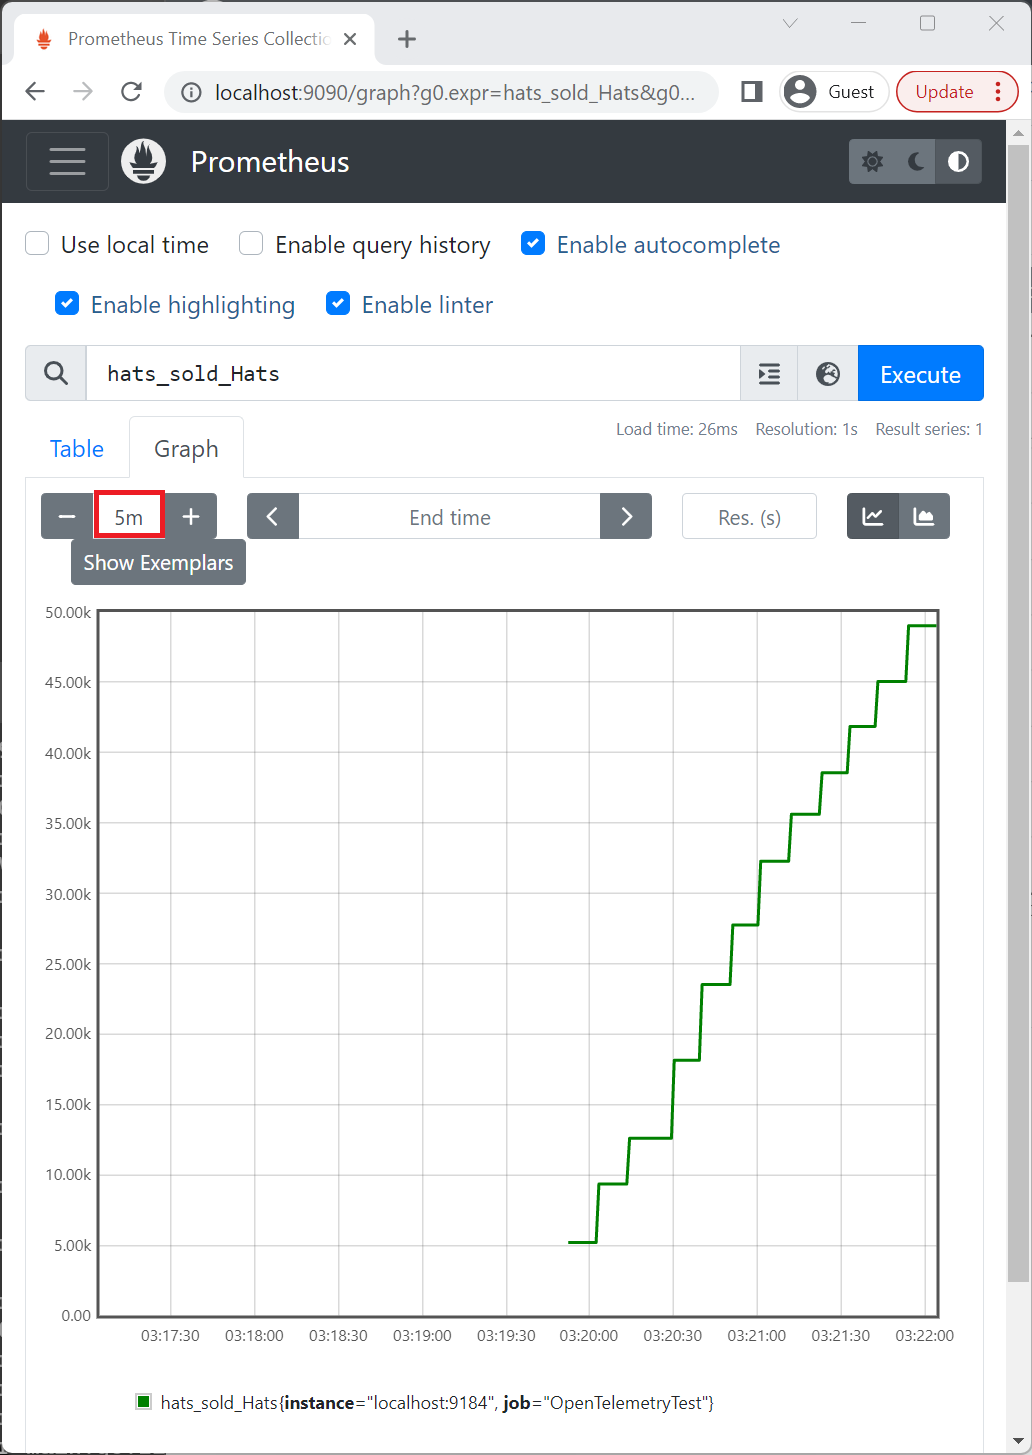
앞의 이미지에서 그래프 시간은 5분인 5m으로 설정되어 있습니다.
Prometheus 서버가 오랫동안 예제 앱을 스크래핑하지 않은 경우 데이터가 누적될 때까지 기다려야 할 수도 있습니다.
Grafana 대시보드에 메트릭 표시
표준 지침에 따라 Grafana를 설치하고 Prometheus 데이터 소스에 연결합니다.
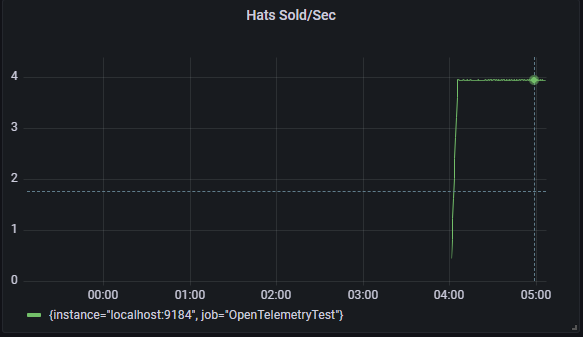
Grafana 웹 포털의 왼쪽 도구 모음에 있는 + 아이콘을 클릭하여 Grafana 대시보드를 만든 다음, 대시보드를 선택합니다. 표시되는 대시보드 편집기에서 제목 입력 상자에 Hats Sold/Sec를 입력하고 PromQL 식 필드에 rate(hats_sold[5m])를 입력합니다.
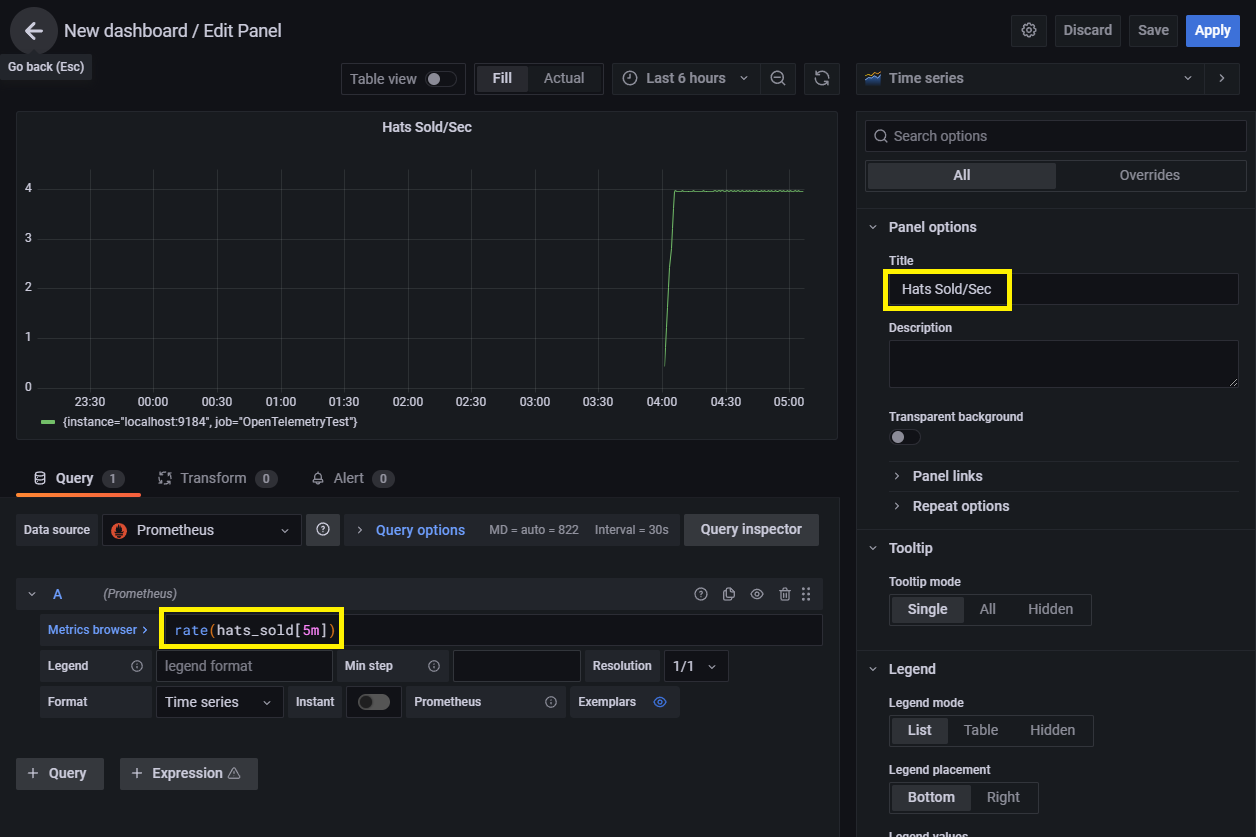
새 대시보드를 저장하고 보려면 적용을 클릭합니다.
 ]
]
.NET MeterListener API를 사용하여 사용자 지정 컬렉션 도구 만들기
.NET MeterListener API를 사용하면 System.Diagnostics.Metrics.Meter에 의해 기록되는 측정값을 관찰하기 위한 사용자 지정 프로세스 내 논리를 만들 수 있습니다. 이전 EventCounters 계측과 호환되는 사용자 지정 논리를 만드는 지침은 EventCounters를 참조하세요.
MeterListener를 사용하도록 Program.cs의 코드를 수정합니다.
using System.Diagnostics.Metrics;

class Program
{
    static Meter s_meter = new("HatCo.HatStore", "1.0.0");
    static Counter<int> s_hatsSold = s_meter.CreateCounter<int>(
        name: "hats-sold",
        unit: "Hats",
        description: "The number of hats sold in our store");

    static void Main(string[] args)
    {
        using MeterListener meterListener = new();
        meterListener.InstrumentPublished = (instrument, listener) =>
        {
            if (instrument.Meter.Name is "HatCo.HatStore")
            {
                listener.EnableMeasurementEvents(instrument);
            }
        };

        meterListener.SetMeasurementEventCallback<int>(OnMeasurementRecorded);
        // Start the meterListener, enabling InstrumentPublished callbacks.
        meterListener.Start();

        var rand = Random.Shared;
        Console.WriteLine("Press any key to exit");
        while (!Console.KeyAvailable)
        {
            //// Simulate hat selling transactions.
            Thread.Sleep(rand.Next(100, 2500));
            s_hatsSold.Add(rand.Next(0, 1000));
        }
    }

    static void OnMeasurementRecorded<T>(
        Instrument instrument,
        T measurement,
        ReadOnlySpan<KeyValuePair<string, object?>> tags,
        object? state)
    {
        Console.WriteLine($"{instrument.Name} recorded measurement {measurement}");
    }
}
다음 출력은 각 측정에 대한 사용자 지정 콜백이 포함된 앱의 출력을 보여 줍니다.
> dotnet run
Press any key to exit
hats-sold recorded measurement 978
hats-sold recorded measurement 775
hats-sold recorded measurement 666
hats-sold recorded measurement 66
hats-sold recorded measurement 914
hats-sold recorded measurement 912
...
샘플 코드 설명
이 섹션의 코드 조각은 이전 샘플에서 가져온 것입니다.
다음 강조 표시된 코드에서는 측정값을 수신하기 위해 MeterListener의 인스턴스가 만들어집니다. using 키워드는 meterListener가 범위를 벗어날 때 Dispose가 호출되도록 합니다.
using MeterListener meterListener = new();
meterListener.InstrumentPublished = (instrument, listener) =>
{
    if (instrument.Meter.Name is "HatCo.HatStore")
    {
        listener.EnableMeasurementEvents(instrument);
    }
};
다음 강조 표시된 코드는 수신 대기자가 측정을 수신하는 계측을 구성합니다. InstrumentPublished는 앱 내에서 새 계측이 만들어질 때 호출되는 대리자입니다.
using MeterListener meterListener = new();
meterListener.InstrumentPublished = (instrument, listener) =>
{
    if (instrument.Meter.Name is "HatCo.HatStore")
    {
        listener.EnableMeasurementEvents(instrument);
    }
};
대리자는 계측을 검사하여 구독 여부를 결정할 수 있습니다. 예를 들어, 대리자는 이름, 미터 또는 기타 공용 속성을 확인할 수 있습니다. EnableMeasurementEvents는 지정된 계측에서 측정값 수신을 사용하도록 설정합니다. 다른 방식으로 계측에 대한 참조를 가져오는 코드:
- 일반적으로 수행되지 않습니다.
- 참조를 사용하여 언제든지
EnableMeasurementEvents()를 호출할 수 있습니다.
계측에서 측정값이 수신될 때 호출되는 대리자는 SetMeasurementEventCallback을 호출하여 구성됩니다.
    meterListener.SetMeasurementEventCallback<int>(OnMeasurementRecorded);
    // Start the meterListener, enabling InstrumentPublished callbacks.
    meterListener.Start();

    var rand = Random.Shared;
    Console.WriteLine("Press any key to exit");
    while (!Console.KeyAvailable)
    {
        //// Simulate hat selling transactions.
        Thread.Sleep(rand.Next(100, 2500));
        s_hatsSold.Add(rand.Next(0, 1000));
    }
}

static void OnMeasurementRecorded<T>(
    Instrument instrument,
    T measurement,
    ReadOnlySpan<KeyValuePair<string, object?>> tags,
    object? state)
{
    Console.WriteLine($"{instrument.Name} recorded measurement {measurement}");
}
제네릭 매개 변수는 콜백이 수신하는 측정 데이터 형식을 제어합니다. 예를 들어, Counter<int>는 int 측정값을 생성하고, Counter<double>은 double 측정값을 생성합니다. 계측은 byte, short, int, long, float, double, decimal 형식으로 만들 수 있습니다. 모든 데이터 형식이 필요하지 않다는 시나리오별 지식이 없으면 모든 데이터 형식에 대해 콜백을 등록하는 것이 좋습니다. 다른 제네릭 인수를 사용하여 SetMeasurementEventCallback을 반복적으로 호출하는 것은 약간 이상해 보일 수 있습니다. API는 MeterListener가 일반적으로 몇 나노초에 불과한 낮은 성능 오버헤드로 측정값을 수신할 수 있도록 이러한 방식으로 설계되었습니다.
MeterListener.EnableMeasurementEvents가 호출되면 state 개체가 매개 변수 중 하나로 제공될 수 있습니다. state 개체는 임의적입니다. 해당 호출에서 상태 개체를 제공하는 경우에는 해당 계측과 함께 저장되고 콜백에서 state 매개 변수로 반환됩니다. 편의 및 성능 최적화를 위해서 입니다. 종종 수신 대기자는 다음을 수행해야 합니다.
- 측정값을 메모리에 저장하는 각 계측에 대한 개체를 만듭니다.
- 해당 측정에 대한 계산을 수행하는 코드가 있습니다.
또는 계측에서 스토리지 개체로 매핑되는 Dictionary를 만들고 모든 측정에서 이를 조회합니다. Dictionary를 사용하는 것은 state에서 액세스하는 것보다 훨씬 느립니다.
meterListener.Start();
앞의 코드는 콜백을 사용하도록 설정하는 MeterListener를 시작합니다. 프로세스의 모든 기존 계측에 대해 InstrumentPublished 대리자가 호출됩니다. 새로 만들어진 계측 개체도 호출되도록 InstrumentPublished를 트리거합니다.
using MeterListener meterListener = new MeterListener();
앱이 수신을 완료한 후 수신기를 삭제하면 콜백 흐름이 중지되고 수신기 개체에 대한 내부 참조가 해제됩니다. meterListener 선언 시 사용된 using 키워드는 변수가 범위를 벗어날 때 Dispose가 호출되도록 합니다. Dispose는 새로운 콜백을 시작하지 않을 것이라고 약속할 뿐입니다. 콜백은 다른 스레드에서 발생하기 때문에 Dispose에 대한 호출이 반환된 후에도 여전히 진행 중인 콜백이 있을 수 있습니다.
콜백의 특정 코드 영역이 현재 실행 중이지 않고 앞으로도 실행되지 않도록 하려면 스레드 동기화를 추가해야 합니다. Dispose에는 다음과 같은 이유로 기본적으로 동기화가 포함되지 않습니다.
- 동기화는 모든 측정 콜백에 성능 오버헤드를 추가합니다.
MeterListener는 성능을 매우 중요하게 생각하는 API로 설계되었습니다.
.NET
