연습: 사용자 정의 컨트롤에서 끌어서 놓기 사용
이 연습에서는 WPF(Windows Presentation Foundation)에서 끌어서 놓기 데이터 전송에 참여할 수 있는 사용자 지정 사용자 정의 컨트롤을 만드는 방법을 보여 줍니다.
이 연습에서는 원 모양을 나타내는 사용자 지정 WPF UserControl을 만듭니다. 컨트롤에서 끌어서 놓기를 통해 데이터 전송을 활성화하는 기능을 구현합니다. 예를 들어 한 원 컨트롤에서 다른 원 컨트롤로 끌면 채우기 색 데이터가 소스 원에서 대상 원으로 복사됩니다. 원 컨트롤에서 TextBox로 끌면 채우기 색의 문자열 표현이 TextBox에 복사됩니다. 또한 끌어서 놓기 기능을 테스트하기 위해 두 개의 패널 컨트롤과 TextBox가 포함된 작은 애플리케이션을 만듭니다. 패널이 끌어 놓은 원 데이터를 처리하여 한 패널의 자식 컬렉션에서 다른 패널로 원을 이동하거나 복사할 수 있도록 하는 코드를 작성합니다.
이 연습에서는 다음 작업을 수행합니다.
사용자 지정 사용자 정의 컨트롤 만들기
사용자 정의 컨트롤을 끌기 소스로 사용할 수 있도록 설정
사용자 정의 컨트롤을 놓기 대상으로 사용할 수 있도록 설정
패널이 사용자 정의 컨트롤에서 놓은 데이터를 받을 수 있도록 설정
사전 요구 사항
이 연습을 완료하려면 Visual Studio가 필요합니다.
애플리케이션 프로젝트 만들기
이 섹션에서는 애플리케이션 인프라를 만들고 두 개의 패널과 TextBox가 있는 기본 페이지를 포함합니다.
Visual Basic 또는 Visual C#에서
DragDropExample이라는 새 WPF 애플리케이션 프로젝트를 만듭니다. 자세한 내용은 연습: 내 첫 WPF 데스크톱 애플리케이션을 참조하세요.MainWindow.xaml을 엽니다.
열고 닫는 Grid 태그 사이에 다음 태그를 추가합니다.
이 태그는 테스트 애플리케이션에 대한 사용자 인터페이스를 만듭니다.
<Grid.ColumnDefinitions>
    <ColumnDefinition />
    <ColumnDefinition />
</Grid.ColumnDefinitions>
<StackPanel Grid.Column="0"
            Background="Beige">
    <TextBox Width="Auto" Margin="2"
             Text="green"/>
</StackPanel>
<StackPanel Grid.Column="1"
            Background="Bisque">
</StackPanel>
프로젝트에 새 사용자 정의 컨트롤 추가
이 섹션에서는 프로젝트에 새 사용자 정의 컨트롤을 추가합니다.
[프로젝트] 메뉴에서 사용자 정의 컨트롤 추가를 선택합니다.
새 항목 추가 대화 상자에서 이름을
Circle.xaml로 변경하고 추가를 클릭합니다.Circle.xaml과 해당 코드 숨김이 프로젝트에 추가됩니다.
Circle.xaml을 엽니다.
이 파일에는 사용자 정의 컨트롤의 사용자 인터페이스 요소가 포함됩니다.
루트 Grid에 다음 태그를 추가하여 파란색 원을 UI로 갖는 간단한 사용자 정의 컨트롤을 만듭니다.
<Ellipse x:Name="circleUI"
         Height="100" Width="100"
         Fill="Blue" />
Circle.xaml.cs 또는 Circle.xaml.vb를 엽니다.
C#에서는 매개 변수 없는 생성자 뒤에 다음 코드를 추가하여 복사 생성자를 만듭니다. Visual Basic에서는 다음 코드를 추가하여 매개 변수 없는 생성자와 복사 생성자를 모두 만듭니다.
사용자 정의 컨트롤을 복사할 수 있도록 하려면 코드 숨김 파일에서 복사 생성자 메서드를 추가합니다. 간단한 원 사용자 정의 컨트롤에서 사용자 정의 컨트롤의 채우기와 크기만 복사합니다.
public Circle(Circle c)
{
    InitializeComponent();
    this.circleUI.Height = c.circleUI.Height;
    this.circleUI.Width = c.circleUI.Height;
    this.circleUI.Fill = c.circleUI.Fill;
}
Public Sub New() ' This call is required by the designer. InitializeComponent() End Sub Public Sub New(ByVal c As Circle) InitializeComponent() Me.circleUI.Height = c.circleUI.Height Me.circleUI.Width = c.circleUI.Height Me.circleUI.Fill = c.circleUI.Fill End Sub
주 창에 사용자 정의 컨트롤 추가
MainWindow.xaml을 엽니다.
다음 XAML을 여는 Window 태그에 추가하여 현재 애플리케이션에 대한 XML 네임스페이스 참조를 만듭니다.
xmlns:local="clr-namespace:DragDropExample"첫 번째 StackPanel에서 다음 XAML을 추가하여 첫 번째 패널에서 원 사용자 정의 컨트롤 인스턴스를 두 개 만듭니다.
<local:Circle Margin="2" />
<local:Circle Margin="2" />
패널에 대한 전체 XAML은 다음과 같습니다.
<StackPanel Grid.Column="0"
            Background="Beige">
    <TextBox Width="Auto" Margin="2"
             Text="green"/>
    <local:Circle Margin="2" />
    <local:Circle Margin="2" />
</StackPanel>
<StackPanel Grid.Column="1"
            Background="Bisque">
</StackPanel>
사용자 정의 컨트롤에서 끌기 소스 이벤트 구현
이 섹션에서는 OnMouseMove 메서드를 재정의하고 끌어서 놓기 작업을 시작합니다.
끌기가 시작되면(마우스 단추를 누르고 마우스를 이동) 전송할 데이터를 DataObject로 패키지합니다. 이 경우 원 컨트롤은 채우기 색의 문자열 표현, 높이의 double 표현과 자신의 복사본이라는 세 개의 데이터 항목을 패키지합니다.
끌어서 놓기 작업을 시작하려면
Circle.xaml.cs 또는 Circle.xaml.vb를 엽니다.
다음 OnMouseMove 재정의를 추가하여 MouseMove 이벤트에 대한 클래스 처리를 제공합니다.
protected override void OnMouseMove(MouseEventArgs e)
{
    base.OnMouseMove(e);
    if (e.LeftButton == MouseButtonState.Pressed)
    {
        // Package the data.
        DataObject data = new DataObject();
        data.SetData(DataFormats.StringFormat, circleUI.Fill.ToString());
        data.SetData("Double", circleUI.Height);
        data.SetData("Object", this);

        // Initiate the drag-and-drop operation.
        DragDrop.DoDragDrop(this, data, DragDropEffects.Copy | DragDropEffects.Move);
    }
}
Protected Overrides Sub OnMouseMove(ByVal e As System.Windows.Input.MouseEventArgs) MyBase.OnMouseMove(e) If e.LeftButton = MouseButtonState.Pressed Then ' Package the data. Dim data As New DataObject data.SetData(DataFormats.StringFormat, circleUI.Fill.ToString()) data.SetData("Double", circleUI.Height) data.SetData("Object", Me) ' Inititate the drag-and-drop operation. DragDrop.DoDragDrop(Me, data, DragDropEffects.Copy Or DragDropEffects.Move) End If End Sub이 OnMouseMove 재정의는 다음 작업을 수행합니다.
마우스를 이동하는 동안 마우스 왼쪽 단추를 눌렀는지 여부를 확인합니다.
원 데이터를 DataObject로 패키지합니다. 이 경우 원 컨트롤은 채우기 색의 문자열 표현, 높이의 double 표현과 자신의 복사본이라는 세 개의 데이터 항목을 패키지합니다.
정적 DragDrop.DoDragDrop 메서드를 호출하여 끌어서 놓기 작업을 시작합니다. DoDragDrop 메서드에 다음 세 가지 매개 변수를 전달합니다.
dragSource– 이 컨트롤에 대한 참조입니다.data– DataObject는 이전 코드에서 생성되었습니다.
F5 키를 눌러 애플리케이션을 빌드하고 실행합니다.
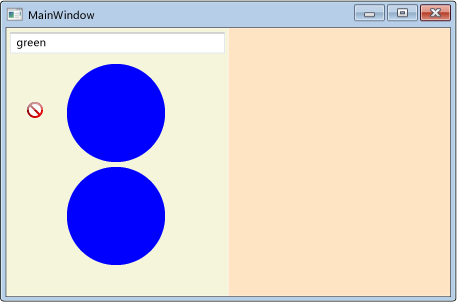
원 컨트롤 중 하나를 클릭하고 패널, 다른 원 및 TextBox로 끕니다. TextBox로 끌면 커서가 이동을 나타내도록 변경됩니다.
원을 TextBox로 끄는 동안 Ctrl 키를 누릅니다. 복사를 나타내기 위해 커서가 어떻게 변경되는지 확인합니다.
원을 TextBox에 끌어다 놓습니다. 원 채우기 색의 문자열 표현이 TextBox에 추가됩니다.
 원 채우기 색의 문자열 표현DragDrop_ColorString
기본적으로 커서는 끌어서 놓기 작업 중 데이터 놓기의 결과를 나타내도록 변경됩니다. GiveFeedback 이벤트를 처리하고 다른 커서를 설정하여 사용자에게 제공된 피드백을 사용자 지정할 수 있습니다.
사용자에게 피드백 제공
Circle.xaml.cs 또는 Circle.xaml.vb를 엽니다.
다음 OnMouseMove 재정의를 추가하여 MouseMove 이벤트에 대한 클래스 처리를 제공합니다.
protected override void OnGiveFeedback(GiveFeedbackEventArgs e)
{
    base.OnGiveFeedback(e);
    // These Effects values are set in the drop target's
    // DragOver event handler.
    if (e.Effects.HasFlag(DragDropEffects.Copy))
    {
        Mouse.SetCursor(Cursors.Cross);
    }
    else if (e.Effects.HasFlag(DragDropEffects.Move))
    {
        Mouse.SetCursor(Cursors.Pen);
    }
    else
    {
        Mouse.SetCursor(Cursors.No);
    }
    e.Handled = true;
}
Protected Overrides Sub OnGiveFeedback(ByVal e As System.Windows.GiveFeedbackEventArgs) MyBase.OnGiveFeedback(e) ' These Effects values are set in the drop target's ' DragOver event handler. If e.Effects.HasFlag(DragDropEffects.Copy) Then Mouse.SetCursor(Cursors.Cross) ElseIf e.Effects.HasFlag(DragDropEffects.Move) Then Mouse.SetCursor(Cursors.Pen) Else Mouse.SetCursor(Cursors.No) End If e.Handled = True End Sub이 OnMouseMove 재정의는 다음 작업을 수행합니다.
F5 키를 눌러 애플리케이션을 빌드하고 실행합니다.
원 컨트롤 중 하나를 패널, 다른 원 및 TextBox로 끕니다. 커서가 OnGiveFeedback 재정의에서 지정한 사용자 지정 커서인지 확인합니다.
 사용자 지정 커서로 끌어서 놓기DragDrop_CustomCursor
TextBox에서
green텍스트를 선택합니다.green텍스트를 원 컨트롤로 끕니다. 기본 커서가 끌어서 놓기 작업의 결과를 나타내도록 표시되는지 확인합니다. 피드백 커서는 항상 끌기 소스에 의해 설정됩니다.
사용자 정의 컨트롤에서 대상 놓기 이벤트 구현
이 섹션에서는 사용자 정의 컨트롤이 놓기 대상이 되도록 지정하고, 사용자 정의 컨트롤을 놓기 대상으로 사용할 수 있도록 설정하는 메서드를 재정의하며, 대상에 끌어 놓은 데이터를 처리합니다.
사용자 정의 컨트롤을 놓기 대상으로 사용할 수 있도록 설정하려면
Circle.xaml을 엽니다.
여는 UserControl 태그에서 AllowDrop 속성을 추가하고
true로 설정합니다.<UserControl x:Class="DragDropWalkthrough.Circle" xmlns="http://schemas.microsoft.com/winfx/2006/xaml/presentation" xmlns:x="http://schemas.microsoft.com/winfx/2006/xaml" xmlns:mc="http://schemas.openxmlformats.org/markup-compatibility/2006" xmlns:d="http://schemas.microsoft.com/expression/blend/2008" mc:Ignorable="d" d:DesignHeight="300" d:DesignWidth="300" AllowDrop="True">
OnDrop 메서드는 AllowDrop 속성을 true로 설정하고 끌기 소스의 데이터를 원 사용자 정의 컨트롤에 놓으면 호출됩니다. 이 메서드에서는 끌어 놓은 데이터를 처리하고 해당 데이터를 원에 적용합니다.
끌어 놓은 데이터를 처리하려면
Circle.xaml.cs 또는 Circle.xaml.vb를 엽니다.
다음 OnMouseMove 재정의를 추가하여 MouseMove 이벤트에 대한 클래스 처리를 제공합니다.
protected override void OnDrop(DragEventArgs e)
{
    base.OnDrop(e);

    // If the DataObject contains string data, extract it.
    if (e.Data.GetDataPresent(DataFormats.StringFormat))
    {
        string dataString = (string)e.Data.GetData(DataFormats.StringFormat);

        // If the string can be converted into a Brush,
        // convert it and apply it to the ellipse.
        BrushConverter converter = new BrushConverter();
        if (converter.IsValid(dataString))
        {
            Brush newFill = (Brush)converter.ConvertFromString(dataString);
            circleUI.Fill = newFill;

            // Set Effects to notify the drag source what effect
            // the drag-and-drop operation had.
            // (Copy if CTRL is pressed; otherwise, move.)
            if (e.KeyStates.HasFlag(DragDropKeyStates.ControlKey))
            {
                e.Effects = DragDropEffects.Copy;
            }
            else
            {
                e.Effects = DragDropEffects.Move;
            }
        }
    }
    e.Handled = true;
}
Protected Overrides Sub OnDrop(ByVal e As System.Windows.DragEventArgs) MyBase.OnDrop(e) ' If the DataObject contains string data, extract it. If e.Data.GetDataPresent(DataFormats.StringFormat) Then Dim dataString As String = e.Data.GetData(DataFormats.StringFormat) ' If the string can be converted into a Brush, ' convert it and apply it to the ellipse. Dim converter As New BrushConverter If converter.IsValid(dataString) Then Dim newFill As Brush = converter.ConvertFromString(dataString) circleUI.Fill = newFill ' Set Effects to notify the drag source what effect ' the drag-and-drop operation had. ' (Copy if CTRL is pressed; otherwise, move.) If e.KeyStates.HasFlag(DragDropKeyStates.ControlKey) Then e.Effects = DragDropEffects.Copy Else e.Effects = DragDropEffects.Move End If End If End If e.Handled = True End Sub이 OnMouseMove 재정의는 다음 작업을 수행합니다.
GetDataPresent 메서드를 사용하여 끌어온 데이터에 문자열 개체가 포함되어 있는지 확인합니다.
GetData 메서드를 사용하여 문자열 데이터가 있는 경우 추출합니다.
BrushConverter를 사용하여 문자열을 Brush로 변환하려고 합니다.
Drop 이벤트를 처리된 것으로 표시합니다. 이 이벤트를 수신하는 다른 요소가 원 사용자 정의 컨트롤에서 해당 이벤트를 처리했음을 알 수 있도록 놓기 이벤트를 처리된 것으로 표시해야 합니다.
F5 키를 눌러 애플리케이션을 빌드하고 실행합니다.
TextBox에서
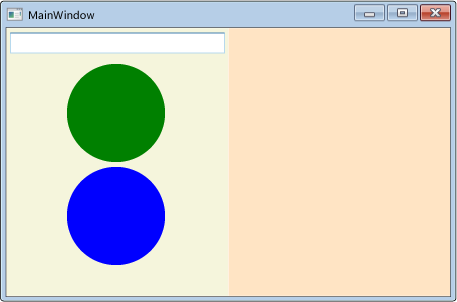
green텍스트를 선택합니다.텍스트를 원 컨트롤로 끌어서 놓습니다. 원이 파란색에서 녹색으로 바뀝니다.
 문자열을 브러시로 변환DragDrop_DropGreenText
TextBox에
green텍스트를 입력합니다.TextBox에서
green텍스트를 선택합니다.이 텍스트를 원 컨트롤로 끌어서 놓습니다. 놓기가 허용됨을 나타내도록 커서가 변경되지만
gre가 유효한 색이 아니기 때문에 원의 색은 변경되지 않습니다.녹색 원 컨트롤에서 끌어서 파란색 원 컨트롤에 놓습니다. 원이 파란색에서 녹색으로 바뀝니다. 표시되는 커서는 끌기 소스가 TextBox인지 원인지에 따라 달라집니다.
AllowDrop 속성을 true로 설정하고 끌어 놓은 데이터를 처리하기만 하면 요소를 놓기 대상으로 사용할 수 있도록 설정할 수 있습니다. 그러나 더 나은 사용자 환경을 제공하려면 DragEnter, DragLeave 및 DragOver 이벤트도 처리해야 합니다. 이러한 이벤트에서 데이터를 놓기 전에 검사를 수행하고 사용자에게 추가 피드백을 제공할 수 있습니다.
데이터를 원 사용자 정의 컨트롤로 끌면 컨트롤에서 끌고 있는 데이터를 처리할 수 있는지 여부를 끌기 소스에 알려야 합니다. 컨트롤에서 데이터 처리 방법을 알지 못하는 경우 놓기를 거부해야 합니다. 이렇게 하려면 DragOver 이벤트를 처리하고 Effects 속성을 설정합니다.
데이터 놓기가 허용되는지 확인하려면
Circle.xaml.cs 또는 Circle.xaml.vb를 엽니다.
다음 OnMouseMove 재정의를 추가하여 MouseMove 이벤트에 대한 클래스 처리를 제공합니다.
protected override void OnDragOver(DragEventArgs e)
{
    base.OnDragOver(e);
    e.Effects = DragDropEffects.None;

    // If the DataObject contains string data, extract it.
    if (e.Data.GetDataPresent(DataFormats.StringFormat))
    {
        string dataString = (string)e.Data.GetData(DataFormats.StringFormat);

        // If the string can be converted into a Brush, allow copying or moving.
        BrushConverter converter = new BrushConverter();
        if (converter.IsValid(dataString))
        {
            // Set Effects to notify the drag source what effect
            // the drag-and-drop operation will have. These values are
            // used by the drag source's GiveFeedback event handler.
            // (Copy if CTRL is pressed; otherwise, move.)
            if (e.KeyStates.HasFlag(DragDropKeyStates.ControlKey))
            {
                e.Effects = DragDropEffects.Copy;
            }
            else
            {
                e.Effects = DragDropEffects.Move;
            }
        }
    }
    e.Handled = true;
}
Protected Overrides Sub OnDragOver(ByVal e As System.Windows.DragEventArgs) MyBase.OnDragOver(e) e.Effects = DragDropEffects.None ' If the DataObject contains string data, extract it. If e.Data.GetDataPresent(DataFormats.StringFormat) Then Dim dataString As String = e.Data.GetData(DataFormats.StringFormat) ' If the string can be converted into a Brush, allow copying or moving. Dim converter As New BrushConverter If converter.IsValid(dataString) Then ' Set Effects to notify the drag source what effect ' the drag-and-drop operation will have. These values are ' used by the drag source's GiveFeedback event handler. ' (Copy if CTRL is pressed; otherwise, move.) If e.KeyStates.HasFlag(DragDropKeyStates.ControlKey) Then e.Effects = DragDropEffects.Copy Else e.Effects = DragDropEffects.Move End If End If End If e.Handled = True End Sub이 OnMouseMove 재정의는 다음 작업을 수행합니다.
F5 키를 눌러 애플리케이션을 빌드하고 실행합니다.
TextBox에서
green텍스트를 선택합니다.텍스트를 원 컨트롤로 끕니다.
gre가 유효한 색이 아니므로 놓기가 허용되지 않음을 나타내도록 커서가 변경됩니다.
놓기 작업의 미리 보기를 적용하여 사용자 환경을 더욱 향상시킬 수 있습니다. 원 사용자 정의 컨트롤의 경우 OnDragEnter 및 OnDragLeave 메서드를 재정의합니다. 데이터를 컨트롤로 끌면 현재 배경 Fill이 자리 표시자 변수에 저장됩니다. 그런 다음, 문자열이 브러시로 변환되고 원의 UI를 제공하는 Ellipse에 적용됩니다. 데이터를 놓지 않고 원 밖으로 끌면 원래 Fill 값이 원에 다시 적용됩니다.
끌어서 놓기 작업의 결과를 미리 보려면
Circle.xaml.cs 또는 Circle.xaml.vb를 엽니다.
원 클래스에서
_previousFill이라는 프라이빗 Brush 변수를 선언하고null로 초기화합니다.public partial class Circle : UserControl { private Brush _previousFill = null;Public Class Circle Private _previousFill As Brush = Nothing다음 OnMouseMove 재정의를 추가하여 MouseMove 이벤트에 대한 클래스 처리를 제공합니다.
protected override void OnDragEnter(DragEventArgs e)
{
    base.OnDragEnter(e);
    // Save the current Fill brush so that you can revert back to this value in DragLeave.
    _previousFill = circleUI.Fill;

    // If the DataObject contains string data, extract it.
    if (e.Data.GetDataPresent(DataFormats.StringFormat))
    {
        string dataString = (string)e.Data.GetData(DataFormats.StringFormat);

        // If the string can be converted into a Brush, convert it.
        BrushConverter converter = new BrushConverter();
        if (converter.IsValid(dataString))
        {
            Brush newFill = (Brush)converter.ConvertFromString(dataString.ToString());
            circleUI.Fill = newFill;
        }
    }
}
Protected Overrides Sub OnDragEnter(ByVal e As System.Windows.DragEventArgs) MyBase.OnDragEnter(e) _previousFill = circleUI.Fill ' If the DataObject contains string data, extract it. If e.Data.GetDataPresent(DataFormats.StringFormat) Then Dim dataString As String = e.Data.GetData(DataFormats.StringFormat) ' If the string can be converted into a Brush, convert it. Dim converter As New BrushConverter If converter.IsValid(dataString) Then Dim newFill As Brush = converter.ConvertFromString(dataString) circleUI.Fill = newFill End If End If e.Handled = True End Sub이 OnMouseMove 재정의는 다음 작업을 수행합니다.
다음 OnMouseMove 재정의를 추가하여 MouseMove 이벤트에 대한 클래스 처리를 제공합니다.
protected override void OnDragLeave(DragEventArgs e)
{
    base.OnDragLeave(e);
    // Undo the preview that was applied in OnDragEnter.
    circleUI.Fill = _previousFill;
}
Protected Overrides Sub OnDragLeave(ByVal e As System.Windows.DragEventArgs) MyBase.OnDragLeave(e) ' Undo the preview that was applied in OnDragEnter. circleUI.Fill = _previousFill End Sub이 OnMouseMove 재정의는 다음 작업을 수행합니다.
F5 키를 눌러 애플리케이션을 빌드하고 실행합니다.
TextBox에서
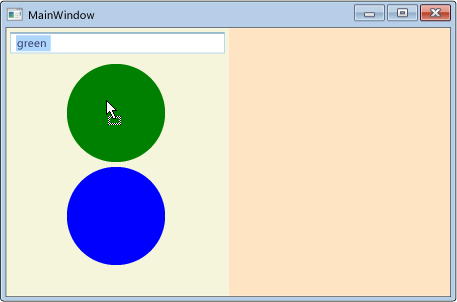
green텍스트를 선택합니다.텍스트를 놓지 않고 원 컨트롤 위로 끕니다. 원이 파란색에서 녹색으로 바뀝니다.
 끌어서 놓기 작업의 효과 미리 보기DragDrop_PreviewEffects
원 컨트롤에서 멀리 텍스트를 끕니다. 원이 녹색에서 다시 파란색으로 바뀝니다.
패널이 끌어 놓은 데이터를 수신할 수 있도록 설정
이 섹션에서는 원 사용자 정의 컨트롤을 호스트하는 패널이 끌어온 원 데이터의 놓기 대상 역할을 하도록 설정합니다. 패널 간에 원을 이동하거나, Ctrl 키를 누른 상태로 원을 끌어서 놓아 원 컨트롤의 복사본을 만들 수 있도록 하는 코드를 구현합니다.
MainWindow.xaml을 엽니다.
다음 XAML에 표시된 대로 각 StackPanel 컨트롤에서 DragOver 및 Drop 이벤트에 대한 처리기를 추가합니다. DragOver 이벤트 처리기의 이름을
panel_DragOver로 지정하고 Drop 이벤트 처리기의 이름을panel_Drop으로 지정합니다.기본적으로 패널은 대상을 삭제하지 않습니다. 사용하도록 설정하려면 두 패널 모두에 AllowDrop 속성을 추가하고 값을
true(으)로 설정합니다.<StackPanel Grid.Column="0" Background="Beige" AllowDrop="True" DragOver="panel_DragOver" Drop="panel_Drop"> <TextBox Width="Auto" Margin="2" Text="green"/> <local:Circle Margin="2" /> <local:Circle Margin="2" /> </StackPanel> <StackPanel Grid.Column="1" Background="Bisque" AllowDrop="True" DragOver="panel_DragOver" Drop="panel_Drop"> </StackPanel>MainWindows.xaml.cs 또는 MainWindow.xaml.vb를 엽니다.
다음 코드를 DragOver 이벤트 처리기에 추가합니다.
private void panel_DragOver(object sender, DragEventArgs e)
{
    if (e.Data.GetDataPresent("Object"))
    {
        // These Effects values are used in the drag source's
        // GiveFeedback event handler to determine which cursor to display.
        if (e.KeyStates == DragDropKeyStates.ControlKey)
        {
            e.Effects = DragDropEffects.Copy;
        }
        else
        {
            e.Effects = DragDropEffects.Move;
        }
    }
}
Private Sub panel_DragOver(ByVal sender As System.Object, ByVal e As System.Windows.DragEventArgs) If e.Data.GetDataPresent("Object") Then ' These Effects values are used in the drag source's ' GiveFeedback event handler to determine which cursor to display. If e.KeyStates = DragDropKeyStates.ControlKey Then e.Effects = DragDropEffects.Copy Else e.Effects = DragDropEffects.Move End If End If End Sub이 DragOver 이벤트 처리기는 다음 작업을 수행합니다.
원 사용자 정의 컨트롤을 통해 DataObject로 패키지되고 DoDragDrop 호출을 통해 전달된 "Object" 데이터가 끌어온 데이터에 포함되어 있는지 확인합니다.
"Object" 데이터가 있는 경우 Ctrl 키를 눌렀는지 여부를 확인합니다.
Ctrl 키를 누르면 Effects 속성을 Copy로 설정합니다. 그렇지 않으면 Effects 속성을 Move로 설정합니다.
다음 코드를 DragOver 이벤트 처리기에 추가합니다.
private void panel_Drop(object sender, DragEventArgs e)
{
    // If an element in the panel has already handled the drop,
    // the panel should not also handle it.
    if (e.Handled == false)
    {
        Panel _panel = (Panel)sender;
        UIElement _element = (UIElement)e.Data.GetData("Object");

        if (_panel != null && _element != null)
        {
            // Get the panel that the element currently belongs to,
            // then remove it from that panel and add it the Children of
            // the panel that its been dropped on.
            Panel _parent = (Panel)VisualTreeHelper.GetParent(_element);

            if (_parent != null)
            {
                if (e.KeyStates == DragDropKeyStates.ControlKey &&
                    e.AllowedEffects.HasFlag(DragDropEffects.Copy))
                {
                    Circle _circle = new Circle((Circle)_element);
                    _panel.Children.Add(_circle);
                    // set the value to return to the DoDragDrop call
                    e.Effects = DragDropEffects.Copy;
                }
                else if (e.AllowedEffects.HasFlag(DragDropEffects.Move))
                {
                    _parent.Children.Remove(_element);
                    _panel.Children.Add(_element);
                    // set the value to return to the DoDragDrop call
                    e.Effects = DragDropEffects.Move;
                }
            }
        }
    }
}
Private Sub panel_Drop(ByVal sender As System.Object, ByVal e As System.Windows.DragEventArgs) ' If an element in the panel has already handled the drop, ' the panel should not also handle it. If e.Handled = False Then Dim _panel As Panel = sender Dim _element As UIElement = e.Data.GetData("Object") If _panel IsNot Nothing And _element IsNot Nothing Then ' Get the panel that the element currently belongs to, ' then remove it from that panel and add it the Children of ' the panel that its been dropped on. Dim _parent As Panel = VisualTreeHelper.GetParent(_element) If _parent IsNot Nothing Then If e.KeyStates = DragDropKeyStates.ControlKey And _ e.AllowedEffects.HasFlag(DragDropEffects.Copy) Then Dim _circle As New Circle(_element) _panel.Children.Add(_circle) ' set the value to return to the DoDragDrop call e.Effects = DragDropEffects.Copy ElseIf e.AllowedEffects.HasFlag(DragDropEffects.Move) Then _parent.Children.Remove(_element) _panel.Children.Add(_element) ' set the value to return to the DoDragDrop call e.Effects = DragDropEffects.Move End If End If End If End If End Sub이 DragOver 이벤트 처리기는 다음 작업을 수행합니다.
Drop 이벤트가 이미 처리되었는지 확인합니다. 예를 들어 Drop 이벤트를 처리하는 다른 원에 원을 놓는 경우 원이 포함된 패널에서도 이벤트를 처리하지 않도록 합니다.
Drop 이벤트가 처리되지 않으면 Ctrl 키를 눌렀는지 확인합니다.
Drop이 발생할 때 Ctrl 키를 누르면 원 컨트롤의 복사본을 만들고 StackPanel의 Children 컬렉션에 추가합니다.
Ctrl 키를 누르지 않으면 부모 패널의 Children 컬렉션에서 원을 놓은 패널의 Children 컬렉션으로 원을 이동합니다.
이동 작업 또는 복사 작업이 수행되었는지 여부를 DoDragDrop 메서드에 알리도록 Effects 속성을 설정합니다.
F5 키를 눌러 애플리케이션을 빌드하고 실행합니다.
TextBox에서
green텍스트를 선택합니다.텍스트를 원 컨트롤로 끌어서 놓습니다.
왼쪽 패널에서 오른쪽 패널로 원 컨트롤을 끌어서 놓습니다. 원이 왼쪽 패널의 Children 컬렉션에서 제거되고 오른쪽 패널의 자식 컬렉션에 추가됩니다.
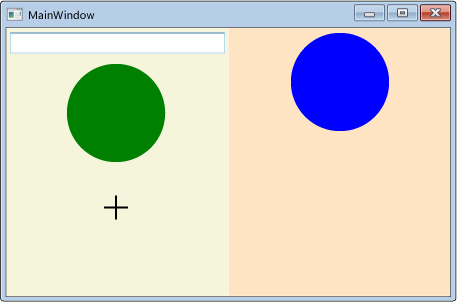
원 컨트롤이 있는 패널에서 다른 패널로 원 컨트롤을 끌고 Ctrl 키를 누른 채 놓습니다. 원이 복사되고 복사본이 수신 패널의 Children 컬렉션에 추가됩니다.
 CTRL 키를 누른 채 원을 드래그하기DragDrop_PanelDrop
참고 항목
.NET Desktop feedback
