트랜잭션을 워크플로 서비스 내부 및 외부로 이동
워크플로 서비스 및 클라이언트는 트랜잭션에 참여할 수 있습니다. 서비스 작업이 앰비언트 트랜잭션의 일부가 되도록 하려면 Receive 활동 내에 TransactedReceiveScope 활동을 배치합니다. Send 내의 SendReply 또는 TransactedReceiveScope 활동에서 실행하는 모든 호출은 앰비언트 트랜잭션 내에서도 실행됩니다. 워크플로 클라이언트 애플리케이션에서는 TransactionScope 활동을 사용하여 앰비언트 트랜잭션을 만들고 앰비언트 트랜잭션을 사용하여 서비스 작업을 호출할 수 있습니다. 이 항목에서는 트랜잭션에 참여하는 워크플로 서비스와 워크플로 클라이언트를 만드는 과정을 보여 줍니다.
Warning
워크플로 서비스 인스턴스가 트랜잭션 내에서 로드되고 워크플로에 Persist 작업이 포함된 경우 트랜잭션 제한 시간이 초과될 때까지 워크플로 인스턴스가 중단됩니다.
Important
TransactedReceiveScope를 사용할 때마다 TransactedReceiveScope 작업 내에서 워크플로에 모든 수신을 배치하는 것이 좋습니다.
Important
TransactedReceiveScope를 사용 중이고 메시지가 잘못된 순서로 도착하면 첫 번째 순서가 잘못된 메시지를 배달하려고 할 때 워크플로가 중단됩니다. 워크플로가 유휴 상태일 때 워크플로가 항상 일관된 중지 지점에 있는지 확인해야 합니다. 이렇게 하면 워크플로가 중단될 경우 이전 지속성 지점에서 워크플로를 다시 시작할 수 있습니다.
공유 라이브러리 만들기
비어 있는 새 Visual Studio 솔루션을 만듭니다.
Common이라는 새 클래스 라이브러리 프로젝트를 추가하고, 다음 어셈블리에 대한 참조를 추가합니다.System.Activities.dll
System.ServiceModel.dll
System.ServiceModel.Activities.dll
System.Transactions.dll
PrintTransactionInfo프로젝트에Common라는 새 클래스를 추가합니다. 이 클래스는 NativeActivity에서 파생되며 Execute 메서드를 오버로드합니다.using System; using System; using System.Activities; using System.Transactions; namespace Common { public class PrintTransactionInfo : NativeActivity { protected override void Execute(NativeActivityContext context) { RuntimeTransactionHandle rth = context.Properties.Find(typeof(RuntimeTransactionHandle).FullName) as RuntimeTransactionHandle; if (rth == null) { Console.WriteLine("There is no ambient RuntimeTransactionHandle"); } Transaction t = rth.GetCurrentTransaction(context); if (t == null) { Console.WriteLine("There is no ambient transaction"); } else { Console.WriteLine("Transaction: {0} is {1}", t.TransactionInformation.DistributedIdentifier, t.TransactionInformation.Status); } } } }이는 앰비언트 트랜잭션에 대한 정보를 표시하는 기본 활동으로서, 이 항목에 사용되는 서비스 및 클라이언트 워크플로 모두에 사용됩니다. 이 작업을 도구 상자의 일반 섹션에서 사용할 수 있도록 솔루션을 빌드합니다.
워크플로 서비스 구현
WorkflowService라는 새 WCF 워크플로 서비스를Common프로젝트에 추가합니다. 이렇게 하려면Common프로젝트를 마우스 오른쪽 단추로 클릭하고 추가, 새 항목...을 차례로 선택하고 설치된 템플릿에서 워크플로를 선택한 다음 WCF 워크플로 서비스를 선택합니다.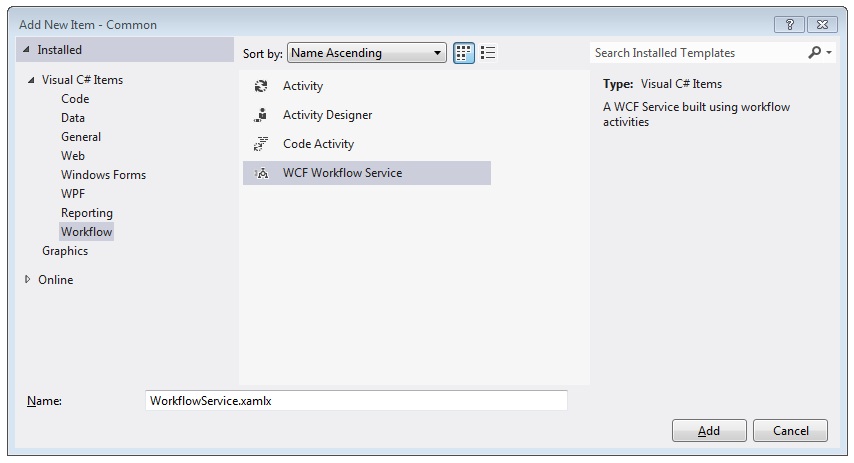
기본
ReceiveRequest및SendResponse활동을 삭제합니다.WriteLine 활동을
Sequential Service활동으로 끌어 놓습니다. 다음 예제와 같이 텍스트 속성을"Workflow Service starting ..."으로 설정합니다.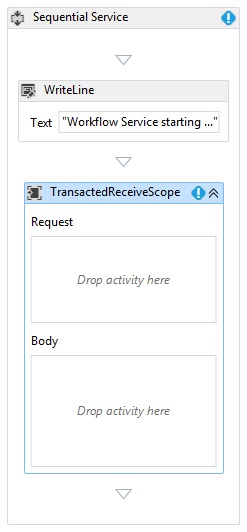
TransactedReceiveScope 작업을 선택하고 변수 단추를 클릭합니다. 다음 변수를 추가합니다.

참고 항목
기본적으로 여기에 포함된 데이터 변수를 삭제할 수 있습니다. 기존 핸들 변수를 사용할 수도 있습니다.
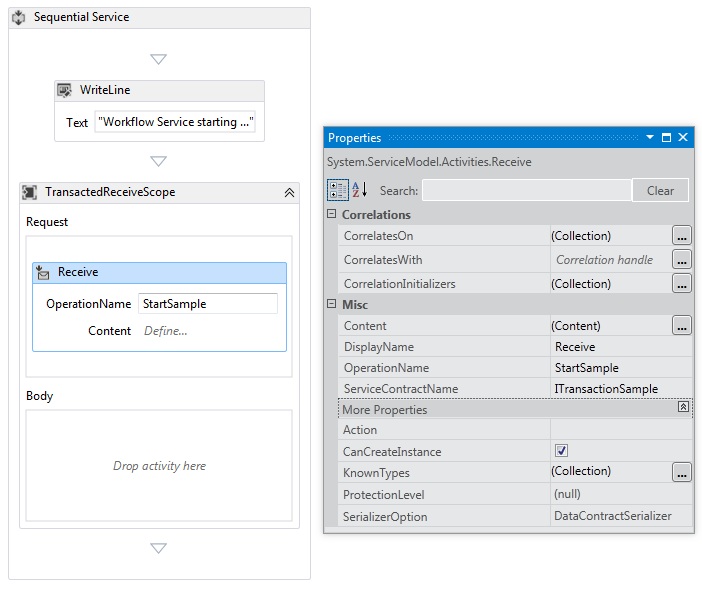
Receive 작업을 TransactedReceiveScope 작업의 요청 섹션 안으로 끌어서 놓습니다. 다음과 같이 속성을 설정합니다.
Property 값 CanCreateInstance True(확인란 선택) OperationName StartSample ServiceContractName ITransactionSample 워크플로가 다음과 같이 나타납니다.
Receive 작업의 정의... 링크를 클릭하고 다음과 같이 설정합니다.

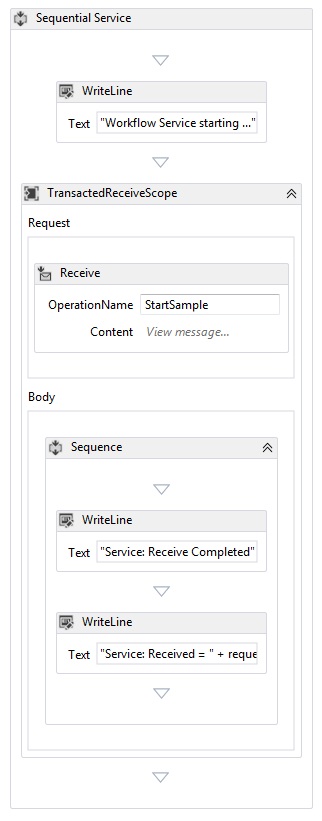
Sequence 활동을 TransactedReceiveScope의 본문 섹션으로 끌어 놓습니다. Sequence 활동 내에 두 개의 WriteLine 활동을 끌어 놓고 Text 속성을 다음 표와 같이 설정합니다.
활동 값 1st WriteLine "Service: Receive Completed" 2nd WriteLine "Service: Received = " + requestMessage 이제 워크플로가 다음과 같이 나타납니다.
PrintTransactionInfo작업을 TransactedReceiveScope 작업의 본문에 있는 두 번째 WriteLine 작업 뒤로 끌어서 놓습니다.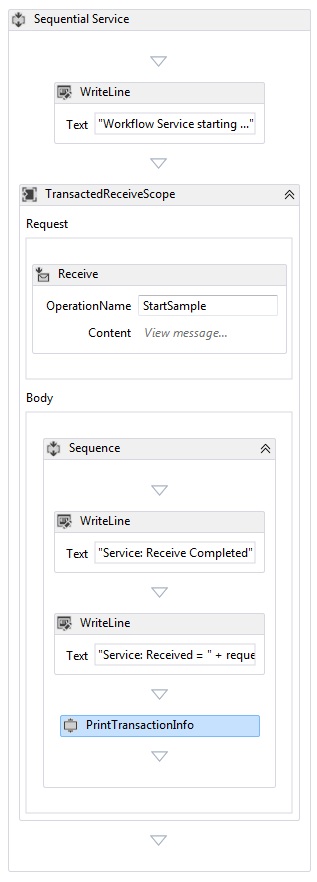
Assign 활동을
PrintTransactionInfo활동 뒤로 끌어 놓고 해당 속성을 다음 표와 같이 설정합니다.속성 값 To replyMessage 값 "Service: Sending reply" WriteLine 활동을 Assign 활동 뒤로 끌어 놓고 해당 Text 속성을 "Service: Begin reply"로 설정합니다.
이제 워크플로가 다음과 같이 나타납니다.

Receive 작업을 마우스 오른쪽 단추로 클릭하고 SendReply 만들기를 선택한 다음 마지막 WriteLine 작업 뒤에 붙여 넣습니다.
SendReplyToReceive작업의 정의... 링크를 클릭하고 다음과 같이 설정합니다.
WriteLine 작업을
SendReplyToReceive작업 뒤로 끌어서 놓고 해당 Text 속성을 "Service: Reply sent"로 설정합니다.WriteLine 활동을 워크플로의 맨 아래로 끌어 놓고 해당 Text 속성을 "Service: Workflow ends, press ENTER to exit"로 설정합니다.
완료된 서비스 워크플로는 다음과 같습니다.

워크플로 클라이언트 구현
WorkflowClient프로젝트에Common라는 새 WCF 워크플로 애플리케이션을 추가합니다. 이렇게 하려면Common프로젝트를 마우스 오른쪽 단추로 클릭하고 추가, 새 항목...을 차례로 선택하고 설치된 템플릿에서 워크플로를 선택한 다음 작업을 선택합니다.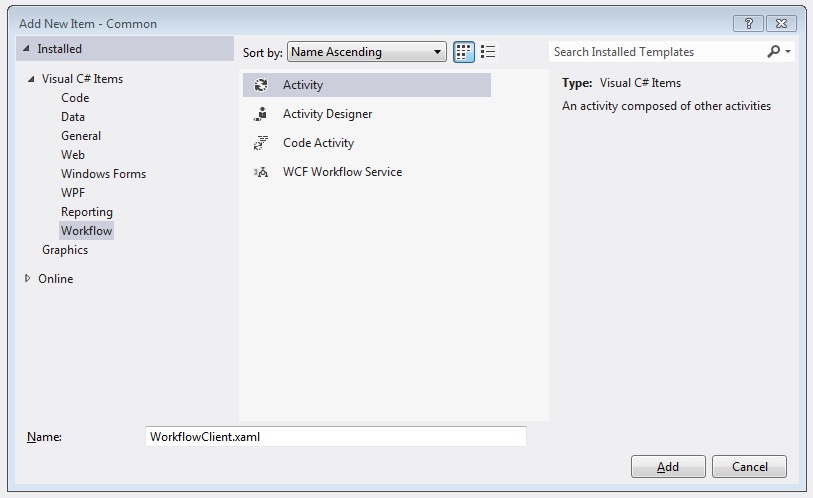
디자인 화면으로 Sequence 활동을 끌어 놓습니다.
Sequence 활동 내에 WriteLine 활동을 끌어 놓고 해당 Text 속성을
"Client: Workflow starting"으로 설정합니다. 이제 워크플로가 다음과 같이 나타납니다.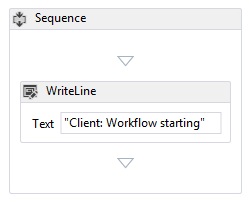
TransactionScope 활동을 WriteLine 활동 뒤로 끌어 놓습니다. TransactionScope 활동을 선택하고 변수 단추를 클릭한 후 다음 변수를 추가합니다.

Sequence 활동을 TransactionScope 활동의 본문으로 끌어 놓습니다.
PrintTransactionInfo활동을 Sequence 안으로 끌어 놓습니다.WriteLine 작업을
PrintTransactionInfo작업 뒤로 끌어 놓고 해당 Text 속성을 "Client: Beginning Send"로 설정합니다. 이제 워크플로가 다음과 같이 나타납니다.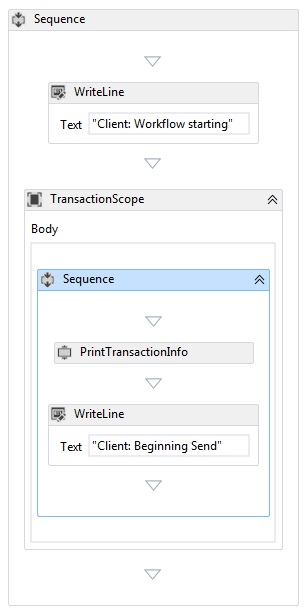
Send 활동을 Assign 활동 뒤로 끌어 놓고 다음 속성을 설정합니다.
속성 값 EndpointConfigurationName workflowServiceEndpoint OperationName StartSample ServiceContractName ITransactionSample 이제 워크플로가 다음과 같이 나타납니다.
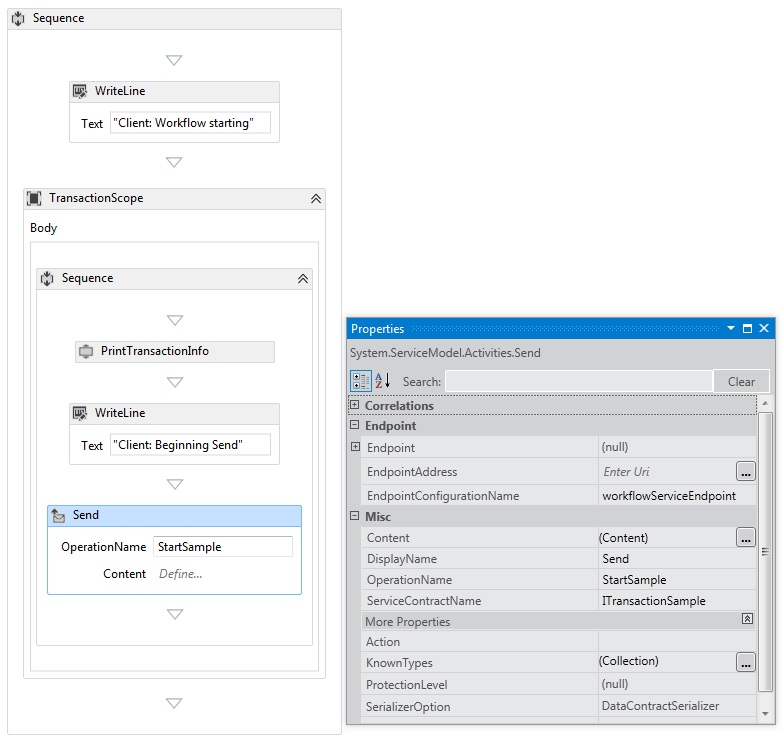
정의... 링크를 클릭하고 다음과 같이 설정합니다.

Send 작업을 마우스 오른쪽 단추로 클릭하고 ReceiveReply 만들기를 선택합니다. ReceiveReply 활동이 자동으로 Send 활동 뒤에 배치됩니다.
ReceiveReplyForSend 활동의 정의... 링크를 클릭하고 다음과 같이 설정합니다.

WriteLine 활동을 Send 활동과 ReceiveReply 활동 사이로 끌어 놓고 해당 Text 속성을 "Client: Send complete"로 설정합니다.
WriteLine 활동을 ReceiveReply 활동 뒤로 끌어 놓고 해당 Text 속성을 "Client side: Reply received = " + replyMessage로 설정합니다.
PrintTransactionInfo활동을 WriteLine 활동 뒤로 끌어 놓습니다.워크플로 끝에 WriteLine 작업을 끌어서 놓고 해당 Text 속성을 "클라이언트 워크플로 종료"로 설정합니다. 완료된 클라이언트 워크플로는 다음 다이어그램과 같아야 합니다.

솔루션을 빌드합니다.
서비스 애플리케이션 만들기
솔루션에
Service라는 새 콘솔 애플리케이션 프로젝트를 추가하고, 다음 어셈블리에 대한 참조를 추가합니다.System.Activities.dll
System.ServiceModel.dll
System.ServiceModel.Activities.dll
생성된 Program.cs 파일을 열고 다음 코드를 추가합니다.
      static void Main()
      {
          Console.WriteLine("Building the server.");
          using (WorkflowServiceHost host = new WorkflowServiceHost(new DeclarativeServiceWorkflow(), new Uri("net.tcp://localhost:8000/TransactedReceiveService/Declarative")))
          {
              //Start the server
              host.Open();
              Console.WriteLine("Service started.");

              Console.WriteLine();
              Console.ReadLine();
              //Shutdown
              host.Close();
          };
      }
프로젝트에 다음 app.config 파일을 추가합니다.
<?xml version="1.0" encoding="utf-8" ?>
<!-- Copyright © Microsoft Corporation.  All rights reserved. -->
<configuration>
    <system.serviceModel>
        <bindings>
            <netTcpBinding>
                <binding transactionFlow="true" />
            </netTcpBinding>
        </bindings>
    </system.serviceModel>
</configuration>
클라이언트 애플리케이션 만들기
솔루션에
Client라는 새 콘솔 애플리케이션 프로젝트를 추가하고, System.Activities.dll에 대한 참조를 추가합니다.program.cs 파일을 열고 다음 코드를 추가합니다.
class Program
{

    private static AutoResetEvent syncEvent = new AutoResetEvent(false);

    static void Main(string[] args)
    {
        //Build client
        Console.WriteLine("Building the client.");
        WorkflowApplication client = new WorkflowApplication(new DeclarativeClientWorkflow());
        client.Completed = Program.Completed;
        client.Aborted = Program.Aborted;
        client.OnUnhandledException = Program.OnUnhandledException;
        //Wait for service to start
        Console.WriteLine("Press ENTER once service is started.");
        Console.ReadLine();

        //Start the client
        Console.WriteLine("Starting the client.");
        client.Run();
        syncEvent.WaitOne();

        //Sample complete
        Console.WriteLine();
        Console.WriteLine("Client complete. Press ENTER to exit.");
        Console.ReadLine();
    }

    private static void Completed(WorkflowApplicationCompletedEventArgs e)
    {
        Program.syncEvent.Set();
    }

    private static void Aborted(WorkflowApplicationAbortedEventArgs e)
    {
        Console.WriteLine("Client Aborted: {0}", e.Reason);
        Program.syncEvent.Set();
    }

    private static UnhandledExceptionAction OnUnhandledException(WorkflowApplicationUnhandledExceptionEventArgs e)
    {
        Console.WriteLine("Client had an unhandled exception: {0}", e.UnhandledException);
        return UnhandledExceptionAction.Cancel;
    }
}