Import data with the Ecolab connector (preview)
Important
Some or all of this functionality is available as part of a preview release. The content and the functionality are subject to change.
Important
This feature is currently available only in US data centers.
We've partnered with Ecolab to integrate Microsoft Sustainability Manager and ECOLAB3D. This integration enables water sustainability experiences for our shared customers. With the Ecolab connector, you have your facilities in sync across both platforms.
To begin the integration, perform the following steps:
- Export a list of facilities from Sustainability Manager
- Send your exported list to Ecolab
- Configure facility goals
- Configure the data import
Step 1: Export a list of facilities from Sustainability Manager
In this step, you export a list of your facilities from Sustainability Manager. Later, you send the list to Ecolab to establish synchronization of common facilities between ECOLAB3D and Sustainability Manager for each tenant.
The exported list is in CSV format and includes the following data:
- Unique identifier
- Facility name
- Address
- Latitude and longitude
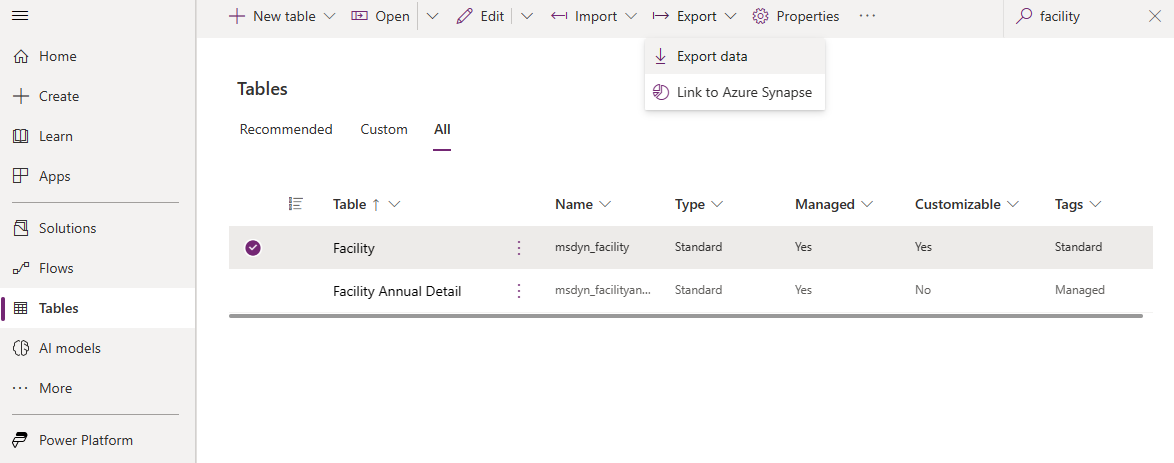
In the Power Apps portal, select Tables in the left navigation.
On the Tables page, select the All tab.
Search for and select the Facility table (msdyn_facility).
Select Export, and then select Export data.

When the export completes, select Download exported data on the Export data page. Continue with the next step.
Step 2: Send your exported list to Ecolab
In this step, you need to send your list to Ecolab to set up the exported data in ECOLAB3D.
Contact your Ecolab or Nalco Water representative, or reach out to ecolabcds@service-now.com. They provide instructions on how to send your exported list.
Step 3: Configure facility goals
After your facilities data has been synchronized with ECOLAB3D, you'll need to configure goals in Sustainability Manager. This step determines the data that synchronizes between Sustainability Manager and ECOLAB3D.
In this step, you create a parent goal. Then you create a facility goal for each facility.
Prerequisites
Be sure you've completed the following requirements before proceeding with this step:
- You've received your ECOLAB3D credentials and configuration details.
- You've sent Ecolab a list of facilities to be mapped and have received confirmation.
- You've created a scorecard to track your facility water reduction goals.
Add a parent goal
Add a parent goal to use for the facility goals and the data connection you create later on. For more information about adding goals, go to Create goals.
In the left navigation of Sustainability Manager, select the Analytics area, and then select Scorecards.
Select the Goals tab.
Select Add goal to create the parent goal.
In the Add a goal pane, enter the parent goal details. Be sure to leave Facility blank. Select Save when you're done.
Field Description Goal name Enter a unique name to identify the parent goal. Owner Select an owner for this parent goal. Scorecard Select the scorecard you created for your Ecolab data. Start date Select the start date. End date Select the end date. Unit of measure In the dropdown under Volume, select a volume unit supported by ECOLAB3D: US gallon, Cubic metres, or Litres. Starting value Enter the value of this goal when it's at 0% of its target. Target value Enter the target value.
Add facility goals
The Ecolab connector only ingests data for facility goals under the parent goal you created. You need to follow these steps for each facility that needs a goal. For more information about adding goals, go to Create goals.
In the left navigation of Sustainability Manager, select the Analytics area, and then select Scorecards.
Select the Goals tab.
Select Add goal to create the parent goal.
In the Add a goal pane, enter the parent goal details. Be sure to leave Facility blank. Select Save when you're done.
Field Description Goal name Enter a unique name to identify the facility goal. Owner Select an owner for this parent goal. Scorecard Select the same scorecard you used for the parent goal. Parent goal The parent goal you created. Facility Ensure that only a single facility goal exists for each facility. Start date Select the start date. End date Select the end date. Unit of measure Enter the same unit you entered for the parent goal. Starting value Enter the value of this goal when it's at 0% of its target. Target value Enter the target value.
Step 4: Configure the data import
In the left navigation of Sustainability Manager, switch to the Data area, and then select Data imports.
On the Data imports page, select New.
Select PARTNER SOLUTIONS.
On the Choose a data source page, select Ecolab Data Connector, and then select Next.
On the Create connection page, in the Select credential dropdown, select Add credential.
On the Add credentials popup, enter the ECOLAB3D configuration details provided to configure the connection. Make sure these credentials match the sign-in information you use to access this account with your provider.
Field Description Credentials nickname Enter a nickname for your credentials. Client ID Enter your client ID. Client secret Enter your client secret. Scope Enter a scope. Unit of volume Enter the same unit you entered for the parent goal. Parent goal Enter the parent goal you created earlier. Select Next.
On the Schedule data import page, set Import data automatically to On, and then select Next.
On the Review and name page, enter a name and description for the data connection.
Related information
- Overview of data import
- Incremental data refresh
- Import data with Excel templates
- Import data with Power Query
- Import data with data provider connectors
- Import data manually
- Change data import connection ownership (preview)
- Review data imports
- Considerations and FAQ
- Integration
