Xamarin.Forms Visual State Manager
Visual State Manager를 사용하여 코드에서 설정된 시각적 상태에 따라 XAML 요소를 변경합니다.
VSM(Visual State Manager)은 코드에서 사용자 인터페이스를 시각적으로 변경하는 구조화된 방법을 제공합니다. 대부분의 경우 애플리케이션의 사용자 인터페이스는 XAML에 정의되며, 이 XAML에는 Visual State Manager가 사용자 인터페이스의 시각적 개체에 미치는 영향을 설명하는 태그가 포함되어 있습니다.
VSM은 시각적 상태의 개념을 소개합니다. Xamarin.Forms 뷰와 같은 Button 뷰는 기본 상태에 따라 여러 가지 시각적 모양을 가질 수 있습니다( 비활성화되었든 누르든, 입력 포커스가 있든 관계없이). 단추의 상태입니다.
시각적 상태는 시각적 상태 그룹에서 수집됩니다. 시각적 상태 그룹 내의 모든 시각적 상태는 상호 배타적입니다. 시각적 상태와 시각적 상태 그룹은 모두 간단한 텍스트 문자열로 식별됩니다.
Visual State Manager는 Xamarin.Forms 다음 시각적 상태를 사용하여 "CommonStates"라는 하나의 시각적 상태 그룹을 정의합니다.
- "Normal"
- "사용 안 함"
- "집중"
- "선택됨"
이 시각적 상태 그룹은 파생 VisualElement되는 모든 클래스에 대해 지원됩니다. 이 클래스는 기본 클래스 View 입니다 Page.
이 문서에서 설명한 대로 고유한 시각적 상태 그룹 및 시각적 상태를 정의할 수도 있습니다.
참고 항목
Xamarin.Forms트리거에 익숙한 개발자는 트리거가 보기의 속성 변경 또는 이벤트 발생에 따라 사용자 인터페이스의 시각적 개체를 변경할 수도 있음을 알고 있습니다. 그러나 트리거를 사용하여 이러한 변경 내용의 다양한 조합을 처리하는 것은 매우 혼란스러울 수 있습니다. 지금까지 Visual State Manager는 시각적 상태의 조합으로 인한 혼란을 완화하기 위해 Windows XAML 기반 환경에서 도입되었습니다. VSM을 사용하면 시각적 상태 그룹 내의 시각적 상태는 항상 상호 배타적입니다. 언제든지 각 그룹의 상태 하나만 현재 상태입니다.
공통 상태
Visual State Manager를 사용하면 보기가 정상이거나 비활성화되었거나 입력 포커스가 있는 경우 보기의 시각적 모양을 변경할 수 있는 태그를 XAML 파일에 포함할 수 있습니다. 이를 공통 상태로 알려져 있습니다.
예를 들어 페이지에 보기가 Entry 있고 시각적 모양이 Entry 다음과 같은 방식으로 변경되도록 하려는 경우를 가정해 보겠습니다.
Entry사용할 수 없는 경우 분홍색 배경이Entry있어야 합니다.- 일반적으로
Entry라임 배경이 있어야합니다. Entry입력 포커스가 있는 경우 정상 높이의 두 배로 확장해야 합니다.
VSM 태그를 개별 보기에 연결하거나 여러 보기에 적용되는 경우 스타일에서 정의할 수 있습니다. 다음 두 섹션에서는 이러한 방법을 설명합니다.
보기의 VSM 태그
뷰에 VSM 태그를 Entry 연결하려면 먼저 시작 태그와 끝 태그를 구분 Entry 합니다.
<Entry FontSize="18">

</Entry>
상태 중 하나가 속성을 사용하여 FontSize 텍스트 Entry의 크기를 두 배로 늘리기 때문에 명시적 글꼴 크기가 지정됩니다.
다음으로, 해당 태그 사이에 태그를 삽입 VisualStateManager.VisualStateGroups 합니다.
<Entry FontSize="18">
    <VisualStateManager.VisualStateGroups>

    </VisualStateManager.VisualStateGroups>
</Entry>
VisualStateGroups 는 클래스에서 정의한 연결된 바인딩 가능 속성입니다 VisualStateManager . (연결된 바인딩 가능한 속성에 대한 자세한 내용은 문서를 참조하세요. 연결된 속성입니다.) 속성이 개체에 VisualStateGroups Entry 연결되는 방법입니다.
속성은 VisualStateGroups 개체 컬렉션인 형식 VisualStateGroupList입니다 VisualStateGroup . VisualStateManager.VisualStateGroups 태그 내에서 포함하려는 시각적 상태의 VisualStateGroup 각 그룹에 대한 태그 쌍을 삽입합니다.
<Entry FontSize="18">
    <VisualStateManager.VisualStateGroups>
        <VisualStateGroup x:Name="CommonStates">

        </VisualStateGroup>
    </VisualStateManager.VisualStateGroups>
</Entry>
태그에는 VisualStateGroup x:Name 그룹의 이름을 나타내는 특성이 있습니다. 클래스는 VisualStateGroup 대신 사용할 수 있는 속성을 정의합니다 Name .
<VisualStateGroup Name="CommonStates">
동일한 요소에서 둘 중 하나 x:Name 또는 Name 둘 다를 사용할 수 있습니다.
클래스는 VisualStateGroup 개체 컬렉션 VisualState 인 명명States된 속성을 정의합니다. States는 태그 사이에 VisualStateGroup 태그를 VisualState 직접 포함할 수 있도록 하는 콘텐츠 속성 VisualStateGroups 입니다. (콘텐츠 속성은 이 문서에서 설명합니다.필수 XAML 구문입니다.)
다음 단계는 해당 그룹의 모든 시각적 상태에 대한 태그 쌍을 포함하는 것입니다. 다음을 사용하거나 Name다음을 사용하여 x:Name 식별할 수도 있습니다.
<Entry FontSize="18">
    <VisualStateManager.VisualStateGroups>
        <VisualStateGroup x:Name="CommonStates">
            <VisualState x:Name="Normal">

            </VisualState>

            <VisualState x:Name="Focused">

            </VisualState>

            <VisualState x:Name="Disabled">

            </VisualState>
        </VisualStateGroup>
    </VisualStateManager.VisualStateGroups>
</Entry>
VisualState는 개체 컬렉션 Setter 인 명명Setters된 속성을 정의합니다. 이러한 개체는 개체에서 사용하는 것과 동일한 Setter 개체입니다 Style .
Setters의 콘텐츠 속성VisualState이 아니므로 속성에 대한 Setters 속성 요소 태그를 포함해야 합니다.
<Entry FontSize="18">
    <VisualStateManager.VisualStateGroups>
        <VisualStateGroup x:Name="CommonStates">
            <VisualState x:Name="Normal">
                <VisualState.Setters>

                </VisualState.Setters>
            </VisualState>

            <VisualState x:Name="Focused">
                <VisualState.Setters>

                </VisualState.Setters>
            </VisualState>

            <VisualState x:Name="Disabled">
                <VisualState.Setters>

                </VisualState.Setters>
            </VisualState>
        </VisualStateGroup>
    </VisualStateManager.VisualStateGroups>
</Entry>
이제 각 태그 쌍 Setters 사이에 하나 이상의 Setter 개체를 삽입할 수 있습니다. 앞에서 설명한 Setter 시각적 상태를 정의하는 개체는 다음과 같습니다.
<Entry FontSize="18">
    <VisualStateManager.VisualStateGroups>
        <VisualStateGroup x:Name="CommonStates">
            <VisualState x:Name="Normal">
                <VisualState.Setters>
                    <Setter Property="BackgroundColor" Value="Lime" />
                </VisualState.Setters>
            </VisualState>

            <VisualState x:Name="Focused">
                <VisualState.Setters>
                    <Setter Property="FontSize" Value="36" />
                </VisualState.Setters>
            </VisualState>

            <VisualState x:Name="Disabled">
                <VisualState.Setters>
                    <Setter Property="BackgroundColor" Value="Pink" />
                </VisualState.Setters>
            </VisualState>
        </VisualStateGroup>
    </VisualStateManager.VisualStateGroups>
</Entry>
각 Setter 태그는 해당 상태가 현재 상태일 때 특정 속성의 값을 나타냅니다. 개체에서 참조하는 Setter 모든 속성은 바인딩 가능한 속성으로 지원되어야 합니다.
이와 유사한 태그는 샘플 프로그램의 보기 페이지에서 VSM을 기반으로 합니다. 페이지에는 세 개의 Entry 보기가 포함되어 있지만 두 번째 보기에만 VSM 태그가 연결되어 있습니다.
<ContentPage xmlns="http://xamarin.com/schemas/2014/forms"
             xmlns:x="http://schemas.microsoft.com/winfx/2009/xaml"
             xmlns:local="clr-namespace:VsmDemos"
             x:Class="VsmDemos.MainPage"
             Title="VSM Demos">

    <StackLayout>
        <StackLayout.Resources>
            <Style TargetType="Entry">
                <Setter Property="Margin" Value="20, 0" />
                <Setter Property="FontSize" Value="18" />
            </Style>

            <Style TargetType="Label">
                <Setter Property="Margin" Value="20, 30, 20, 0" />
                <Setter Property="FontSize" Value="Large" />
            </Style>
        </StackLayout.Resources>

        <Label Text="Normal Entry:" />
        <Entry />
        <Label Text="Entry with VSM: " />
        <Entry>
            <VisualStateManager.VisualStateGroups>
                <VisualStateGroup x:Name="CommonStates">
                    <VisualState x:Name="Normal">
                        <VisualState.Setters>
                            <Setter Property="BackgroundColor" Value="Lime" />
                        </VisualState.Setters>
                    </VisualState>
                    <VisualState x:Name="Focused">
                        <VisualState.Setters>
                            <Setter Property="FontSize" Value="36" />
                        </VisualState.Setters>
                    </VisualState>
                    <VisualState x:Name="Disabled">
                        <VisualState.Setters>
                            <Setter Property="BackgroundColor" Value="Pink" />
                        </VisualState.Setters>
                    </VisualState>
                </VisualStateGroup>
            </VisualStateManager.VisualStateGroups>

            <Entry.Triggers>
                <DataTrigger TargetType="Entry"
                             Binding="{Binding Source={x:Reference entry3},
                                               Path=Text.Length}"
                             Value="0">
                    <Setter Property="IsEnabled" Value="False" />
                </DataTrigger>
            </Entry.Triggers>
        </Entry>
        <Label Text="Entry to enable 2nd Entry:" />
        <Entry x:Name="entry3"
               Text=""
               Placeholder="Type something to enable 2nd Entry" />
    </StackLayout>
</ContentPage>
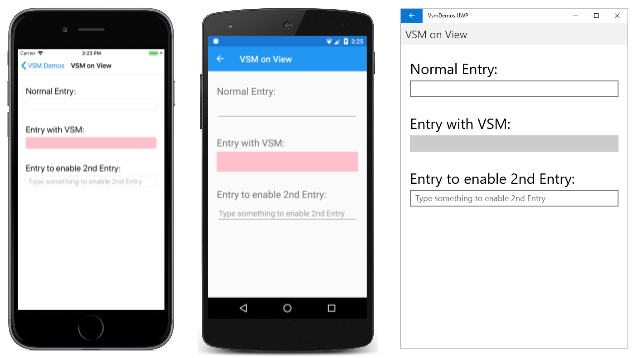
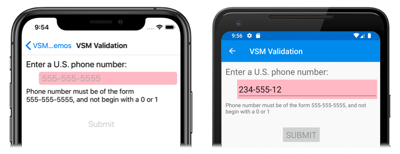
두 번째 Entry 컬렉션에는 DataTrigger 컬렉션의 Trigger 일부로도 있습니다. 이렇게 하면 Entry 세 번째 Entry에 입력할 때까지 비활성화됩니다. iOS, Android 및 UWP(유니버설 Windows 플랫폼)에서 실행되는 시작 시의 페이지는 다음과 같습니다.
현재 시각적 상태는 "사용 안 함"이므로 두 번째 Entry 화면의 배경은 iOS 및 Android 화면에서 분홍색입니다. UWP 구현 Entry 에서는 사용할 수 없는 경우 Entry 배경색을 설정할 수 없습니다.
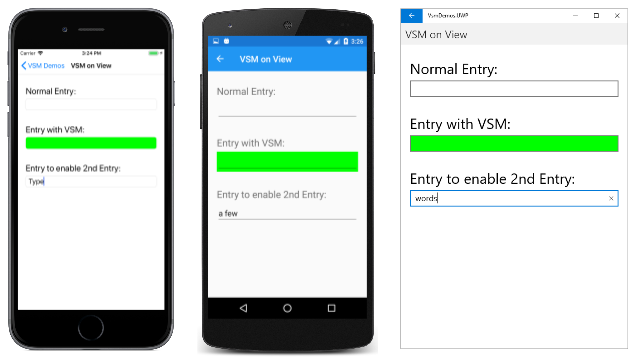
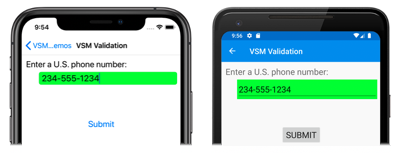
세 번째 Entry텍스트에 텍스트를 입력하면 두 번째 Entry 텍스트가 "보통" 상태로 전환되고 배경이 이제 라임으로 바뀝니다.
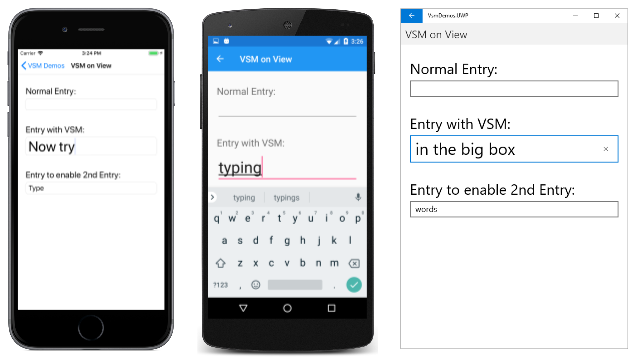
두 번째 Entry키를 터치하면 입력 포커스가 표시됩니다. "집중" 상태로 전환되고 높이의 두 배로 확장됩니다.
입력 포커스를 Entry 받을 때 라임 배경은 유지되지 않습니다. Visual State Manager가 시각적 상태 간에 전환되면 이전 상태에서 설정한 속성이 설정되지 않습니다. 시각적 상태는 상호 배타적입니다. "보통" 상태는 전적으로 활성화된 것을 Entry 의미하지는 않습니다. 즉, Entry 이 설정이 사용되며 입력 포커스가 없음을 의미합니다.
"집중" 상태의 Entry 라임 배경을 사용하려면 해당 시각적 상태에 다른 Setter 배경을 추가합니다.
<VisualState x:Name="Focused">
    <VisualState.Setters>
        <Setter Property="FontSize" Value="36" />
        <Setter Property="BackgroundColor" Value="Lime" />
    </VisualState.Setters>
</VisualState>
이러한 Setter 개체가 제대로 VisualStateGroup 작동하려면 해당 그룹의 모든 상태에 대한 개체를 포함 VisualState 해야 합니다. 개체가 없는 Setter 시각적 상태가 있는 경우 어쨌든 빈 태그로 포함합니다.
<VisualState x:Name="Normal" />
스타일의 Visual State Manager 태그
두 개 이상의 보기 간에 동일한 Visual State Manager 태그를 공유해야 하는 경우가 많습니다. 이 경우 태그를 정의에 배치하려고 합니다 Style .
VSM On View 페이지의 요소에 Entry 대한 기존 암시적 Style 내용은 다음과 같습니다.
<Style TargetType="Entry">
    <Setter Property="Margin" Value="20, 0" />
    <Setter Property="FontSize" Value="18" />
</Style>
연결된 바인딩 가능 속성에 대한 태그를 VisualStateManager.VisualStateGroups 추가 Setter 합니다.
<Style TargetType="Entry">
    <Setter Property="Margin" Value="20, 0" />
    <Setter Property="FontSize" Value="18" />
    <Setter Property="VisualStateManager.VisualStateGroups">

    </Setter>
</Style>
콘텐츠 속성 Setter 은 Value해당 태그 내에서 직접 속성 값을 Value 지정할 수 있도록 합니다. 해당 속성은 다음과 같은 형식 VisualStateGroupList입니다.
<Style TargetType="Entry">
    <Setter Property="Margin" Value="20, 0" />
    <Setter Property="FontSize" Value="18" />
    <Setter Property="VisualStateManager.VisualStateGroups">
        <VisualStateGroupList>

        </VisualStateGroupList>
    </Setter>
</Style>
이러한 태그 내에 다음 VisualStateGroup 개체 중 하나를 포함할 수 있습니다.
<Style TargetType="Entry">
    <Setter Property="Margin" Value="20, 0" />
    <Setter Property="FontSize" Value="18" />
    <Setter Property="VisualStateManager.VisualStateGroups">
        <VisualStateGroupList>
            <VisualStateGroup x:Name="CommonStates">

            </VisualStateGroup>
        </VisualStateGroupList>
    </Setter>
</Style>
VSM 태그의 나머지는 이전과 동일합니다.
다음은 전체 VSM 태그를 보여 주는 스타일 내 VSM 페이지입니다.
<ContentPage xmlns="http://xamarin.com/schemas/2014/forms"
             xmlns:x="http://schemas.microsoft.com/winfx/2009/xaml"
             x:Class="VsmDemos.VsmInStylePage"
             Title="VSM in Style">
    <StackLayout>
        <StackLayout.Resources>
            <Style TargetType="Entry">
                <Setter Property="Margin" Value="20, 0" />
                <Setter Property="FontSize" Value="18" />
                <Setter Property="VisualStateManager.VisualStateGroups">
                    <VisualStateGroupList>
                        <VisualStateGroup x:Name="CommonStates">
                            <VisualState x:Name="Normal">
                                <VisualState.Setters>
                                    <Setter Property="BackgroundColor" Value="Lime" />
                                </VisualState.Setters>
                            </VisualState>
                            <VisualState x:Name="Focused">
                                <VisualState.Setters>
                                    <Setter Property="FontSize" Value="36" />
                                    <Setter Property="BackgroundColor" Value="Lime" />
                                </VisualState.Setters>
                            </VisualState>
                            <VisualState x:Name="Disabled">
                                <VisualState.Setters>
                                    <Setter Property="BackgroundColor" Value="Pink" />
                                </VisualState.Setters>
                            </VisualState>
                        </VisualStateGroup>
                    </VisualStateGroupList>
                </Setter>
            </Style>

            <Style TargetType="Label">
                <Setter Property="Margin" Value="20, 30, 20, 0" />
                <Setter Property="FontSize" Value="Large" />
            </Style>
        </StackLayout.Resources>

        <Label Text="Normal Entry:" />
        <Entry />
        <Label Text="Entry with VSM: " />
        <Entry>
            <Entry.Triggers>
                <DataTrigger TargetType="Entry"
                             Binding="{Binding Source={x:Reference entry3},
                                               Path=Text.Length}"
                             Value="0">
                    <Setter Property="IsEnabled" Value="False" />
                </DataTrigger>
            </Entry.Triggers>
        </Entry>
        <Label Text="Entry to enable 2nd Entry:" />
        <Entry x:Name="entry3"
               Text=""
               Placeholder="Type something to enable 2nd Entry" />
    </StackLayout>
</ContentPage>
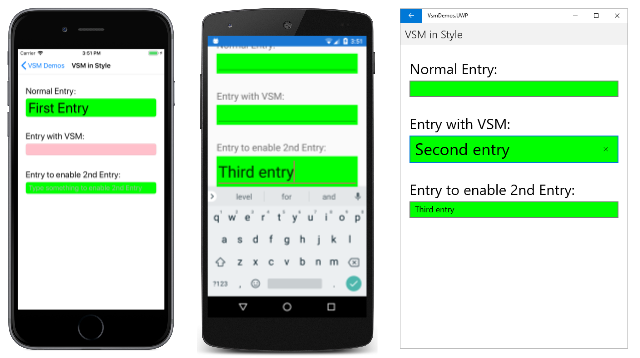
이제 이 페이지의 모든 Entry 보기가 시각적 상태에 동일한 방식으로 응답합니다. 또한 "포커스가 있는" 상태에는 입력 포커스가 있을 때 각 Entry 배경에 라임 배경을 제공하는 초 Setter 가 포함됩니다.
의 시각적 상태 Xamarin.Forms
다음 표에서는 다음에 정의된 시각적 상태를 나열합니다.Xamarin.Forms
| 클래스 | 상태 | 추가 정보 |
|---|---|---|
Button |
Pressed |
단추 시각적 상태 |
CheckBox |
IsChecked |
CheckBox 시각적 상태 |
CarouselView |
DefaultItem, CurrentItem, PreviousItemNextItem |
CarouselView 시각적 상태 |
ImageButton |
Pressed |
ImageButton 시각적 상태 |
RadioButton |
Checked, Unchecked |
RadioButton 시각적 상태 |
Switch |
On, Off |
시각적 상태 전환 |
VisualElement |
Normal, Disabled, FocusedSelected |
공통 상태 |
이러한 각 상태는 이름이 지정된 CommonStates시각적 상태 그룹을 통해 액세스할 수 있습니다.
또한 CollectionView 상태를 구현합니다 Selected . 자세한 내용은 선택한 항목 색 변경을 참조 하세요.
여러 요소에 상태 설정
이전 예제에서 시각적 상태는 단일 요소에 연결되고 작동되었습니다. 그러나 단일 요소에 연결되어 있지만 동일한 범위 내의 다른 요소에 대한 속성을 설정하는 시각적 상태를 만들 수도 있습니다. 이렇게 하면 상태가 작동하는 각 요소에 대해 시각적 상태를 반복할 필요가 없습니다.
형식에는 Setter TargetName 시각적 상태에 대해 조작할 대상 요소를 나타내는 형식 string의 Setter 속성이 있습니다. 속성이 TargetName 정의되면 정의된 TargetName 요소의 집합 Property 은 다음과 같습니다ValueSetter.
<Setter TargetName="label"
        Property="Label.TextColor"
        Value="Red" />
이 예제에서는 명명 label 된 Label 속성이 TextColor .로 Red설정됩니다. 속성을 설정할 때는 TargetName 속성의 전체 경로를 Property지정해야 합니다. 따라서 속성을 LabelProperty 설정 TextColor 하려면 .로 Label.TextColor지정됩니다.
참고 항목
개체에서 참조하는 Setter 모든 속성은 바인딩 가능한 속성으로 지원되어야 합니다.
샘플의 Setter TargetName 페이지가 있는 VSM은 단일 시각적 상태 그룹에서 여러 요소의 상태를 설정하는 방법을 보여줍니다. XAML 파일은 요소, Entry요소 및 다음을 Label 포함하는 파일로 Button구성됩니다StackLayout.
<ContentPage xmlns="http://xamarin.com/schemas/2014/forms"
             xmlns:x="http://schemas.microsoft.com/winfx/2009/xaml"
             x:Class="VsmDemos.VsmSetterTargetNamePage"
             Title="VSM with Setter TargetName">
    <StackLayout Margin="10">
        <Label Text="What is the capital of France?" />
        <Entry x:Name="entry"
               Placeholder="Enter answer" />
        <Button Text="Reveal answer">
            <VisualStateManager.VisualStateGroups>
                <VisualStateGroup x:Name="CommonStates">
                    <VisualState x:Name="Normal" />
                    <VisualState x:Name="Pressed">
                        <VisualState.Setters>
                            <Setter Property="Scale"
                                    Value="0.8" />
                            <Setter TargetName="entry"
                                    Property="Entry.Text"
                                    Value="Paris" />
                        </VisualState.Setters>
                    </VisualState>
                </VisualStateGroup>
            </VisualStateManager.VisualStateGroups>
        </Button>
    </StackLayout>
</ContentPage>
VSM 태그가 StackLayout. "Normal" 및 "Pressed"라는 두 개의 상호 배타적 상태가 있으며 각 상태에는 태그가 VisualState 포함됩니다.
"보통" 상태는 누르지 않을 때 Button 활성화되며 질문에 대한 응답을 입력할 수 있습니다.
눌렀을 때 Button "누름" 상태가 활성화됩니다.
"Pressed" VisualState 는 누를 때 Button 해당 Scale 속성이 기본값 1에서 0.8로 변경되도록 지정합니다. 또한 명명 entry 된 Entry 속성은 Text 파리로 설정됩니다. 따라서 눌렀을 때 Button 크기가 약간 작아지고 파리가 Entry 표시됩니다. 그런 다음 릴리스 Button 되면 기본값 1로 다시 크기가 조정되고 Entry 이전에 입력한 텍스트가 표시됩니다.
Important
속성 경로는 현재 속성을 지정 TargetName 하는 요소에서 Setter 지원되지 않습니다.
고유한 시각적 상태 정의
파생된 VisualElement 모든 클래스는 공통 상태 "Normal", "Focused" 및 "Disabled"를 지원합니다. 또한 클래스는 CollectionView "선택됨" 상태를 지원합니다. 내부적으로 클래스는 VisualElement 활성화 또는 비활성화되거나 포커스가 없거나 포커스가 없는 경우를 감지하고 정적 VisualStateManager.GoToState 메서드를 호출합니다.
VisualStateManager.GoToState(this, "Focused");
클래스에서 VisualElement 찾을 수 있는 유일한 Visual State Manager 코드입니다. GoToState 파생되는 VisualElement모든 클래스에 따라 모든 개체에 대해 호출되므로 Visual State Manager를 모든 VisualElement 개체와 함께 사용하여 이러한 변경 내용에 응답할 수 있습니다.
흥미롭게도 시각적 상태 그룹 "CommonStates"의 이름은 .에서 VisualElement명시적으로 참조되지 않습니다. 그룹 이름은 Visual State Manager에 대한 API의 일부가 아닙니다. 지금까지 표시된 두 샘플 프로그램 중 하나에서 그룹의 이름을 "CommonStates"에서 다른 이름으로 변경할 수 있으며 프로그램은 계속 작동합니다. 그룹 이름은 해당 그룹의 상태에 대한 일반적인 설명일 뿐입니다. 모든 그룹의 시각적 상태는 상호 배타적인 것으로 암시적으로 이해됩니다. 한 상태와 한 상태만 현재 상태입니다.
고유한 시각적 상태를 구현하려면 코드에서 호출 VisualStateManager.GoToState 해야 합니다. 대부분의 경우 페이지 클래스의 코드 숨김 파일에서 이 호출을 수행합니다.
샘플의 VSM 유효성 검사 페이지에는 입력 유효성 검사와 관련하여 Visual State Manager를 사용하는 방법이 표시됩니다. XAML 파일은 다음 두 Label 요소, 즉 StackLayout Entry다음을 포함하는 파일로 Button구성됩니다.
<ContentPage xmlns="http://xamarin.com/schemas/2014/forms"
             xmlns:x="http://schemas.microsoft.com/winfx/2009/xaml"
             x:Class="VsmDemos.VsmValidationPage"
             Title="VSM Validation">
    <StackLayout x:Name="stackLayout"
                 Padding="10, 10">
            <VisualStateManager.VisualStateGroups>
                <VisualStateGroup Name="ValidityStates">
                    <VisualState Name="Valid">
                        <VisualState.Setters>
                            <Setter TargetName="helpLabel"
                                    Property="Label.TextColor"
                                    Value="Transparent" />
                            <Setter TargetName="entry"
                                    Property="Entry.BackgroundColor"
                                    Value="Lime" />
                        </VisualState.Setters>
                    </VisualState>
                    <VisualState Name="Invalid">
                        <VisualState.Setters>
                            <Setter TargetName="entry"
                                    Property="Entry.BackgroundColor"
                                    Value="Pink" />
                            <Setter TargetName="submitButton"
                                    Property="Button.IsEnabled"
                                    Value="False" />
                        </VisualState.Setters>
                    </VisualState>
                </VisualStateGroup>
            </VisualStateManager.VisualStateGroups>
        <Label Text="Enter a U.S. phone number:"
               FontSize="Large" />
        <Entry x:Name="entry"
               Placeholder="555-555-5555"
               FontSize="Large"
               Margin="30, 0, 0, 0"
               TextChanged="OnTextChanged" />
        <Label x:Name="helpLabel"
               Text="Phone number must be of the form 555-555-5555, and not begin with a 0 or 1" />
        <Button x:Name="submitButton"
                Text="Submit"
                FontSize="Large"
                Margin="0, 20"
                VerticalOptions="Center"
                HorizontalOptions="Center" />
    </StackLayout>
</ContentPage>
VSM 태그는 (명명stackLayout된)에 StackLayout 연결됩니다. "Valid" 및 "Invalid"라는 두 개의 상호 배타적 상태가 있으며 각 상태에는 태그가 VisualState 포함됩니다.
Entry 유효한 전화 번호가 없으면 현재 상태가 "잘못됨"이므로 Entry 분홍색 배경이 있고 두 번째 Label 가 표시되고 Button 비활성화됩니다.
유효한 전화 번호를 입력하면 현재 상태가 "유효"가 됩니다. 라임 Entry 배경을 가져오고Button, 두 번째 Label 배경이 사라지고, 이제 활성화됩니다.
코드 숨김 파일은 TextChanged .Entry 처리기는 정규식을 사용하여 입력 문자열이 유효한지 여부를 확인합니다. 명명 GoToState 된 코드 숨김 파일의 메서드는 다음의 정적 VisualStateManager.GoToState 메서드를 호출합니다 stackLayout.
public partial class VsmValidationPage : ContentPage
{
    public VsmValidationPage()
    {
        InitializeComponent();

        GoToState(false);
    }

    void OnTextChanged(object sender, TextChangedEventArgs args)
    {
        bool isValid = Regex.IsMatch(args.NewTextValue, @"^[2-9]\d{2}-\d{3}-\d{4}$");
        GoToState(isValid);
    }

    void GoToState(bool isValid)
    {
        string visualState = isValid ? "Valid" : "Invalid";
        VisualStateManager.GoToState(stackLayout, visualState);
    }
}
또한 GoToState 상태를 초기화하기 위해 생성자에서 메서드가 호출됩니다. 항상 현재 상태가 있어야 합니다. 그러나 명확한 목적을 위해 XAML에서 "ValidationStates"로 참조되지만 코드에는 시각적 상태 그룹의 이름에 대한 참조가 없습니다.
코드 숨김 파일은 시각적 상태를 정의하는 페이지의 개체를 고려하여 이 개체를 호출 VisualStateManager.GoToState 하기만 하면 됩니다. 이는 두 시각적 상태 모두 페이지의 여러 개체를 대상으로 하므로
코드 숨김 파일이 시각적 상태를 정의하는 페이지의 개체를 참조해야 하는 경우 코드 숨김 파일이 이 개체와 다른 개체에 직접 액세스할 수 없는 이유는 무엇인가요? 그것은 확실히 할 수 있습니다. 그러나 VSM을 사용할 때의 장점은 모든 UI 디자인을 한 위치에 유지하는 XAML에서 시각적 요소가 완전히 다른 상태에 반응하는 방식을 제어할 수 있다는 것입니다. 이렇게 하면 코드 숨김에서 직접 시각적 요소에 액세스하여 시각적 모양을 설정할 수 없습니다.
시각적 상태 트리거
시각적 상태는 적용해야 하는 조건을 정의하는 특수한 트리거 그룹인 상태 트리거를 VisualState 지원합니다.
상태 트리거는 VisualState의 StateTriggers 컬렉션에 추가됩니다. 이 컬렉션은 단일 상태 트리거 또는 여러 상태 트리거를 포함할 수 있습니다. 컬렉션의 상태 트리거가 활성 상태인 경우 VisualState가 적용됩니다.
상태 트리거를 사용하여 시각적 개체 상태를 제어하는 경우 Xamarin.Forms는 다음과 같은 우선 순위 규칙을 사용하여 활성화될 트리거(및 해당 VisualState)를 결정합니다.
StateTriggerBase에서 파생되는 모든 트리거.MinWindowWidth조건을 충족하여 활성화되는AdaptiveTrigger.MinWindowHeight조건을 충족하여 활성화되는AdaptiveTrigger.
여러 트리거가 동시에 활성화된 경우(예: 두 개의 사용자 지정 트리거) 태그에 선언된 첫 번째 트리거가 우선적으로 적용됩니다.
상태 트리거에 대한 자세한 내용은 상태 트리거를 참조하세요.
적응형 레이아웃에 Visual State Manager 사용
휴대폰에서 실행되는 애플리케이션은 Xamarin.Forms 일반적으로 세로 또는 가로 가로 가로 세로 비율로 볼 수 있으며 Xamarin.Forms 데스크톱에서 실행되는 프로그램의 크기를 조정하여 다양한 크기와 가로 세로 비율을 가정할 수 있습니다. 잘 디자인된 애플리케이션은 이러한 다양한 페이지 또는 창 폼 팩터에 대해 해당 콘텐츠를 다르게 표시할 수 있습니다.
이 기술을 적응형 레이아웃이라고도 합니다. 적응형 레이아웃에는 프로그램의 시각적 개체만 포함되므로 Visual State Manager의 이상적인 애플리케이션입니다.
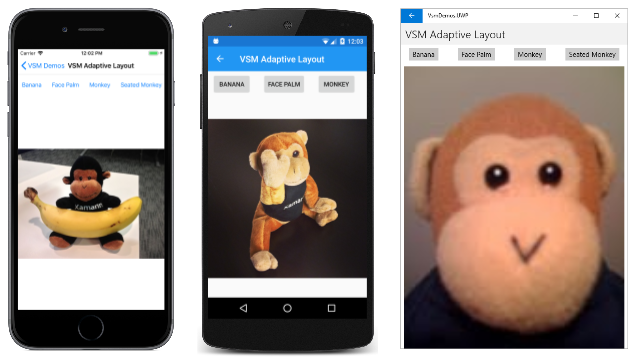
간단한 예제는 애플리케이션의 콘텐츠에 영향을 주는 단추의 작은 컬렉션을 표시 하는 애플리케이션입니다. 세로 모드에서는 이러한 단추가 페이지 위쪽의 가로 행에 표시될 수 있습니다.
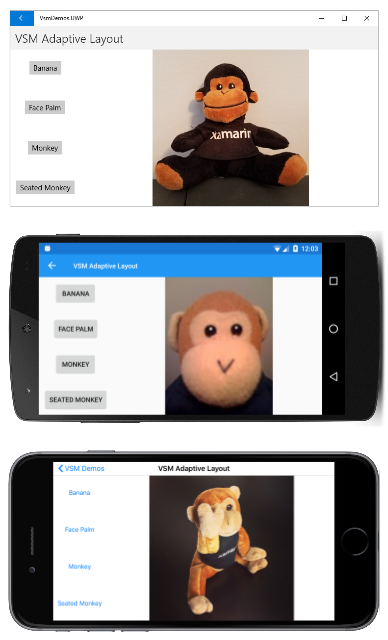
가로 모드에서는 단추 배열을 한쪽으로 이동하고 열에 표시할 수 있습니다.
위에서 아래로 프로그램이 유니버설 Windows 플랫폼, Android 및 iOS에서 실행됩니다.
샘플의 VSM 적응형 레이아웃 페이지는 "Portrait" 및 "Landscape"라는 두 개의 시각적 상태를 사용하여 "OrientationStates"라는 그룹을 정의합니다. (더 복잡한 방법은 여러 페이지 또는 창 너비를 기반으로 할 수 있습니다.)
VSM 태그는 XAML 파일의 네 위치에서 발생합니다. StackLayout 명명된 메뉴 mainStack 와 요소인 콘텐츠가 모두 포함됩니다Image. 세 StackLayout 로 모드에서는 세로 방향, 가로 방향은 가로 방향이어야 합니다.
<ContentPage xmlns="http://xamarin.com/schemas/2014/forms"
             xmlns:x="http://schemas.microsoft.com/winfx/2009/xaml"
             x:Class="VsmDemos.VsmAdaptiveLayoutPage"
             Title="VSM Adaptive Layout">

    <StackLayout x:Name="mainStack">
        <VisualStateManager.VisualStateGroups>
            <VisualStateGroup Name="OrientationStates">
                <VisualState Name="Portrait">
                    <VisualState.Setters>
                        <Setter Property="Orientation" Value="Vertical" />
                    </VisualState.Setters>
                </VisualState>
                <VisualState Name="Landscape">
                    <VisualState.Setters>
                        <Setter Property="Orientation" Value="Horizontal" />
                    </VisualState.Setters>
                </VisualState>
            </VisualStateGroup>
        </VisualStateManager.VisualStateGroups>

        <ScrollView x:Name="menuScroll">
            <VisualStateManager.VisualStateGroups>
                <VisualStateGroup Name="OrientationStates">
                    <VisualState Name="Portrait">
                        <VisualState.Setters>
                            <Setter Property="Orientation" Value="Horizontal" />
                        </VisualState.Setters>
                    </VisualState>
                    <VisualState Name="Landscape">
                        <VisualState.Setters>
                            <Setter Property="Orientation" Value="Vertical" />
                        </VisualState.Setters>
                    </VisualState>
                </VisualStateGroup>
            </VisualStateManager.VisualStateGroups>

            <StackLayout x:Name="menuStack">
                <VisualStateManager.VisualStateGroups>
                    <VisualStateGroup Name="OrientationStates">
                        <VisualState Name="Portrait">
                            <VisualState.Setters>
                                <Setter Property="Orientation" Value="Horizontal" />
                            </VisualState.Setters>
                        </VisualState>
                        <VisualState Name="Landscape">
                            <VisualState.Setters>
                                <Setter Property="Orientation" Value="Vertical" />
                            </VisualState.Setters>
                        </VisualState>
                    </VisualStateGroup>
                </VisualStateManager.VisualStateGroups>

                <StackLayout.Resources>
                    <Style TargetType="Button">
                        <Setter Property="VisualStateManager.VisualStateGroups">
                            <VisualStateGroupList>
                                <VisualStateGroup Name="OrientationStates">
                                    <VisualState Name="Portrait">
                                        <VisualState.Setters>
                                            <Setter Property="HorizontalOptions" Value="CenterAndExpand" />
                                            <Setter Property="Margin" Value="10, 5" />
                                        </VisualState.Setters>
                                    </VisualState>
                                    <VisualState Name="Landscape">
                                        <VisualState.Setters>
                                            <Setter Property="VerticalOptions" Value="CenterAndExpand" />
                                            <Setter Property="HorizontalOptions" Value="Center" />
                                            <Setter Property="Margin" Value="10" />
                                        </VisualState.Setters>
                                    </VisualState>
                                </VisualStateGroup>
                            </VisualStateGroupList>
                        </Setter>
                    </Style>
                </StackLayout.Resources>

                <Button Text="Banana"
                        Command="{Binding SelectedCommand}"
                        CommandParameter="Banana.jpg" />
                <Button Text="Face Palm"
                        Command="{Binding SelectedCommand}"
                        CommandParameter="FacePalm.jpg" />
                <Button Text="Monkey"
                        Command="{Binding SelectedCommand}"
                        CommandParameter="monkey.png" />
                <Button Text="Seated Monkey"
                        Command="{Binding SelectedCommand}"
                        CommandParameter="SeatedMonkey.jpg" />
            </StackLayout>
        </ScrollView>

        <Image x:Name="image"
               VerticalOptions="FillAndExpand"
               HorizontalOptions="FillAndExpand" />
    </StackLayout>
</ContentPage>
명명된 menuScroll 내부 ScrollView 및 명명된 menuStack StackLayout 단추 메뉴를 구현합니다. 이러한 레이아웃의 방향은 .의 mainStack반대입니다. 메뉴는 세로 모드에서 가로로, 가로 모드에서는 세로여야 합니다.
VSM 태그의 네 번째 섹션은 단추 자체에 대한 암시적 스타일입니다. 이 태그는 세로 HorizontalOptions및 Margin 가로 방향과 관련된 속성을 설정합니다VerticalOptions.
코드 숨김 파일은 명령을 구현 Button 할 속성을 menuStack 설정하고 BindingContext 페이지의 이벤트에 처리기를 SizeChanged 연결합니다.
public partial class VsmAdaptiveLayoutPage : ContentPage
{
    public VsmAdaptiveLayoutPage ()
    {
        InitializeComponent ();

        SizeChanged += (sender, args) =>
        {
            string visualState = Width > Height ? "Landscape" : "Portrait";
            VisualStateManager.GoToState(mainStack, visualState);
            VisualStateManager.GoToState(menuScroll, visualState);
            VisualStateManager.GoToState(menuStack, visualState);

            foreach (View child in menuStack.Children)
            {
                VisualStateManager.GoToState(child, visualState);
            }
        };

        SelectedCommand = new Command<string>((filename) =>
        {
            image.Source = ImageSource.FromResource("VsmDemos.Images." + filename);
        });

        menuStack.BindingContext = this;
    }

    public ICommand SelectedCommand { private set; get; }
}
SizeChanged 처리기는 두 StackLayout 요소와 ScrollView 요소를 호출 VisualStateManager.GoToState 한 다음 요소를 호출 VisualStateManager.GoToState Button 할 자 menuStack 식을 반복합니다.
코드 숨김 파일이 XAML 파일에서 요소의 속성을 설정하여 방향 변경을 보다 직접적으로 처리할 수 있는 것처럼 보일 수 있지만 Visual State Manager는 확실히 좀 더 구조화된 접근 방식입니다. 모든 시각적 개체는 XAML 파일에 유지되므로 검사, 유지 관리 및 수정이 더 쉬워집니다.
Xamarin.University를 사용한 Visual State Manager
Xamarin.Forms 3.0 Visual State Manager 비디오
