연습 - 루프를 사용하여 여러 리소스 배포
지금까지 사용한 Bicep 템플릿은 프로덕션 환경에 대한 감사 설정을 포함하여 단일 Azure SQL 논리 서버를 배포했습니다. 이제는 새 스마트 곰 인형을 출시하는 지역마다 하나씩, 여러 논리 서버를 배포해야 합니다.
이 연습에서는 데이터베이스 인스턴스를 여러 Azure 지역에 배포할 수 있도록 이전에 만든 Bicep 코드를 확장합니다.
프로세스 중에 다음을 수행합니다.
- 기존 Bicep 코드를 모듈로 이동합니다.
- 복사 루프를 사용하여 새 Bicep 파일을 만들어 모듈의 리소스를 여러 번 배포합니다.
- Bicep 파일을 배포하고 리소스 배포를 확인합니다.
- 매개 변수를 수정하여 위치를 더 추가하고 파일을 다시 배포한 다음 새 리소스가 배포되었는지 확인합니다.
리소스를 모듈로 이동
Visual Studio Code에서 main.bicep 파일을 만든 폴더에 modules라는 새 폴더를 만듭니다.
방금 만든 modules 폴더로 main.bicep 파일을 이동합니다.
main.bicep 파일의 이름을 database.bicep으로 바꿉니다.
복사 루프를 사용하여 여러 인스턴스 배포
방금 이동하고 이름이 바꾼 파일을 대체할 새 main.bicep 파일을 만듭니다.
새 main.bicep 파일을 열고 다음 매개 변수를 추가합니다.
@description('The Azure regions into which the resources should be deployed.')
param locations array = [
  'westeurope'
  'eastus2'
]

@secure()
@description('The administrator login username for the SQL server.')
param sqlServerAdministratorLogin string

@secure()
@description('The administrator login password for the SQL server.')
param sqlServerAdministratorLoginPassword string
매개 변수 선언 아래에 다음 모듈 선언을 추가합니다.
module databases 'modules/database.bicep' = [for location in locations: {
  name: 'database-${location}'
  params: {
    location: location
    sqlServerAdministratorLogin: sqlServerAdministratorLogin
    sqlServerAdministratorLoginPassword: sqlServerAdministratorLoginPassword
  }
}]
모듈 선언은
locations배열 매개 변수의 모든 값을 반복합니다.변경 내용을 파일에 저장합니다.
Bicep 파일 확인
위의 모든 변경을 완료한 후에는 main.bicep 파일이 다음 예제와 같습니다.
@description('The Azure regions into which the resources should be deployed.')
param locations array = [
  'westeurope'
  'eastus2'
]

@secure()
@description('The administrator login username for the SQL server.')
param sqlServerAdministratorLogin string

@secure()
@description('The administrator login password for the SQL server.')
param sqlServerAdministratorLoginPassword string

module databases 'modules/database.bicep' = [for location in locations: {
  name: 'database-${location}'
  params: {
    location: location
    sqlServerAdministratorLogin: sqlServerAdministratorLogin
    sqlServerAdministratorLoginPassword: sqlServerAdministratorLoginPassword
  }
}]
database.bicep 파일은 다음 예제와 같습니다.
@description('The Azure region into which the resources should be deployed.')
param location string

@secure()
@description('The administrator login username for the SQL server.')
param sqlServerAdministratorLogin string

@secure()
@description('The administrator login password for the SQL server.')
param sqlServerAdministratorLoginPassword string

@description('The name and tier of the SQL database SKU.')
param sqlDatabaseSku object = {
  name: 'Standard'
  tier: 'Standard'
}

@description('The name of the environment. This must be Development or Production.')
@allowed([
  'Development'
  'Production'
])
param environmentName string = 'Development'

@description('The name of the audit storage account SKU.')
param auditStorageAccountSkuName string = 'Standard_LRS'

var sqlServerName = 'teddy${location}${uniqueString(resourceGroup().id)}'
var sqlDatabaseName = 'TeddyBear'
var auditingEnabled = environmentName == 'Production'
var auditStorageAccountName = take('bearaudit${location}${uniqueString(resourceGroup().id)}', 24)

resource sqlServer 'Microsoft.Sql/servers@2023-08-01-preview' = {
  name: sqlServerName
  location: location
  properties: {
    administratorLogin: sqlServerAdministratorLogin
    administratorLoginPassword: sqlServerAdministratorLoginPassword
  }
}

resource sqlDatabase 'Microsoft.Sql/servers/databases@2023-08-01-preview' = {
  parent: sqlServer
  name: sqlDatabaseName
  location: location
  sku: sqlDatabaseSku
}

resource auditStorageAccount 'Microsoft.Storage/storageAccounts@2023-05-01' = if (auditingEnabled) {
  name: auditStorageAccountName
  location: location
  sku: {
    name: auditStorageAccountSkuName
  }
  kind: 'StorageV2'
}

resource sqlServerAudit 'Microsoft.Sql/servers/auditingSettings@2023-08-01-preview' = if (auditingEnabled) {
  parent: sqlServer
  name: 'default'
  properties: {
    state: 'Enabled'
    storageEndpoint: environmentName == 'Production' ? auditStorageAccount.properties.primaryEndpoints.blob : ''
    storageAccountAccessKey: environmentName == 'Production' ? listKeys(auditStorageAccount.id, auditStorageAccount.apiVersion).keys[0].value : ''
  }
}
아닌 경우 예제를 복사하거나 예제와 일치하도록 템플릿을 조정합니다.
Azure에 Bicep 템플릿 배포
Visual Studio Code 터미널에서 다음 코드를 실행하여 Azure에 Bicep 템플릿을 배포합니다.
az deployment group create --template-file main.bicep
Visual Studio Code 터미널에서 다음 Azure PowerShell 명령을 실행하여 Azure에 Bicep 템플릿을 배포합니다.
New-AzResourceGroupDeployment -TemplateFile main.bicep
주의
이전에 사용한 것과 동일한 로그인 및 암호를 사용해야 합니다. 그러지 않으면 배포가 성공적으로 완료되지 않습니다.
배포가 완료될 때까지 기다립니다.
배포 확인
배포가 완료되면 새 논리 서버와 데이터베이스가 배포되었는지, 올바른 Azure 지역에 있는지 확인하는 것이 좋습니다.
Azure Portal로 이동하여 샌드박스 구독에 있는지 확인합니다.
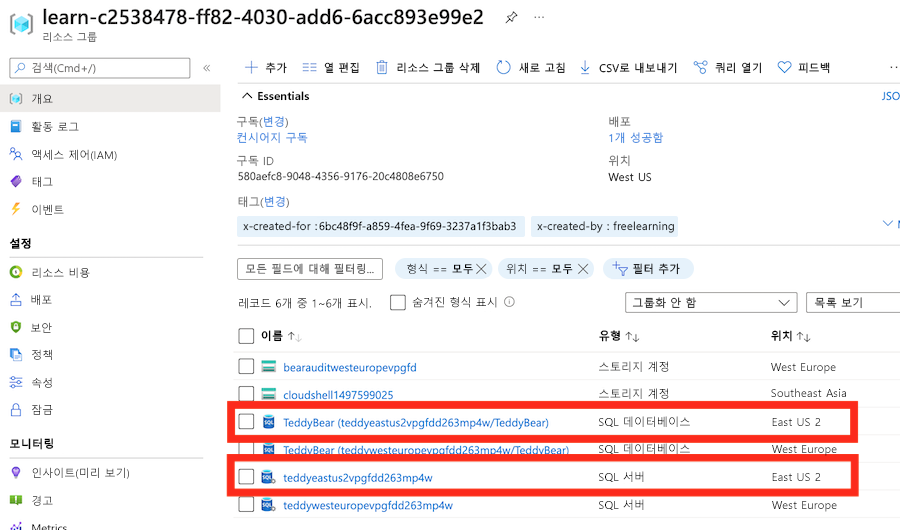
[샌드박스 리소스 그룹 이름] 을 선택합니다.새 논리 서버와 데이터베이스가
locations매개 변수의 기본값에 지정한 미국 동부 2 지역에 있는지 확인합니다.
브라우저에서 페이지를 열어 둡니다. 나중에 배포를 다시 확인합니다.
논리 서버를 위한 추가 위치를 사용하여 템플릿을 업데이트하고 Azure에 다시 배포합니다.
곰 인형팀이 이번에는 아시아에 출시하려고 합니다. 팀으로부터 동아시아 지역에 새 서버와 데이터베이스를 배포해 줄 것을 요청받습니다. 이렇게 하려면 Bicep 매개 변수를 업데이트하고 템플릿을 다시 배포해야 합니다.
Visual Studio Code로 돌아갑니다. main.bicep 파일의 맨 위에서
locations배열에 새 값을 추가합니다.@description('The Azure regions into which the resources should be deployed.') param locations array = [ 'westeurope' 'eastus2' 'eastasia' ]변경 내용을 파일에 저장합니다.
Visual Studio Code 터미널에서 다음 코드를 실행하여 파일을 다시 배포합니다.
az deployment group create --template-file main.bicep
Visual Studio Code로 돌아갑니다. main.bicep 파일의 맨 위에서
locations배열에 새 값을 추가합니다.@description('The Azure regions into which the resources should be deployed.') param locations array = [ 'westeurope' 'eastus2' 'eastasia' ]변경 내용을 파일에 저장합니다.
Visual Studio Code 터미널에서 다음 코드를 실행하여 파일을 다시 배포합니다.
New-AzResourceGroupDeployment -TemplateFile main.bicep
주의
이전에 사용한 것과 동일한 로그인 및 암호를 사용해야 합니다. 그러지 않으면 배포가 성공적으로 완료되지 않습니다.
배포가 완료될 때까지 기다립니다.
재배포 확인
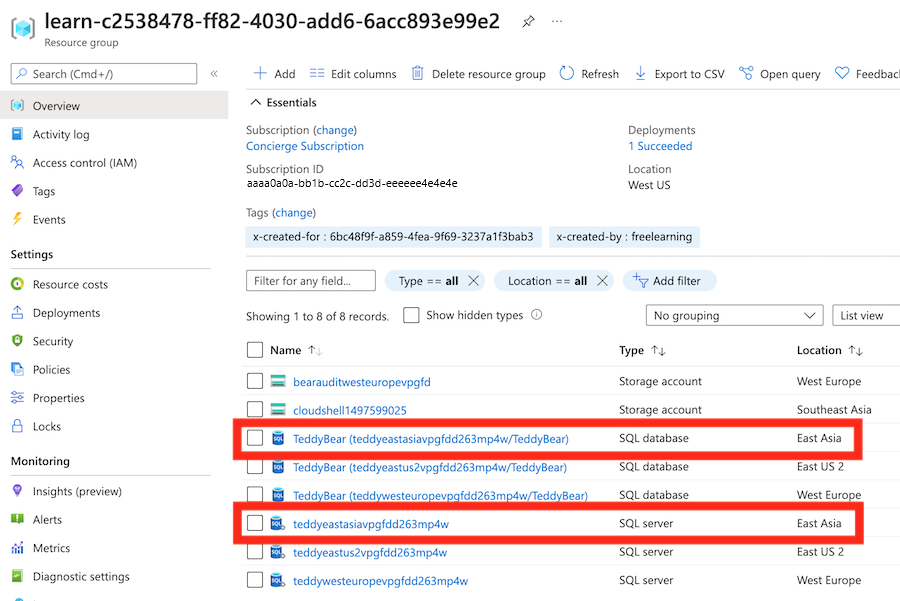
리소스를 다시 배포했으므로 이제 추가 논리 서버 및 데이터베이스 리소스가 동아시아 지역에 만들어졌는지 확인하려고 합니다.
Azure Portal로 돌아가서
[샌드박스 리소스 그룹 이름] 리소스 그룹을 선택합니다. 필요한 경우 새로 고침을 선택하여 새로 배포된 리소스를 확인합니다.새 논리 서버 및 데이터베이스가 동아시아 지역에 배포되었는지 확인합니다.
