단일 SQL 데이터베이스 살펴보기
싱글톤 Azure SQL Database를 배포하는 몇 가지 방법을 살펴보겠습니다.
포털을 통해 배포
Azure Portal을 통해 싱글톤 데이터베이스를 만드는 프로세스는 간단합니다. 포털의 왼쪽 탐색 메뉴에서 "SQL Databases"를 선택합니다. 결과적으로 생성된 슬라이드 아웃 대화 상자에서 "생성"를 클릭합니다.
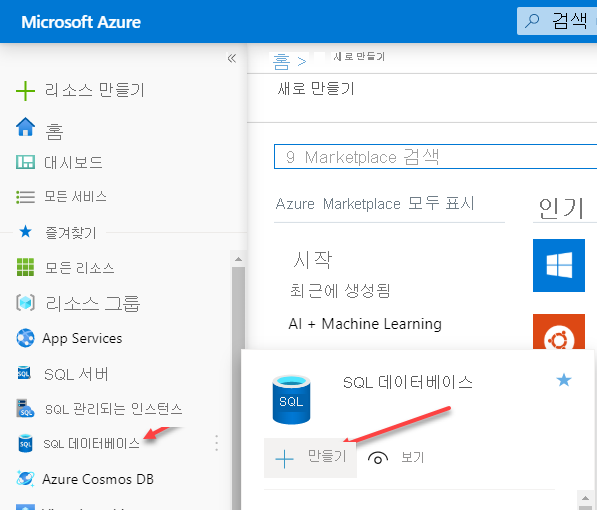
아래 이미지의 블레이드에서 구독이 이미 제공되었음을 알 수 있습니다. 다음 정보를 제공해야 합니다.
- 리소스 그룹 – 사용하려는 기존 리소스 그룹이 있으면 드롭다운 목록에서 선택할 수 있습니다. 이 Azure SQL Database의 새 리소스 그룹을 만들려면 "새로 생성" 옵션을 클릭하면 됩니다.
- 데이터베이스 이름 – 데이터베이스 이름을 제공해야 합니다.
- 서버 – 각 데이터베이스는 논리 서버에 있어야 합니다. 해당 지역에 이미 있으면 사용하도록 선택할 수 있습니다. 그렇지 않으면 새로 만들기를 클릭하고 프롬프트에 따라 데이터베이스를 저장할 새 논리 서버를 호스트할 수 있습니다.
- SQL 탄력적 풀을 사용하시겠습니까? 탄력적 풀을 사용할지 결정합니다.
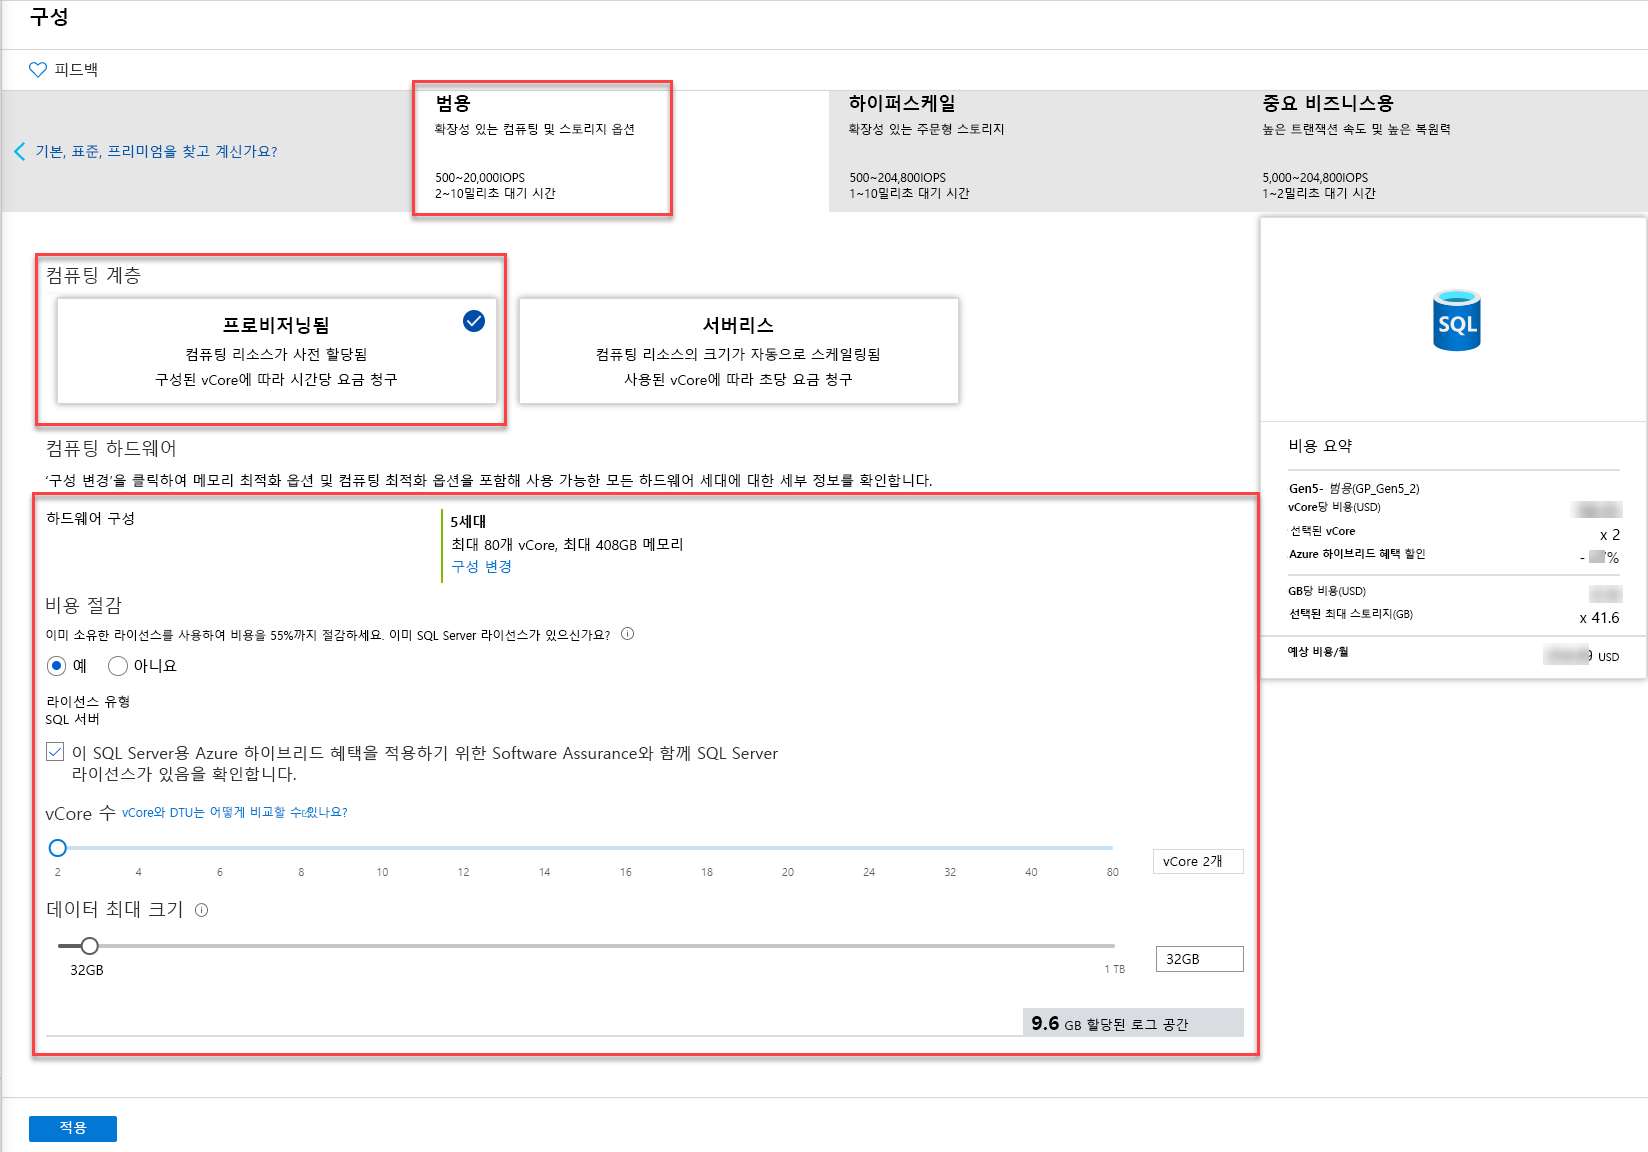
- 컴퓨팅 + 스토리지 – 필요한 컴퓨팅 리소스를 확인합니다. 다른 항목을 선택할 때까지 기본적으로 32GB의 스토리지를 포함하는 Gen5, 2vCore가 됩니다. 데이터베이스 구성을 클릭하여 대체 구성 옵션을 확인합니다.

아래 이미지는 데이터베이스 옵션을 구성할 수 있는 포털 블레이드를 보여 줍니다. 여기에서 서비스 계층은 범용이며 컴퓨팅 계층은 프로비저닝됨임을 알 수 있습니다. 프로비저닝됨은 컴퓨팅 리소스가 구성된 vCore의 수에 따라 미리 할당되고 시간당 청구되는 것을 의미합니다. 다른 옵션은 앞서 설명한 서버리스입니다. 서버리스는 사용된 vCore 수에 따라 초당 청구됩니다.
PowerShell/CLI를 통해 Azure SQL Database 배포
Azure PowerShell 또는 Azure CLI를 통해서도 데이터베이스를 배포할 수 있습니다. 아래 이미지에서는 새 리소스 그룹을 만들고 SqlAdmin이라는 관리자를 정의한 다음 새 서버, 데이터베이스 및 방화벽 규칙을 만드는 PowerShell 예제를 보여 줍니다.
# Connect-AzAccount

# The SubscriptionId in which to create these objects
$SubscriptionId = ''

# Set the resource group name and location for your server
$resourceGroupName = "myResourceGroup-$(Get-Random)"
$location = "westus2"

# Set an admin login and password for your server
$adminSqlLogin = "SqlAdmin"
$password = "ChangeYourAdminPassword1"

# Set server name - the logical server name has to be unique in the system
$serverName = "server-$(Get-Random)"

# The sample database name
$databaseName = "mySampleDatabase"

# The ip address range that you want to allow to access your server
$startIp = "0.0.0.0"
$endIp = "0.0.0.0"

# Set subscription
Set-AzContext -SubscriptionId $subscriptionId

# Create a resource group
$resourceGroup = New-AzResourceGroup -Name $resourceGroupName -Location $location

# Create a server with a system wide unique server name
$server = New-AzSqlServer -ResourceGroupName $resourceGroupName `
 -ServerName $serverName `
 -Location $location `
 -SqlAdministratorCredentials $(New-Object -TypeName System.Management.Automation.PSCredential -ArgumentList $adminSqlLogin, $(ConvertTo-SecureString -String $password -AsPlainText -Force))

# Create a server firewall rule that allows access from the specified IP range

$serverFirewallRule = New-AzSqlServerFirewallRule -ResourceGroupName $resourceGroupName `
 -ServerName $serverName `
 -FirewallRuleName "AllowedIPs" -StartIpAddress $startIp -EndIpAddress $endIp

# Create a blank database with an S0 performance level

$database = New-AzSqlDatabase -ResourceGroupName $resourceGroupName `
 -ServerName $serverName `
 -DatabaseName $databaseName `
 -RequestedServiceObjectiveName "S0" `
 -SampleName "AdventureWorksLT"
Azure CLI를 사용하여 아래와 같이 Azure SQL Database를 배포할 수도 있습니다.
#!/bin/bash

# set execution context (if necessary)
az account set --subscription <replace with your subscription name or id>

# Set the resource group name and location for your server
resourceGroupName=myResourceGroup-$RANDOM
location=westus2

# Set an admin login and password for your database
adminlogin=ServerAdmin
password=`openssl rand -base64 16`

# password=<EnterYourComplexPasswordHere1>

# The logical server name has to be unique in all of Azure
servername=server-$RANDOM

# The ip address range that you want to allow to access your DB
startip=0.0.0.0
endip=0.0.0.0

# Create a resource group
az group create \
 --name $resourceGroupName \
 --location $location

# Create a logical server in the resource group
az sql server create \
 --name $servername \
 --resource-group $resourceGroupName \
 --location $location \
 --admin-user $adminlogin \
 --admin-password $password

# Configure a firewall rule for the server

az sql server firewall-rule create \
 --resource-group $resourceGroupName \
 --server $servername \
 -n AllowYourIp \
 --start-ip-address $startip \
 --end-ip-address $endip

# Create a database in the server
az sql db create \
 --resource-group $resourceGroupName \
 --server $servername
 --name mySampleDatabase \
 --sample-name AdventureWorksLT \
 --edition GeneralPurpose \
 --family Gen4 \
 --capacity 1 \

# Echo random password
echo $password
Azure Resource Manager 템플릿을 사용하여 Azure SQL Database 배포
리소스를 배포하는 또 다른 방법은 앞서 설명한 바와 같이 Azure Resource Manager 템플릿을 사용하는 것입니다. Resource Manager 템플릿을 사용하면 리소스를 가장 세부적으로 제어할 수 있으며, Microsoft는 배포에서 참조할 수 있는 Azure Resource Manager 템플릿을 호스트하는 "Azure-Quickstart-Templates"이라는 GitHub 리포지토리를 제공합니다. GitHub 기반 템플릿을 배포하는 PowerShell 예제는 다음과 같습니다.
#Define Variables for parameters to pass to template
$projectName = Read-Host -Prompt "Enter a project name"
$location = Read-Host -Prompt "Enter an Azure location (i.e. centralus)"
$adminUser = Read-Host -Prompt "Enter the SQL server administrator username"
$adminPassword = Read-Host -Prompt "Enter the SQl server administrator password" -AsSecureString
$resourceGroupName = "${projectName}rg"

#Create Resource Group and Deploy Template to Resource Group
New-AzResourceGroup -Name $resourceGroupName -Location $location

New-AzResourceGroupDeployment -ResourceGroupName $resourceGroupName `
 -TemplateUri "https://raw.githubusercontent.com/Azure/azure-quickstart-templates/master/101-sql-logical-server/azuredeploy.json" `
 -administratorLogin $adminUser -administratorLoginPassword $adminPassword

Read-Host -Prompt "Press [ENTER] to continue ..."