Expander
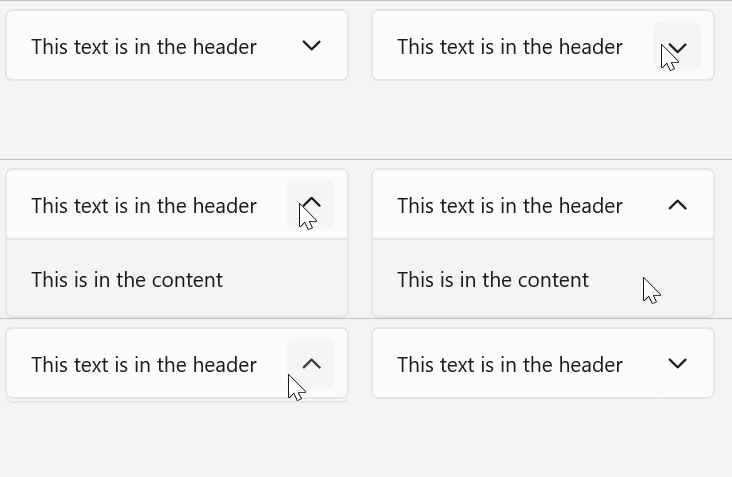
Expander 컨트롤을 사용하면 항상 표시되는 기본 콘텐츠와 관련된 내용 중에 덜 중요한 콘텐츠를 표시하거나 숨길 수 있습니다. Header에 포함된 항목은 항상 표시됩니다. 사용자는 헤더와 상호 작용하여 보조 콘텐츠가 표시되는 Content 영역을 확장하고 축소할 수 있습니다. 확장된 콘텐츠 영역은 다른 UI와 겹치지 않고 다른 UI 요소를 밀어냅니다. Expander는 위쪽 또는 아래쪽으로 확장할 수 있습니다.
Header 및 Content 영역 둘 다 간단한 텍스트부터 복잡한 UI 레이아웃까지 모든 콘텐츠를 포함할 수 있습니다. 예를 들어 컨트롤을 사용하여 항목의 추가 옵션을 표시할 수 있습니다.
올바른 컨트롤인가요?
일부 기본 콘텐츠는 항상 표시해야 하지만 관련 보조 콘텐츠는 필요할 때까지 숨겨도 되는 경우에는 Expander를 사용합니다. 이 UI는 디스플레이 공간이 제한적이고 정보 또는 옵션을 함께 그룹화할 수 있는 경우에 주로 사용됩니다. 또한 보조 콘텐츠를 필요할 때까지 숨기면 사용자가 앱의 가장 중요한 부분에 집중할 수 있습니다.
UWP 및 WinUI 2
Important
이 문서의 정보 및 예제는 Windows 앱 SDK 및 WinUI 3를 사용하는 앱에 최적화되어 있지만 WinUI 2를 사용하는 UWP 앱에도 대체로 적용 가능합니다. 플랫폼별 정보 및 예제는 UWP API 참조를 확인하세요.
이 섹션에는 UWP 또는 WinUI 2 앱에서 컨트롤을 사용하는 데 필요한 정보를 다룹니다.
UWP 앱을 위한 Expander에는 WinUI 2가 필요합니다. 설치 지침을 비롯한 자세한 내용은 WinUI 2를 참조하세요. 이 컨트롤용 API는 Microsoft.UI.Xaml.Controls 네임스페이스에 있습니다.
- WinUI 2 API: Expander 클래스, Header 속성, Content 속성
- WinUI 2 갤러리 앱을 열고 작동 중인 Expander를 확인합니다. WinUI 2 갤러리 앱에는 대부분의 WinUI 2 컨트롤, 특징, 기능의 대화형 예제가 포함되어 있습니다. Microsoft Store에서 앱을 다운로드하거나 GitHub에서 소스 코드를 가져오세요.
이 문서의 코드를 WinUI 2와 함께 사용하려면 XAML의 별칭(여기서는 muxc를 사용)을 사용하여 프로젝트에 포함된 Windows UI 라이브러리 API를 표현합니다. 자세한 내용은 WinUI 2 시작 섹션을 참조하세요.
xmlns:muxc="using:Microsoft.UI.Xaml.Controls"

<muxc:Expander />
Expander 만들기
- 중요 API: Expander 클래스, Header 속성, Content 속성
WinUI 3 갤러리 앱에는 대부분의 WinUI 3 컨트롤, 특징, 기능의 대화형 예제가 포함되어 있습니다. 앱을 Microsoft Store 에서 다운로드하거나 GitHub에서 소스 코드를 가져오세요.
이 예제에서는 기본 스타일링을 사용하여 간단한 Expander를 만드는 방법을 보여줍니다. Header 속성은 항상 표시되는 요소를 정의합니다. Content 속성은 축소 및 확장할 수 있는 요소를 정의합니다. 이 예제에서는 이전 그림과 같은 Expander를 만듭니다.
<Expander Header="This text is in the header"
               Content="This is in the content"/>
Expander 콘텐츠
Expander의 Content 속성은 모든 형식의 개체가 될 수 있지만, 일반적으로 문자열 또는 UIElement입니다. Content 속성 설정에 대한 자세한 내용은 ContentControl 클래스의 설명 섹션을 참조하세요.
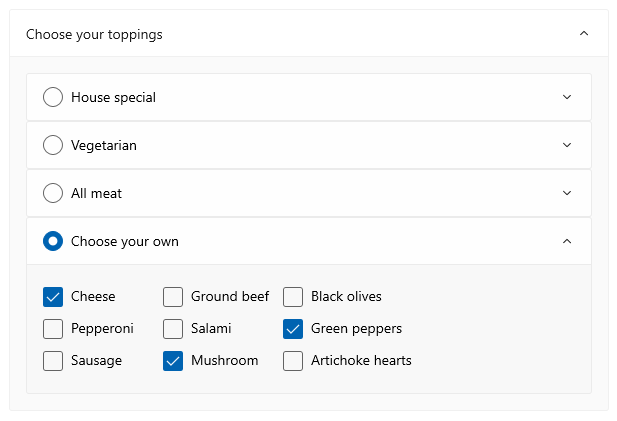
여기에 표시된 것처럼 복잡한 대화형 UI를 부모 Expander의 중첩된 Expander 컨트롤을 포함한 Expander의 콘텐츠로 사용할 수 있습니다.
콘텐츠 맞춤
Expander 컨트롤의 HorizontalContentAlignment 및 VerticalContentAlignment 속성을 설정하여 콘텐츠를 맞출 수 있습니다. 이러한 속성을 설정하면 맞춤은 헤더가 아닌 확장된 콘텐츠에만 적용됩니다.
Expander의 크기 제어
기본적으로 Header 및 Content 영역은 콘텐츠에 맞게 자동으로 크기가 조정됩니다. 원하지 않은 모양이나 동작이 발생하지 않도록 올바른 기술을 사용하여 Expander의 크기를 제어해야 합니다.
Width
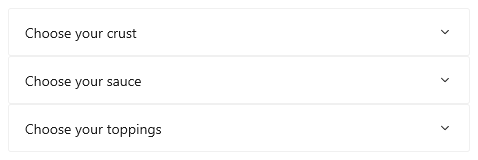
콘텐츠가 헤더보다 넓으면 콘텐츠 영역이 확장될 때 콘텐츠 영역과 일치하도록 헤더 너비가 증가하고, 콘텐츠 영역이 축소될 때는 축소됩니다. 확장되거나 축소될 때 컨트롤 너비가 변경되지 않도록 하려면 명시적 너비를 설정하거나, 컨트롤이 Panel의 자식인 경우 HorizontalAlignment를 Stretch로 설정하고 레이아웃 패널이 크기를 제어하도록 하면 됩니다.
여기서 일련의 관련 Expander 컨트롤은 StackPanel에 배치됩니다. 각 리소스의 StackPanel 스타일 사용을 StackPanel 설정 Stretch 하 고 너비 컨트롤의 StackPanel Expander 너비를 결정 합니다.Expander HorizontalAlignment
<StackPanel x:Name="ExpanderStack" MaxWidth="600">
    <StackPanel.Resources>
        <Style TargetType="Expander">
            <Setter Property="HorizontalAlignment" Value="Stretch"/>
            <Setter Property="HorizontalContentAlignment" Value="Stretch"/>
        </Style>
    </StackPanel.Resources>
    <Expander Header="Choose your crust"> ... </Expander>
    <Expander Header="Choose your sauce"> ... </Expander>
    <Expander Header="Choose your toppings"> ... </Expander>
 </StackPanel>
Height
Expander에서 Height를 지정하지 마세요. 지정할 경우 콘텐츠 영역이 축소되더라도 컨트롤이 해당 공간을 예약하므로 Expander의 목적에 맞지 않습니다. 확장된 콘텐츠 영역의 크기를 지정하려면 Expander의 콘텐츠에서 크기 치수를 설정합니다. 필요한 경우 콘텐츠의 Height를 제한하고 콘텐츠를 스크롤 가능하게 만들 수 있습니다.
스크롤 가능 콘텐츠
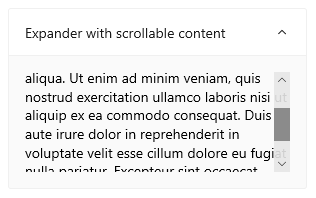
콘텐츠가 콘텐츠 영역 크기에 비해 너무 크면 콘텐츠를 ScrollViewer로 래핑하여 콘텐츠 영역을 스크롤 가능하게 만들 수 있습니다. Expander 컨트롤은 스크롤 기능을 자동으로 제공하지 않습니다.
ScrollViewer를 Expander 콘텐츠에 배치할 때 ScrollViewer 컨트롤의 높이를 콘텐츠 영역에 필요한 높이로 설정해야 합니다. 그렇지 않고 ScrollViewer 내부에서 콘텐츠의 높이 치수를 설정하면 ScrollViewer가 이 설정을 인식하지 못하므로 스크롤 가능한 콘텐츠를 제공하지 않습니다.
다음은 스크롤 가능한 텍스트를 콘텐츠로 포함하는 Expander 컨트롤을 만드는 방법을 보여주는 예제입니다.
<Expander Header="Expander with scrollable content">
    <ScrollViewer MaxHeight="200">
        <Grid>
            <TextBlock TextWrapping="Wrap">
                Lorem ipsum dolor sit amet, consectetur adipisicing elit,
                sed do eiusmod tempor incididunt ut labore et dolore magna
                aliqua. Ut enim ad minim veniam, quis nostrud exercitation
                ullamco laboris nisi ut aliquip ex ea commodo consequat.
                Duis aute irure dolor in reprehenderit in voluptate velit
                esse cillum dolore eu fugiat nulla pariatur. Excepteur sint
                occaecat cupidatat non proident, sunt in culpa qui officia
                deserunt mollit anim id est laborum.
            </TextBlock>
        </Grid>
    </ScrollViewer>
</Expander>
콘텐츠 영역 확장 및 축소
기본적으로 Expander는 아래쪽으로 축소되고 확장됩니다.
- 콘텐츠 영역을 처음으로 확장하려면 IsExpanded 속성을
true로 설정합니다. - 콘텐츠를 위쪽으로 확장하려면 ExpandDirection 속성을 Up으로 설정합니다.
<Expander IsExpanded="True" ExpandDirection="Up">
속성을 Expander 설정 IsExpanded 하거나 상호 작용 Header하여 프로그래밍 방식으로 확장되거나 축소됩니다. 가볍게 해제할 수 없습니다.
팁
Flyout 또는 ComboBox의 열려 있는 드롭다운과 같은 임시 UI의 외부를 클릭하거나 탭하면 닫힙니다. 이를 빠른 해제라고 합니다. Expander의 콘텐츠 영역은 일시적인 영역으로 간주되지 않으며 다른 UI를 오버레이하지 않으므로 빠른 해제를 지원하지 않습니다.
Expanding및 Collapsed 이벤트를 처리하여 콘텐츠가 표시되거나 숨겨질 때 작업을 수행하도록 할 수도 있습니다. 다음은 이러한 이벤트의 예입니다.
Expanding 이벤트
이 예제에서는 Expander 그룹이 있으며 한 번에 하나의 Expander만 열려고 합니다. 사용자가 Expander를 열면 Expanding 이벤트를 처리하고 사용자가 클릭한 컨트롤이 아닌 그룹의 모든 Expander 컨트롤을 축소합니다.
주의
앱 및 사용자 경험에 따라 사용자가 다른 컨트롤을 확장할 때 Expander 컨트롤을 자동으로 축소하는 것이 편리할 수 있습니다. 그러나 이렇게 하면 사용자가 제어할 수 없게 됩니다. 이 동작이 유용할 수도 있는 경우에는 사용자가 쉽게 설정할 수 있는 옵션으로 만드는 것이 좋습니다.
<StackPanel x:Name="ExpanderStack">
    <Expander Header="Choose your crust"
                   Expanding="Expander_Expanding"> ... </Expander>
    <Expander Header="Choose your sauce"
                   Expanding="Expander_Expanding"> ... </Expander>
    <Expander Header="Choose your toppings"
                   Expanding="Expander_Expanding"> ... </Expander>
 </StackPanel>
// Let the user opt out of custom behavior.
private bool _autoCollapse = true;

private void Expander_Expanding(muxc.Expander sender,
                                muxc.ExpanderExpandingEventArgs args)
{
    if (_autoCollapse == true)
    {
        foreach (muxc.Expander ex in ExpanderStack.Children)
        {
            if (ex != sender && ex.IsExpanded)
                ex.IsExpanded = false;
        }
    }
}
Collapsed 이벤트
이 예제에서는 Collapsed 이벤트를 처리하고 Header를 Content에서 선택한 옵션의 요약 정보로 채웁니다.
이 이미지는 콘텐츠가 확장되고 옵션이 선택된 Expander를 보여줍니다.
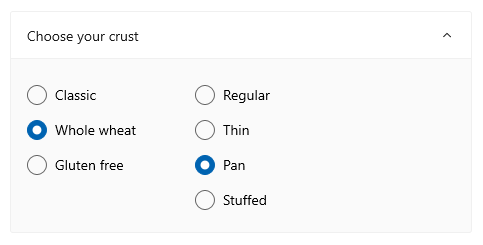
축소하면 선택한 옵션이 헤더에 요약되므로 사용자가 Expander를 열지 않고도 계속 볼 수 있습니다.

<Expander IsExpanded="True"
        Expanding="Expander_Expanding"
        Collapsed="Expander_Collapsed">
    <Expander.Header>
        <Grid>
            <TextBlock Text="Choose your crust"/>
            <TextBlock x:Name="tbCrustSelections"
                       HorizontalAlignment="Right"
                       Style="{StaticResource CaptionTextBlockStyle}"/>
        </Grid>
    </Expander.Header>
    <StackPanel Orientation="Horizontal">
        <RadioButtons x:Name="rbCrustType" SelectedIndex="0">
            <x:String>Classic</x:String>
            <x:String>Whole wheat</x:String>
            <x:String>Gluten free</x:String>
        </RadioButtons>
        <RadioButtons x:Name="rbCrustStyle" SelectedIndex="0"
                           Margin="48,0,0,0">
            <x:String>Regular</x:String>
            <x:String>Thin</x:String>
            <x:String>Pan</x:String>
            <x:String>Stuffed</x:String>
        </RadioButtons>
    </StackPanel>
</Expander>
private void Expander_Collapsed(muxc.Expander sender,
                                muxc.ExpanderCollapsedEventArgs args)
{
    // Update the header with options selected in the content.
    tbCrustSelections.Text = rbCrustType.SelectedItem.ToString() +
        ", " + rbCrustStyle.SelectedItem.ToString();
}
경량 스타일링
기본 Style 및 ControlTemplate을 수정하여 컨트롤의 고유한 모양을 만들 수 있습니다. 사용 가능한 테마 리소스 목록은 Expander API 문서의 컨트롤 스타일 및 템플릿 섹션을 참조하세요. 자세한 내용은 스타일링 컨트롤 문서의 경량 스타일 지정 섹션을 참조하세요.
권장 사항
- 디스플레이 공간이 제한적이고 사용자의 요청이 있을 때까지 일부 보조 콘텐츠를 숨겨도 되는 경우에는
Expander를 사용합니다.
코드 예제
이 XAML은 이 문서의 다른 파트에 나와 있는 Expander 컨트롤 그룹을 만듭니다. Expanding 및 Collapsed 이벤트 처리기의 코드도 이전 섹션에 나와 있습니다.
<StackPanel x:Name="ExpanderStack" MaxWidth="600">
    <StackPanel.Resources>
        <Style TargetType="Expander">
            <Setter Property="HorizontalAlignment" Value="Stretch"/>
            <Setter Property="HorizontalContentAlignment" Value="Stretch"/>
        </Style>
    </StackPanel.Resources>
    <Expander IsExpanded="True"
                   Expanding="Expander_Expanding"
                   Collapsed="Expander_Collapsed">
        <Expander.Header>
            <Grid>
                <TextBlock Text="Choose your crust"/>
                <TextBlock x:Name="tbCrustSelections"
                           HorizontalAlignment="Right"
        Style="{StaticResource CaptionTextBlockStyle}"/>
            </Grid>
        </Expander.Header>
        <StackPanel Orientation="Horizontal">
            <RadioButtons x:Name="rbCrustType" SelectedIndex="0">
                <x:String>Classic</x:String>
                <x:String>Whole wheat</x:String>
                <x:String>Gluten free</x:String>
            </RadioButtons>
            <RadioButtons x:Name="rbCrustStyle" SelectedIndex="0"
                   Margin="48,0,0,0">
                <x:String>Regular</x:String>
                <x:String>Thin</x:String>
                <x:String>Pan</x:String>
                <x:String>Stuffed</x:String>
            </RadioButtons>
        </StackPanel>
    </Expander>

    <Expander Header="Choose your sauce" Margin="24"
            Expanding="Expander_Expanding">
        <RadioButtons SelectedIndex="0" MaxColumns="2">
            <x:String>Classic red</x:String>
            <x:String>Garlic</x:String>
            <x:String>Pesto</x:String>
            <x:String>Barbecue</x:String>
        </RadioButtons>
    </Expander>

    <Expander Header="Choose your toppings"
                   Expanding="Expander_Expanding">
        <StackPanel>
            <Expander>
                <Expander.Header>
                    <RadioButton GroupName="Toppings" Content="House special"/>
                </Expander.Header>
                <TextBlock Text="Cheese, pepperoni, sausage, black olives, mushrooms"
                           TextWrapping="WrapWholeWords"/>
            </Expander>
            <Expander>
                <Expander.Header>
                    <RadioButton GroupName="Toppings" Content="Vegetarian"/>
                </Expander.Header>
                <TextBlock Text="Cheese, mushrooms, black olives, green peppers, artichoke hearts"
                           TextWrapping="WrapWholeWords"/>
            </Expander>
            <Expander>
                <Expander.Header>
                    <RadioButton GroupName="Toppings" Content="All meat"/>
                </Expander.Header>
                <TextBlock Text="Cheese, pepperoni, sausage, ground beef, salami"
                           TextWrapping="WrapWholeWords"/>
            </Expander>
            <Expander>
                <Expander.Header>
                    <RadioButton GroupName="Toppings" Content="Choose your own"/>
                </Expander.Header>
                <StackPanel Orientation="Horizontal">
                    <StackPanel>
                        <CheckBox Content="Cheese"/>
                        <CheckBox Content="Pepperoni"/>
                        <CheckBox Content="Sausage"/>
                    </StackPanel>
                    <StackPanel>
                        <CheckBox Content="Ground beef"/>
                        <CheckBox Content="Salami"/>
                        <CheckBox Content="Mushroom"/>
                    </StackPanel>
                    <StackPanel>
                        <CheckBox Content="Black olives"/>
                        <CheckBox Content="Green peppers"/>
                        <CheckBox Content="Artichoke hearts"/>
                    </StackPanel>
                </StackPanel>
            </Expander>
        </StackPanel>
    </Expander>
</StackPanel>
관련된 문서
Windows developer
