HoloLens(1세대) 및 Azure 302b: Custom Vision
참고 항목
Mixed Reality 아카데미 자습서는 HoloLens(1세대) 및 Mixed Reality 몰입형 헤드셋을 염두에 두고 설계되었습니다. 따라서 이러한 디바이스 개발에 대한 지침을 계속 찾고 있는 개발자를 위해 이러한 자습서를 그대로 두는 것이 중요합니다. 이러한 자습서는 HoloLens 2에 사용되는 최신 도구 집합 또는 상호 작용으로 업데이트되지 않습니다. 대신 지원되는 디바이스에서 계속 작동하도록 유지 관리됩니다. HoloLens 2용으로 개발하는 방법을 보여 주는 새로운 자습서 시리즈가 향후 게시될 예정입니다. 이 알림은 해당 자습서가 게시될 때 해당 자습서에 대한 링크로 업데이트됩니다.
이 과정에서는 혼합 현실 애플리케이션에서 Azure Custom Vision 기능을 사용하여 제공된 이미지 내에서 사용자 지정 시각적 콘텐츠를 인식하는 방법을 알아봅니다.
이 서비스를 사용하면 개체 이미지를 사용하여 기계 학습 모델을 학습시킬 수 있습니다. 그런 다음, 학습된 모델을 사용하여 Microsoft HoloLens의 카메라 캡처 또는 몰입형(VR) 헤드셋을 위해 PC에 연결된 카메라에서 제공하는 것과 유사한 개체를 인식합니다.
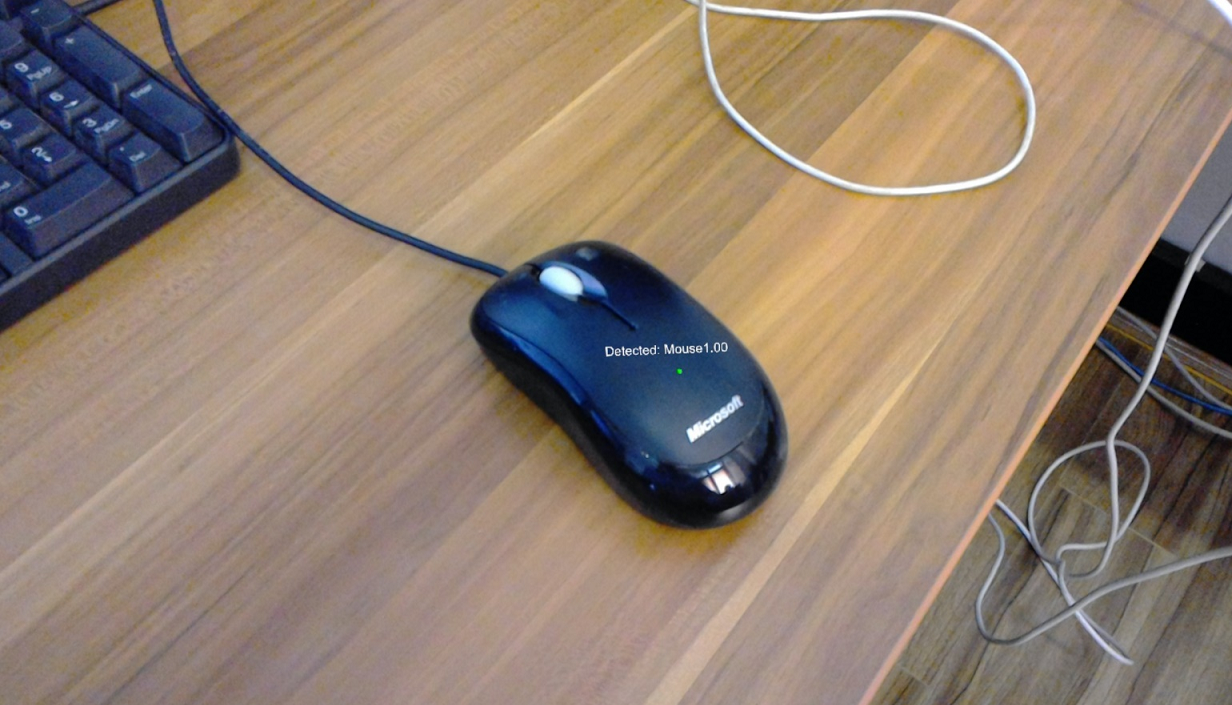
Azure Custom Vision은 개발자가 사용자 지정 이미지 분류자를 빌드할 수 있도록 하는 Microsoft Cognitive Service입니다. 그런 다음 이러한 분류자를 새 이미지와 함께 사용하여 새 이미지 내의 개체를 인식하거나 분류할 수 있습니다. 이 서비스는 프로세스를 간소화하기 위해 간단하고 사용하기 쉬운 온라인 포털을 제공합니다. 자세한 내용은 Azure Custom Vision Service 페이지를 참조 하세요.
이 과정이 완료되면 두 가지 모드로 작업할 수 있는 혼합 현실 애플리케이션이 있습니다.
분석 모드: 이미지를 업로드하고, 태그를 만들고, 다른 개체(이 경우 마우스 및 키보드)를 인식하도록 서비스를 학습시켜 Custom Vision Service를 수동으로 설정합니다. 그런 다음 카메라를 사용하여 이미지를 캡처하는 HoloLens 앱을 만들고 실제 환경에서 해당 개체를 인식하려고 합니다.
학습 모드: 앱에서 "학습 모드"를 사용하도록 설정하는 코드를 구현합니다. 학습 모드를 사용하면 HoloLens의 카메라를 사용하여 이미지를 캡처하고, 캡처된 이미지를 서비스에 업로드하고, 사용자 지정 비전 모델을 학습할 수 있습니다.
이 과정에서는 Custom Vision Service에서 Unity 기반 샘플 애플리케이션으로 결과를 가져오는 방법을 설명합니다. 빌드할 수 있는 사용자 지정 애플리케이션에 이러한 개념을 적용하는 것은 사용자에게 달려 있습니다.
디바이스 지원
| 과정 | HoloLens | 몰입형 헤드셋 |
|---|---|---|
| MR 및 Azure 302b: Custom Vision | ✔️ | ✔️ |
참고 항목
이 과정은 주로 HoloLens에 초점을 맞추고 있지만, 이 과정에서 배운 내용을 Windows Mixed Reality 몰입형(VR) 헤드셋에 적용할 수도 있습니다. 몰입형(VR) 헤드셋에는 접근성 있는 카메라가 없으므로 PC에 연결된 외부 카메라가 필요합니다. 과정을 따라가면 몰입형(VR) 헤드셋을 지원하기 위해 사용해야 할 수 있는 변경 내용에 대한 메모가 표시됩니다.
필수 조건
참고 항목
이 자습서는 Unity 및 C#에 대한 기본 경험이 있는 개발자를 위해 설계되었습니다. 또한 이 문서의 필수 구성 요소와 서면 지침은 작성 당시 테스트 및 확인된 내용을 나타냅니다(2018년 7월). 이 과정의 정보가 아래에 나열된 것보다 최신 소프트웨어에서 찾을 수 있는 것과 완벽하게 일치한다고 가정해서는 안 되지만, 설치 도구 문서에 나열된 대로 최신 소프트웨어를 자유롭게 사용할 수 있습니다.
이 과정에는 다음 하드웨어 및 소프트웨어를 사용하는 것이 좋습니다.
- 몰입형(VR) 헤드셋 개발을 위해 Windows Mixed Reality와 호환되는 개발 PC
- 개발자 모드를 사용하도록 설정된 Windows 10 Fall Creators Update(이상)
- 최신 Windows 10 SDK
- Unity 2017.4
- Visual Studio 2017
- 개발자 모드가 설정된 Windows Mixed Reality 몰입형(VR) 헤드셋 또는 Microsoft HoloLens
- PC에 연결된 카메라(몰입형 헤드셋 개발용)
- Azure 설치 및 Custom Vision API 검색을 위한 인터넷 액세스
- Custom Vision Service에서 인식할 각 개체에 대해 5개 이상의 이미지(10개(10개)를 권장합니다. 원하는 경우 이 과정(컴퓨터 마우스 및 키보드)과 함께 이미 제공된 이미지를 사용할 수 있습니다.
시작하기 전에
- 이 프로젝트를 빌드하는 데 문제가 발생하지 않도록 이 자습서에서 언급한 프로젝트를 루트 또는 루트에 가까운 폴더에 만드는 것이 좋습니다(긴 폴더 경로는 빌드 시 문제를 일으킬 수 있음).
- HoloLens를 설정하고 테스트합니다. HoloLens 설정을 지원해야 하는 경우 HoloLens 설정 문서를 방문하세요.
- 새 HoloLens 앱 개발을 시작할 때 보정 및 센서 튜닝을 수행하는 것이 좋습니다(때로는 각 사용자에 대해 이러한 작업을 수행하는 데 도움이 될 수 있음).
보정에 대한 도움말은 HoloLens 보정 문서에 대한 이 링크를 따르세요.
센서 튜닝에 대한 도움말은 HoloLens 센서 튜닝 문서에 대한 이 링크를 따르세요.
1장 - Custom Vision Service 포털
Azure에서 Custom Vision Service를 사용하려면 애플리케이션에서 사용할 수 있도록 서비스의 인스턴스를 구성해야 합니다.
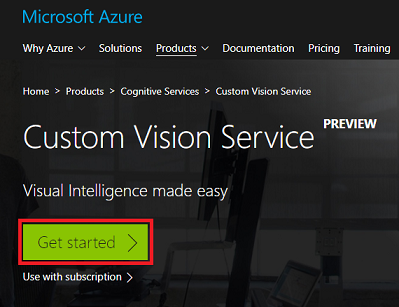
먼저 Custom Vision Service 기본 페이지로 이동합니다.
시작 단추를 클릭합니다.
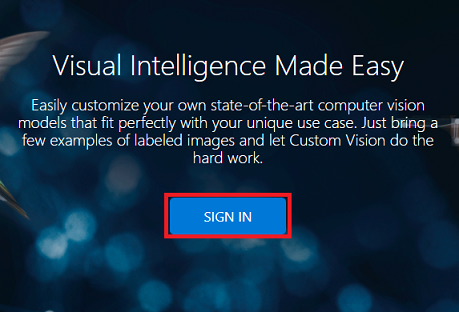
Custom Vision Service 포털에 로그인합니다.
참고 항목
Azure 계정이 아직 없는 경우 계정을 만들어야 합니다. 교실 또는 랩 상황에서 이 자습서를 따르는 경우 강사 또는 프록터 중 한 명에게 새 계정 설정에 대한 도움을 요청하세요.
처음으로 로그인하면 서비스 약관 패널이 표시됩니다. 약관에 동의하려면 확인란을 클릭합니다. 그런 다음 동의를 클릭합니다.
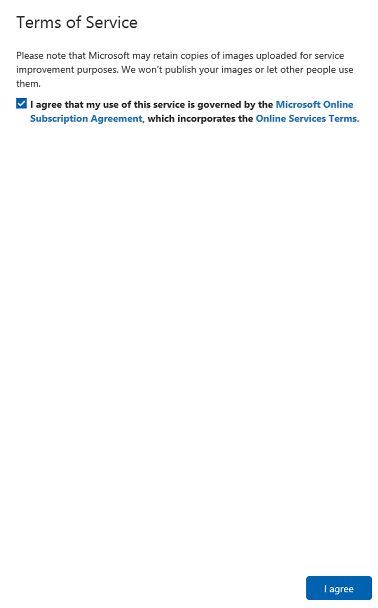
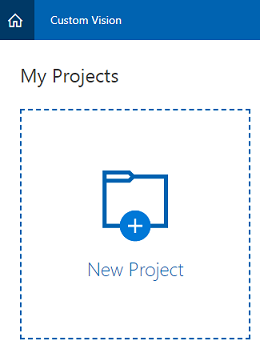
약관에 동의하면 포털의 프로젝트 섹션으로 이동합니다. 새 프로젝트를 클릭합니다.
오른쪽에 탭이 표시되어 프로젝트의 일부 필드를 지정하라는 메시지가 표시됩니다.
프로젝트의 이름을 삽입합니다.
프로젝트에 대한 설명을 삽입합니다(선택 사항).
리소스 그룹을 선택하거나 새 리소스 그룹을 만듭니다. 리소스 그룹은 Azure 자산 컬렉션에 대한 청구를 모니터링, 제어, 프로비전 및 관리하는 방법을 제공합니다. 단일 프로젝트(예: 이러한 과정)와 연결된 모든 Azure 서비스를 공통 리소스 그룹 아래에 유지하는 것이 좋습니다.
프로젝트 형식을 분류로 설정
도메인을 일반으로 설정합니다.
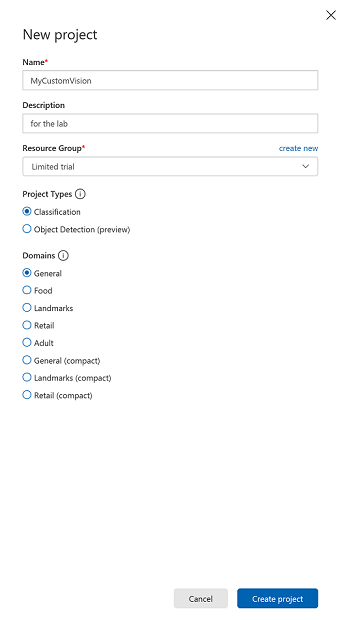
Azure 리소스 그룹에 대해 자세히 알아보려면 리소스 그룹 문서를 방문하세요.
완료되면 프로젝트 만들기를 클릭하면 Custom Vision Service 프로젝트 페이지로 리디렉션됩니다.
2장 - Custom Vision 프로젝트 교육
Custom Vision 포털에서 기본 목표는 이미지의 특정 개체를 인식하도록 프로젝트를 학습시키는 것입니다. 애플리케이션에서 인식할 각 개체에 대해 10개(10)가 선호되지만 5개 이상의 이미지가 필요합니다. 이 과정(컴퓨터 마우스 및 키보드)과 함께 제공되는 이미지를 사용할 수 있습니다.
Custom Vision Service 프로젝트를 학습하려면 다음을 수행합니다.
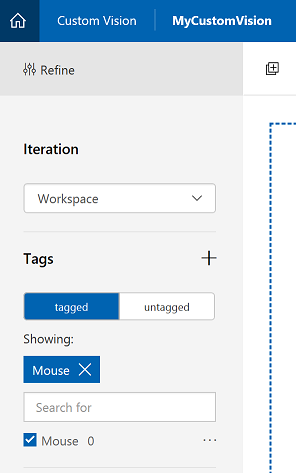
태그 옆의 + 단추를 클릭합니다.
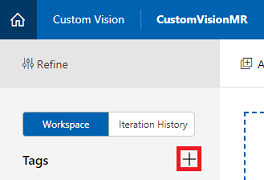
인식할 개체의 이름을 추가합니다. Save를 클릭합니다.
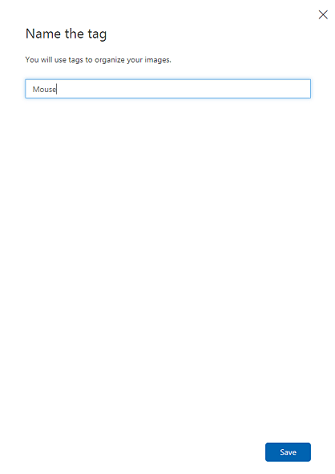
태그가 추가되었습니다(표시하려면 페이지를 다시 로드해야 할 수 있음). 아직 선택하지 않은 경우 새 태그와 함께 확인란을 클릭합니다.
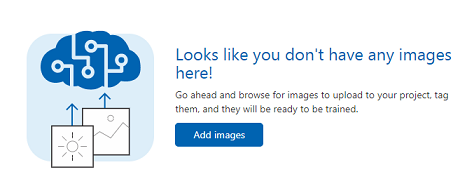
페이지 가운데에 있는 이미지 추가를 클릭합니다.
로컬 파일 찾아보기를 클릭하고 검색한 다음 업로드할 이미지를 최소 5개(5)로 선택합니다. 이러한 모든 이미지에는 학습 중인 개체가 포함되어야 합니다.
참고 항목
한 번에 여러 이미지를 선택하여 업로드할 수 있습니다.
탭에 이미지가 표시되면 내 태그 상자에서 적절한 태그를 선택합니다.
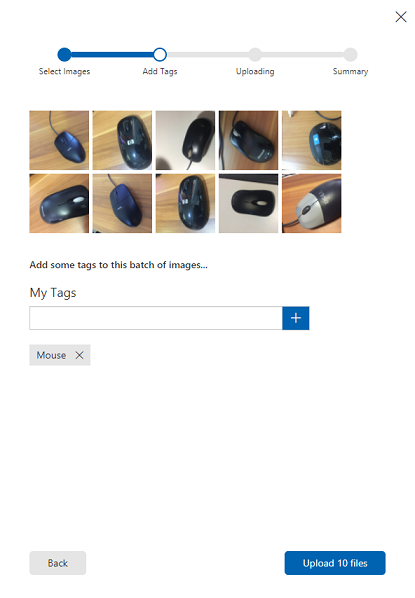
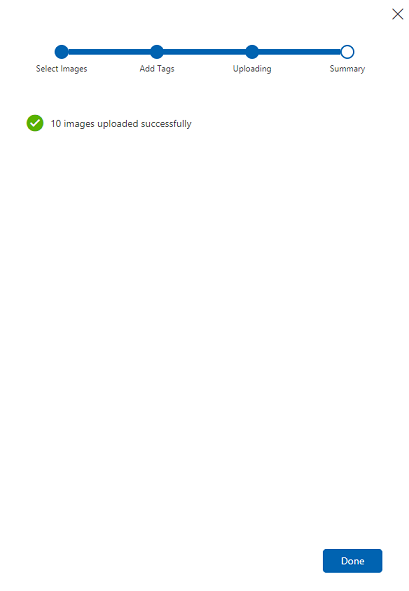
파일 업로드를 클릭합니다. 파일 업로드가 시작됩니다. 업로드를 확인했으면 완료를 클릭합니다.
동일한 프로세스를 반복하여 키보드라는 새 태그를 만들고 적절한 사진을 업로드합니다. 이미지 추가 창을 표시하려면 새 태그를 만든 후 마우스 선택을 취소해야 합니다.
두 태그가 모두 설정되면 학습을 클릭하면 첫 번째 학습 반복이 빌드되기 시작합니다.

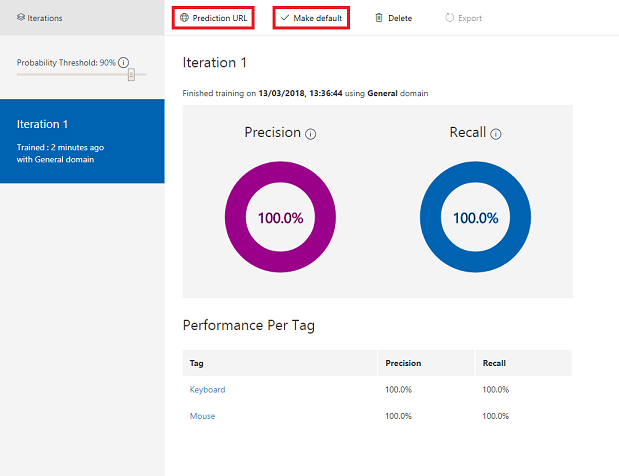
빌드되면 기본값 및 예측 URL이라는 두 개의 단추를 볼 수 있습니다. 먼저 기본값 만들기를 클릭한 다음 예측 URL을 클릭합니다.
참고 항목
여기서 제공되는 엔드포인트 URL은 기본값으로 표시된 반복으로 설정됩니다. 따라서 나중에 새 반복 을 만들고 기본값으로 업데이트하는 경우 코드를 변경할 필요가 없습니다.
예측 URL을 클릭하면 메모장을 열고 URL 및 예측 키를 복사하여 붙여넣어 코드의 뒷부분에서 필요할 때 검색할 수 있습니다.
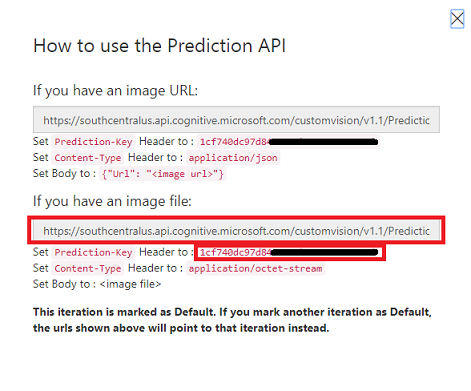
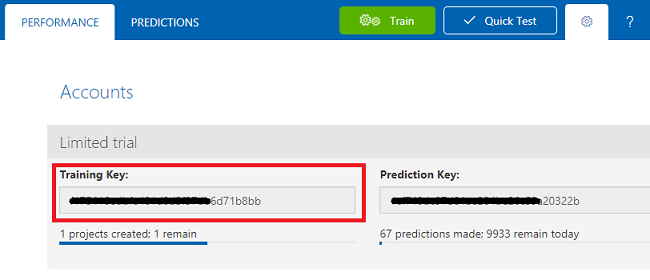
화면 오른쪽 위에 있는 코그 를 클릭합니다.

나중에 사용하기 위해 학습 키를 복사하여 메모장에 붙여넣습니다.
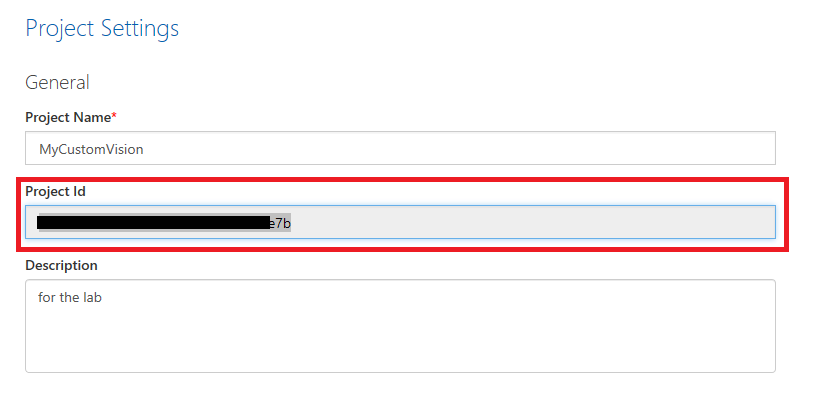
또한 프로젝트 ID를 복사하여 메모장 파일에 붙여넣어 나중에 사용할 수 있습니다.
3장 - Unity 프로젝트 설정
다음은 혼합 현실로 개발하기 위한 일반적인 설정이며, 따라서 다른 프로젝트에 적합한 템플릿입니다.
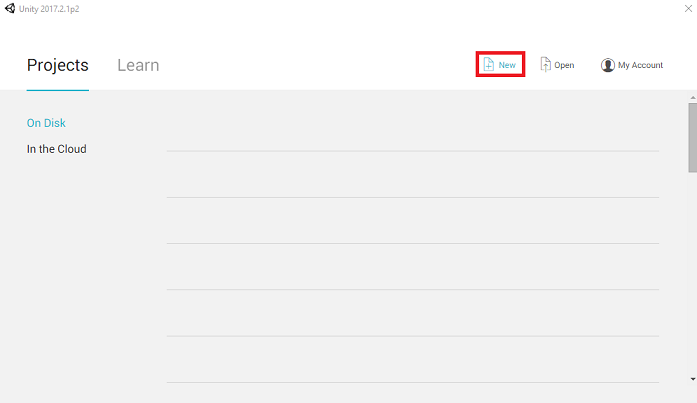
Unity를 열고 새로 만들기를 클릭합니다.
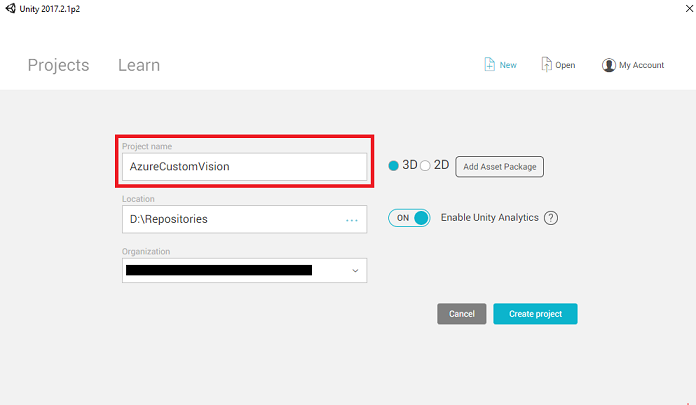
이제 Unity 프로젝트 이름을 제공해야 합니다. AzureCustomVision을 삽입합니다. 프로젝트 템플릿이 3D로 설정되어 있는지 확인합니다. 위치를 적절한 위치로 설정합니다(루트 디렉터리에 더 가깝습니다.). 그런 다음 프로젝트 만들기를 클릭합니다.
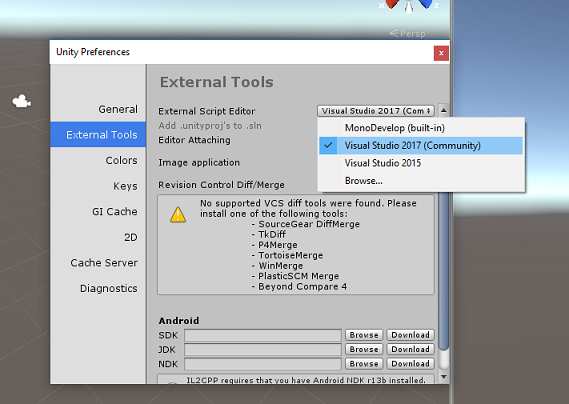
Unity가 열려 있으면 기본 스크립트 편집 기가 Visual Studio로 설정되어 있는지 확인할 필요가 있습니다. 기본 설정 편집>으로 이동한 다음 새 창에서 외부 도구로 이동합니다. 외부 스크립트 편집기를 Visual Studio 2017로 변경합니다. 기본 설정 창을 닫습니다.
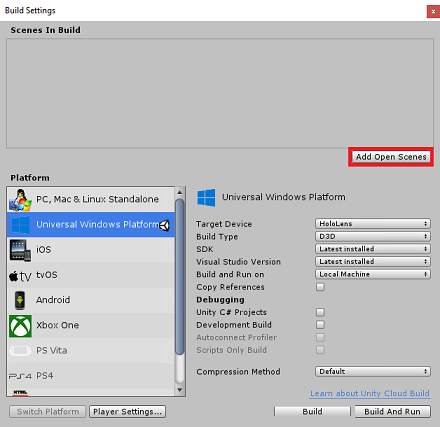
다음으로 파일 > 빌드 설정으로 이동하여 유니버설 Windows 플랫폼 선택한 다음 플랫폼 전환 단추를 클릭하여 선택 항목을 적용합니다.
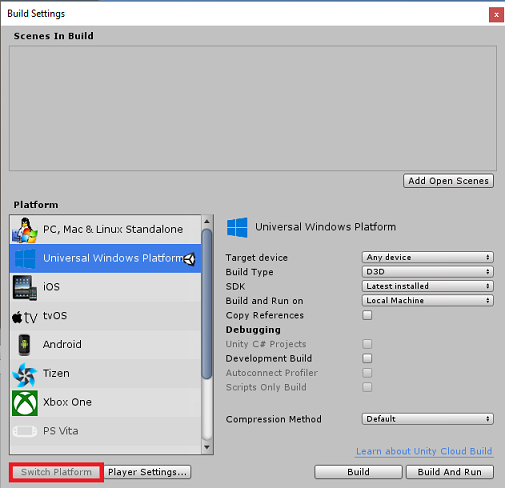
파일 > 빌드 설정에 있는 동안 다음을 확인합니다.
대상 디바이스 가 HoloLens로 설정됩니다.
몰입형 헤드셋의 경우 대상 디바이스를 모든 디바이스로 설정합니다.
빌드 유형 이 D3D로 설정됨
SDK 가 최신 설치됨으로 설정됨
Visual Studio 버전 이 설치된 최신 버전으로 설정됨
빌드 및 실행 이 로컬 컴퓨터로 설정됩니다.
장면을 저장하고 빌드에 추가합니다.
열린 장면 추가를 선택하여 이 작업을 수행합니다. 저장 창이 나타납니다.
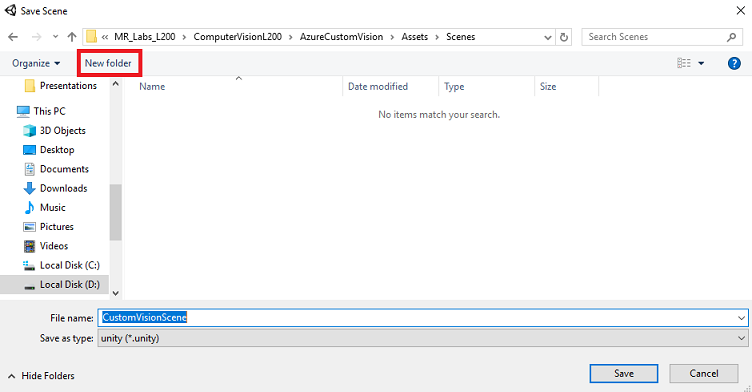
이에 대한 새 폴더 및 이후의 장면, 새 폴더 단추를 선택하여 새 폴더를 만들고 이름을 Scenes로 지정합니다.
새로 만든 Scenes 폴더를 연 다음 파일 이름: 텍스트 필드에 CustomVisionScene을 입력한 다음 저장을 클릭합니다.
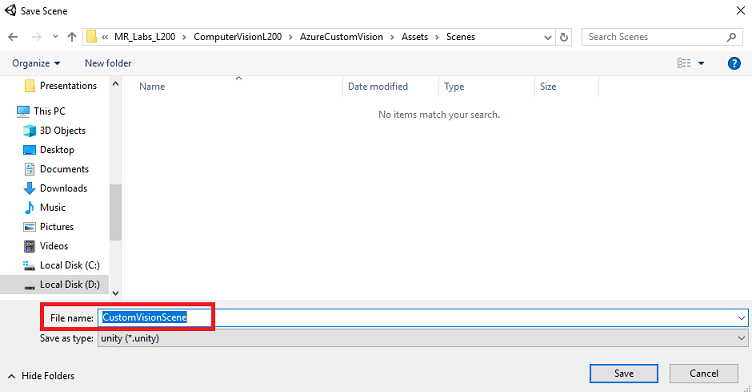
Unity 프로젝트와 연결되어야 하므로 Unity 장면을 Assets 폴더 내에 저장해야 합니다. 장면 폴더(및 기타 유사한 폴더)를 만드는 것은 Unity 프로젝트를 구성하는 일반적인 방법입니다.
빌드 설정의 나머지 설정은 현재 기본값으로 남아 있어야 합니다.
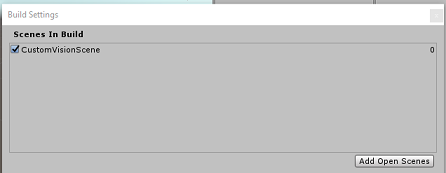
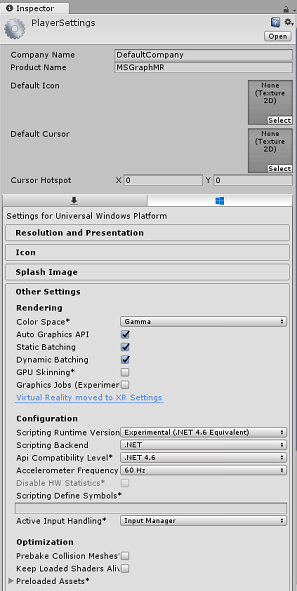
빌드 설정 창에서 플레이어 설정 단추를 클릭하면 Inspector가 있는 공간에서 관련 패널이 열립니다.
이 패널에서 몇 가지 설정을 확인해야 합니다.
기타 설정 탭에서 다음을 수행 합니다.
런타임 버전 스크립팅은 편집기를 다시 시작해야 하는 실험적 버전(.NET 4.6 등가)이어야 합니다.
백 엔드 스크립팅은 .NET이어야 합니다.
API 호환성 수준은 .NET 4.6이어야 합니다.
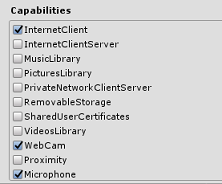
게시 설정 탭의 기능 아래에서 다음을 확인합니다.
InternetClient
웹캠
마이크
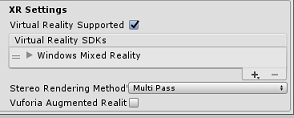
패널 아래에서 XR 설정(게시 설정 아래에 있음)에서 지원되는 Virtual Reality를 확인하여 Windows Mixed Reality SDK가 추가되었는지 확인합니다.
빌드 설정으로 돌아가면 Unity C# 프로젝트가 더 이상 회색으로 표시되지 않습니다. 이 옆에 있는 확인란을 선택합니다.
빌드 설정 창을 닫습니다.
장면 및 프로젝트 저장(FILE > SAVE SCENE / FILE > SAVE PROJECT).
4장 - Unity에서 Newtonsoft DLL 가져오기
Important
이 과정의 Unity 설정 구성 요소를 건너뛰고 코드를 계속 진행하려면 이 Azure-MR-302b.unitypackage를 다운로드하고 사용자 지정 패키지로 프로젝트로 가져온 다음 6장에서 계속 진행하세요.
이 과정에서는 자산에 DLL로 추가할 수 있는 Newtonsoft 라이브러리를 사용해야 합니다. 이 라이브러리가 포함된 패키지는 이 링크에서 다운로드할 수 있습니다. Newtonsoft 라이브러리를 프로젝트로 가져오려면 이 과정과 함께 제공된 Unity 패키지를 사용합니다.
자산 패키지 사용자 지정패키지> 가져오기메뉴 옵션을 사용하여 Unity에 .unitypackage를 추가합니다.>
팝업되는 Unity 패키지 가져오기 상자에서 플러그 인(및 포함) 아래의 모든 항목이 선택되어 있는지 확인합니다.
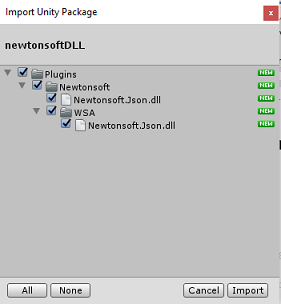
가져오기 단추를 클릭하여 프로젝트에 항목을 추가합니다.
프로젝트 보기의 플러그 인 아래에 있는 Newtonsoft 폴더로 이동하여 Newtonsoft.Json 플러그 인을 선택합니다.
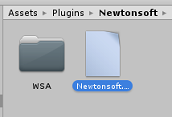
Newtonsoft.Json 플러그 인을 선택한 상태에서 모든 플랫폼의 선택을 취소한 다음 WSAPlayer도 선택 취소되었는지 확인하고 적용을 클릭합니다. 이는 파일이 올바르게 구성되었는지 확인하기 위한 것입니다.
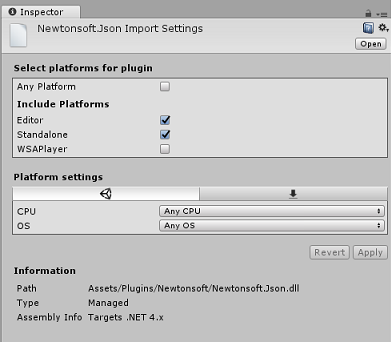
참고 항목
이러한 플러그 인을 표시하면 Unity 편집기에서만 사용하도록 구성됩니다. WSA 폴더에는 프로젝트를 Unity에서 내보낸 후 사용할 다른 집합이 있습니다.
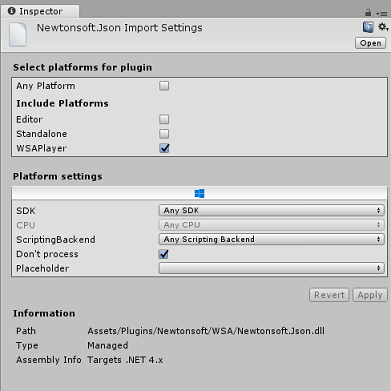
다음으로 Newtonsoft 폴더 내에서 WSA 폴더를 열어야 합니다. 방금 구성한 것과 동일한 파일의 복사본이 표시됩니다. 파일을 선택한 다음 검사기에서 확인합니다.
- 모든 플랫폼 이 선택 취소됨
- WSAPlayer만 확인됨
- Dont process가 선택됨
5장 - 카메라 설정
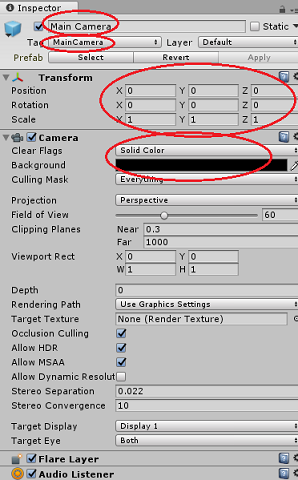
계층 구조 패널에서 기본 카메라를 선택합니다.
선택하면 검사기 패널에서 주 카메라의 모든 구성 요소를 볼 수 있습니다.
카메라 개체의 이름은 주 카메라여야 합니다(맞춤법 유의하세요!)
Main Camera 태그는 MainCamera로 설정해야 합니다(맞춤법 유의하세요!)
변환 위치가 0, 0, 0으로 설정되어 있는지 확인합니다.
플래그 지우기를 단색으로 설정합니다(몰입형 헤드셋의 경우 무시).
카메라 구성 요소의 배경색을 검은색, 알파 0(16진수 코드: #00000000)으로 설정합니다(몰입형 헤드셋의 경우 무시).
6장 - CustomVisionAnalyser 클래스를 만듭니다.
이 시점에서 코드를 작성할 준비가 된 것입니다.
CustomVisionAnalyser 클래스로 시작합니다.
참고 항목
아래 표시된 코드에서 만든 Custom Vision Service에 대한 호출은 Custom Vision REST API를 사용하여 수행됩니다. 이를 사용하면 이 API를 구현하고 사용하는 방법을 확인할 수 있습니다(비슷한 것을 직접 구현하는 방법을 이해하는 데 유용). Microsoft는 서비스를 호출하는 데 사용할 수 있는 Custom Vision Service SDK를 제공합니다. 자세한 내용은 Custom Vision Service SDK 문서를 참조하세요.
이 클래스는 다음을 담당합니다.
바이트 배열로 캡처된 최신 이미지를 로드합니다.
분석을 위해 바이트 배열을 Azure Custom Vision Service 인스턴스로 보냅니다.
응답을 JSON 문자열로 수신합니다.
응답을 역직렬화하고 결과 예측을 SceneOrganiser 클래스에 전달합니다. 이 클래스는 응답을 표시하는 방법을 처리합니다.
이 클래스를 만들려면 다음을 수행합니다.
프로젝트 패널에 있는 자산 폴더를 마우스 오른쪽 단추로 클릭한 다음 폴더 만들기 > 를 클릭합니다. 폴더 스크립트를 호출합니다.
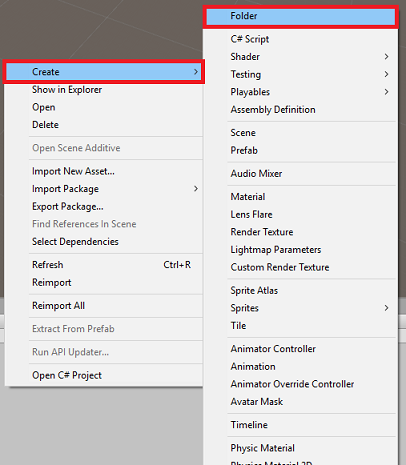
방금 만든 폴더를 두 번 클릭하여 엽니다.
폴더 내부를 마우스 오른쪽 단추로 클릭한 다음 C# 스크립트 만들기>를 클릭합니다. 스크립트 이름을 CustomVisionAnalyser로 지정합니다.
새 CustomVisionAnalyser 스크립트를 두 번 클릭하여 Visual Studio에서 엽니다.
파일 맨 위에 있는 네임스페이스를 다음과 일치하도록 업데이트합니다.
using System.Collections;
using System.IO;
using UnityEngine;
using UnityEngine.Networking;
using Newtonsoft.Json;
CustomVisionAnalyser 클래스에서 다음 변수를 추가합니다.
    /// <summary>
    /// Unique instance of this class
    /// </summary>
    public static CustomVisionAnalyser Instance;

    /// <summary>
    /// Insert your Prediction Key here
    /// </summary>
    private string predictionKey = "- Insert your key here -";

    /// <summary>
    /// Insert your prediction endpoint here
    /// </summary>
    private string predictionEndpoint = "Insert your prediction endpoint here";

    /// <summary>
    /// Byte array of the image to submit for analysis
    /// </summary>
    [HideInInspector] public byte[] imageBytes;
참고 항목
predictionKey 변수에 예측 키를 삽입하고 예측 엔드포인트를 predictionEndpoint 변수에 삽입해야 합니다. 과정 앞부분에서 메모장에 복사했습니다.
이제 Instance 변수를 초기화하기 위해 Awake()에 대한 코드를 추가해야 합니다.
    /// <summary>
    /// Initialises this class
    /// </summary>
    private void Awake()
    {
        // Allows this instance to behave like a singleton
        Instance = this;
    }
Start() 및 Update() 메서드를 삭제합니다.
다음으로, 코루틴을 추가합니다(아래에 정적 GetImageAsByteArray() 메서드를 사용하여) ImageCapture 클래스에서 캡처한 이미지 분석 결과를 가져옵니다.
참고 항목
AnalyseImageCapture 코루틴에는 아직 만들지 않은 SceneOrganiser 클래스에 대한 호출이 있습니다. 따라서 지금은 해당 줄을 주석으로 둡니다.
    /// <summary>
    /// Call the Computer Vision Service to submit the image.
    /// </summary>
    public IEnumerator AnalyseLastImageCaptured(string imagePath)
    {
        WWWForm webForm = new WWWForm();
        using (UnityWebRequest unityWebRequest = UnityWebRequest.Post(predictionEndpoint, webForm))
        {
            // Gets a byte array out of the saved image
            imageBytes = GetImageAsByteArray(imagePath);

            unityWebRequest.SetRequestHeader("Content-Type", "application/octet-stream");
            unityWebRequest.SetRequestHeader("Prediction-Key", predictionKey);

            // The upload handler will help uploading the byte array with the request
            unityWebRequest.uploadHandler = new UploadHandlerRaw(imageBytes);
            unityWebRequest.uploadHandler.contentType = "application/octet-stream";

            // The download handler will help receiving the analysis from Azure
            unityWebRequest.downloadHandler = new DownloadHandlerBuffer();

            // Send the request
            yield return unityWebRequest.SendWebRequest();

            string jsonResponse = unityWebRequest.downloadHandler.text;

            // The response will be in JSON format, therefore it needs to be deserialized

            // The following lines refers to a class that you will build in later Chapters
            // Wait until then to uncomment these lines

            //AnalysisObject analysisObject = new AnalysisObject();
            //analysisObject = JsonConvert.DeserializeObject<AnalysisObject>(jsonResponse);
            //SceneOrganiser.Instance.SetTagsToLastLabel(analysisObject);
        }
    }

    /// <summary>
    /// Returns the contents of the specified image file as a byte array.
    /// </summary>
    static byte[] GetImageAsByteArray(string imageFilePath)
    {
        FileStream fileStream = new FileStream(imageFilePath, FileMode.Open, FileAccess.Read);

        BinaryReader binaryReader = new BinaryReader(fileStream);

        return binaryReader.ReadBytes((int)fileStream.Length);
    }
Unity로 돌아가기 전에 Visual Studio에서 변경 내용을 저장해야 합니다.
7장 - CustomVisionObjects 클래스 만들기
지금 만들 클래스는 CustomVisionObjects 클래스입니다.
이 스크립트에는 Custom Vision Service에 대한 호출을 직렬화하고 역직렬화하기 위해 다른 클래스에서 사용하는 여러 개체가 포함되어 있습니다.
Warning
아래 JSON 구조가 Custom Vision 예측 v2.0을 사용하도록 설정되었으므로 Custom Vision Service에서 제공하는 엔드포인트를 적어 두는 것이 중요합니다. 다른 버전이 있는 경우 아래 구조를 업데이트해야 할 수 있습니다.
이 클래스를 만들려면 다음을 수행합니다.
스크립트 폴더 내부를 마우스 오른쪽 단추로 클릭한 다음 C# 스크립트 만들기>를 클릭합니다. CustomVisionObjects 스크립트 를 호출합니다.
새 CustomVisionObjects 스크립트를 두 번 클릭하여 Visual Studio에서 엽니다.
다음 네임스페이스를 파일 맨 위에 추가합니다.
using System;
using System.Collections.Generic;
using UnityEngine;
using UnityEngine.Networking;
CustomVisionObjects 클래스 내에서 Start() 및 Update() 메서드를 삭제합니다. 이제 이 클래스는 비어 있어야 합니다.
CustomVisionObjects 클래스 외부 에 다음 클래스를 추가합니다 . 이러한 개체는 Newtonsoft 라이브러리에서 응답 데이터를 직렬화하고 역직렬화하는 데 사용됩니다.
// The objects contained in this script represent the deserialized version
// of the objects used by this application

/// <summary>
/// Web request object for image data
/// </summary>
class MultipartObject : IMultipartFormSection
{
    public string sectionName { get; set; }

    public byte[] sectionData { get; set; }

    public string fileName { get; set; }

    public string contentType { get; set; }
}

/// <summary>
/// JSON of all Tags existing within the project
/// contains the list of Tags
/// </summary>
public class Tags_RootObject
{
    public List<TagOfProject> Tags { get; set; }
    public int TotalTaggedImages { get; set; }
    public int TotalUntaggedImages { get; set; }
}

public class TagOfProject
{
    public string Id { get; set; }
    public string Name { get; set; }
    public string Description { get; set; }
    public int ImageCount { get; set; }
}

/// <summary>
/// JSON of Tag to associate to an image
/// Contains a list of hosting the tags,
/// since multiple tags can be associated with one image
/// </summary>
public class Tag_RootObject
{
    public List<Tag> Tags { get; set; }
}

public class Tag
{
    public string ImageId { get; set; }
    public string TagId { get; set; }
}

/// <summary>
/// JSON of Images submitted
/// Contains objects that host detailed information about one or more images
/// </summary>
public class ImageRootObject
{
    public bool IsBatchSuccessful { get; set; }
    public List<SubmittedImage> Images { get; set; }
}

public class SubmittedImage
{
    public string SourceUrl { get; set; }
    public string Status { get; set; }
    public ImageObject Image { get; set; }
}

public class ImageObject
{
    public string Id { get; set; }
    public DateTime Created { get; set; }
    public int Width { get; set; }
    public int Height { get; set; }
    public string ImageUri { get; set; }
    public string ThumbnailUri { get; set; }
}

/// <summary>
/// JSON of Service Iteration
/// </summary>
public class Iteration
{
    public string Id { get; set; }
    public string Name { get; set; }
    public bool IsDefault { get; set; }
    public string Status { get; set; }
    public string Created { get; set; }
    public string LastModified { get; set; }
    public string TrainedAt { get; set; }
    public string ProjectId { get; set; }
    public bool Exportable { get; set; }
    public string DomainId { get; set; }
}

/// <summary>
/// Predictions received by the Service after submitting an image for analysis
/// </summary>
[Serializable]
public class AnalysisObject
{
    public List<Prediction> Predictions { get; set; }
}

[Serializable]
public class Prediction
{
    public string TagName { get; set; }
    public double Probability { get; set; }
}
8장 - VoiceRecognizer 클래스 만들기
이 클래스는 사용자의 음성 입력을 인식합니다.
이 클래스를 만들려면 다음을 수행합니다.
스크립트 폴더 내부를 마우스 오른쪽 단추로 클릭한 다음 C# 스크립트 만들기>를 클릭합니다. VoiceRecognizer 스크립트를 호출합니다.
새 VoiceRecognizer 스크립트를 두 번 클릭하여 Visual Studio에서 엽니다.
VoiceRecognizer 클래스 위에 다음 네임스페이스를 추가합니다.
using System;
using System.Collections.Generic;
using System.Linq;
using UnityEngine;
using UnityEngine.Windows.Speech;
그런 다음, Start() 메서드 위에 VoiceRecognizer 클래스 내에 다음 변수를 추가합니다.
    /// <summary>
    /// Allows this class to behave like a singleton
    /// </summary>
    public static VoiceRecognizer Instance;

    /// <summary>
    /// Recognizer class for voice recognition
    /// </summary>
    internal KeywordRecognizer keywordRecognizer;

    /// <summary>
    /// List of Keywords registered
    /// </summary>
    private Dictionary<string, Action> _keywords = new Dictionary<string, Action>();
각기() 및 Start() 메서드를 추가합니다. 그 중 후자는 태그를 이미지에 연결할 때 인식할 사용자 키워드를 설정합니다.
    /// <summary>
    /// Called on initialization
    /// </summary>
    private void Awake()
    {
        Instance = this;
    }

    /// <summary>
    /// Runs at initialization right after Awake method
    /// </summary>
    void Start ()
    {

        Array tagsArray = Enum.GetValues(typeof(CustomVisionTrainer.Tags));

        foreach (object tagWord in tagsArray)
        {
            _keywords.Add(tagWord.ToString(), () =>
            {
                // When a word is recognized, the following line will be called
                CustomVisionTrainer.Instance.VerifyTag(tagWord.ToString());
            });
        }

        _keywords.Add("Discard", () =>
        {
            // When a word is recognized, the following line will be called
            // The user does not want to submit the image
            // therefore ignore and discard the process
            ImageCapture.Instance.ResetImageCapture();
            keywordRecognizer.Stop();
        });

        //Create the keyword recognizer
        keywordRecognizer = new KeywordRecognizer(_keywords.Keys.ToArray());

        // Register for the OnPhraseRecognized event
        keywordRecognizer.OnPhraseRecognized += KeywordRecognizer_OnPhraseRecognized;
    }
Update() 메서드를 삭제합니다.
음성 입력이 인식될 때마다 호출되는 다음 처리기를 추가합니다.
    /// <summary>
    /// Handler called when a word is recognized
    /// </summary>
    private void KeywordRecognizer_OnPhraseRecognized(PhraseRecognizedEventArgs args)
    {
        Action keywordAction;
        // if the keyword recognized is in our dictionary, call that Action.
        if (_keywords.TryGetValue(args.text, out keywordAction))
        {
            keywordAction.Invoke();
        }
    }
Unity로 돌아가기 전에 Visual Studio에서 변경 내용을 저장해야 합니다.
참고 항목
곧 추가 클래스를 제공하므로 오류가 발생할 수 있는 코드에 대해 걱정하지 마세요. 그러면 이 문제를 해결할 수 있습니다.
9장 - CustomVisionTrainer 클래스 만들기
이 클래스는 Custom Vision Service를 학습하기 위해 일련의 웹 호출을 연결합니다. 각 호출은 코드 바로 위에 자세히 설명됩니다.
이 클래스를 만들려면 다음을 수행합니다.
스크립트 폴더 내부를 마우스 오른쪽 단추로 클릭한 다음 C# 스크립트 만들기>를 클릭합니다. CustomVisionTrainer 스크립트 를 호출합니다.
새 CustomVisionTrainer 스크립트를 두 번 클릭하여 Visual Studio에서 엽니다.
CustomVisionTrainer 클래스 위에 다음 네임스페이스를 추가합니다.
using Newtonsoft.Json;
using System.Collections;
using System.Collections.Generic;
using System.IO;
using System.Text;
using UnityEngine;
using UnityEngine.Networking;
그런 다음, Start() 메서드 위에 CustomVisionTrainer 클래스 내에 다음 변수를 추가합니다.
참고 항목
여기서 사용되는 학습 URL은 Custom Vision Training 1.2 설명서 내에서 제공되며 다음과 같은 구조를 가집니다.https://southcentralus.api.cognitive.microsoft.com/customvision/v1.2/Training/projects/{projectId}/
자세한 내용은 Custom Vision Training v1.2 참조 API를 참조하세요.Warning
CustomVisionObjects 클래스 내에서 사용되는 JSON 구조가 Custom Vision Training v1.2에서 작동하도록 설정되었으므로 Custom Vision Service에서 학습 모드에 대해 제공하는 엔드포인트를 적어 두는 것이 중요합니다. 다른 버전이 있는 경우 개체 구조를 업데이트해야 할 수 있습니다.
    /// <summary>
    /// Allows this class to behave like a singleton
    /// </summary>
    public static CustomVisionTrainer Instance;

    /// <summary>
    /// Custom Vision Service URL root
    /// </summary>
    private string url = "https://southcentralus.api.cognitive.microsoft.com/customvision/v1.2/Training/projects/";

    /// <summary>
    /// Insert your prediction key here
    /// </summary>
    private string trainingKey = "- Insert your key here -";

    /// <summary>
    /// Insert your Project Id here
    /// </summary>
    private string projectId = "- Insert your Project Id here -";

    /// <summary>
    /// Byte array of the image to submit for analysis
    /// </summary>
    internal byte[] imageBytes;

    /// <summary>
    /// The Tags accepted
    /// </summary>
    internal enum Tags {Mouse, Keyboard}

    /// <summary>
    /// The UI displaying the training Chapters
    /// </summary>
    private TextMesh trainingUI_TextMesh;
Important
앞에서 설명한 서비스 키(학습 키) 값과 프로젝트 ID 값을 추가해야 합니다. 이 값은 과정 앞부분에서 포털에서 수집한 값입니다(2장, 10단계 이후).
다음 Start() 및 Awake() 메서드를 추가합니다. 이러한 메서드는 초기화 시 호출되며 UI를 설정하는 호출을 포함합니다.
    /// <summary>
    /// Called on initialization
    /// </summary>
    private void Awake()
    {
        Instance = this;
    }

    /// <summary>
    /// Runs at initialization right after Awake method
    /// </summary>
    private void Start()
    {
        trainingUI_TextMesh = SceneOrganiser.Instance.CreateTrainingUI("TrainingUI", 0.04f, 0, 4, false);
    }
Update() 메서드를 삭제합니다. 이 클래스는 필요하지 않습니다.
RequestTagSelection() 메서드를 추가합니다. 이 메서드는 이미지를 캡처하여 디바이스에 저장하고 이제 Custom Vision Service에 제출하여 학습할 준비가 되었을 때 가장 먼저 호출됩니다. 이 메서드는 학습 UI에 캡처된 이미지에 태그를 지정하는 데 사용할 수 있는 키워드 집합을 표시합니다. 또한 VoiceRecognizer 클래스에 음성 입력에 대한 사용자의 수신 대기를 시작하도록 경고합니다.
    internal void RequestTagSelection()
    {
        trainingUI_TextMesh.gameObject.SetActive(true);
        trainingUI_TextMesh.text = $" \nUse voice command \nto choose between the following tags: \nMouse\nKeyboard \nor say Discard";

        VoiceRecognizer.Instance.keywordRecognizer.Start();
    }
VerifyTag() 메서드를 추가합니다. 이 메서드는 VoiceRecognizer 클래스에서 인식한 음성 입력을 수신하고 유효성을 확인한 다음 학습 프로세스를 시작합니다.
    /// <summary>
    /// Verify voice input against stored tags.
    /// If positive, it will begin the Service training process.
    /// </summary>
    internal void VerifyTag(string spokenTag)
    {
        if (spokenTag == Tags.Mouse.ToString() || spokenTag == Tags.Keyboard.ToString())
        {
            trainingUI_TextMesh.text = $"Tag chosen: {spokenTag}";
            VoiceRecognizer.Instance.keywordRecognizer.Stop();
            StartCoroutine(SubmitImageForTraining(ImageCapture.Instance.filePath, spokenTag));
        }
    }
SubmitImageForTraining() 메서드를 추가합니다. 이 메서드는 Custom Vision Service 학습 프로세스를 시작합니다. 첫 번째 단계는 사용자의 유효성이 검사된 음성 입력과 연결된 서비스에서 태그 ID를 검색하는 것입니다. 그러면 태그 ID가 이미지와 함께 업로드됩니다.
    /// <summary>
    /// Call the Custom Vision Service to submit the image.
    /// </summary>
    public IEnumerator SubmitImageForTraining(string imagePath, string tag)
    {
        yield return new WaitForSeconds(2);
        trainingUI_TextMesh.text = $"Submitting Image \nwith tag: {tag} \nto Custom Vision Service";
        string imageId = string.Empty;
        string tagId = string.Empty;

        // Retrieving the Tag Id relative to the voice input
        string getTagIdEndpoint = string.Format("{0}{1}/tags", url, projectId);
        using (UnityWebRequest www = UnityWebRequest.Get(getTagIdEndpoint))
        {
            www.SetRequestHeader("Training-Key", trainingKey);
            www.downloadHandler = new DownloadHandlerBuffer();
            yield return www.SendWebRequest();
            string jsonResponse = www.downloadHandler.text;

            Tags_RootObject tagRootObject = JsonConvert.DeserializeObject<Tags_RootObject>(jsonResponse);

            foreach (TagOfProject tOP in tagRootObject.Tags)
            {
                if (tOP.Name == tag)
                {
                    tagId = tOP.Id;
                }
            }
        }

        // Creating the image object to send for training
        List<IMultipartFormSection> multipartList = new List<IMultipartFormSection>();
        MultipartObject multipartObject = new MultipartObject();
        multipartObject.contentType = "application/octet-stream";
        multipartObject.fileName = "";
        multipartObject.sectionData = GetImageAsByteArray(imagePath);
        multipartList.Add(multipartObject);

        string createImageFromDataEndpoint = string.Format("{0}{1}/images?tagIds={2}", url, projectId, tagId);

        using (UnityWebRequest www = UnityWebRequest.Post(createImageFromDataEndpoint, multipartList))
        {
            // Gets a byte array out of the saved image
            imageBytes = GetImageAsByteArray(imagePath);

            //unityWebRequest.SetRequestHeader("Content-Type", "application/octet-stream");
            www.SetRequestHeader("Training-Key", trainingKey);

            // The upload handler will help uploading the byte array with the request
            www.uploadHandler = new UploadHandlerRaw(imageBytes);

            // The download handler will help receiving the analysis from Azure
            www.downloadHandler = new DownloadHandlerBuffer();

            // Send the request
            yield return www.SendWebRequest();

            string jsonResponse = www.downloadHandler.text;

            ImageRootObject m = JsonConvert.DeserializeObject<ImageRootObject>(jsonResponse);
            imageId = m.Images[0].Image.Id;
        }
        trainingUI_TextMesh.text = "Image uploaded";
        StartCoroutine(TrainCustomVisionProject());
    }
TrainCustomVisionProject() 메서드를 추가합니다. 이미지가 제출되고 태그가 지정되면 이 메서드가 호출됩니다. 서비스에 제출된 모든 이전 이미지와 방금 업로드한 이미지로 학습되는 새 반복을 만듭니다. 학습이 완료되면 이 메서드는 새로 만든 반복을 기본값으로 설정하는 메서드를 호출하므로 분석에 사용하는 엔드포인트가 최신 학습된 반복입니다.
    /// <summary>
    /// Call the Custom Vision Service to train the Service.
    /// It will generate a new Iteration in the Service
    /// </summary>
    public IEnumerator TrainCustomVisionProject()
    {
        yield return new WaitForSeconds(2);

        trainingUI_TextMesh.text = "Training Custom Vision Service";

        WWWForm webForm = new WWWForm();

        string trainProjectEndpoint = string.Format("{0}{1}/train", url, projectId);

        using (UnityWebRequest www = UnityWebRequest.Post(trainProjectEndpoint, webForm))
        {
            www.SetRequestHeader("Training-Key", trainingKey);
            www.downloadHandler = new DownloadHandlerBuffer();
            yield return www.SendWebRequest();
            string jsonResponse = www.downloadHandler.text;
            Debug.Log($"Training - JSON Response: {jsonResponse}");

            // A new iteration that has just been created and trained
            Iteration iteration = new Iteration();
            iteration = JsonConvert.DeserializeObject<Iteration>(jsonResponse);

            if (www.isDone)
            {
                trainingUI_TextMesh.text = "Custom Vision Trained";

                // Since the Service has a limited number of iterations available,
                // we need to set the last trained iteration as default
                // and delete all the iterations you dont need anymore
                StartCoroutine(SetDefaultIteration(iteration));
            }
        }
    }
SetDefaultIteration() 메서드를 추가합니다. 이 메서드는 이전에 만들고 학습한 반복을 기본값으로 설정합니다. 완료되면 이 메서드는 서비스에 있는 이전 반복을 삭제해야 합니다. 이 과정을 작성할 때 서비스에는 최대 10개(10개) 반복이 동시에 존재할 수 있습니다.
    /// <summary>
    /// Set the newly created iteration as Default
    /// </summary>
    private IEnumerator SetDefaultIteration(Iteration iteration)
    {
        yield return new WaitForSeconds(5);
        trainingUI_TextMesh.text = "Setting default iteration";

        // Set the last trained iteration to default
        iteration.IsDefault = true;

        // Convert the iteration object as JSON
        string iterationAsJson = JsonConvert.SerializeObject(iteration);
        byte[] bytes = Encoding.UTF8.GetBytes(iterationAsJson);

        string setDefaultIterationEndpoint = string.Format("{0}{1}/iterations/{2}",
                                                        url, projectId, iteration.Id);

        using (UnityWebRequest www = UnityWebRequest.Put(setDefaultIterationEndpoint, bytes))
        {
            www.method = "PATCH";
            www.SetRequestHeader("Training-Key", trainingKey);
            www.SetRequestHeader("Content-Type", "application/json");
            www.downloadHandler = new DownloadHandlerBuffer();

            yield return www.SendWebRequest();

            string jsonResponse = www.downloadHandler.text;

            if (www.isDone)
            {
                trainingUI_TextMesh.text = "Default iteration is set \nDeleting Unused Iteration";
                StartCoroutine(DeletePreviousIteration(iteration));
            }
        }
    }
DeletePreviousIteration() 메서드를 추가합니다. 이 메서드는 기본이 아닌 이전 반복을 찾아서 삭제합니다.
    /// <summary>
    /// Delete the previous non-default iteration.
    /// </summary>
    public IEnumerator DeletePreviousIteration(Iteration iteration)
    {
        yield return new WaitForSeconds(5);

        trainingUI_TextMesh.text = "Deleting Unused \nIteration";

        string iterationToDeleteId = string.Empty;

        string findAllIterationsEndpoint = string.Format("{0}{1}/iterations", url, projectId);

        using (UnityWebRequest www = UnityWebRequest.Get(findAllIterationsEndpoint))
        {
            www.SetRequestHeader("Training-Key", trainingKey);
            www.downloadHandler = new DownloadHandlerBuffer();
            yield return www.SendWebRequest();

            string jsonResponse = www.downloadHandler.text;

            // The iteration that has just been trained
            List<Iteration> iterationsList = new List<Iteration>();
            iterationsList = JsonConvert.DeserializeObject<List<Iteration>>(jsonResponse);

            foreach (Iteration i in iterationsList)
            {
                if (i.IsDefault != true)
                {
                    Debug.Log($"Cleaning - Deleting iteration: {i.Name}, {i.Id}");
                    iterationToDeleteId = i.Id;
                    break;
                }
            }
        }

        string deleteEndpoint = string.Format("{0}{1}/iterations/{2}", url, projectId, iterationToDeleteId);

        using (UnityWebRequest www2 = UnityWebRequest.Delete(deleteEndpoint))
        {
            www2.SetRequestHeader("Training-Key", trainingKey);
            www2.downloadHandler = new DownloadHandlerBuffer();
            yield return www2.SendWebRequest();
            string jsonResponse = www2.downloadHandler.text;

            trainingUI_TextMesh.text = "Iteration Deleted";
            yield return new WaitForSeconds(2);
            trainingUI_TextMesh.text = "Ready for next \ncapture";

            yield return new WaitForSeconds(2);
            trainingUI_TextMesh.text = "";
            ImageCapture.Instance.ResetImageCapture();
        }
    }
이 클래스에서 추가할 마지막 메서드는 웹 호출에서 캡처된 이미지를 바이트 배열로 변환하는 데 사용되는 GetImageAsByteArray() 메서드입니다.
    /// <summary>
    /// Returns the contents of the specified image file as a byte array.
    /// </summary>
    static byte[] GetImageAsByteArray(string imageFilePath)
    {
        FileStream fileStream = new FileStream(imageFilePath, FileMode.Open, FileAccess.Read);
        BinaryReader binaryReader = new BinaryReader(fileStream);
        return binaryReader.ReadBytes((int)fileStream.Length);
    }
Unity로 돌아가기 전에 Visual Studio에서 변경 내용을 저장해야 합니다.
10장 - SceneOrganiser 클래스 만들기
이 클래스는 다음을 수행합니다.
Main Camera에 연결할 커서 개체를 만듭니다.
서비스에서 실제 개체를 인식할 때 표시되는 Label 개체를 만듭니다.
적절한 구성 요소를 연결하여 주 카메라를 설정합니다.
분석 모드에서 주 카메라의 위치를 기준으로 적절한 월드 공간에서 런타임에 레이블을 생성하고 Custom Vision Service에서 받은 데이터를 표시합니다.
학습 모드에서 학습 프로세스의 여러 단계를 표시하는 UI를 생성합니다.
이 클래스를 만들려면 다음을 수행합니다.
스크립트 폴더 내부를 마우스 오른쪽 단추로 클릭한 다음 C# 스크립트 만들기>를 클릭합니다. 스크립트 이름을 SceneOrganiser로 지정합니다.
새 SceneOrganiser 스크립트를 두 번 클릭하여 Visual Studio에서 엽니다.
하나의 네임스페이스만 필요하고, SceneOrganiser 클래스 위에서 다른 네임스페이스를 제거합니다.
using UnityEngine;그런 다음 Start() 메서드 위에 SceneOrganiser 클래스 내에 다음 변수를 추가합니다.
    /// <summary>
    /// Allows this class to behave like a singleton
    /// </summary>
    public static SceneOrganiser Instance;

    /// <summary>
    /// The cursor object attached to the camera
    /// </summary>
    internal GameObject cursor;

    /// <summary>
    /// The label used to display the analysis on the objects in the real world
    /// </summary>
    internal GameObject label;

    /// <summary>
    /// Object providing the current status of the camera.
    /// </summary>
    internal TextMesh cameraStatusIndicator;

    /// <summary>
    /// Reference to the last label positioned
    /// </summary>
    internal Transform lastLabelPlaced;

    /// <summary>
    /// Reference to the last label positioned
    /// </summary>
    internal TextMesh lastLabelPlacedText;

    /// <summary>
    /// Current threshold accepted for displaying the label
    /// Reduce this value to display the recognition more often
    /// </summary>
    internal float probabilityThreshold = 0.5f;
Start() 및 Update() 메서드를 삭제합니다.
변수 바로 아래에 클래스를 초기화하고 장면을 설정하는 Awake() 메서드를 추가합니다.
    /// <summary>
    /// Called on initialization
    /// </summary>
    private void Awake()
    {
        // Use this class instance as singleton
        Instance = this;

        // Add the ImageCapture class to this GameObject
        gameObject.AddComponent<ImageCapture>();

        // Add the CustomVisionAnalyser class to this GameObject
        gameObject.AddComponent<CustomVisionAnalyser>();

        // Add the CustomVisionTrainer class to this GameObject
        gameObject.AddComponent<CustomVisionTrainer>();

        // Add the VoiceRecogniser class to this GameObject
        gameObject.AddComponent<VoiceRecognizer>();

        // Add the CustomVisionObjects class to this GameObject
        gameObject.AddComponent<CustomVisionObjects>();

        // Create the camera Cursor
        cursor = CreateCameraCursor();

        // Load the label prefab as reference
        label = CreateLabel();

        // Create the camera status indicator label, and place it above where predictions
        // and training UI will appear.
        cameraStatusIndicator = CreateTrainingUI("Status Indicator", 0.02f, 0.2f, 3, true);

        // Set camera status indicator to loading.
        SetCameraStatus("Loading");
    }
이제 주 카메라 커서를 만들고 배치하는 CreateCameraCursor() 메서드와 Analysis Label 개체를 만드는 CreateLabel() 메서드를 추가합니다.
    /// <summary>
    /// Spawns cursor for the Main Camera
    /// </summary>
    private GameObject CreateCameraCursor()
    {
        // Create a sphere as new cursor
        GameObject newCursor = GameObject.CreatePrimitive(PrimitiveType.Sphere);

        // Attach it to the camera
        newCursor.transform.parent = gameObject.transform;

        // Resize the new cursor
        newCursor.transform.localScale = new Vector3(0.02f, 0.02f, 0.02f);

        // Move it to the correct position
        newCursor.transform.localPosition = new Vector3(0, 0, 4);

        // Set the cursor color to red
        newCursor.GetComponent<Renderer>().material = new Material(Shader.Find("Diffuse"));
        newCursor.GetComponent<Renderer>().material.color = Color.green;

        return newCursor;
    }

    /// <summary>
    /// Create the analysis label object
    /// </summary>
    private GameObject CreateLabel()
    {
        // Create a sphere as new cursor
        GameObject newLabel = new GameObject();

        // Resize the new cursor
        newLabel.transform.localScale = new Vector3(0.01f, 0.01f, 0.01f);

        // Creating the text of the label
        TextMesh t = newLabel.AddComponent<TextMesh>();
        t.anchor = TextAnchor.MiddleCenter;
        t.alignment = TextAlignment.Center;
        t.fontSize = 50;
        t.text = "";

        return newLabel;
    }
카메라 상태를 제공하는 텍스트 메시용 메시지를 처리하는 SetCameraStatus() 메서드를 추가합니다.
    /// <summary>
    /// Set the camera status to a provided string. Will be coloured if it matches a keyword.
    /// </summary>
    /// <param name="statusText">Input string</param>
    public void SetCameraStatus(string statusText)
    {
        if (string.IsNullOrEmpty(statusText) == false)
        {
            string message = "white";

            switch (statusText.ToLower())
            {
                case "loading":
                    message = "yellow";
                    break;

                case "ready":
                    message = "green";
                    break;

                case "uploading image":
                    message = "red";
                    break;

                case "looping capture":
                    message = "yellow";
                    break;

                case "analysis":
                    message = "red";
                    break;
            }

            cameraStatusIndicator.GetComponent<TextMesh>().text = $"Camera Status:\n<color={message}>{statusText}..</color>";
        }
    }
Custom Vision Service의 데이터를 생성하고 장면에 표시하는 PlaceAnalysisLabel() 및 SetTagsToLastLabel() 메서드를 추가합니다.
    /// <summary>
    /// Instantiate a label in the appropriate location relative to the Main Camera.
    /// </summary>
    public void PlaceAnalysisLabel()
    {
        lastLabelPlaced = Instantiate(label.transform, cursor.transform.position, transform.rotation);
        lastLabelPlacedText = lastLabelPlaced.GetComponent<TextMesh>();
    }

    /// <summary>
    /// Set the Tags as Text of the last label created.
    /// </summary>
    public void SetTagsToLastLabel(AnalysisObject analysisObject)
    {
        lastLabelPlacedText = lastLabelPlaced.GetComponent<TextMesh>();

        if (analysisObject.Predictions != null)
        {
            foreach (Prediction p in analysisObject.Predictions)
            {
                if (p.Probability > 0.02)
                {
                    lastLabelPlacedText.text += $"Detected: {p.TagName} {p.Probability.ToString("0.00 \n")}";
                    Debug.Log($"Detected: {p.TagName} {p.Probability.ToString("0.00 \n")}");
                }
            }
        }
    }
마지막으로, 애플리케이션이 학습 모드에 있을 때 학습 프로세스의 여러 단계를 표시하는 UI를 생성하는 CreateTrainingUI() 메서드를 추가합니다. 또한 이 메서드를 사용하여 카메라 상태 개체를 만듭니다.
    /// <summary>
    /// Create a 3D Text Mesh in scene, with various parameters.
    /// </summary>
    /// <param name="name">name of object</param>
    /// <param name="scale">scale of object (i.e. 0.04f)</param>
    /// <param name="yPos">height above the cursor (i.e. 0.3f</param>
    /// <param name="zPos">distance from the camera</param>
    /// <param name="setActive">whether the text mesh should be visible when it has been created</param>
    /// <returns>Returns a 3D text mesh within the scene</returns>
    internal TextMesh CreateTrainingUI(string name, float scale, float yPos, float zPos, bool setActive)
    {
        GameObject display = new GameObject(name, typeof(TextMesh));
        display.transform.parent = Camera.main.transform;
        display.transform.localPosition = new Vector3(0, yPos, zPos);
        display.SetActive(setActive);
        display.transform.localScale = new Vector3(scale, scale, scale);
        display.transform.rotation = new Quaternion();
        TextMesh textMesh = display.GetComponent<TextMesh>();
        textMesh.anchor = TextAnchor.MiddleCenter;
        textMesh.alignment = TextAlignment.Center;
        return textMesh;
    }
Unity로 돌아가기 전에 Visual Studio에서 변경 내용을 저장해야 합니다.
Important
계속하기 전에 CustomVisionAnalyser 클래스를 열고, AnalyticLastImageCaptured() 메서드 내에서 다음 줄의 주석 처리를 제거합니다.
  AnalysisObject analysisObject = new AnalysisObject();
  analysisObject = JsonConvert.DeserializeObject<AnalysisObject>(jsonResponse);
  SceneOrganiser.Instance.SetTagsToLastLabel(analysisObject);
11장 - ImageCapture 클래스 만들기
만들려는 다음 클래스는 ImageCapture 클래스입니다.
이 클래스는 다음을 담당합니다.
HoloLens 카메라를 사용하여 이미지를 캡처하고 앱 폴더에 저장합니다.
사용자의 탭 제스처 처리
애플리케이션이 분석 모드 또는 학습 모드에서 실행되는지 여부를 결정하는 열거형 값을 유지 관리합니다.
이 클래스를 만들려면 다음을 수행합니다.
이전에 만든 Scripts 폴더로 이동합니다.
폴더 내부를 마우스 오른쪽 단추로 클릭한 다음 C# 스크립트 만들기 > 를 클릭합니다. 스크립트 이름을 ImageCapture로 지정합니다.
새 ImageCapture 스크립트를 두 번 클릭하여 Visual Studio에서 엽니다.
파일 맨 위에 있는 네임스페이스를 다음으로 바꿉니다.
using System;
using System.IO;
using System.Linq;
using UnityEngine;
using UnityEngine.XR.WSA.Input;
using UnityEngine.XR.WSA.WebCam;
그런 다음, Start() 메서드 위에 ImageCapture 클래스 내에 다음 변수를 추가합니다.
    /// <summary>
    /// Allows this class to behave like a singleton
    /// </summary>
    public static ImageCapture Instance;

    /// <summary>
    /// Keep counts of the taps for image renaming
    /// </summary>
    private int captureCount = 0;

    /// <summary>
    /// Photo Capture object
    /// </summary>
    private PhotoCapture photoCaptureObject = null;

    /// <summary>
    /// Allows gestures recognition in HoloLens
    /// </summary>
    private GestureRecognizer recognizer;

    /// <summary>
    /// Loop timer
    /// </summary>
    private float secondsBetweenCaptures = 10f;

    /// <summary>
    /// Application main functionalities switch
    /// </summary>
    internal enum AppModes {Analysis, Training }

    /// <summary>
    /// Local variable for current AppMode
    /// </summary>
    internal AppModes AppMode { get; private set; }

    /// <summary>
    /// Flagging if the capture loop is running
    /// </summary>
    internal bool captureIsActive;

    /// <summary>
    /// File path of current analysed photo
    /// </summary>
    internal string filePath = string.Empty;
이제 Awake() 및 Start() 메서드에 대한 코드를 추가해야 합니다.
    /// <summary>
    /// Called on initialization
    /// </summary>
    private void Awake()
    {
        Instance = this;

        // Change this flag to switch between Analysis Mode and Training Mode
        AppMode = AppModes.Training;
    }

    /// <summary>
    /// Runs at initialization right after Awake method
    /// </summary>
    void Start()
    {
        // Clean up the LocalState folder of this application from all photos stored
        DirectoryInfo info = new DirectoryInfo(Application.persistentDataPath);
        var fileInfo = info.GetFiles();
        foreach (var file in fileInfo)
        {
            try
            {
                file.Delete();
            }
            catch (Exception)
            {
                Debug.LogFormat("Cannot delete file: ", file.Name);
            }
        }

        // Subscribing to the HoloLens API gesture recognizer to track user gestures
        recognizer = new GestureRecognizer();
        recognizer.SetRecognizableGestures(GestureSettings.Tap);
        recognizer.Tapped += TapHandler;
        recognizer.StartCapturingGestures();

        SceneOrganiser.Instance.SetCameraStatus("Ready");
    }
탭 제스처가 발생할 때 호출되는 처리기를 구현합니다.
    /// <summary>
    /// Respond to Tap Input.
    /// </summary>
    private void TapHandler(TappedEventArgs obj)
    {
        switch (AppMode)
        {
            case AppModes.Analysis:
                if (!captureIsActive)
                {
                    captureIsActive = true;

                    // Set the cursor color to red
                    SceneOrganiser.Instance.cursor.GetComponent<Renderer>().material.color = Color.red;

                    // Update camera status to looping capture.
                    SceneOrganiser.Instance.SetCameraStatus("Looping Capture");

                    // Begin the capture loop
                    InvokeRepeating("ExecuteImageCaptureAndAnalysis", 0, secondsBetweenCaptures);
                }
                else
                {
                    // The user tapped while the app was analyzing
                    // therefore stop the analysis process
                    ResetImageCapture();
                }
                break;

            case AppModes.Training:
                if (!captureIsActive)
                {
                    captureIsActive = true;

                    // Call the image capture
                    ExecuteImageCaptureAndAnalysis();

                    // Set the cursor color to red
                    SceneOrganiser.Instance.cursor.GetComponent<Renderer>().material.color = Color.red;

                    // Update camera status to uploading image.
                    SceneOrganiser.Instance.SetCameraStatus("Uploading Image");
                }
                break;
        }
    }
참고 항목
분석 모드에서 TapHandler 메서드는 사진 캡처 루프를 시작하거나 중지하는 스위치 역할을 합니다.
학습 모드에서는 카메라에서 이미지를 캡처합니다.
커서가 녹색이면 카메라를 사용하여 이미지를 촬영할 수 있습니다.
커서가 빨간색이면 카메라가 사용 중임을 의미합니다.
애플리케이션에서 이미지 캡처 프로세스를 시작하고 이미지를 저장하는 데 사용하는 메서드를 추가합니다.
    /// <summary>
    /// Begin process of Image Capturing and send To Azure Custom Vision Service.
    /// </summary>
    private void ExecuteImageCaptureAndAnalysis()
    {
        // Update camera status to analysis.
        SceneOrganiser.Instance.SetCameraStatus("Analysis");

        // Create a label in world space using the SceneOrganiser class
        // Invisible at this point but correctly positioned where the image was taken
        SceneOrganiser.Instance.PlaceAnalysisLabel();

        // Set the camera resolution to be the highest possible
        Resolution cameraResolution = PhotoCapture.SupportedResolutions.OrderByDescending((res) => res.width * res.height).First();

        Texture2D targetTexture = new Texture2D(cameraResolution.width, cameraResolution.height);

        // Begin capture process, set the image format
        PhotoCapture.CreateAsync(false, delegate (PhotoCapture captureObject)
        {
            photoCaptureObject = captureObject;

            CameraParameters camParameters = new CameraParameters
            {
                hologramOpacity = 0.0f,
                cameraResolutionWidth = targetTexture.width,
                cameraResolutionHeight = targetTexture.height,
                pixelFormat = CapturePixelFormat.BGRA32
            };

            // Capture the image from the camera and save it in the App internal folder
            captureObject.StartPhotoModeAsync(camParameters, delegate (PhotoCapture.PhotoCaptureResult result)
            {
                string filename = string.Format(@"CapturedImage{0}.jpg", captureCount);
                filePath = Path.Combine(Application.persistentDataPath, filename);
                captureCount++;
                photoCaptureObject.TakePhotoAsync(filePath, PhotoCaptureFileOutputFormat.JPG, OnCapturedPhotoToDisk);
            });
        });
    }
사진이 캡처될 때 및 분석할 준비가 되었을 때 호출될 처리기를 추가합니다. 그런 다음, 코드가 설정된 모드에 따라 결과가 CustomVisionAnalyser 또는 CustomVisionTrainer에 전달됩니다.
    /// <summary>
    /// Register the full execution of the Photo Capture.
    /// </summary>
    void OnCapturedPhotoToDisk(PhotoCapture.PhotoCaptureResult result)
    {
            // Call StopPhotoMode once the image has successfully captured
            photoCaptureObject.StopPhotoModeAsync(OnStoppedPhotoMode);
    }


    /// <summary>
    /// The camera photo mode has stopped after the capture.
    /// Begin the Image Analysis process.
    /// </summary>
    void OnStoppedPhotoMode(PhotoCapture.PhotoCaptureResult result)
    {
        Debug.LogFormat("Stopped Photo Mode");

        // Dispose from the object in memory and request the image analysis
        photoCaptureObject.Dispose();
        photoCaptureObject = null;

        switch (AppMode)
        {
            case AppModes.Analysis:
                // Call the image analysis
                StartCoroutine(CustomVisionAnalyser.Instance.AnalyseLastImageCaptured(filePath));
                break;

            case AppModes.Training:
                // Call training using captured image
                CustomVisionTrainer.Instance.RequestTagSelection();
                break;
        }
    }

    /// <summary>
    /// Stops all capture pending actions
    /// </summary>
    internal void ResetImageCapture()
    {
        captureIsActive = false;

        // Set the cursor color to green
        SceneOrganiser.Instance.cursor.GetComponent<Renderer>().material.color = Color.green;

        // Update camera status to ready.
        SceneOrganiser.Instance.SetCameraStatus("Ready");

        // Stop the capture loop if active
        CancelInvoke();
    }
Unity로 돌아가기 전에 Visual Studio에서 변경 내용을 저장해야 합니다.
이제 모든 스크립트가 완료되었으므로 Unity 편집기로 돌아가서 Scripts 폴더에서 Hierarchy 패널의 Main Camera 개체로 SceneOrganiser 클래스를 클릭하고 끕니다.
12장 - 빌드 전
애플리케이션에 대한 철저한 테스트를 수행하려면 HoloLens에 테스트용으로 로드해야 합니다.
이렇게 하기 전에 다음을 확인합니다.
2장에 언급된 모든 설정이 올바르게 설정됩니다.
주 카메라의 모든 필드인 검사기 패널이 제대로 할당됩니다.
Script SceneOrganiser는 Main Camera 개체에 연결됩니다.
predictionKey 변수에 예측 키를 삽입해야 합니다.
predictionEndpoint 변수에 예측 엔드포인트를 삽입했습니다.
CustomVisionTrainer 클래스의 trainingKey 변수에 학습 키를 삽입했습니다.
CustomVisionTrainer 클래스의 projectId 변수에 프로젝트 ID를 삽입했습니다.
13장 - 애플리케이션 빌드 및 테스트용 로드
빌드 프로세스를 시작하려면 다음을 수행합니다.
파일 > 빌드 설정으로 이동합니다.
Unity C# 프로젝트를 선택합니다.
빌드를 클릭한 다음 Unity에서 파일 탐색기 창이 시작됩니다. 여기서는 앱을 만들 폴더를 선택합니다. 이제 해당 폴더를 만들고 이름을 앱으로 지정합니다. 그런 다음 앱 폴더를 선택한 상태에서 폴더 선택을 클릭합니다.
Unity는 App 폴더에 프로젝트 빌드를 시작합니다.
Unity가 빌드를 마치면(시간이 좀 걸릴 수 있음) 빌드 위치에서 파일 탐색기 창이 열립니다(작업 표시줄이 항상 창 위에 표시되지는 않지만 새 창이 추가되었음을 알려 주시기 때문에 작업 표시줄 확인).
HoloLens에 배포하려면:
HoloLens의 IP 주소(원격 배포용)가 필요하며 HoloLens가 개발자 모드에 있는지 확인합니다. 방법:
HoloLens를 착용하는 동안 설정을 엽니다.
네트워크 및 인터넷>Wi-Fi>고급 옵션으로 이동
IPv4 주소를 확인합니다.
다음으로, 설정으로 다시 이동한 다음 개발자용 업데이트 및 보안>으로 이동합니다.
개발자 모드를 설정합니다.
새 Unity 빌드(앱 폴더)로 이동하고 Visual Studio를 사용하여 솔루션 파일을 엽니다.
솔루션 구성에서 디버그를 선택합니다.
솔루션 플랫폼에서 x86, 원격 머신을 선택합니다. 원격 디바이스의 IP 주소를 삽입하라는 메시지가 표시됩니다(이 경우 언급한 HoloLens).

빌드 메뉴로 이동하여 솔루션 배포를 클릭하여 HoloLens에 애플리케이션을 테스트용으로 로드합니다.
이제 시작 준비가 된 HoloLens의 설치된 앱 목록에 앱이 표시됩니다.
참고 항목
몰입형 헤드셋에 배포하려면 솔루션 플랫폼을 로컬 머신으로 설정하고 x86을 플랫폼으로 사용하여 구성을 디버그로 설정합니다. 그런 다음 빌드 메뉴 항목을 사용하여 로컬 컴퓨터에 배포하고 솔루션 배포를 선택합니다.
애플리케이션을 사용하려면 다음을 수행합니다.
학습 모드와 예측 모드 간에 앱 기능을 전환하려면 ImageCapture 클래스 내에 있는 Awake() 메서드에 있는 AppMode 변수를 업데이트해야 합니다.
        // Change this flag to switch between Analysis mode and Training mode
        AppMode = AppModes.Training;
또는
        // Change this flag to switch between Analysis mode and Training mode
        AppMode = AppModes.Analysis;
학습 모드에서:
마우스 또는 키보드를 보고 탭 제스처를 사용합니다.
다음으로 태그를 제공하도록 요청하는 텍스트가 표시됩니다.
마우스 또는 키보드 중 하나를 말합니다.
예측 모드에서:
개체를 보고 탭 제스처를 사용합니다.
검색된 개체를 제공하는 텍스트가 가장 높은 확률(정규화됨)을 제공합니다.
14장 - Custom Vision 모델 평가 및 개선
서비스를 보다 정확하게 만들려면 예측에 사용되는 모델을 계속 학습해야 합니다. 이 작업은 학습 모드와 예측 모드를 모두 사용하는 새 애플리케이션을 사용하여 수행되며, 후자는 이 챕터에서 다루는 포털을 방문해야 합니다. 포털을 여러 번 다시 방문하여 모델을 지속적으로 개선할 준비를 합니다.
Azure Custom Vision Portal로 다시 이동하여 프로젝트에 참여하면 페이지의 위쪽 가운데에서 예측 탭을 선택합니다.

애플리케이션이 실행되는 동안 서비스에 전송된 모든 이미지가 표시됩니다. 이미지를 마우스로 가리키면 해당 이미지에 대해 만들어진 예측을 제공합니다.
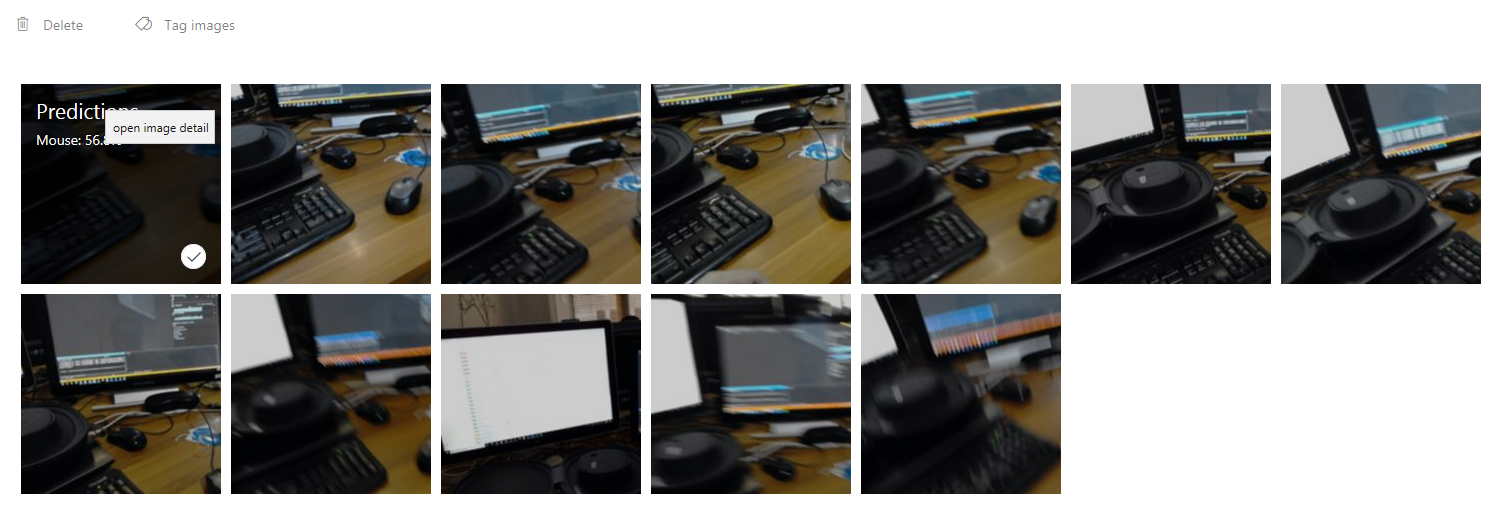
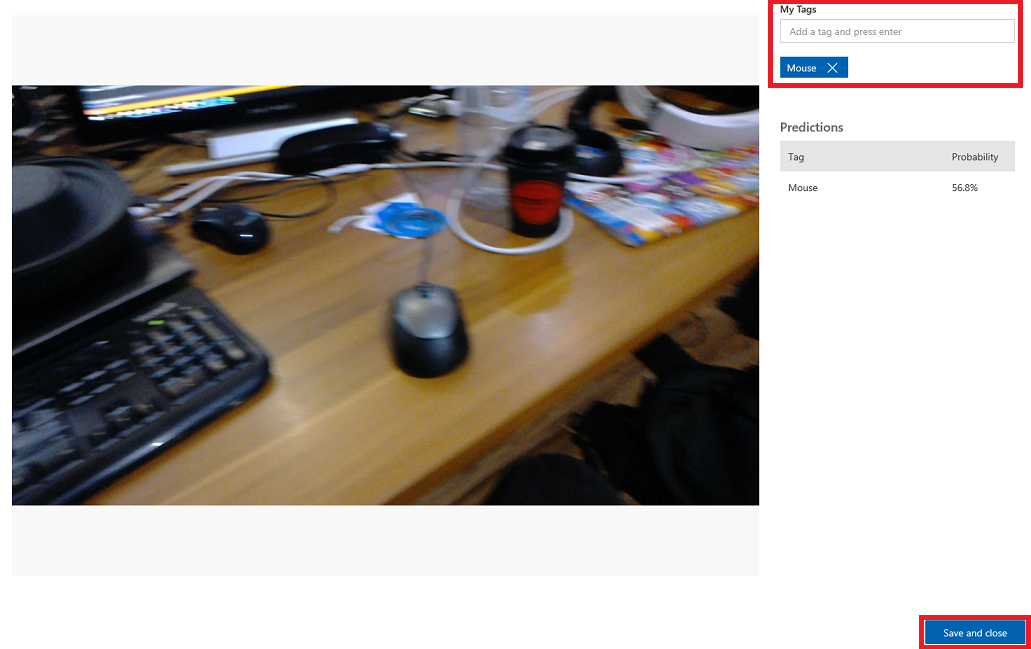
이미지 중 하나를 선택하여 엽니다. 열리면 해당 이미지에 대한 예측이 오른쪽에 표시됩니다. 예측이 올바르고 이 이미지를 서비스의 학습 모델에 추가하려는 경우 내 태그 입력 상자를 클릭하고 연결할 태그를 선택합니다. 작업을 마치면 오른쪽 아래에 있는 저장 및 닫기 단추를 클릭하고 다음 이미지로 계속 진행합니다.
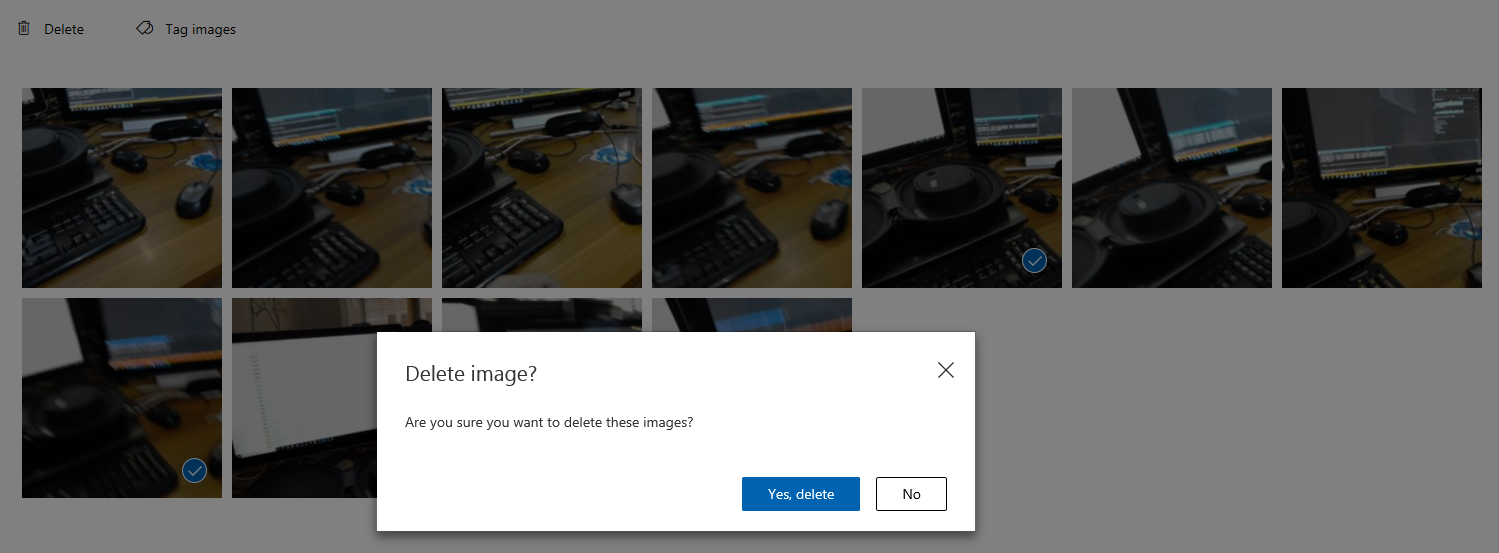
이미지 그리드로 돌아가면 태그를 추가하고 저장한 이미지가 제거됩니다. 태그가 지정된 항목이 없는 이미지를 찾으면 해당 이미지의 틱을 클릭한 다음(여러 이미지에 대해 이 작업을 수행할 수 있음) 그리드 페이지의 오른쪽 위 모서리에 있는 삭제를 클릭하여 삭제할 수 있습니다. 다음 팝업에서 각각 예, 삭제 또는 아니요를 클릭하여 삭제를 확인하거나 취소할 수 있습니다.
계속 진행할 준비가 되면 오른쪽 위에 있는 녹색 학습 단추를 클릭합니다. 서비스 모델은 현재 제공된 모든 이미지로 학습됩니다(보다 정확하게 만들기). 학습이 완료되면 예측 URL이 서비스의 최신 반복을 계속 사용할 수 있도록 기본 설정 단추를 한 번 더 클릭해야 합니다.


완료된 Custom Vision API 애플리케이션
축하합니다. Azure Custom Vision API를 활용하여 실제 개체를 인식하고, 서비스 모델을 학습시키고, 표시된 내용에 대한 신뢰를 표시하는 혼합 현실 앱을 빌드했습니다.

보너스 연습
연습 1
Custom Vision Service를 학습하여 더 많은 개체를 인식합니다.
연습 2
학습한 내용을 확장하는 방법으로 다음 연습을 완료합니다.
개체를 인식할 때 소리를 재생합니다.
연습 3
API를 사용하여 앱이 분석하는 것과 동일한 이미지로 서비스를 다시 학습하여 서비스를 보다 정확하게 만듭니다(예측과 학습을 동시에 수행).