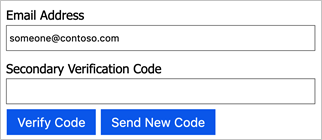
Verification display control
Use a verification display control to verify a claim, for example an email address or phone number, with a verification code sent to the user.
VerificationControl actions
The verification display control consists of two steps (actions):
Request a destination from the user, such as an email address or phone number, to which the verification code should be sent. When the user selects the Send Code button, the SendCode Action of the verification display control is executed. The SendCode Action generates a code, constructs the content to be sent, and sends it to the user. The value of the address can be pre-populated and serve as a second-factor authentication.

After the code has been sent, the user reads the message, enters the verification code into the control provided by the display control, and selects Verify Code. By selecting Verify Code, the VerifyCode Action is executed to verify the code associated with the address. If the user selects Send New Code, the first action is executed again.

VerificationControl required elements
The VerificationControl must contain following elements:
- The type of the
DisplayControlisVerificationControl. DisplayClaims- Send to - One or more claims specifying where to send the verification code to. For example, email or country code and phone number.
- Verification code - The verification code claim that user provides after the code has been sent. This claim must be set as required, and the
ControlClaimTypemust be set toVerificationCode.
- Output claim (optional) to be returned to the self-asserted page after the user completes verification process. For example, email or country code and phone number. The self-asserted technical profile uses the claims to persist the data or bubble up the output claims to the next orchestration step.
- Two
Actions with following names:- SendCode - Sends a code to the user. This action usually contains two validation technical profile, to generate a code and to send it.
- VerifyCode - Verifies the code. This action usually contains a single validation technical profile.
In the example below, an email textbox is displayed on the page. When the user enters their email address and selects SendCode, the SendCode action is triggered in the Azure AD B2C back end.
Then, the user enters the verificationCode and selects VerifyCode to trigger the VerifyCode action in the back end. If all validations pass, the VerificationControl is considered complete and the user can continue to the next step.
<DisplayControl Id="emailVerificationControl" UserInterfaceControlType="VerificationControl">
  <DisplayClaims>
    <DisplayClaim ClaimTypeReferenceId="email"  Required="true" />
    <DisplayClaim ClaimTypeReferenceId="verificationCode" ControlClaimType="VerificationCode" Required="true" />
  </DisplayClaims>
  <OutputClaims>
    <OutputClaim ClaimTypeReferenceId="email" />
  </OutputClaims>
  <Actions>
    <Action Id="SendCode">
      <ValidationClaimsExchange>
        <ValidationClaimsExchangeTechnicalProfile TechnicalProfileReferenceId="GenerateOtp" />
        <ValidationClaimsExchangeTechnicalProfile TechnicalProfileReferenceId="SendGrid" />
      </ValidationClaimsExchange>
    </Action>
    <Action Id="VerifyCode">
      <ValidationClaimsExchange>
        <ValidationClaimsExchangeTechnicalProfile TechnicalProfileReferenceId="VerifyOtp" />
      </ValidationClaimsExchange>
    </Action>
  </Actions>
</DisplayControl>