Enable remote access to SharePoint with Microsoft Entra application proxy
This step-by-step guide explains how to integrate an on-premises SharePoint farm with Microsoft Entra application proxy.
Prerequisites
To perform the configuration, you need the following resources:
- A SharePoint 2013 farm or newer. The SharePoint farm must be integrated with Microsoft Entra ID.
- A Microsoft Entra tenant with a plan that includes application proxy. Learn more about Microsoft Entra ID plans and pricing.
- A Microsoft Office Web Apps Server farm to properly launch Office files from the on-premises SharePoint farm.
- A custom, verified domain in the Microsoft Entra tenant.
- On-premises Active Directory synchronized with Microsoft Entra Connect, through which users can sign in to Azure.
- a private network connector installed and running on a machine within the corporate domain.
Configuring SharePoint with application proxy requires two URLs:
- An external URL, visible to end-users and determined in Microsoft Entra ID. This URL can use a custom domain. Learn more about working with custom domains in Microsoft Entra application proxy.
- An internal URL, known only within the corporate domain and never used directly.
Important
To make sure the links are mapped correctly, follow these recommendations for the internal URL:
- Use HTTPS.
- Don't use custom ports.
- In the corporate Domain Name System (DNS), create a host (A) to point to the SharePoint WFE (or load balancer), and not an alias (CName).
This article uses the following values:
- Internal URL:
https://sharepoint. - External URL:
https://spsites-demo1984.msappproxy.net/. - Application pool account for the SharePoint web application:
Contoso\spapppool.
Step 1: Configure an application in Microsoft Entra ID that uses application proxy
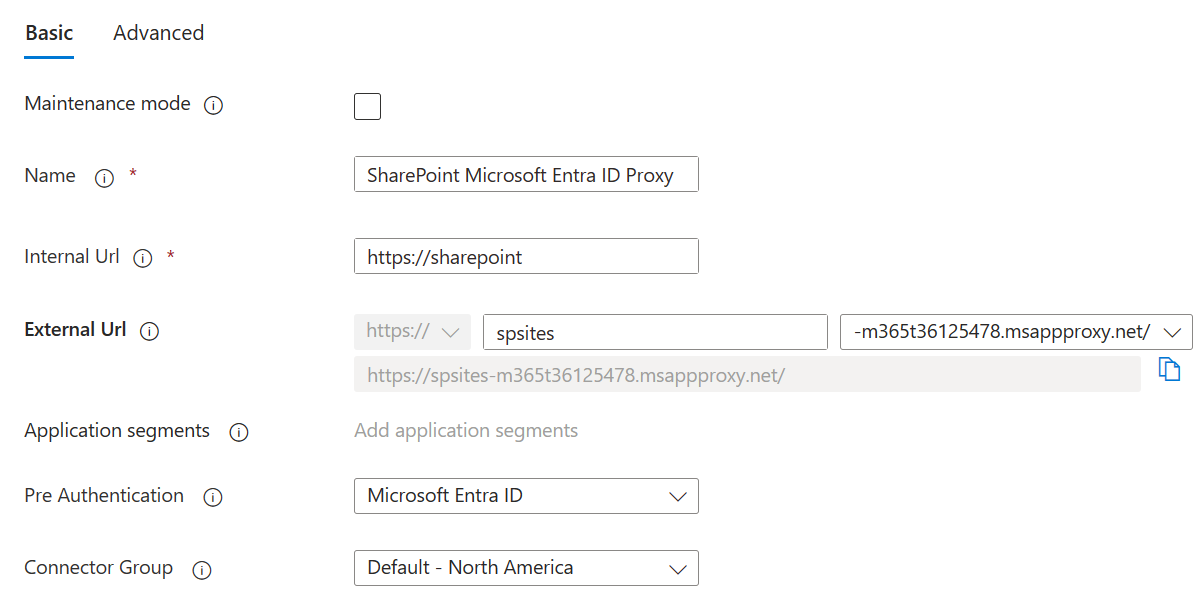
In this step, you create an application in your Microsoft Entra tenant that uses application proxy. You set the external URL and specify the internal URL, both of which are used later in SharePoint.
Create the app as described with the following settings. For step-by-step instructions, see Publishing applications using Microsoft Entra application proxy.
- Internal URL: SharePoint internal URL that is set later in SharePoint, such as
https://sharepoint. - Pre-Authentication:
Microsoft Entra ID. - Translate URLs in Headers:
No. - Translate URLs in Application Body:
No.

- Internal URL: SharePoint internal URL that is set later in SharePoint, such as
After your app is published, follow these steps to configure the single sign-on settings.
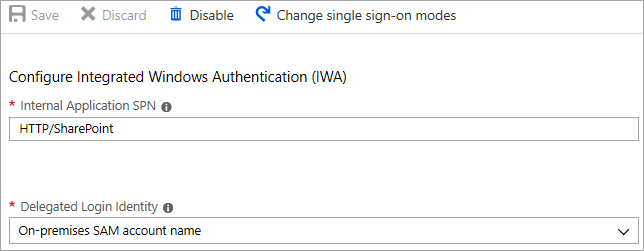
- On the application page in the portal, select Single sign-on.
- For Single Sign-on Mode, select Integrated Windows Authentication.
- Set Internal Application Service Principal Name (SPN) to the value you set earlier. For this example, the value is
HTTP/sharepoint. - Under Delegated Login Identity, select the most suitable option for your Active Directory forest configuration. For example if you have a single Active Directory domain in your forest, select On-premises SAM account name (as shown in the following screenshot). But if your users aren't in the same domain as SharePoint and the private network connector servers, select On-premises user principal name (not shown in the screenshot).

Finish setting up your application, go to the Users and groups section and assign users to access this application.
Step 2: Configure the SharePoint web application
The SharePoint web application must be configured with Kerberos and the appropriate alternate access mappings to work correctly with Microsoft Entra application proxy. There are two possible options:
- Create a new web application and use only the default zone. Using the default zone is the preferred option, it offers the best experience with SharePoint. For example, the links in email alerts that SharePoint generates point to the default zone.
- Extend an existing web application to configure Kerberos in a non default zone.
Important
Regardless of the zone that's used, the application pool account of the SharePoint web application must be a domain account for Kerberos to work correctly.
Create the SharePoint web application
The script shows an example of creating a new web application using the default zone. using the default zone is the preferred option.
Start the SharePoint Management Shell and run the script.
# This script creates a web application and configures the Default zone with the internal/external URL needed to work with Azure AD application proxy
# Edit variables below to fit your environment. Note that the managed account must exist and it must be a domain account
$internalUrl = "https://sharepoint"
$externalUrl = "https://spsites-demo1984.msappproxy.net/"
$applicationPoolManagedAccount = "Contoso\spapppool"

$winAp = New-SPAuthenticationProvider -UseWindowsIntegratedAuthentication -DisableKerberos:$false
$wa = New-SPWebApplication -Name "SharePoint - AAD Proxy" -Port 443 -SecureSocketsLayer -URL $externalUrl -ApplicationPool "SharePoint - AAD Proxy" -ApplicationPoolAccount (Get-SPManagedAccount $applicationPoolManagedAccount) -AuthenticationProvider $winAp
New-SPAlternateURL -Url $internalUrl -WebApplication $wa -Zone Default -Internal
Open the SharePoint Central Administration site.
Under System Settings, select Configure Alternate Access Mappings. The Alternate Access Mapping Collection box opens.
Filter the display with the new web application.

If you extend an existing web application to a new zone.
Start the SharePoint Management Shell and run the following script.
# This script extends an existing web application to Internet zone with the internal/external URL needed to work with Azure AD application proxy
# Edit variables below to fit your environment
$webAppUrl = "http://spsites/"
$internalUrl = "https://sharepoint"
$externalUrl = "https://spsites-demo1984.msappproxy.net/"

$winAp = New-SPAuthenticationProvider -UseWindowsIntegratedAuthentication -DisableKerberos:$false
$wa = Get-SPWebApplication $webAppUrl
New-SPWebApplicationExtension -Name "SharePoint - AAD Proxy" -Identity $wa -SecureSocketsLayer -Zone Extranet -Url $externalUrl -AuthenticationProvider $winAp
New-SPAlternateURL -Url $internalUrl -WebApplication $wa -Zone Extranet -Internal
`. Open the SharePoint Central Administration site.
Under System Settings, select Configure Alternate Access Mappings. The Alternate Access Mapping Collection box opens.
Filter the display with the web application that was extended.

Make sure the SharePoint web application is running under a domain account
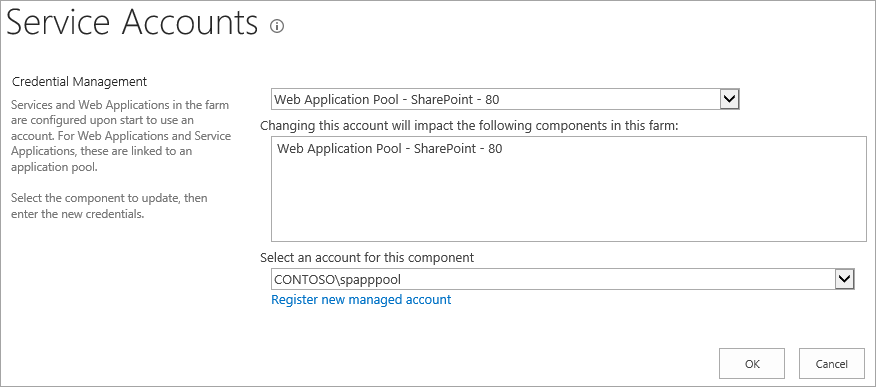
To identify the account running the application pool of the SharePoint web application and to make sure it's a domain account, follow these steps:
Open the SharePoint Central Administration site.
Go to Security and select Configure service accounts.
Select Web Application Pool - YourWebApplicationName.

Confirm that Select an account for this component returns a domain account, and remember it, since you use it in the next step.
Make sure that an HTTPS certificate is configured for the IIS site of the extranet zone
Because the Internal URL uses HTTPS protocol (https://SharePoint/), a certificate must be set on the Internet Information Services (IIS) site.
Open the Windows PowerShell console.
Run the following script to generate a self-signed certificate and add it to the computer's
MY store.# Replace "SharePoint" with the actual hostname of the Internal URL of your Azure AD proxy application New-SelfSignedCertificate -DnsName "SharePoint" -CertStoreLocation "cert:\LocalMachine\My"Important
Self-signed certificates are suitable only for test purposes. In production environments, we strongly recommend that you use certificates issued by a certificate authority instead.
Open the Internet Information Services Manager console.
Expand the server in the tree view, expand Sites, select the SharePoint - Microsoft Entra ID Proxy site, and select Bindings.
Select https binding and then select Edit.
In the TLS/SSL certificate field, choose SharePoint certificate and then select OK.
You can now access the SharePoint site externally through Microsoft Entra application proxy.
Step 3: Configure Kerberos Constrained Delegation
Users initially authenticate in Microsoft Entra ID and then to SharePoint by using Kerberos through the Microsoft Entra private network connector. To allow the connector to obtain a Kerberos token on behalf of the Microsoft Entra user, you must configure Kerberos Constrained Delegation (KCD) with protocol transition. To learn more about KCD, see Kerberos Constrained Delegation overview.
Set the Service Principal Name (SPN) for the SharePoint service account
In this article, the internal URL is https://sharepoint, and so the service principal name (SPN) is HTTP/sharepoint. You must replace those values with the values that correspond to your environment.
To register SPN HTTP/sharepoint for the SharePoint application pool account Contoso\spapppool, run the following command from a command prompt, as an administrator of the domain:
setspn -S HTTP/sharepoint Contoso\spapppool
The Setspn command searches for the SPN before it adds it. If the SPN already exists, you see a Duplicate SPN Value error. Remove the existing SPN. Verify that the SPN was added successfully by running the Setspn command with the -L option. To learn more about the command, see Setspn.
Make sure the connector is trusted for delegation to the SPN that was added to the SharePoint application pool account
Configure the KCD so that the Microsoft Entra application proxy service can delegate user identities to the SharePoint application pool account. Configure KCD by enabling the private network connector to retrieve Kerberos tickets for your users who are authenticated in Microsoft Entra ID. Then, that server passes the context to the target application (SharePoint in this case).
To configure the KCD, follow these steps for each connector machine:
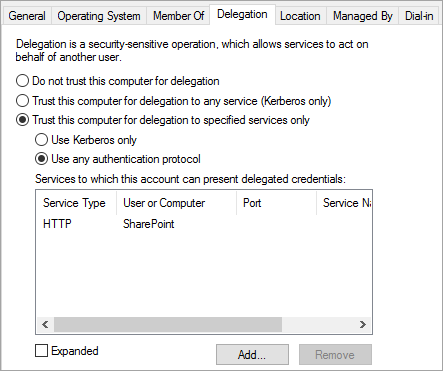
Sign in to a domain controller as a domain administrator, and then open Active Directory Users and Computers.
Find the computer running the Microsoft Entra private network connector. In this example, it's the computer that's running SharePoint Server.
Double-click the computer, and then select the Delegation tab.
Make sure the delegation options are set to Trust this computer for delegation to the specified services only. Then, select Use any authentication protocol.
Select the Add button, select Users or Computers, and locate the SharePoint application pool account. For example:
Contoso\spapppool.In the SPN list, select the one that you created earlier for the service account.
Select OK and then select OK again to save your changes.

You're now ready to sign in to SharePoint by using the external URL and to authenticate with Azure.
Troubleshoot sign-in errors
If sign-in to the site isn't working, you can get more information about the issue in the Connector logs: From the machine running the connector, open the event viewer, go to Applications and Services Logs > Microsoft > Microsoft Entra private network > Connector, and inspect the Admin log.